
There is one final approach to using Mapnik that is worth examining. In addition to creating your symbolizers, rules, styles, and layers programmatically, Mapnik allows you to store all of this information using a map definition file. This is an XML-format file that defines the various Mapnik objects used to generate a map. For example, consider the following Python program to create a simple world map using the World Borders Dataset:
import mapnik

map = mapnik.Map(800, 400)
map.background = mapnik.Color("steelblue")

style = mapnik.Style()
rule = mapnik.Rule()
polySymbolizer = mapnik.PolygonSymbolizer()
polySymbolizer.fill = mapnik.Color("ghostwhite")

stroke = mapnik.Stroke()
stroke.color = mapnik.Color("gray")
stroke.width = 0.1
lineSymbolizer = mapnik.LineSymbolizer(stroke)

rule.symbols.append(polySymbolizer)
rule.symbols.append(lineSymbolizer)
style.rules.append(rule)
map.append_style("My Style", style)

datasource = mapnik.Shapefile(file="TM_WORLD_BORDERS-0.3/" +
                              "TM_WORLD_BORDERS-0.3.shp")

layer = mapnik.Layer("layer")
layer.datasource = datasource
layer.styles.append("My Style")

map.layers.append(layer)

map.zoom_to_box(mapnik.Envelope(-180, -90, +180, +90))
mapnik.render_to_file(map, "map.png")
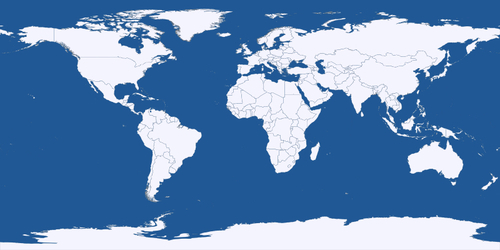
As you can see, this program creates a single rule containing two symbolizers: a PolygonSymbolizer to draw the interior of the country in the color named ghostwhite, and a LineSymbolizer to draw the outlines in gray. This rule is added to a style named My Style, and a single layer is created loading the data from the World Borders Dataset Shapefile. Finally, the map is rendered to a file named map.png.
Here is what the resulting map looks like:
This program was written entirely using Python code. Now, consider the following map definition file, which creates exactly the same map using an XML stylesheet:
<?xml version="1.0" encoding="utf-8"?>
<!DOCTYPE Map>

<Map bgcolor="steelblue" srs="+proj=latlong +datum=WGS84">
  <Style name="My Style">
    <Rule>
      <PolygonSymbolizer>
        <CssParameter name="fill">ghostwhite</CssParameter>
      </PolygonSymbolizer>
      <LineSymbolizer>
        <CssParameter name="stroke">gray</CssParameter>
        <CssParameter name="stroke-width">0.1</CssParameter>
      </LineSymbolizer>
    </Rule>
  </Style>

  <Layer name="world" srs="+proj=latlong +datum=WGS84">
    <StyleName>My Style</StyleName>
    <Datasource>
      <Parameter name="type">shape</Parameter>
      <Parameter name="file">TM_WORLD_BORDERS-0.3/ TM_WORLD_BORDERS-0.3.shp</Parameter>
    </Datasource>
  </Layer>
</Map>
To use this stylesheet, you call the load_map() function to load the contents of the map definition file into a Mapnik Map object before rendering it, as shown here:
map = mapnik.Map(800, 400)
mapnik.load_map(map, "mapDefinition.xml")
map.zoom_to_box(mapnik.Envelope(-180, -90, +180, +90))
mapnik.render_to_file(map, "map.png")
Either approach is perfectly valid. You may prefer to do all your coding in Python (with or without a wrapper module), or you might like the more compact XML stylesheet definition. With only a few exceptions, anything you can do in Python can be done with the XML stylesheets, and vice versa.
Unlike the Python bindings, the format for the XML definition file is thoroughly documented. More information on the syntax of the map definition file can be found at:
You don't have to choose between doing all your map definition in the XML or doing it all in Python; Mapnik supports a hybrid approach where you can define as much or as little in the XML file, and use Python to do the rest. For example, you might like to define your Mapnik styles in the XML file, and use Python to define the datasources and map layers. To do this, you would set up your map definition file, as shown here:
<?xml version="1.0" encoding="utf-8"?>
<!DOCTYPE Map>

<Map bgcolor="steelblue" srs="+proj=latlong +datum=WGS84">
  <Style name="My Style">
    <Rule>
      <PolygonSymbolizer>
        <CssParameter name="fill">ghostwhite</CssParameter>
      </PolygonSymbolizer>
      <LineSymbolizer>
        <CssParameter name="stroke">gray</CssParameter>
        <CssParameter name="stroke-width">0.1</CssParameter>
      </LineSymbolizer>
    </Rule>
  </Style>
</Map>
Your Python code would then look like this:
import mapnik

map = mapnik.Map(800, 400)
mapnik.load_map(map, "sampleXMLStylesheet.xml")

datasource = mapnik.Shapefile(file="TM_WORLD_BORDERS-0.3/" +
                              "TM_WORLD_BORDERS-0.3.shp")

layer = mapnik.Layer("layer")
layer.datasource = datasource
layer.styles.append("My Style")

map.layers.append(layer)

map.zoom_to_box(mapnik.Envelope(-180, -90, +180, +90))
mapnik.render_to_file(map, "map.png")
Notice how we simply exclude the<Layer> section from the XML file, and then create our map layers using Python.
This hybrid approach has the advantage of separating out the visual representation of the map from the code used to generate it: the XML file defines the various styles to use for rendering the map, but doesn't include any map-generation logic itself. Indeed, you can completely change the appearance of the map just by changing the XML stylesheet, without having to change a single line of code in your program. This is very similar to the way HTML templating engines separate form and function within a web application.