
If you wish to use an open source database for your geo-spatial development work, you currently have three options: MySQL, PostGIS, and SpatiaLite. Each has its own advantages and disadvantages, and no one database is the ideal choice in every situation. Let's take a closer look at each of these spatially-enabled databases.
Tip
MySQL is the world's most popular open source database, and is generally an extremely capable database. It is also spatially-enabled, though with some limitations that we will get to in a moment.
The MySQL database server can be downloaded from http://mysql.com/downloads for a variety of operating systems, including MS Windows, Mac OS X, and Linux. Once downloaded, running the installer will set up everything you need, and you can access MySQL directly from the command line:
% mysql
Welcome to the MySQL monitor.  Commands end with ; or g.
Your MySQL connection id is 460
Server version: 5.1.43 MySQL Community Server (GPL)

Type 'help;' or 'h' for help. Type 'c' to clear the current input statement.

mysql>
To access MySQL from your Python programs, you need the MySQL-Python driver, which is available from http://sourceforge.net/projects/mysql-python. You can download the driver in source-code format for Mac OS X and Linux, as well as MS Windows installers for Python versions 2.4 and 2.5. If you need MS Windows installers for Python 2.6, these are available from http://www.codegood.com.
The MySQL-Python driver acts as an interface between MySQL and your Python programs:
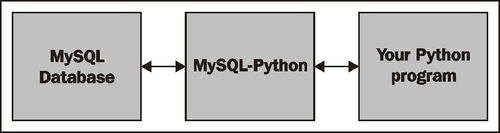
Once you have installed the MySQL-Python driver, it will be available as a module named MySQLdb. Here is an example of how you might use this module from within your Python programs:
import MySQLdb

connection = MySQLdb.connect(user="...", passwd="...")
cursor = connection.cursor()
cursor.execute("USE myDatabase")
The cursor.execute() method lets you execute any MySQL command, just as if you were using the MySQL command-line client. MySQLdb is also completely compatible with the Python Database API specification (http://www.python.org/dev/peps/pep-0249), allowing you to access all of MySQL's features from within your Python programs.
Note
Learning how to use databases within Python is beyond the scope of this book. If you haven't used a DB-API compatible database from Python before, you may want to check out one of the many available tutorials on the subject, for example http://tutorialspoint.com/python/python_database_access.htm. Also, the Python Database Programming wiki page (http://wiki.python.org/moin/DatabaseProgramming) has useful information, as does the user's guide for MySQLdb (http://mysql-python.sourceforge.net/MySQLdb.html).
MySQL comes with spatial capabilities built-in. For example, the following MySQL command creates a new database table that contains a polygon:
CREATE TABLE cities (
    id      INTEGER AUTO_INCREMENT PRIMARY KEY,
    name    CHAR(255),
    outline POLYGON NOT NULL,

    INDEX (name),
    SPATIAL INDEX (outline))
Notice that POLYGON is a valid column type, and that you can directly create a spatial index on a geometry. This allows you to issue queries such as:
SELECT name FROM cities WHERE MBRContains(outline, myLocation)
This will return all the cities where the MBRContains() function determines that the given location is within the city's outline.
This brings us one of the major limitations of MySQL's capabilities: the "MBR" at the start of the MBRContains() function stands for Minimum Bounding Rectangle. The MBRContains() function doesn't actually determine if the point is inside the polygon; rather, it determines if the point is inside the polygon's minimum bounding rectangle:
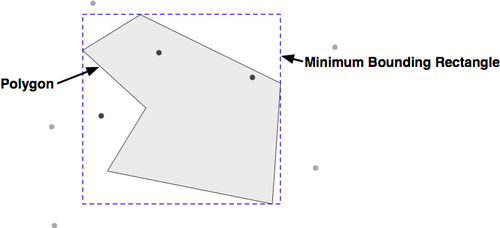
As you can see, the dark points are inside the minimum bounding rectangle, while the lighter points are outside this rectangle. This means that the MBRContains() function returns false positives; that is, points that are inside the bounding rectangle, but outside the polygon itself.
Now, before you give up on MySQL completely, consider what this bounding-rectangle calculation gives you. If you have a million points and need to quickly determine which points are within a given polygon, the MBRContains() function will reduce that down to the small number of points that might be inside the polygon, by virtue of being in the polygon's bounding rectangle. You can then extract the polygon from the database and use another function such as Shapely's polygon.contains(point) method to do the final calculation on these few remaining points, like this:
cursor.execute("SELECT AsText(outline) FROM cities WHERE...")
wkt = cursor.fetchone()[0]

polygon = shapely.wkt.loads(wkt)
pointsInPolygon = []

cursor.execute("SELECT X(coord),Y(coord) FROM coordinates " +
               "WHERE MBRContains(GEOMFromText(%s), coord)",
               (wkt,))
for x,y in cursor:
    point = shapely.geometry.Point(x, y)
    if polygon.contains(point):
        pointsInPolygon.append(point)
As you can see, we first ask the database to find all points within the minimum bounding rectangle, and then check each returned point to see if it's actually inside the polygon. This approach is a bit more work, but it gets the job done and (for typical polygon shapes) will be extremely efficient and scalable.
MySQL has other disadvantages as well—the range of spatial functions is more limited, and performance can sometimes be a problem. But, it does have two major advantages that make it a serious contender for geo-spatial development:
- MySQL is extremely popular, so if you are using a hosted server or have a computer set up for you, chances are that MySQL will already be installed. Hosting providers in particular may be very reluctant to install a different database server for you to use.
- MySQL is the easiest database to install, set up, and administer. Other databases (in particular PostgreSQL) are notorious for being hard to set up and use correctly.
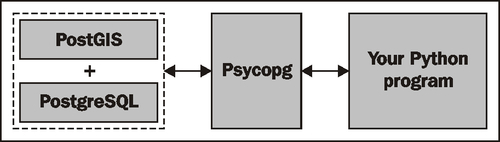
PostGIS is an extension to the PostgreSQL database, allowing geo-spatial data to be stored in a PostgreSQL database. To use PostGIS from a Python application, you first have to install PostgreSQL, followed by the PostGIS extension, and finally the Psycopg database adapter so you can access PostgreSQL from Python. All this can get rather confusing:
Let's take a look at what is required to use PostGIS on your computer:
- Install PostgreSQL.
You first have to download and install the PostgreSQL database server. For MS Windows and Linux, installers can be found at:
http://postgresql.org/download
For Mac OS X, you can download an installer from:
http://kyngchaos.com/software/postgres
Be warned that installing PostgreSQL can be complicated, and you may well need to configure or debug the server before it will work. The PostgreSQL documentation (http://postgresql.org/docs) can help, and remember that Google is your friend if you encounter any problems.
- Install the PostGIS Extension
The PostGIS spatial extension to PostgreSQL, along with full documentation, can be downloaded from:
http://postgis.refractions.net
Make sure you install the correct version of PostGIS to match the version of PostgreSQL you are using.
- Install Psycopg
Psycopg allows you to access PostgreSQL (and PostGIS) databases from Python. The Psycopg database adapter can be found at:
Make sure you use version 2 and not the outdated version 1 of Psycopg. For Windows, you can download a pre-built version of Psycopg; for Linux and Mac OS X, you need to download the source code and build it yourself in the usual way:
% cd psycopg2
% python setup.py build
% python setup.py install
Tip
Mac OS X users: if you are building Psycopg to run with the Kyngchaos version of PostgreSQL, type the following into the terminal window before you attempt to build Psycopg:
% export PATH="/usr/local/pgsql/bin:$PATH"
% export ARCHFLAGS="-arch i386"
- Set up a new PostgreSQL User and database
Before you can use PostgreSQL, you need to have a user (sometimes called a "role" in the PostgreSQL manuals) that owns the database you create. While you might have a user account on your computer that you use for logging in and out, the PostgreSQL user is completely separate from this account, and is used only within PostgreSQL. You can set up a PostgreSQL user with the same name as your computer username, or you can give it a different name if you prefer.
To create a new PostgreSQL user, type the following command:
% pgsql/bin/createuser -s <username>
% pgsql/bin/createdb -U <username> <dbname>
Tip
Once again, replace
<username>and<dbname>with the appropriate names for the user and database you wish to set up.Note that we are keeping this as simple as possible. Setting up and administering a properly-configured PostgreSQL database is a major undertaking, and is way beyond the scope of this book. The above commands, however, should be enough to get you up and running.
- Spatially enable your new database
So far, you have created a plain-vanilla PostgreSQL database. To turn this into a spatially-enabled database, you will need to configure the database to use PostGIS. Doing this is a two-step process; first, type the following:
% pgsql/bin/createlang plpgsql <dbname>
This enables the
PL/pgSQLlanguage used by PostGIS. You then load the PostGIS functions and data types into your database by typing (all on one line):% pgsql/bin/psql -d <dbname> -f pgsql/share/contrib/postgis-1.5/postgis.sql
- Import the spatial reference table into your database
PostGIS comes with a complete list of more than 3,000 spatial references (projections, datums, coordinate systems) that you can import into your spatial database. With this table installed, you can tell PostGIS which spatial reference each piece of spatial data uses, and perform on-the-fly reprojections from one spatial reference to another.
To import the
spatial_ref_systable into your database, use the following command (again, all on one line):
% pgsql/bin/psql -d <dbname>
   -f pgsql/share/contrib/postgis-1.5/spatial_ref_sys.sql
Once you have installed the various pieces of software, and have set up a spatially-enabled database, you can use the Psycopg database adapter in much the same way as you would use MySQLdb to access a MySQL database:
import psycopg2

connection = psycopg2.connect("dbname=... user=...")
cursor = connection.cursor()
cursor.execute("SELECT id,name FROM cities WHERE pop>100000")
for row in cursor:
  print row[0],row[1]
Because Psycopg conforms to Python's DB-API specification, using PostgreSQL from Python is relatively straightforward, especially if you have used databases from Python before.
Here is how you might create a new spatially-enabled table using PostGIS:
import psycopg2

connection = psycopg2.connect("dbname=... user=...")
cursor = connection.cursor()

cursor.execute("DROP TABLE IF EXISTS cities")
cursor.execute("CREATE TABLE cities (id INTEGER," +
               "name VARCHAR(255), PRIMARY KEY (id))")
cursor.execute("SELECT AddGeometryColumn('cities', 'geom', " +
               "-1, 'POLYGON', 2)")
cursor.execute("CREATE INDEX cityIndex ON cities " +
               "USING GIST (geom)")
connection.commit()
Let's take a look at each of these steps in more detail. We first get a cursor object to access the database, and then create the non-spatial parts of our table using standard SQL statements:
connection = psycopg2.connect("dbname=... user=...")
cursor = connection.cursor()

cursor.execute("DROP TABLE IF EXISTS cities")
cursor.execute("CREATE TABLE cities (id INTEGER," +
               "name VARCHAR(255), PRIMARY KEY (id))")
Once the table itself has been created, we have to use a separate PostGIS function called AddGeometryColumn() to define the spatial columns within our table:
cursor.execute("SELECT AddGeometryColumn('cities', 'geom', " +
               "-1, 'POLYGON', 2)")
Note
Recent versions of PostGIS support two distinct types of geo-spatial data, called geometries and geographies. The geometry type (that we are using here) uses cartesian coordinates to place features onto a plane, and all calculations are done using cartesian (x,y) coordinates. The geography type, on the other hand, identifies geo-spatial features using angular coordinates (latitudes and longitudes), positioning the features onto a spheroid model of the Earth.
The geography type is relatively new, much slower to use, and doesn't yet support all the functions that are available for the geometry type. Despite having the advantages of being able to accurately calculate distances that cover a large portion of the Earth and not requiring knowledge of projections and spatial references, we will not be using the geography type in this book.
Finally, we create a spatial index so that we can efficiently search using the new geometry column:
cursor.execute("CREATE INDEX cityIndex ON cities " +
               "USING GIST (geom)")
Once you have created your database, you can insert geometry features into it using the ST_GeomFromText() function, like this:
cursor.execute("INSERT INTO cities (name,geom) VALUES " +
               "(%s, ST_GeomFromText(%s)", (cityName, wkt))
Conversely, you can retrieve a geometry from the database in WKT format using the ST_AsText() function:
cursor.execute("select name,ST_AsText(geom) FROM cities")
for name,wkt in cursor:
    ...
Because PostGIS is an extension to PostgreSQL, and you use Psycopg to access it, there are three separate sets of documentation you will need to refer to:
- The PostgreSQL manual: http://postgresql.org/docs
- The PostGIS manual: http://postgis.refractions.net/docs
- The Psycopg documentation: http://initd.org/psycopg/docs
Of these, the PostGIS manual is probably going to be the most useful, and you will also need to refer to the Psycopg documentation to find out the details of using PostGIS from Python. You will probably also need to refer to the PostgreSQL manual to learn the non-spatial aspects of using PostGIS, though be aware that this manual is huge and extremely complex, reflecting the complexity of PostgreSQL itself.
PostGIS supports the following features not available with MySQL:
- On-the-fly transformations of geometries from one spatial reference to another.
- The ability to edit geometries by adding, changing, and removing points, and by rotating, scaling, and shifting entire geometries.
- The ability to read and write geometries in GeoJSON, GML, KML, and SVG formats, in addition to WKT and WKB.
- A complete range of bounding-box comparisons, including
A overlaps B, A contains B, A is to the left of B, and so on. These comparison operators make use of spatial indexes to identify matching features extremely quickly. - Proper spatial comparisons between geometries, including intersection, containment, crossing, equality, overlap, touching, and so on. These comparisons are done using the true geometry rather than just their bounding boxes.
- Spatial functions to calculate information such as the area, centroid, closest point, distance, length, perimeter, shortest connecting line, and more. These functions take into account the geometry's spatial reference, if known.
PostGIS has a reputation for being a geo-spatial powerhouse. While it is not the only option for storing geo-spatial data (and is certainly the most complex database discussed in this book), it is worth considering if you are looking for a powerful spatially-enabled database to use from within your Python geo-spatial programs.
As the name suggests, SpatiaLite is a lightweight spatial database, though the performance is surprisingly good and it doesn't skimp on features. Just like PostGIS is a spatial extension to PostgreSQL, SpatiaLite is a spatial extension to the serverless SQLite database engine. To access SQLite (and SpatiaLite) from Python, you need to use the pysqlite database adapter:

Before you can use SpatiaLite in your Python programs, you need to install SQLite, SpatiaLite, and pysqlite. How you do this depends on which operating system your computer is running:
If you're using a Mac OS X-based system, you're in luck—the framework build of sqlite3 that can be downloaded from:
http://www.kyngchaos.com/software/frameworks
will install everything you need, and you won't have to deal with any configuration issues at all.
For MS Windows-based systems, go to the SpatiaLite website's download page:
http://gaia-gis.it/spatialite/binaries.html
and download the following precompiled libraries:
libspatialiteprojgeoslibiconv
Once you have decompressed them, you will end up with a series of DLLs. Because the DLLs are dependent on each other, make sure you place these on the system path so they can be found when SpatiaLite is loaded.
For Linux, you can download a prebuilt version of libspatialite from the SpatiaLite website:
You will, however, have to install PROJ, GEOS, and libiconv before libspatialite will work. These libraries can be found at:
Either install a suitable binary distribution, or compile the libraries yourself from source.
After installing the libspatialite library and its dependencies, you now need to make sure you have a workable version of pysqlite, the Python database adapter for SQLite.
Tip
Mac users are once again in luck: the sqlite3 framework you downloaded already includes a suitable version of pysqlite, so you can ignore this section.
A version of pysqlite comes bundled with Python version 2.5 and later, in the form of a standard library module named sqlite3. This standard library module, however, may not work with SpatiaLite. Because SpatiaLite is an extension to SQLite, the pysqlite library must be able to load extensions—a feature that was only introduced in pysqlite version 2.5, and is often disabled by default. To see if your version of Python includes a usable version of sqlite3, type the following into the Python command line:
>>> import sqlite3
>>> conn = sqlite3.connect(":memory:")
>>> conn.enable_load_extension(True)
If you get an AttributeError, your built-in version of sqlite3 does not support loading extensions, and you will have to download and install a different version.
The main website for pysqlite is:
http://code.google.com/p/pysqlite
You can download binary versions for MS Windows, and source code packages that you can compile yourself for Linux.
Now that you have all the libraries installed, you are ready to start using pysqlite to access and work with SpatiaLite databases. There is, however, one final thing to be aware of: because pysqlite is a database adapter for SQLite rather than SpatiaLite, you will need to load the libspatialite extension before you can use any of the SpatiaLite functionality in your Python program.
Tip
Mac users don't need to do this because the version of sqlite3 you downloaded comes with the libspatialite extension built-in.
To load the libspatialite extension, add the following highlighted statements to your Python program:
from pysqlite2 import dbapi as sqlite

conn = sqlite.connect("...")
conn.enable_load_extension(True)
conn.execute('SELECT load_extension("libspatialite-2.dll")')
curs = conn.cursor()
...
For Linux users, make sure you use the correct name for the libspatialite extension. You may also need to change the name of the pysqlite2 module you're importing depending on which version you downloaded.
With all these different packages, it can be quite confusing knowing where to look for more information. First off, you can learn more about the SQL syntax supported by SQLite (and SpatiaLite) by looking at the SQL as Understood by SQLite page:
Then, to learn more about SpatiaLite itself, check out the SpatiaLite Manual, which can be found at:
http://gaia-gis.it/spatialite/docs.html
There are also tutorials available from the above link, but they aren't that useful if you are using SpatiaLite from Python.
Finally, to learn more about using pysqlite to access SQLite and SpatiaLite from Python, see:
In many ways, SpatiaLite has been modeled after PostGIS. Before using SpatiaLite for your database, you need to load an "initialization file" into the database, and you also need to explicitly define your spatial columns by calling the AddGeometryColumn() function, just like you do in PostGIS. Let's see how all this works by creating a SpatiaLite database and creating an example database table.
As described above, the first step in using SpatiaLite is to connect to the database and load the SpatiaLite extension, like this:
from pysqlite2 import dbapi2 as sqlite

db = sqlite.connect("myDatabase.db")
db.enable_load_extension(True)
db.execute('SELECT load_extension("libspatialite.dll")')
Tip
Note that because SQLite is a serverless database, the myDatabase.db database is simply a file on your hard disk. Also, if you are running on Mac OS X, you can skip the enable_load_extension / load_extension dance and remove or comment out the last two lines.
You next need to load the SpatiaLite tables into your database. This can be done by downloading the initialization file from:
http://gaia-gis.it/spatialite/resources.html
For the current version of SpatiaLite at the time this book was written, the file you need is named init_spatialite-2.3.sql. The version number may have changed, so download the appropriate initialization file for your version of SpatiaLite.
This file contains a series of SQL commands that prepare your database to use with SpatiaLite. If you have the SQLite command-line client installed on your computer, you can load the initialization file directly into your database, like this:
% sqlite3 myDatabase.db < init_spatialite-2.3.sql
Alternatively, if you don't have the SQLite command-line client installed, you can use the following Python code to read the initialization file into memory and execute it using pysqlite:
from pysqlite2 import dbapi2 as sqlite

db = sqlite.connect("test.db")
db.enable_load_extension(True)
db.execute('SELECT load_extension("libspatialite.dll")')
cursor = db.cursor()

f = file("init_spatialite-2.3.sql", "r")
lines = []
for line in f.readlines():
    line = line.rstrip()
    if len(line) == 0: continue
    if line.startswith("--"): continue
    if line.startswith("BEGIN"): continue
    if line.startswith("COMMIT"): continue
    lines.append(line)
f.close()
cmds = ("".join(lines)).split(";")
for cmd in cmds:
    cursor.execute(cmd)
db.commit()
Tip
Mac users can skip the db.enable_load_extension(...) and db.execute('SELECT load_extension(...)') statements.
Note that this code removes comments (lines starting with --), and also strips out the BEGIN and COMMIT instructions as these can't be executed using pysqlite.
Running the initialization script will create the internal database tables needed by SpatiaLite, and will also load the master list of spatial references into the database so you can use SRID values to assign a spatial reference to your features.
After running the initialization script, you can create a new database table to hold your geo-spatial data. As with PostGIS, this is a two-step process; you first create the non-spatial parts of your table using standard SQL statements:
cursor.execute("DROP TABLE IF EXISTS cities")
cursor.execute("CREATE TABLE cities (" +
               "id INTEGER PRIMARY KEY AUTOINCREMENT, " +
               "name CHAR(255))")
You then use the SpatiaLite function AddGeometryColumn() to define the spatial column(s) in your table:
cursor.execute("SELECT AddGeometryColumn('cities', 'geom', " +
               "4326, 'POLYGON', 2)")
Note
The number 4326 is the spatial reference ID (SRID) used to identify the spatial reference this column's features will use. The SRID number 4326 refers to a spatial reference using latitude and longitude values and the WGS84 datum; we will look at SRID values in more detail in the Recommended best practices section, later.
You can then create a spatial index on your geometries using the CreateSpatialIndex() function, like this:
cursor.execute("SELECT CreateSpatialIndex('cities', 'geom')")
Now that you have set up your database table, you can insert geometry features into it using the GeomFromText() function:
cursor.execute("INSERT INTO cities (name, geom)" +
               " VALUES (?, GeomFromText(?, 4326))",
               (city, wkt))
And, you can retrieve geometries from the database in WKT format using the AsText() function:
cursor.execute("select name,AsText(geom) FROM cities")
for name,wkt in cursor:
    ...
Some highlights of SpatiaLite include:
- The ability to handle all the major geometry types, including Point, LineString, Polygon, MultiPoint, MultiLineString, MultiPolygon, and GeometryCollection.
- Every geometry feature has a spatial reference identifier (SRID) which tells you the spatial reference used by this feature.
- Geometry columns are constrained to a particular type of geometry and a particular SRID. This prevents you from accidentally storing the wrong type of geometry, or a geometry with the wrong spatial reference, into a database table.
- Support for translating geometries to and from WKT and WKB format.
- Support for Geometry functions to do things like calculate the area of a polygon, to simplify polygons and linestrings, to calculate the distance between two geometries, and to calculate intersections, differences, and buffers.
- Functions to transform geometries from one spatial reference to another, and to shift, scale, and rotate geometries.
- Support for fast spatial relationship calculations using minimum bounding rectangles.
- Support for complete spatial relationship calculations (equals, touches, intersects, and so on) using the geometry itself rather than just the bounding rectangle.
- The use of R-Tree indexes that can (if you use them correctly) produce impressive results when performing spatial queries. Calculating the intersection of 500,000 linestrings with 380,000 polygons took just nine seconds, according to one researcher.
- An alternative way of implementing spatial indexes, using in-memory MBR caching. This can be an extremely fast way of indexing features using minimum bounding rectangles, though it is limited by the amount of available RAM and so isn't suitable for extremely large datasets.
While SpatiaLite is considered to be a lightweight database, it is indeed surprisingly capable. Depending on your application, SpatiaLite may well be an excellent choice for your Python geo-spatial programming needs.