
Now that we know which feature we want to edit, our next task is to implement the "edit feature" page itself. To do this, we are going to have to create a custom form with a single input field, named geometry, that uses a map-editing widget for editing the feature's geometry. To create this form, we're going to borrow elements from GeoDjango's built-in "admin" interface, in particular the django.contrib.gis.admin.GeoModelAdmin class. This class provides a method named get_map_widget() which returns an editing widget that we can then include in a custom-generated form.
The process of building this form is a bit involved thanks to the fact that we have to create a new django.forms.Form subclass on-the-fly to be handle the different types of geometries that can be edited. Let's put this complexity into a new function within the utils.py module, which we'll call getMapForm().
Edit the utils.py module and type in the following code:
def getMapForm(shapefile):
    geometryField = calcGeometryField(shapefile.geom_type)

    adminInstance = admin.GeoModelAdmin(Feature, admin.site)
    field         = Feature._meta.get_field(geometryField)
    widgetType    = adminInstance.get_map_widget(field)

    class MapForm(forms.Form):
        geometry = forms.CharField(widget=widgetType(),
                                   label="")

    return MapForm
You'll also need to add the following import statements to the top of the file:
from django import forms
from django.contrib.gis import admin
from models import Feature
The getMapForm() function creates a new GeoModelAdmin instance. We met GeoModelAdmin earlier in this chapter when we explored GeoDjango's built-in admin interface; here, we are using it to generate an appropriate map widget for editing the type of geometry stored in the current Shapefile.
The getMapForm() function creates and returns a new django.forms.Form subclass with the appropriate widget type used to edit this particular Shapefile's features. Note that the getMapForm() function returns the MapForm
class rather than an instance of that class; we'll use the returned class to create the appropriate MapForm instances as we need them.
With this function behind us, we can now implement the rest of the "edit feature" view. Let's start by setting up the view's URL; edit urls.py and add the following to the list of geodjango.shapeEditor.view patterns:
  (r'^shape-editor/editFeature/(?P<shapefile_id>d+)/' +
   r'(?P<feature_id>d+)$', 'editFeature'),
We're now ready to implement the view function itself. Edit the views.py module and start defining the editFeature() function:
def editFeature(request, shapefile_id, feature_id):
  try:
    shapefile = Shapefile.objects.get(id=shapefile_id)
  except ShapeFile.DoesNotExist:
    raise Http404

  try:
    feature = Feature.objects.get(id=feature_id)
  except Feature.DoesNotExist:
    raise Http404
So far, this is quite straightforward: we load the Shapefile object for the current Shapefile, and the Feature object for the feature we are editing. We next want to load into memory a list of that feature's attributes so that these can be displayed to the user:
  attributes = []
  for attrValue in feature.attributevalue_set.all():
    attributes.append([attrValue.attribute.name,
                       attrValue.value])
  attributes.sort()
This is where things get interesting. We need to create a Django Form object (actually, an instance of the MapForm class created dynamically by the getMapForm() function we wrote earlier), and use this form instance to display the feature to be edited. When the form is submitted, we'll extract the updated geometry and save it back into the Feature object again, before redirecting the user back to the "edit Shapefile" page to select another feature.
As we saw when we created the "import Shapefile" form, the basic Django idiom for processing a form looks like this:
if request.method == "GET":
    form = MyForm()
    return render_to_response("template.html",
                              {'form' : form})
elif request.method == "POST":
    form = MyForm(request.POST)
    if form.is_valid():
        ...extract and save the form’s contents...
        return HttpResponseRedirect("/somewhere/else")
    return render_to_response("template.html",
                              {'form' : form})
When the form is to be displayed for the first time, request.method will be set to GET. In this case, we create a new form object and display the form as part of an HTML template. When the form is submitted by the user, request.method will be set to POST. In this case, a new form object is created that is bound to the submitted POST arguments. The form's contents are then checked, and if they are valid they are saved and the user is redirected back to some other page. If the form is not valid, it will be displayed again along with a suitable error message.
Let's see how this idiom is used by the "edit feature" view. Add the following to the end of your new view function:
  geometryField = utils.calcGeometryField(shapefile.geom_type)
  formType      = utils.getMapForm(shapefile)

  if request.method == "GET":
    wkt = getattr(feature, geometryField)
    form = formType({'geometry' : wkt})

    return render_to_response("editFeature.html",
                              {'shapefile'  : shapefile,
                               'form'       : form,
                               'attributes' : attributes})
  elif request.method == "POST":
    form = formType(request.POST)
    try:
      if form.is_valid():
        wkt = form.clean_data['geometry']
        setattr(feature, geometryField, wkt)
        feature.save()
        return HttpResponseRedirect("/shape-editor/edit/" +
                                    shapefile_id)
    except ValueError:
      pass

    return render_to_response("editFeature.html",
                              {'shapefile'  : shapefile,
                               'form'       : form,
                               'attributes' : attributes})
As you can see, we call utils.getMapForm() to create a new django.forms.Form subclass that will be used to edit the feature's geometry. We also call utils.calcGeometryField() to see which field in the Feature object should be edited.
The rest of this function pretty much follows the Django idiom for form-processing. The only interesting thing to note is that we get and set the geometry field (using the getattr() and setattr() functions, respectively) in WKT format. GeoDjango treats geometry fields as if they were character fields that hold the geometry in WKT format. The GeoDjango JavaScript code then takes that WKT data (which is stored in a hidden form field named geometry) and passes it to OpenLayers for display as a vector geometry. OpenLayers allows the user to edit that vector geometry, and the updated geometry is stored back into the hidden geometry field as WKT data. We then extract that updated geometry's WKT text, and store it back into the Feature object again.
So much for the editFeature() view function. Let's now create the template used by this view. Create a new file named editFeature.html within the templates directory, and enter the following text into this file:
<html>
<head>
<title>ShapeEditor</title>
<script src="http://openlayers.org/api/OpenLayers.js">
</script>
</head>
<body>
<h1>Edit Feature</h1>
<form method="POST" action="">
<table>
{{ form.as_table }}
<tr>
<td></td>
<td align="right">
<table>
{% for attr in attributes %}
<tr>
<td>{{ attr.0 }}</td>
<td>{{ attr.1 }}</td>
</tr>
{% endfor %}
</table>
</td>
</tr>
<tr>
<td></td>
<td align="center">
<input type="submit" value="Save"/>
<button type="button" onClick='window.location="/shape-editor/edit/{{ shapefile.id }}";'>
Cancel
</button>
</td>
</tr>
</table>
</form>
</body>
</html>
This template uses an HTML table to display the form, and uses the {{ form.as_table }} template function call to render the form as HTML table rows. We then display the list of feature attributes within a sub-table, and finally include Save and Cancel buttons at the bottom.
With all this code written, we are finally able to edit features within the ShapeEditor:
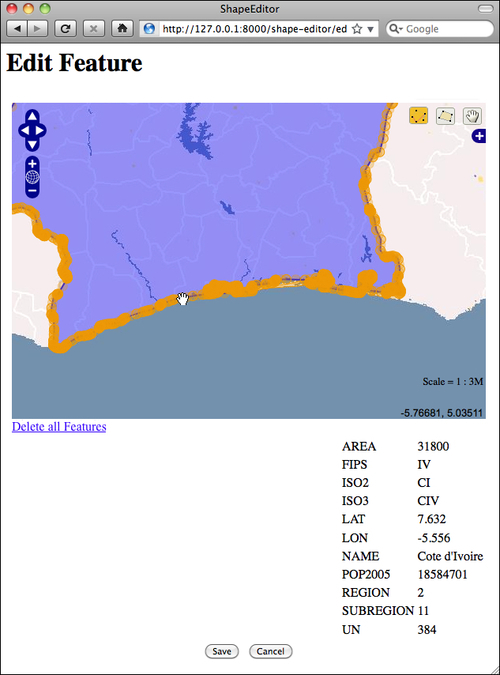
Within this editor, you can make use of a number of GeoDjango's built-in features to edit the geometry:
-
You can click on the Edit Geometry tool (
 ) to select a feature for editing.
-
You can click on the Add Geometry tool (
 ) to start drawing a new geometry.
- When a geometry is selected, you can click on a dark circle and drag it to move the endpoints of a line segment.
- When a geometry is selected, you can click on a light circle to split an existing line segment in two, making a new point that can then be dragged.
- If you hold the mouse down over a dark circle, you can press the Delete key (or type
d)to delete that point. Note that this only works if the geometry has more than three points. - You can click on the Delete all Features hyperlink to delete the current feature's geometries. We'll look at this hyperlink in more detail shortly.
Once you have finished editing the feature, you can click on the Save button to save the edited features, or the Cancel button to abandon the changes.
While this is all working well, there is one rather annoying quirk: GeoDjango lets the user remove the geometries from a map by using a hyperlink named Delete all Features. Since we're currently editing a single feature, this hyperlink is rather confusingly named: what it actually does is delete the geometries for this feature, not the feature itself. Let's change the text of this hyperlink to something more meaningful.
Go to the copy of Django that you downloaded, and navigate to the contrib/gis/templates/gis/admin directory. In this directory is a file named openlayers.html. Take a copy of this file, and move it into your templates directory, renaming it to openlayers-custom.html.
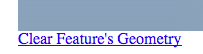
Open your copy of this file, and look near the bottom for the text Delete all Features. Change this to Clear feature's Geometry, and save your changes.
So far, so good. Now, we need to tell the GeoDjango editing widget to use our custom version of the openlayers.html file. To do this, edit your utils.py module and find your definition of the getMapForm() function. Replace the line that defines the adminInstance variable with the following highlighted lines:
def getMapForm(shapefile):
    geometryField = calcGeometryField(shapefile.geom_type)

    class CustomGeoModelAdmin(admin.GeoModelAdmin):
        map_template = "openlayers-custom.html"

    adminInstance = CustomGeoModelAdmin(Feature, admin.site)
    field         = Feature._meta.get_field(geometryField)
    widgetType    = adminInstance.get_map_widget(field)

    class MapForm(forms.Form):
        geometry = forms.CharField(widget=widgetType(),
                                   label="")

    return MapForm
If you then try editing a feature, you'll see that your customized version of the openlayers.html file is being used:
By replacing the template, and by creating your own custom subclass of GeoModelAdmin, you can make various changes to the appearance and functionality of the built-in editing widget. If you want to see what is possible, take a look at the modules in the django.contrib.gis.admin directory.