
Working with FL Studio channels and the settings inside them allows you to tweak your sounds with a plethora of options and quick presets. Generally, a Sample/shape properties tab (SMP), an Instrument properties tab (INS), a Miscellaneous tab (MISC), and a Special tools & functions tab (FUNC) is visible when you click on a given channel. When you are working with virtual instruments, virtual plugins, or any type of software synth, you will find a PLUGIN tab, that is, the plugin properties. In this tab, you will be working with the settings and parameters of your third-party plugin; this means that you will be able to use software synths and virtual instruments from multiple manufacturers and sources, including the free Virtual Studio Technology (VSTs) available online. With third-party plugins and free plugins, you will see that a screen readout pops up when you click the PLUGIN tab, and it generally allows you access to presets, parameters, knobs, and the virtual keybed or keyboard. The free plugins are designed by coders, geeks, underground designers, and those that believe in freeware. Most VST plugins and software synths are .dll files. There are always exceptions to the rule as VST3 plugins use a .vst extension. We previously reviewed how to install virtual plugins and effects in Chapter 1, Configuring FL Studio. With plugins that are part of the FL Studio factory installation, you will have access to the PLUGIN tab, which has immediate parameters and control modifiers.
As discussed earlier, your channels are the backbone of your music project and contain all of the sounds that you are using. Press F6 to bring up the step sequencer, or go to the VIEW menu and select Step sequencer. A third way to bring up the step sequencer is to use your mouse and click the second button from the left in Fig 3.9. It shows the tiny square steps inside the step sequencer. In order to bring up the channel settings and subfolders, click directly on a channel.
Fig 3.9
Let's take a look at the channel settings inside the channels on the step sequencer, which can be considered subtabs.
- The SMP tab:
The SMP tab is the place where you will use audio manipulation tools such as pitch shift, time stretching, normalizing, and reversing. The following screenshot shows all the Channel settings tab options:
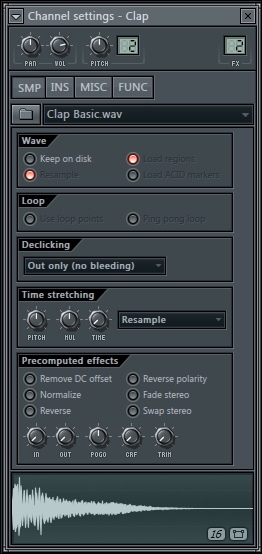
Fig 3.10
- Click on a channel in the FL Studio step sequencer. If the channel is an audio sample, it will default on the SMP tab as shown in the previous screenshot. With virtual instruments, it will default to PLUGIN.
- Use the panning (PAN), volume (VOL), and pitch (PITCH) knobs based on your creative taste. Again, with the volume, make sure your level is not clipping. These knobs may be automated like any other knob in FL Studio, which we will review in Chapter 10, Recording Automation.
- In the Fig 3.10, the channel has the name
Clap Basic.wav. Click on the folder symbol directly to the left of that to bring up your computer file hierarchy to see where your given sound is located. Also, use the folder symbol to change the sample. - Click and explore the precomputed effects at the bottom of the window and the color of the small circles will change to orange when selected. They require no computational power to be played, which makes them super useful. You can hear the changes while viewing the visual feedback of your given waveform at the bottom of the SMP section. Since they are precomputed effects, you cannot automate these knobs. Automation will be covered in Chapter 10, Recording Automation.
- Click and explore the knobs at the bottom to shape your wave form readout and modify your sound. Many of these knobs create sounds and chords that are much smoother. These knobs can be automated by being drawn with your mouse movements or using a MIDI controller.
- Adjust the knobs under the Time stretching area. These knobs can speed up, slow down, or change the pitch of your waveform. We will review crucial tools involving time stretching in Chapter 7, Sampling Using Edison. Right-click on TIME to automatically apply a specific bar length to your sample.
- Click on the waveform to hear a preview of your current sound properties.
- Right-click on the waveform to bring up the additional options.
- The INS tab:
The TIME section of the INS tab has the shape and envelope of your sine wave samples—you may also adjust it to TNS (tension). The following screenshot explores this option:
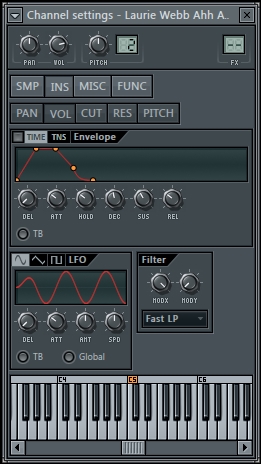
Fig 3.11
- Click on the INS (instrument) tab within your channel settings. It will default to the volume properties of your sound envelope. A red drawing will be visible, which you can adjust or right-click to toggle between TIME and TNS. The TNS screen will display a from drawing and adjust the curve between the points, as shown in the following screenshot:
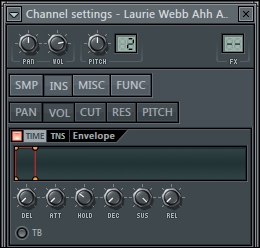
Fig 3.12
- In Fig 3.12, you can see the TIME mode, which has turned the DEL, ATT, DEC, and REL knobs all the way to the left. This will help with triggering samples when you press and hold them on a MIDI keyboard, with your mouse, or in the Piano roll. When you press the knobs quickly and briefly, the sample should cut off completely. This means that you also have this cutoff ability in the FL Studio Piano roll, which will be reviewed in Chapter 4, Building Your Song. Be sure to look at the subtab and envelope values of PAN, VOL, CUT, RES, and PITCH. The small orange light in the left-hand corner must be engaged to make each envelope active. The PAN option does not support an envelope.
- The envelope of your sine wave in the TIME mode includes Attack, Decay, Sustain, and Release (ADSR). Attack is the time it takes to go from the minimum to the maximum. Decay is the time it takes to go from the maximum to the sustain level. Sustain is the level you stay at for as long as you hold the key (or sustain pedal). Release is the time it takes to go from wherever you are to the minimum.
- Envelope parameters are modified over time per event.
- Click on TNS to adjust the tension with the same knobs. You can also right-click on either the TIME or TNS knob to select either. In the tension edit mode (TNS), you can adjust the curves of the purple sine wave drawing.
Further shape your sound using the Low Frequency Oscillator (LFO) and Filter areas. This will modulate your sound. An LFO modulating an oscillator will produce vibrato, which is a frequency modulation. An LFO modulating a filter will produce an auto wave effect, which is a timbre modulation. An LFO modulating an amp will produce tremolo, which is an amplitude modulation. You may choose between sine waves, triangle waves, and square waves.
The filter section controls the lows, mids, and highs of the given sound. In the real world, this is the reason you can hear the bass and thumping from a neighbor's apartment or a dance club on the street. When the doors to a dance club are opened, the music's high end is released. Standing outside, it is only thumping that you will hear. Mod X is the filter cutoff frequency that can cut the highs with a low pass filter and cut the lows with a high pass filter. After the cutoff point, the filter will start doing its job. Mod Y is the filter resonance that controls the ringing of the frequencies at the cutoff. In LFOs, these parameters are modified over time, periodically.
- Click on the INS (instrument) tab within your channel settings. It will default to the volume properties of your sound envelope. A red drawing will be visible, which you can adjust or right-click to toggle between TIME and TNS. The TNS screen will display a from drawing and adjust the curve between the points, as shown in the following screenshot:
- The MISC tab:
The following steps will show you the settings for the MISC tab:
- The VOL knob under Levels adjustment can amplify your sound, in addition to all of the other volumes. The step sequencer volume knob goes up to 100 percent. This knob in the MISC tab goes up to a whopping 200 percent. The Levels adjustment area is handy for automation, which will be reviewed in Chapter 10, Recording Automation. The following screenshot shows the Levels adjustment tab:
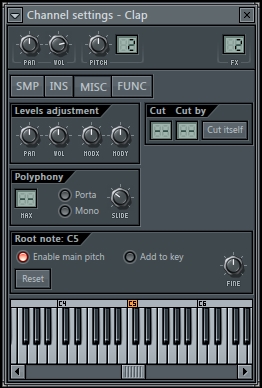
Fig 3.13
- The Cut by feature is found in samplers such as the MPC, software samplers such as the FPC, and Battery. Usually, notes will roll into each other. Click on Cut to make the signal stop and cut it off when the next note hits.
- Multiple notes are handled through the Polyphony section. This is the maximum amount of voices/notes that you can use simultaneously. If you lower this number, you will save CPU power and increase computer performance.
- On the keyboard at the bottom, you can change the channel root note to something different from the main project by right-clicking on the seekbar (the main project always defaults to C5 at a specific place). Set the key range by clicking-and-dragging the seekbar.
Let's see how to get a note that glides/slides into the next note using the following steps:
- Engage the Mono button under the Polyphony area, and the small circle will turn orange. Mono makes it so only one note can be played at a time (no chords).
- Adjust the SLIDE knob to the right of the Mono button.
- Hold down a note with your left finger and then simultaneously click on another note(s) with your right finger to hear the effect you have just added. You may use your QWERTY keyboard or a MIDI controller to trigger your notes.
- Move the SLIDE knob further to the right in order to have a more drastic effect between keys/notes.
- The VOL knob under Levels adjustment can amplify your sound, in addition to all of the other volumes. The step sequencer volume knob goes up to 100 percent. This knob in the MISC tab goes up to a whopping 200 percent. The Levels adjustment area is handy for automation, which will be reviewed in Chapter 10, Recording Automation. The following screenshot shows the Levels adjustment tab:
- The FUNC tab:
Let's take a look at the FUNC tab, which includes many options to process and shape your sound, as shown in the following screenshot:
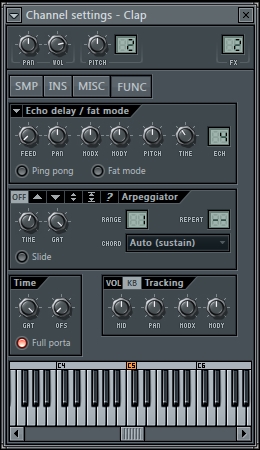
Fig 3.14—presets for Echo delay / fat mode
- Click on the small triangle sign in Fig 3.14 next to Echo delay / fat mode. This will populate some presets to further shape your sound.
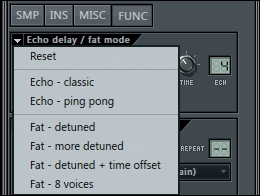
Fig 3.15
- Explore the Arpeggiator area. An arpeggiator will automatically add a specific sequence of notes to your instrument, generally in an ascending or descending order. It could help inspire you if you are not the best keyboard player in the world. You may click next to the CHORD area, and FL Studio will populate it with multiple chords, which you will be able to choose for arpeggiation. When using a chord, the arpeggiator will focus on that particular key range and apply an automatic sequence of notes. Explore the areas next to the OFF button, in addition to the Slide, TIME (in the hint bar it is shown as Arpeggio time), and GAT (in the hint bar it is shown as Arpeggio gate) buttons.
- Select from the choice of chords first and then experiment with the arpeggio directions, which can go up and down your keyboard in various fashions. The arpeggio directions can be clicked by selecting any option directly next to the OFF button.
- Use the OFS (offset) button to fine time shift your sound, which will move things over in time ever so slightly. This can help with your groove and make things less robotic. This is under the TIME area at the bottom left.
- Click on the small triangle sign in Fig 3.14 next to Echo delay / fat mode. This will populate some presets to further shape your sound.
- The Plugin Tab (third party):
The PLUGIN tab will appear on plugins purchased from FL Studio, third-party software purchased from any manufacturer, or free plugins found online. It will also pop out on a graphical interface, as shown in the following screenshot, and then explore steps for the PLUGIN tab after that:
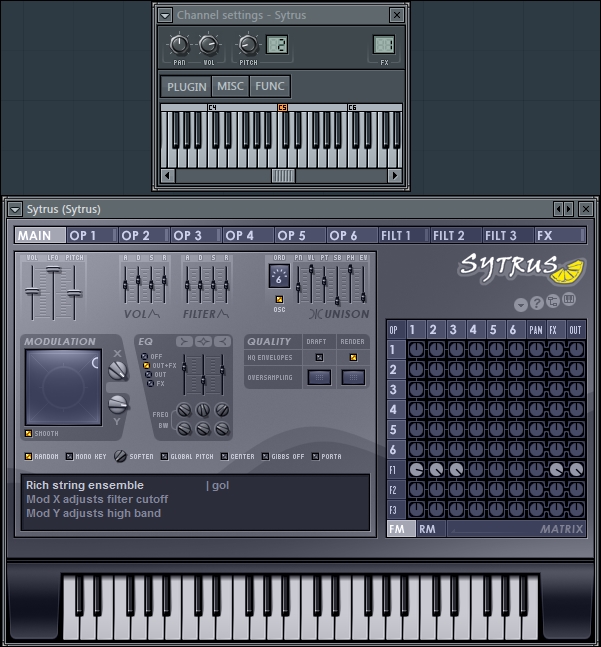
Fig 3.16
- Click on the PLUGIN tab after loading a VST channel. You can load a channel by selecting Add one from the main CHANNELS menu or by right-clicking on an existing sequencer channel and selecting Insert or Replace.
- Your virtual interface will pop up and you will be able to press any keybed with your mouse, QWERTY keyboard, or MIDI controller.
- Use the MISC and FUNC tabs like any other channel according to your creative taste.
- In Fig 3.16, you have clicked on the regular PLUGIN tab in your FL Studio Channel settings, after which the Sytrus interface will appear. Sytrus is an available upgrade for FL Studio, but you could download a demo version too.
- The Plugin tab (default)
Factory virtual instruments are included in FL Studio's default installation. The PLUGIN tab will not pop out on a graphical interface, but the functions and parameters , shown in the next steps, can be tweaked directly from the PLUGIN tab as shown in the following screenshot:
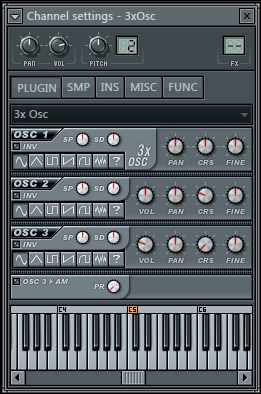
Fig 3.17
- Select the CHANNELS menu (the main window in FL Studio) and go to Add one | 3x Osc to make a 3x Osc channel. You can also right-click on an existing sequencer channel and select Insert or Replace.
- When you click on the channel, the PLUGIN tab shows immediate access to the keyboard, settings, and parameters.
- Use the FL Studio Browser and open up the folder
Channel presets. - Click on the
3x Oscfolder to open up the various presets of sounds for the 3x Osc virtual instrument. - Right-click on the preset or patch to send the preset you want to the 3x Osc channel. You may also left-click, hold, and drag the preset directly on top of the 3x Osc channel or let the preset go directly on top of the parameters shown in Fig 3.17.
- The same method will work for the TS404 bassline synthesizer.
The SMP tab is the tab that shows your waveform, file hierarchy, and time stretching information. We will review key ways to work with time stretching in Chapter 7, Sampling Using Edison. The precomputed effects on the Sample tab are quite handy because you can normalize and reverse your sound. Normalizing will boost the volume (or normalize the volume so the peaks are at the same level) of any given sample or sound, and may help when you need to beef up your sound. Reversing is an awesome tool, which can be used based on your creative taste. When you right-click on the waveform in the SMP tab, you are able to further edit your sound using Edison. When you select edit after right-clicking on your waveform, FL Studio automatically opens up Edison. You may also use the knobs above your waveform to tweak it and view immediate feedback about your changes on the waveform image.
The INS tab is where the true audio engineers will go, although all you really need are good ears and a willingness to experiment with different parameters. You can come up with some truly interesting sounds here. This allows you to shape your sound based on how long you hold down a note for and when you let go of it.
The MISC tab has your levels, Cut by, and Polyphony. The FUNC tab has interesting effects for echo and delay, in addition to a very intuitive arpeggiator. All four of these areas allow the user to modify their sound and use it in creative ways. The PLUGIN tabs are used to open up virtual instruments and add harmonies and sounds to your music project.
You can experiment with sounds by right-clicking on a channel and selecting Clone. In this way, you can keep your original channel, mute it, but then see how it sounds with other parameters engaged.
If you have adjusted many channel parameters and want to keep your adjusted sound, knobs, and settings to be used at a later date, you may select the small triangle at the very top of any Channel settings window. This will allow you to save your channel by clicking on Save channel state as…, and you may then save it in the Channel presets folder in the FL Studio Browser. In this manner, you can bring up the sound that you really liked within any project in FL Studio and then tweak it from there yet again (refer to the top-left corner in Fig 3.10). All channel settings automatically save on the current music project you are working on. This enables you to create a collection of sounds that you are proud of.
Also, remember that you can group your channels to bunch certain ones of the same sort together based on your music project. FL Studio also does this for you automatically, which will show in the bottom left-hand corner of the step sequencer.
- The Sending a channel to a mixer slot recipe
- The Adding virtual instruments recipe in Chapter 4, Building Your Song