
Working with MIDI pads, controllers, and keyboards allows you to have a hands on feel when working with FL Studio and opens up many doors for the creative process. You may find that you have more creative control when turning physical knobs instead of a mouse or drawing in automation curves. It is extremely helpful when working with keyboards because you have 10 fingers instead of one mouse click. Working with pads can help when working with percussion samples and coming up with percussion grooves. You may also have faders/sliders that can control the faders/sliders (volume control) in the FL Studio mixer. In this manner, you can adjust the volume of multiple mixer tracks at the same time, similar to a standard analog mixer, but in this case you are using a MIDI controller to control software.
Many keyboards and MIDI controllers are also touch sensitive, which means the volume output will vary depending on how hard or how soft you press the keys. This also helps with creativity and building your song. Additionally, MIDI keyboards come in all sizes. You may have a small, transportable keyboard when you are on the go, or a full size 88-key MIDI controller at your home studio. There are also many different types of MIDI pads, touchscreens, and knob configurations. Using a physical MIDI controller may make you feel like you are more involved with your music project because using a mouse can become boring and tedious. MIDI signals can now be recognized by simply using a USB chord, which makes them very easy to use with your computer.
You usually want to connect your MIDI controller before launching FL Studio. However, if you connect after launching, you may press Rescan MIDI devices as shown in Fig 4.14. You may use a USB chord that connects to your computer or MIDI cables that will connect to your audio interface.
The following steps will show you how to work with MIDI devices using FL Studio:
- Plug your MIDI device into your computer. If you are connected to the Internet, your device will usually automatically install the proper MIDI drivers/software for your computer. However, sometimes the manufacturer may have a MIDI driver that unlocks more features of the device. At other times, you may have an installation disk. This may work, but keep in mind the manufacturer's website usually has the most recently updated drivers.
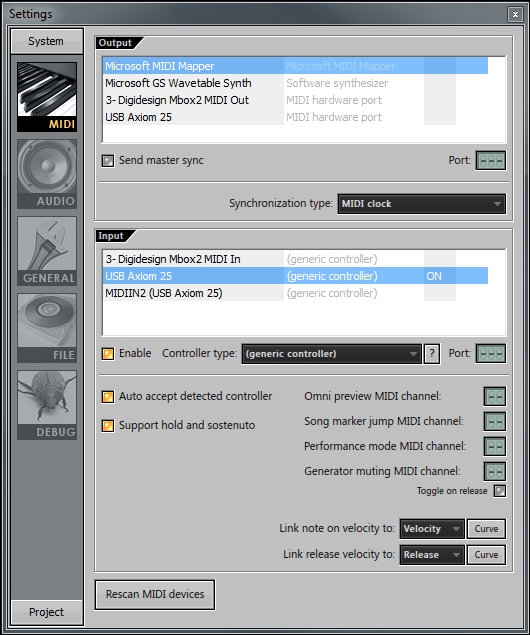
Fig 4.14
- Press F10 to open up your MIDI settings, or go to the OPTIONS menu and select MIDI settings.
- Click on your desired device in the Input section so it shows up in blue, as shown in Fig 4.14.
- Click on the Enable button as shown in Fig 4.14. When engaged, it will turn orange.
- Click on the ? (question mark) tab while connected to the Internet for more information on linking MIDI controllers to your device.
- Click on the (generic controller) to view MIDI devices that are preconfigured to work with FL Studio. You may also use a generic controller, that is, something not in the list, and configure it to your liking.
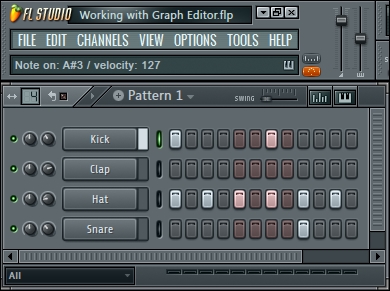
Fig 4.15
- Press a key on your MIDI controller. If it is operating correctly, you will see MIDI activity, which is apparent due to the orange glow of the MIDI button, as shown in Fig 4.15. The hint bar will also display which key you have pressed and how hard you have pressed it. (velocity: 127) If you have a channel engaged (green slit), it will show the volume activity in white (kick activity). When acting on other MIDI inputs, such as moving a knob or a slider, the MIDI signal will light in green instead of orange.
- If your device is not operating correctly and FL Studio has been launched, you may select Rescan MIDI devices, as shown in Fig 4.14.
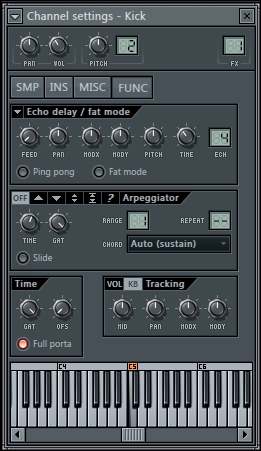
Fig 4.16
- You will also see a screen readout of the key you have pressed on your MIDI controller when you open up your channel settings or virtual instrument plugin. In Fig 4.16, the C key was pressed on your physical MIDI key and the C5 key symbolizes this. The physical keys on your MIDI controller will parallel your graphical images in FL Studio. This generally holds true for any instrument plugins that pop out into a graphical keyboard interface.
- Let's look at the connecting knobs, sliders, and any physical parameter on a MIDI controller (not preconfigured). Have a look at the following screenshot:
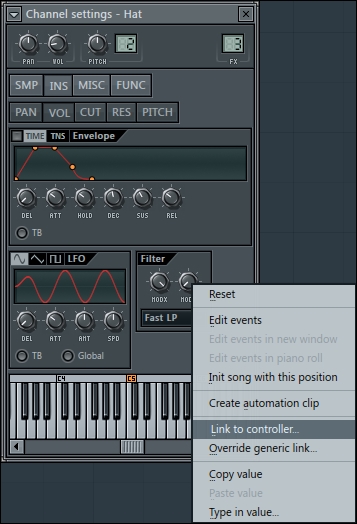
Fig 4.17
- Move your mouse to any parameter, knob, or slider in FL Studio.
- Right-click on the knob or slider you want to control with your MIDI controller and then select Link to controller…, as shown in Fig 4.17.
- The Remote control settings dialog box will appear as shown in Fig 4.18.
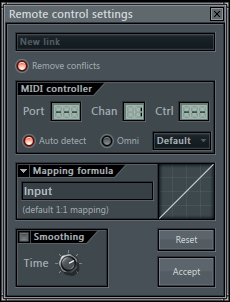
Fig 4.18
Connecting multiple knobs, sliders, and any physical parameter on a MIDI controller (not preconfigured)
The following steps explain how to connect multiple knobs, sliders, and any physical parameter on a MIDI controller:
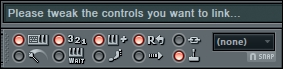
Fig 4.19
- Click on the Multilink to controllers button, which is the button on the bottom right-hand side of the preceding screenshot.
- Click and move, one at a time, the parameters you want to control with your mouse in FL Studio.
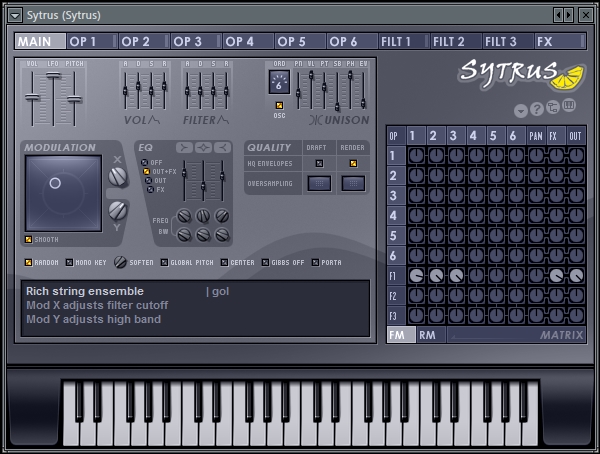
Fig 4.20
- In the preceding screenshot, we have clicked and moved the X knob with our mouse, and then we have clicked and moved the Y knob with our mouse. This must be done in the order you specify, because FL Studio will remember which knob, slider, or parameter you have moved and in what order. This will then match up to the physical knobs your move with your fingers and hands.

Fig 4.21
- When we move any parameter with our mouse, FL Studio will show a brief hint next to the Multilink to controllers button. In Fig 4.21, the hint titled 2: Sytrus - Main - Modulation Y has appeared after we moved the Y knob in Fig 4.20. This is because it was the second parameter we moved. The first parameter we moved was the X knob.
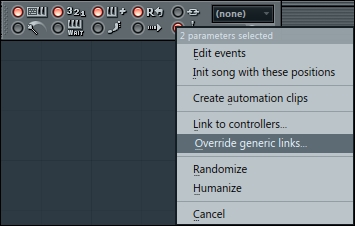
Fig 4.22
- Right-click on the Multilink to controllers button.
- Select Override generic links…. Note that it also says that two parameters are selected because we have clicked and moved two parameters with our mouse, the X and Y knob.
- Finally, move the knobs, sliders, or physical control on your given MIDI controller in the exact order you want to specify, based on the order you engaged with your mouse in Fig 4.20. The first/primary knob or control you physically turn with your finger or slide with your hand (this can be any knob or button you desire) will control the X knob because it was clicked first in the example on Fig 4.20. The second knob or control you physically turn with your finger or slide with your hand will control the Y knob because you clicked it second with your mouse, as shown in Fig 4.20.
When you are selecting Link to controller… or Multilink to controllers, you are selecting whatever physical control you desire to move with your hands instead of clicking with a mouse. Many times, people enjoy using sliders on their MIDI controller to control the sliders in the FL Studio mixer. You may also control any knob within the channel settings on any FL Studio channel. The creative possibilities of using your MIDI controller are unlimited; many times, using the functionality of MIDI control will enhance your studio productions as well as your live performances. If you can see the Link to controller… button on right-clicking a knob, slider, or parameter, it means that you can control it via MIDI control. Many times, these controls are used to control low pass or hi pass filters, which can add intrigue and suspense to your music projects. You can also use other physical tools on your MIDI controller, such as the pitch bend.
Many DJs and EDM producers use the functionality of MIDI at live venues, but MIDI control is friendly to all genres of music, including Rock, Jazz, and Pop. MIDI pads or keys can also control your mute and solo buttons in FL Studio, in addition to your volume and panning. You can also use a MIDI button as an on/off switch to toggle effects. When performing live, it allows you to have much more flexibility. For many, using MIDI control is the final piece of the puzzle, because it allows you to have fun while creating music instead of just using your mouse. You may have a better feel and control for your FL Studio parameters when moving MIDI controllers instead of clicking-and-dragging with a mouse. With regard to using MIDI keys on a keyboard, it basically replaces older types of synthesizers, which produce their own sounds. The only caveat is that you need to have a powerful computer when using a MIDI keyboard, which controls your virtual instruments.
- The Adding Effects to your effect chain recipe in Chapter 6, Using the FL Studio Mixer and Recording Audio
- The Using automation on virtual instruments and effects recipe in Chapter 10, Recording Automation