
Equalization means dealing with the frequencies of your instruments and percussion. Hertz (Hz) is the measure of the pitch, also known as the frequency; dB is the volume. Equalization helps you shape the sonic landscape when your music is played back on headphones, speakers, loud speakers, or any type of media device, or even when it is streamed online. You have probably seen the basic controls on entertainment systems and within your automobile radio. The basic controls are simply low, mid, and high. There is a fine line between knowing what to adjust and what sounds good just the way it is! The best advice is to trust your ears and get feedback from others in order to recognize the techniques that work for you. A pitch-to-frequency chart will help you understand the exact frequencies that correlate to the pitches, as shown in the following screenshot:
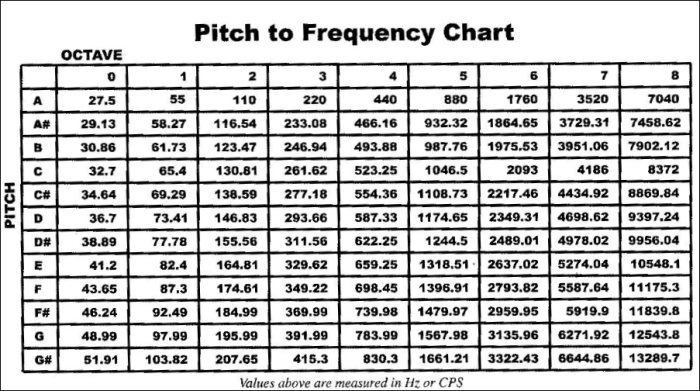
Fig 6.13
To start using EQ as an effect in the FL Studio Mixer, you will need to have some sort of audio sent to a mixer track. This was previously discussed in this chapter as well as in the Sending a channel to a mixer slot recipe in Chapter 3, Working with Step Sequencer and Channels. Once you have audio on any given mixer track, you are ready to start using equalization. You may press F9 to bring up the FL Studio Mixer.
- Send your audio to a mixer slot.
- After your mixer slot is engaged or faintly highlighted, click on the triangle drop-down box next to the first effect slot in your mixer.
- Select the Fruity Parametric EQ 2 effect, as shown in Fig 6.14. Also note that the ninth mixer slot is engaged (faintly highlighted) and has been renamed to read
Alien Synth. The dropdown will read Replace or Select based on whether an effect currently exists in a slot.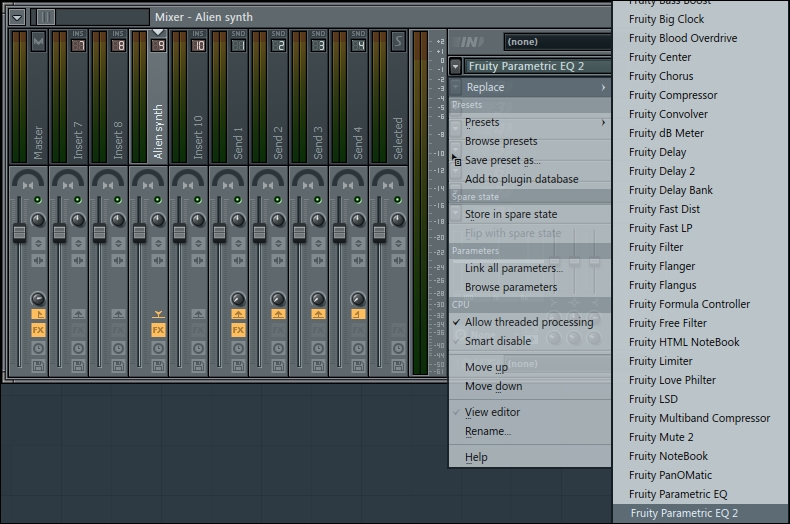
Fig 6.14
- You will see the audio show up in purple and red visual feedback as shown in Fig 6.15 on your EQ effect plugin. The leftmost side goes all the way to 20 Hz (low), and the rightmost side goes to 20000 Hz (high). Certain sounds and instruments sit in certain frequency ranges. Low bass is where 808s and kick drums sit, while vocals and percussion tend to stay between the mid-high range of frequencies.
- Look to the right-hand side of your EQ plugin effect and focus on the yellow column.
- Click-and-hold with your mouse on the small box of the yellow column and drag it up slowly. If you notice the dB numbers on the plugin, the range is from -18 all the way up to +18. For general purposes and as a fundamental approach, you should raise this between +6 and a little bit above +12. In Fig 6.15, we have raised up that particular frequency band to around +10.5 dB. This is the gain box.
- As you drag up your yellow column, you will see that the circled number 4 in yellow will be pushed up on the EQ readout section of your plugin. When you use the square box in the column, it is locked to a vertical adjustment; it can only go straight up or straight down.
- Look to your yellow column again and adjust the yellow circle / half circle at the bottom, which is next to FREQ. In this manner, you can sweep your frequency left and right until you hear something pleasing to your ears.
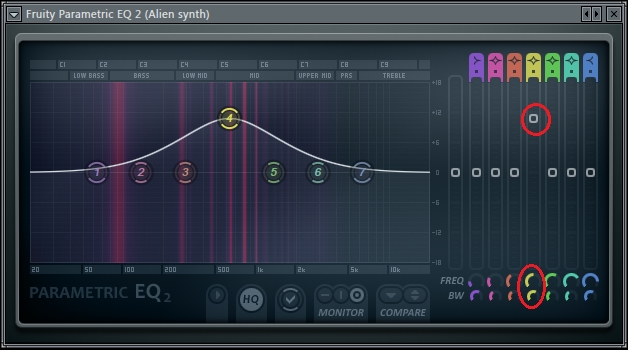
Fig 6.15
- Look at the extreme bottom of your yellow column and you will see another circle that you can adjust. This is the bandwidth control, which is in the BW row at the bottom. When you adjust this knob, it will adjust how wide a range you are dealing with, from narrow to broad. Note that the only change we are making is to the bandwidth. The frequency and dB have not changed at all. The only difference between the previous and following screenshot is that the bandwidth is narrower in the latter.
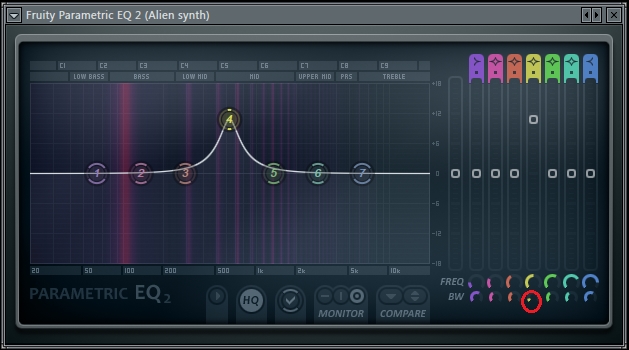
Fig 6.16
- Once you find something pleasing to your ears, adjust the square box (dB) that goes straight up or down all the way back to 0. This will not adjust your frequency or the bandwidth you have already set, so do not worry. It will only bring your dB back to zero.
- Slowly, bring up the dB scale to taste. You will want to slowly bring it up vertically until you hear it kick in. You want to raise it up in a delicate manner. You will not raise this all of the way up to where it was earlier in step 6, but you will raise it ever so slightly. In the following screenshot, we have brought our dB back down to zero and then raised it up to our final position, which is around +2.5 dB:
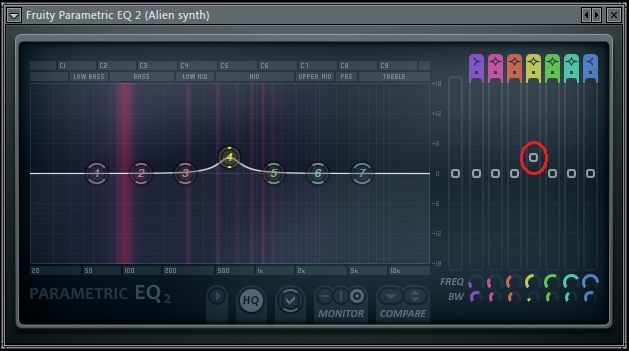
Fig 6.17
The process we just described is called additive equalization. It boosts specific frequency ranges, but the downside is that it leaves the rest of your music content / mixer tracks down in volume from the area being boosted and reduces headroom. To do this, bring up the gain of a frequency range and sweep the frequency knob back and forth until you hear something you like. When you find a pleasing frequency range, bring the gain back to zero and then add it back until you have just enough for your tastes. This tends to yield a more hyped sound, which is sometimes the desired effect. For example, a kick drum can sound much bigger than it really is! Remember to use your ears in order to distinguish what is too much or too little. Using too much or too little EQ can make or break a song quite easily. Sometimes, the hardest thing to do is to leave instruments that already sound good alone.
A method that is used by prominent engineers is called subtractive equalization. In this method, you will basically do the same thing, but you will remove your displeasing frequency. Turn the gain of one of your frequency bands up by about +5 to +10 dB and sweep the frequency back and forth until you find an area that sounds displeasing to your ears. Then, you can return the gain back down to zero and lower it a little bit. This is regarded as a more natural-sounding use of equalization because it leaves most of the original content intact.
You can also hover your mouse over the top portion of each column in the Fruity Parametric EQ 2 effect until you see an arrow appear. This will change the type of filter, and you will be able to scroll through a low pass filter, band pass filter, high pass filter, notch filter, low shelf filter, and high shelf filter. A low pass filter will cut off the high frequencies, and you will hear the lows. You will be rolling off the highs and can choose how sharp you want a roll-off slope to be and how extreme that slope is. No dB adjustment will be available. Low pass is the noisy neighbor bass. A band pass filter focuses on the band you want to hear, and no dB adjustment will be available. A high pass filter will cut the low frequencies without dB. You will hear the highs. You will be rolling off the lows and can choose how extreme or sharp a roll-off slope you want. The higher you bring the high pass frequency, the more AM radio sounding it can be!
A notch filter takes out a certain frequency with no dB. Shelving equalizers amplify or satisfy the main frequency selected, plus all of the frequencies beyond that point. Shelving equalizers are good at making an instrument sound a little brighter or darker overall, without affecting any one specific frequency. Shelving EQs have a dB and can work pretty well. Shelving can give more bass or less bass across the board. It can give more treble or less treble across the board. Shelving is an overall boost or an overall removal.
To make your mix less muddy, you may want to remove 75 Hz and below on all instruments and all vocals. This is a tactic that is practiced by some of the best engineers. You can do this by selecting a high pass filter on band 1 (purple column) in Fruity Parametric EQ 2 and adjusting the frequency to around 75 Hz. This is also a good trick for hi hats and percussion sounds that need to be clear in your mix. Most of the time, you don't need these low frequencies (75 Hz and below) on most your instruments besides bass, so you can roll them off and add more clarity to your mix. However, in cases where you desire to keep some of the darkness in your hi hats or instruments, you can try panning to either side so it has its own sonic space.
Using an equalizer to boost higher frequencies can give the illusion of an instrument sounding closer, while removing higher frequencies can make an instrument sound farther away.
Be mindful of your panning and volume throughout the EQ and mixing process. The greater the difference in the volume on one side (panning), the farther to that side is the sound from the center. So, raising the volume and panning a certain sound could open up the mix a bit.
Also, remember that you can use a MIDI controller to adjust the many knobs and parameters on your EQ plugins and on any type of effect in FL Studio. As always, you can also create automation clips by right-clicking on a given parameter.
Also, beneath your entire tree of effects in your effect chain (1 through 8), there is a basic low-, mid-, and high-frequency selector for your given mixer track on the FL Studio Mixer. This can come in handy for quick adjustments if you don't want to open up Fruity Parametric EQ 2 and is great in cases where you want to totally cut off the low end. If you want to cut off the low end, simply bring the low shelf slider all the way to the bottom, that is, to -18 dB. You can also adjust the mid and high frequencies with this handy, basic EQ controller. Note that this EQ is like a ninth slot, and thus, it will affect the sound after all of the other slots in the chain. This is the final adjustment right before the output of the track.
- The Adding effects and your effect chain recipe
- The Sending a channel to a mixer slot recipe in Chapter 3, Working with the Step Sequencer and Channels
- The Using automation for virtual instruments and effects recipe in Chapter 10, Recording Automation