
Now that we have our Toplevel window ready, it is time to think over the question, what components should appear in the window? In Tkinter jargon, these components are called widgets .
The syntax for adding a widget is as follows:
mywidget = Widget-name (its container window,**configuration options)
In the following example (refer to the code 01.02.py), we add two widgets, a label and a button, to the root frame. Notice how all widgets are added in between the skeleton code we defined in the first example.
from Tkinter import *
root = Tk()
mylabel = Label(root,text="I am a label widget")
mybutton = Button(root,text="I am a button")
mylabel.pack()
mybutton.pack()
root.mainloop()
The description of the code is listed as follows:
- This code adds a new instance,
mylabel, for the Label widget. The first parameter definesrootas its parent or container. The second parameter configures its text option as"I am a label widget". - We similarly define an instance of a Button widget. This is also bound to the root window as its parent.
- We use the
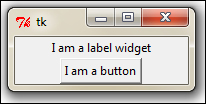
pack()method, which is essentially required to position the label and button widgets within the window. We will discuss thepack()method and several other related concepts under the Geometry management task. However, you must note that some sort of geometry specification is essential for the widgets to display within the Toplevel window. - Running this code will generate a window as shown in the following screenshot. It will have a custom label and a custom button:
In this iteration, we have learned the following:
- What widgets are.
- How widgets are instantiated and displayed within a container window frame.
- How to set options for the widgets at the time of instantiation.
- The importance of specifying a geometry option such as
pack()to display a widget. We will discuss more about this in a subsequent task.
- All widgets are actually objects derived from their respective widget class. So, a statement such as
mybutton = Button(myContainer), actually creates the button instance from theButtonclass. - Each widget has a set of options that decides its behavior and appearance. This includes attributes such as text labels, colors, font size, and many more. For example, the Button widget has attributes to manage its label, control its size, change its foreground and background colors, change the size of the border, and so on.
- To set these attributes, you can set the values directly at the time of creation of the widget as we have done in the preceding example. Alternatively, you can later set or change the options of the widget by using the
.config()or.configure()method. Note that the.config()or.configure()method are interchangeable and provide the same functionality.
Tip
You can also add the pack() method on the same line in which you create a new instance of the widget. For example, consider the following code:
mylabel = Label(root,text="I am a label widget")
mylabel.pack()
If you are instantiating the widget directly, you can write both the lines together as follows:
Label(root,text="I am a label widget").pack()
You may keep a reference to the widget created (as in the first example, mylabel) or you can create a widget without keeping any reference to it (as in the second example).
You should ideally keep the reference if the widget content is likely to be modified by some action at a later stage in the program. If the widget state is to remain static after its creation, you need not keep a reference for the widget.
Also, note that calls to pack() (or other geometry managers) always returns None. So, consider you create a widget keeping a reference to it and add the geometry manager (say pack()) on the same line as shown:
mylabel = Label(…).pack()
In this case, you are actually not creating a reference to the widget but instead creating a None type object for the variable mylabel.
So, when you later try to modify the widget through the reference, you get an error as you are actually trying to work on a None type object.
This is one of the most common errors committed by beginners.