
Let's now build a simple phonebook application that allows the user to store names and phone numbers. The user should be able to create new records, read existing records, update existing records, and delete records from the database using this application. Together, these activities constitute what is known as CRUD (Create, Read, Update and Delete) operations on a database.
The main learning objective for this project relates to being able to use a relational database with Tkinter to store and manipulate records.
We have already seen some basic examples of object persistence with serialization. Relational databases extend this persistence using rules of relational algebra to store data into tables.
Python provides database interfaces for a wide range of database engines. In addition, Python provides a generic interface standard that can be used to access database engines, but it is not natively available as a Python module.
Some of the commonly-used database engines include MySQL, SQLite, PostgreSQL, Oracle, Ingres, SAP DB, Informix, Sybase, Firebird, IBM DB2, Microsoft SQL Server, Microsoft Access, and so on.
We will use SQLite to store data for our phonebook application.
SQLite is a server-less, zero-configuration, self-contained SQL database engine suitable for developing embedded applications. The source code for SQLite is in the public domain, which makes it freely available for use in all sorts of commercial and non-commercial projects.
Unlike many other SQL databases, SQLite does not require running a separate server process. Instead, SQLite stores all the data directly onto flat files which get stored on a computer disk. These files are easily portable across different platforms, making it a very popular choice for smaller and simpler database implementation requirements.
Python 2.7 comes with a built-in standard library for sqlite3 support. However, we need to download the sqlite3 command-line tool that lets us create, modify, and access the database using a command-line tool. The command-line shell for Windows, Linux, and Mac OS X can be downloaded from http://sqlite.org/download.html.
Following the instruction on the website, install the SQLite command shell into any location of your choice.
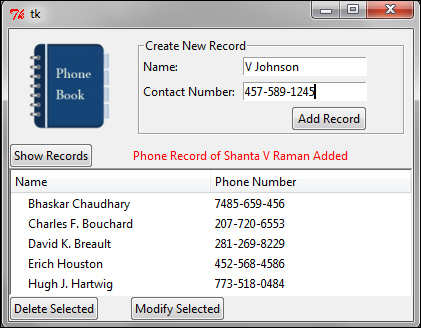
Let us now implement our phonebook application. The application will look like the screenshot shown in the following. The application will demonstrate some of the common operations involved in database programming, as follows:
- In order to create the database, we open the command-line tool of our operating system. On Windows, we generally invoke the command line by typing
cmdin the run console.Within the command line, we first navigate to the directory where we need to create the new database file. In order to create the database, we simply use this command:
sqlite3 phonebook.dbThis creates a database file named
phonebook.dbin the folder from which we execute the command. It also displays a message similar to the one shown below:SQLite version 3.7.17 2013-05-20 00:56:22 Enter ".help" for instructions Enter SQL statements terminated with a ";" sqlite>
We have now created a database named
phonebook.db. However, the database file is currently empty. It does not contain any tables or any data. So, we get no results if we run the command:sqlite> .tablesLet's for now exit the command-line tool by typing:
sqlite> .exit - We want to store contacts in our database, and that is why we need to create the c
ontactstable. Intuitively, our database table should store a person's name and phone number. In addition, it is a good practice to keep a unique identification number for each person or each entry in the table. This is because multiple people might have the same name or same contact number.To create a table within our
phonebook.dbdatabase, we again open the command-line tool and navigate to the directory where we had created the database. We again get into the sqlite3 terminal by typing:sqlite3 phonebook.dbThis time a new database is not created. Rather, the command now opens the existing
phonebook.dbdatabase, because it is already present on the disk.Next, we create a table named
contacts, and add three columns to the table from the command line:sqlite> CREATE TABLE contacts ( contactid INTEGER PRIMARY KEY AUTOINCREMENT, name STRINGNOT NULL, contactnumber INTEGER NOT NULL );
You can verify if the
contactstable was created by typing the following command:sqlite>.tableThis prints the name of all the tables present in the currently open database. You will get the following output:
sqlite>.table contacts - Let's first begin by creating a basic GUI that would let us add, view, delete, and modify the records. We create a class named
PhoneBookand create all GUI widgets from within its__init__method (refer to7.07 phonebook.py):class PhoneBook: def __init__(self, master): # all widgets created hereWe do not rewrite the code here, because we have created similar widgets in all our previous projects.
- Let's start creating the records in the database file we created. A new record is to be created every time a user enters a new name and a phone number in the entry widgets provided, and clicks on the Add Record button.
def create_record(self):
    name = self.namefield.get()
    num = self.numfield.get()
    if name == "":
        self.msg["text"] = "Please Enter name"
        return
    if num == "":
        self.msg["text"] = "Please Enter Number"
        return
    conn = sqlite3.connect('phonebook.db')
    c = conn.cursor()
    c.execute("INSERT INTO contacts VALUES(NULL,?, ?)", (name,num))
    conn.commit()
    c.close()
    self.namefield.delete(0, END)
    self.numfield.delete(0, END)
    self.msg["text"] = "Phone Record of %s Added" %name
The description of the code is as follows:
- The
create_recordmethod, as defined above, is attached as a command callback to the Add Record button. - When the
create_recordmethod is called, it retrieves the name and number values entered in the Name and Contact Number entry field. - If the name or number field is empty, it prints an error message and exits.
- If name and number fields are valid, the method establishes connection to the
phonebook.dbdatabase we had created earlier. - The next line,
c = conn.cursor(), creates a cursor object. The cursor is a control structure that is required as per SQL standards, and it enables us to traverse over the records in a database. - The next line,
c.execute(query)is the line that actually inserts the name and phone number into database. Note that it includes three insertion values: the first is the NULL value corresponding to autoincrement contact ID which is added through that we had created in ourcontactstable. - The line
conn.commit()actually commits these changes to the database and linec.close()closes the connection to the database.
- The
- After the above steps are carried out, we will view the records stored in the database. This method is responsible for fetching all the records from the database and displaying them in the tree widget.
def view_records(self):
    x = self.tree.get_children()
    for item in x:
        self.tree.delete(item)
    conn = sqlite3.connect('phonebook.db')
    c = conn.cursor()
    list = c.execute("SELECT * FROM contacts ORDER BY namedesc")
    for row in list:
        self.tree.insert("",0,text=row[1],values=row[2])
    c.close()
The description of the code is as follows:
- The
view_recordsmethod first deletes all existing items being displayed in the tree widget - It then establishes a database connection and queries the database to fetch all the data sorted by name in descending order
- Finally, it iterates over the fetched record to update the tree widget with the content
- The
- Now, on the phonebook application we'll delete some records. The
delete_recordmethod is simply responsible for deleting a row from the database based on a given name criterion:def delete_record(self): self.msg["text"] = "" conn = sqlite3.connect('phonebook.db') c = conn.cursor() name = self.tree.item(self.tree.selection())['text'] query = "DELETE FROM contacts WHERE name = '%s';" %name c.execute(query) conn.commit() c.close() self.msg["text"] = "Phone Record for %s Deleted" %name - The final operation in the phonebook application is modifying the records. When a user selects a particular record and clicks on the Modify Selected button, it opens a new Toplevel window like the one shown here:
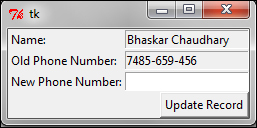
This window is created using the
open_modify_windowmethod, as defined in the7.07 phonebook.pyPython file. We will not reproduce the code for this method, because you should be comfortable making such windows by now.When a user specifies a new number and clicks the Update Record button, it calls the
update_recordmethod, which is defined in the following:def update_record(self, newphone,oldphone, name): conn = sqlite3.connect('phonebook.db') c = conn.cursor() c.execute("UPDATE contacts SET contactnumber=? WHEREcontactnumber=? AND name=?", (newphone, oldphone, name)) conn.commit() c.close() self.tl.destroy() self.msg["text"] = "Phone Number of %s modified" %name
We have completed coding a basic phonebook application.
More importantly, we have seen how to work with databases. Our phonebook application has demonstrated how to execute basic create, read, update, and delete (CRUD) operations on a database.
We have seen how to create database, add tables to the database, and query the database to add, modify, delete, and view items in the database.
Furthermore, due to similarity of basic database operations, you can now consider working with other database systems, such as MySQL, PostgreSQL, Oracle, Ingres, SAP DB, Informix, Sybase, Firebird, IBM DB2, Microsoft SQL Server, and Microsoft Access.