
The first goal of our project is to add the ability to play the audio file. As usual, we will keep the audio related logic separate from our GUI section. Therefore, we create two separate files: main-gui.py and player.py. (See code 5.01)
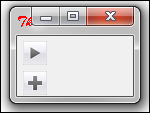
We first code a basic GUI, which includes a Play button (which toggles between play and stop functionality) and an Add File button. At the end of this iteration, we should be able to load a file, play it, and stop it. By the end of this section, our application will look like the following screenshot:
Let's create the GUI class. The code for main-gui.py is as follows (see code 5.01 main-gui.py):
from Tkinter import *
import tkFileDialog
import player
class GUI:
   def __init__(self, player):
     self.player = player
     player.parent = self
     self.root = Tk()
     self.create_button_frame()
     self.create_bottom_frame()
     self.root.mainloop()
The description of the code is listed as follows:
- We create a class named
GUI, and run the Tkinter mainloop from within its__init__ method. - We will separate the actual audio manipulation logic such as play, pause, rewind, forward, and others in a separate class to be defined later. However, because we want those functionalities to be available in this
GUIclass, we pass an object instantiated out of thatplayerclass as an argument to our__init__method. - The line
self.player = playerwithin our__init__method ensures that theplayerclass instance is available throughout theGUIclass. - Just like we want to access the properties and methods of the
playerclass from thisGUIclass, we also want the methods and attributes of theGUIclass to be available within ourplayerclass. We, therefore, use the lineplayer.parent = selfin the__init__method. This creates a reference to self so that all its methods can be assessed inside theplayerclass using the syntaxparent.attributeandparent.method(). - With these two lines of code, we have ensured that all properties of the
GUIclass will be available in theplayerclass and vice versa; all properties of theplayerclass will be available in theGUIclass.
For this, we add two methods: create_button_frame and create_bottom_frame. The create_button_frame method holds the Play button, and the create_bottom_frame method holds the Add File button, as follows:
def create_button_frame(self):
    buttonframe= Frame(self.root)
    self.playicon = PhotoImage(file='../icons/play.gif')
    self.stopicon = PhotoImage(file='../icons/stop.gif')
    self.playbtn=Button(buttonframe, text ='play', image=self.playicon, borderwidth=0, command=self.toggle_play_pause)
   self.playbtn.image = self.playicon
   self.playbtn.grid(row=3, column=3)
   buttonframe.grid(row=1, pady=4, padx=5)

def create_bottom_frame(self):
    bottomframe = Frame(self.root)
    add_fileicon = PhotoImage(file='../icons/add_file.gif')
   add_filebtn=Button(bottomframe, image=add_fileicon, borderwidth=0, text='Add File', command=self.add_file)
   add_filebtn.image = add_fileicon
   add_filebtn.grid(row=2, column=1)
   bottomframe.grid(row=2, sticky='w', padx=5)
The description of the code is listed as follows:
- Each of the two buttons is associated with a
TkinterPhotoImageclass icon. We have provided a set of icons in a separate folder namedicons.
The Play button has a command callback that toggles the button between play and stop functionality. The toggle method is defined as follows:
def toggle_play_pause(self):
    if self.playbtn['text'] =='play':
     self.playbtn.config(text='stop', image=self.stopicon)
     self.player.start_play_thread()
   elif self.playbtn['text'] =='stop':
     self.playbtn.config(text ='play', image=self.playicon)
     self.player.pause()
The description of the code is listed as follows:
- The method,
toggle_play_pause, changes the icon alternatively between a play and pause icon. It also calls theplayandpausemethods of theplayerclass to play and pause the songs.
The Add File button opens tkFileDialog, which associates the file opened with a class attribute named currentTrack, as follows:
def add_file(self):
    tfile = tkFileDialog.askopenfilename(filetypes=[('All supported', '.mp3 .wav .ogg'), ('All files', '*.*')])
self.currentTrack = tfileNow, let's code the basic player class. For now, we will only add play and pause functionality to the class. The code for our player class is built upon the pyglet library.
Note
Pyglet provides an object-oriented interface for developing rich media applications, such as games, audio and video tools, and others. It is a popular choice with Python programmers for media manipulation, because it has no external dependencies, supports a large number of formats, and is available on all major operating systems.
Before we proceed further, you might want to look at the API documentation of the pyglet player available at:
http://www.pyglet.org/doc/api/pyglet.media.Player-class.html
The documentation tells us that we can play an audio file using the following code:
myplayer= pyglet.media.Player()
source = pyglet.media.load(<<audio file to be played>>)
myplayer.queue(source)
myplayer.play()
pyglet.app.run()
We will use this code snippet to play the audio file. Accordingly, the code for our Player class is as follows(see code 5.01 player.py):
import pyglet
from threading import Thread
class Player():
   parent = None
   def play_media(self):
     try:
        self.myplayer= pyglet.media.Player()
        self.source = pyglet.media.load(self.parent.currentTrack)
        self.myplayer.queue(self.source)
        self.myplayer.play()
        pyglet.app.run()
     except:
        pass

   def start_play_thread(self):
     player_thread = Thread(target=self.play_media)
     player_thread.start()

   def pause(self):
     try:
        self.myplayer.pause()
        self.paused = True
     except: pass
The description of the code is listed as follows:
- We create a class named
Playerand initialize its parent class asNone. Recall that in ourGUIclass, we have defined a referenceplayer.parent = self, so as to be able to assess ourGUIclass properties from within ourplayerclass. - We then define our
play_mediamethod, which is responsible for actually playing the sound. The method accesses thecurrentTrackattribute of theGUIclass and tries to play it. - Although this code can play audio files, pyglet requires running its own event loop to play the audio. This means it will return control to our GUI mainloop only after it has completed playing the entire sound, while freezing the Tkinter mainloop if run directly.
- We, therefore, need to call the play method in a separate thread. We use the threading module to define a new method named
start_play_thread, which simply calls ourplay_mediamethod in a separate thread, thus preventing freezing out of GUI. - Lastly, we define the pause method, which pauses or stops the audio file being currently played. Pyglet does not differentiate between pause and stop functions. Therefore, we are typically stopping the audio using the pause command.
We finally run the application by creating an object out of our GUI class. Because this GUI class requires an object from the player class, we also instantiate a player object and pass it as an argument to our GUI class, as follows:
if __name__ == '__main__':
   playerobj = player.Player()
   app = GUI(playerobj)
The description of the code is listed as follows:
- The last section of code creates an object from the
playerclass that we are yet to define. Theplayerclass will take care of all audio manipulation using pyglet. - We first create an object out of the
playerclass and pass it as an argument to the__init__method of ourGUIclass. This ensures that all attributes and methods of theplayerclass are available within theGUIclass using the syntaxplayer.attributeandplayer.method().
This completes our first iteration.
In this section, we created a GUI class, added a button that toggles between play and pause. We added another button to add a file using tkFileDialog.
We also created a Player class, which uses pyglet for playing audio files. The files are played in a separate thread to avoid freezing of the Tkinter mainloop while the audio is playing.
Finally, we ran our application by first creating a player object and passing it as an argument to another object created by our GUI class.
We now have a functional audio player, where you can load a single file using tkFileDialog. After loading, you can press the Play button and the audio file starts playing. You can stop the audio by clicking the Play button, which toggles alternatively between play and pause functions.