
In this iteration, we will add a few more functionalities to our text editor:
- Showing the shortcut icon toolbar
- Displaying line numbers
- Highlighting the current line
- Changing the color theme of the editor
In the process, we will see more usage of indexing and tagging.
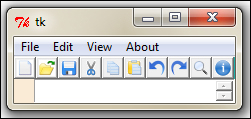
Let's start with a simple task first. In this step we add the shortcut icon toolbar to our editor. Recall that we have already created a frame to hold these toolbar icons. Let's add these icons now.
- Let's start with adding a shortcut icon toolbar. While adding these icons, we have followed a convention. All icons have been placed in the
iconsfolder. Moreover, the icons have been named exactly the same as the corresponding function that handles them. Following this convention has enabled us to loop through a list, simultaneously applying the icon image to each button and adding thecommandcallback from within the loop.The code has been placed between the shortcut frame we created earlier to place these icons. The code is as follows (refer to the code in
2.10.py):shortcutbar = Frame(root, height=25, bg='light sea green') #creating icon toolbar icons = ['new_file', 'open_file', 'save', 'cut', 'copy', 'paste', 'undo', 'redo', 'on_find', 'about'] for i, icon in enumerate(icons): tbicon = PhotoImage(file='icons/'+icon+'.gif') cmd = eval(icon) toolbar = Button(shortcutbar, image=tbicon, command=cmd) toolbar.image = tbicon toolbar.pack(side=LEFT) shortcutbar.pack(expand=NO, fill=X)
The description of the code is listed as follows:
- We have already created a shortcut bar in our first iteration. Now we place our code between the lines where we created the frame and line and where we used the
packmanager to display it. - We create a list of icons, taking care to name them exactly as the name of icons.
- We then iterate through a loop with length equal to the number of items in the icons lists. In every loop, we create a Button widget, taking the corresponding image and adding the respective
commandcallback. - Before adding the
commandcallback, we had to convert the string to an equivalent expression using theevalcommand. If we do not applyeval, it cannot be applied as an expression to ourcommandcallback.
This completes our coding of the shortcut icon toolbar. Now, if you run the code (code
2.10.py), it should show you a shortcut icon toolbar at the top. Moreover, as we have linked each button to a callback, all these shortcut icons should work as they should. - We have already created a shortcut bar in our first iteration. Now we place our code between the lines where we created the frame and line and where we used the
- Let us now work at showing line numbers on the left frame of the Text widget. This will require us to do a bit if tweaking of code at various places. So, before we start coding, let's take a look at what we are trying to achieve here:
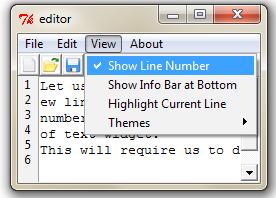
- The View menu has a menu item that lets the user choose whether or not to show the line numbers. We only want to show line numbers if the option is selected.
- If the option is selected, we need to display line numbers in the left frame that we created earlier.
- The line number should update every time a user enters a new line, deletes a line, cuts or pastes text from the line, performs an undo or redo operation, opens an existing file, or clicks on the new menu item. In short, the line number should be updated after every activity that may affect line numbers.
Therefore, we need to define a function called
update_line_number(). This function should be called after every keypress, cut, paste, undo, redo, new, and open definitions to see if lines have been added or removed from the text area and accordingly update the line numbers. We achieve this using these two strategies (see the code in2.10.py):- Bind any keypress events to our
update_line_number()function:textPad.bind("<Any-KeyPress>", update_line_number) - Add a call to our
update_line_number()function in each of our definitions of cut, paste, undo, redo, new, and open
Finally, we define our
update_line_number()function as follows:def update_line_number(event=None): txt = '' if showln.get(): endline, endcolumn = textPad.index('end-1c').split('.') txt = ' '.join(map(str, range(1, int(endline)))) lnlabel.config(text=txt, anchor='nw')The description of the code is listed as follows:
- Recall that we have assigned a variable
showlnto our menu item earlier:showln = IntVar() showln.set(1) viewmenu.add_checkbutton(label="Show Line Number", variable=showln) update_line_number
- We first mark the text configuration of label as blank.
- If the
showlineoption is set to1(that is to say, it has been tick-marked in the menu item), we calculate the last line and last column in the text. - We then create a text string consisting of numbers from 1 to the number of the last line, each number separated by a line break,
textPad.config()method. - If Show Line Number is unchecked in the menu, the variable text remains blank, thereby displaying no line numbers.
- Finally, we update each of our previously defined cut, paste, undo, redo, new, and open functions to invoke the
update_line_number()function at their end.
We are now done adding the line number functionality to our text editor.
Note
You may have noticed an
event=Noneargument in our function definition previously given. We need to specify this here, because this function can be invoked from two places:- From the event binding (we bound it to the
<Any-KeyPress>event) - From other functions such as cut, copy, paste, undo, redo, and more
When the function is invoked from other functions, no arguments are passed. However, when the function is invoked from an event binding, the event object is passed as parameter. If we do not specify the
event=Noneargument and the function is invoked from an event binding, it will give the following error:TypeError: myfunction() takes no arguments (1 given) - Last in this iteration, we will implement a feature where the user can select to add a highlight on the current line. (See the code in
2.10.py)The idea is simple. We need to locate the line of the cursor and add a tag to the line. And finally, we need to configure that tag to appear with a different color background to highlight it.
Recall that we have already provided a menu choice to our user to decide whether or not to highlight the current line. We now add a
commandcallback from this menu item to a function that we define astoggle_highlight:hltln = IntVar() viewmenu.add_checkbutton(label="Highlight Current Line", onvalue=1, offvalue=0, variable=hltln, command=toggle_highlight)We define three functions to handle this for us:
#line highlighting
def highlight_line(interval=100):
  textPad.tag_remove("active_line", 1.0, "end")
  textPad.tag_add("active_line", "insert linestart", "insert lineend+1c")
  textPad.after(interval, toggle_highlight)

def undo_highlight():
  textPad.tag_remove("active_line", 1.0, "end")

def toggle_highlight(event=None):
  val = hltln.get()
  undo_highlight() if not val else highlight_line()
The description of the code is given as follows:
- Every time a user checks/unchecks the View | Highlight Current Line, it invokes our function
toggle_highlight. This function checks if the menu item is checked. If it is checked, it invokes thehighlight_linefunction, otherwise, if the menu item is unchecked, it invokes the undo highlight function. - Our
highlight_linefunction simply adds a tag calledactive_lineto our current line, and after every one second it calls the toggle highlight function to check whether the current line should still be highlighted. - Our
undo_highlightfunction is invoked when the user unchecks highlighting in the View menu. Once invoked, it simply removes theactive_linetag from the entire text area. - Finally, we configure our tag named
active_lineto be displayed with a different background color:textPad.tag_configure("active_line", background="ivory2")
Note
In our code, we used the
.widget.after(ms, callback)handler. Methods like this that let us perform some periodic actions are called alarm handlers . Some commonly used Tkinter alarm handlers include:after(delay_ms, callback, args...): Registers an alarm callback to be called after given number of millisecondafter_cancel(id): Cancels the given alarm callbackafter_idle(callback, args...): Calls back only when there are no more events to process in the mainloop, that is, after the system becomes idle
- Every time a user checks/unchecks the View | Highlight Current Line, it invokes our function
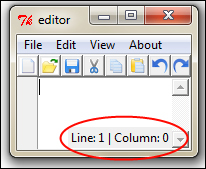
- The info bar is simply a small area at the bottom-right corner of our Text widget, which displays the current line number and column number of the position of the cursor as shown in the following screenshot:
The user can choose to show/hide this info bar from the view menu; refer to the code in
2.11.py. We begin by creating a Label widget within the Text widget and pack it in the southeast corner.infobar = Label(textPad, text='Line: 1 | Column: 0') infobar.pack(expand=NO, fill=None, side=RIGHT, anchor='se')
In many ways, this is similar to displaying the line numbers. Here, too, the positions must be calculated after every keypress or after events such as cut, paste, undo, redo, new, open, or activities that lead to a change in cursor positions. Because this is so similar to our line number code, we will use the existing bindings and existing function
update_line_number()to update this. To do this, we simply add two lines to our existing definition of theupdate_line_number()function:currline, curcolumn = textPad.index("insert").split('.') infobar.config(text= 'Line: %s | Column: %s' %(currline, curcolumn))This keeps updating the label with the line and column of the current cursor position.
Finally, if the user unchecks the option from the View menu, we need to hide this widget. We do this by defining a function called
show_info_bar, which depending upon the user-selected choice, either appliespackorpack_forgetto theinfobarlabel.def show_info_bar(): val = showinbar.get() if val: infobar.pack(expand=NO, fill=None, side=RIGHT, anchor='se') elif not val: infobar.pack_forget()This function is then connected to the existing menu item using a
commandcallback:viewmenu.add_checkbutton(label="Show Info Bar at Bottom", variable=showinbar ,command=show_info_bar) - Recall that while defining our Themes menu, we defined a color scheme dictionary containing the name and hexadecimal color codes as a key-value pair. Actually, we need two colors for each theme, one for the background and other for our foreground color. Let's modify our color definition to specify two colors separated by the dot character (
.). Refer to code2.11.py:clrschms = { '1. Default White': '000000.FFFFFF', '2. Greygarious Grey': '83406A.D1D4D1', '3. Lovely Lavender': '202B4B.E1E1FF' , '4. Aquamarine': '5B8340.D1E7E0', '5. Bold Beige': '4B4620.FFF0E1', '6. Cobalt Blue': 'ffffBB.3333aa', '7. Olive Green': 'D1E7E0.5B8340', }Our theme choice menu has already been defined earlier. Let us now add a
commandcallback to handle the selected menu:themechoice= StringVar() themechoice.set('1. Default White') for k in sorted(clrschms): themesmenu.add_radiobutton(label=k, variable=themechoice, command=theme) menubar.add_cascade(label="View", menu=viewmenu)Finally, let's define our
themefunction to handle the changing of themes:def theme(): global bgc,fgc val = themechoice.get() clrs = clrschms.get(val) fgc, bgc = clrs.split('.') fgc, bgc = '#'+fgc, '#'+bgc textPad.config(bg=bgc, fg=fgc)The function is simple. It picks up the key-value pair from our defined color scheme dictionary. It splits the color into its two components and applies one color each to the Text widget foreground and background using
widget.config().Now if you select a different color from the Themes menu, the background and foreground colors change accordingly.
We completed coding our shortcut icon toolbar and all functionality of the View menu in this iteration. In the process we learned how to handle the Checkbutton and Radiobutton menu items. We also saw how to make compound buttons, while reinforcing several Tkinter options covered in previous sections.