
Now that we have learned how to add widgets to our screen and how to position them where we want, let's turn our attention to the third component of GUI programming. This addresses the question of how to make the widgets functional.
Making the widgets functional involves making them responsive to events such as the pressing of buttons, the pressing keys on keyboards, mouse clicks, and the like. This requires associating callbacks to specific events.
Callbacks are normally associated with specific widget events using the command binding the rules, which is elaborated on in the following section.
The simplest way to add functionality to a button is called
command binding, whereby the callback function is mentioned in the form of command = some_callback in the widget option.
Take a look at the following sample code:
def my_callback ():
  # do something
  Button(root,text="Click",command= my_callback)
Note that my_callback is called without parentheses () from within the widget command option. This is because when the callback functions are set, it is necessary to pass a reference to a function rather than actually calling it.
If the callback does not take any argument, it can be handled with a simple function like the one we just used. However, if the callback needs to take some arguments, we can use the lambda function as shown in the following code snippet:
def my_callback (somearg):
  #do something with argument
  Button(root,text="Click",command=lambda: my_callback ('some argument'))
Python borrows syntax from a functional program called the lambda function. The lambda function lets you define a single-line, nameless function on the fly.
The format for using lambda is lambda arg: #do something with arg in a single line, for instance:
lambda x: return x^2
The command button binds by default to the left mouse click and the Space bar. It does not bind to the Return key. Therefore, if you bind a button using the command function, it will react to the Space bar and not the Return key. This is counter-intuitive to many Windows users. What's worse is you cannot change this binding of the command function. The moral is that command binding, though a very handy tool, does not provide you the the independence to decide your own bindings.
Fortunately, Tkinter provides an alternative form of event binding mechanism called bind() to let you deal with different events. The standard syntax for binding an event is as follows:
widget.bind(event, handler)
When an event corresponding to the event description occurs in the widget, it calls the associated handle passing an instance of the event object as the argument, with the event details.
Let us look at an example of the bind() method (refer to the code file 1.10.py):
from Tkinter import *
root = Tk()
Label(root, text='Click at different
 locations in the frame below').pack()
def mycallback(event):
  print dir(event)
  print "you clicked at", event.x, event.y
myframe = Frame(root, bg='khaki', width=130, height=80)
myframe.bind("<Button-1>", mycallback)
myframe.pack()
root.mainloop()
The description of the code is listed as follows:
- We bind the Frame widget to the event,
<Button-1>, which corresponds to left-click of the mouse. On the occurrence of this event, it calls the functionmycallback, passing along an object instance as its argument. - We define the function
mycallback(event). Notice that it takes the event object generated by the event as the argument. - We inspect the event object using
dir(event), which returns a sorted list of attribute names for the event object passed to it. This prints the list:['__doc__', '__module__', 'char', 'delta', 'height', 'keycode', 'keysym', 'keysym_num', 'num', 'send_event', 'serial', 'state', 'time', 'type', 'widget', 'width', 'x', 'x_root', 'y', 'y_root'].
- Out of the attributes list generated by the object, we use two attributes,
event.xandevent.y, to print the coordinates of the point of click.
When you run this code, it produces a window like the one shown. When you left-click anywhere in the frame, it outputs messages to the console. A sample message passed to the console is as follows:

['__doc__', '__module__', 'char', 'delta', 'height', 'keycode', 'keysym', 'keysym_num', 'num', 'send_event', 'serial', 'state', 'time', 'type', 'widget', 'width', 'x', 'x_root', 'y', 'y_root']
You clicked at 63 36.In the previous example, you saw how we used the event <Button-1> to denote the left-click of a mouse. This is a built-in pattern in Tkinter that maps it to the mouse's left-click event. Tkinter has an exhaustive mapping scheme that exactly identifies events such as this one.
Here are some examples to give you an idea of event patterns:
|
Event pattern |
Associated Event |
|---|---|
|
Left-click of the mouse button | |
|
Keyboard press of the key B | |
|
Keyboard press of Alt + Ctrl + Delete |
In general, the mapping pattern takes the following form:
<[event modifier-]...event type [-event detail]>
Typically an event pattern will comprise of:
- An event type (required): Some common event types include
Button,ButtonRelease,KeyRelease,Keypress,FocusIn,FocusOut,Leave(mouse leaves the widget), andMouseWheel. For a complete list of event types, refer to the The event types section in Appendix B, Quick Reference Sheets. - An event modifier (optional): Some common event modifiers include
Alt,Any(used like in<Any-KeyPress>),Control,Double(used like in<Double-Button-1>to denote a double-click of the left mouse button),Lock, andShift. For a complete list of event modifiers, refer to the The event modifiers section in Appendix B, Quick Reference Sheets. - The event detail (optional): The mouse event detail is captured by number
1for a left-click and number2for a right-click. Similarly, each keyboard keypress is either represented by the key letter itself (say B in<KeyPress-B>) or using a key symbol abbreviated as keysym. For example, the up arrow key on the keyboard is represented by thekeysymvalue ofKP_Up. For a completekeysymmapping, refer to the The event details section in Appendix B, Quick Reference Sheets.
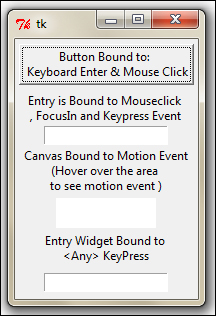
Let's take a look at a practical example of the event binding on widgets. (See the code in 1.11.py for the complete working example). The following is a modified snippet of code to give you a flavor of the commonly used the event bindings:
widget.bind("<Button-1>",callback)  #bind widget to left mouse click
widget.bind("<Button-2>", callback) # bind to right mouse click
widget.bind("<Return>", callback)# bind  to Return(Enter) Key
widget.bind("<FocusIn>", callback) #bind  to  Focus in Event
widget.bind("<KeyPress-A>", callback)# bind  to keypress A
widget.bind("<KeyPress-Caps_Lock>", callback)# bind to CapsLockkeysym
widget.bind("<KeyPress-F1>", callback)# bind widget to F1 keysym
widget.bind("<KeyPress-KP_5>", callback)# bind to keypad number 5
widget.bind('<Motion>', callback) # bind to motion over widget
widget.bind("<Any-KeyPress>", callback) # bind to any keypress
Rather than binding an event to a particular widget, you can also bind it to the Toplevel window. The syntax remains the same except that now you call it on the root instance of the root window like root.bind().
In the previous section, you saw how to bind an event to an instance of a widget. This can be called instance level binding.
However, there might be times when you need to bind events to the entire application. At other times you may want to bind the event to a particular class of widget. Tkinter provides different levels of binding options for this:
- An application-level binding: Application-level bindings will let you use the same binding across all windows and widgets of the application, as long as any one window of the application is in focus.
The syntax for application-level bindings is:
w.bind_all(event, callback)
The typical usage pattern is as follows:
root.bind_all('<F1>', show_help)An application-level binding here means that no matter what widget is under the current focus, a press of the F1 key will always trigger the
show_helpcallback as long as the application is under active focus. - A class-level binding: You can also bind events at a particular class level. This is normally used to set the same behavior of all instances of a particular widget class.
This syntax for class level binding is as follows:
w.bind_class(className, event, callback)
The typical usage pattern is as follows:
myentry.bind_class('Entry', '<Control-V>', paste)In the preceding example, all entry widgets will be bound to the
<Control-V>event that would call a method called'paste (event)'.
Note
Most of the keyboard events and mouse events occur at the operating system level. It propagates from the source of the event, hierarchically up, until it finds a window that has a corresponding binding. The event propagation does not stop there. It propagates itself upwards looking for other bindings from other widgets until it reaches the root window. If it does reach the root window and no bindings are discovered by it, the event is disregarded.
You need variables with a wide variety of widgets. You likely need a string variable to track what the user enters into the entry widget or text widget. You most probably need Boolean variables to track whether the user has checked the Checkbox widget. You need integer variables to track the value entered in a Spinbox or Slider widget.
In order to respond to changes in widget-specific variables, Tkinter offers its own variable class. The variable that you use to track widget-specific values must be subclassed from this Tkinter variable class. Tkinter offers some commonly used predefined variables. They are StringVar, IntVar, BooleanVar, and DoubleVar.
You can use these variables to capture and play with changes in the value of variables from within your callback functions. You can also define your own variable type, if required.
Creating a Tkinter variable is simple. You simply call the required constructor:
mystring = StringVar()
ticked_yes = BooleanVar()
option1 = IntVar()
volume = DoubleVar()
Once the variable is created, you can use it as a widget option, as follows:
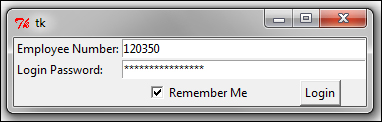
Entry(root, textvariable = mystring)
Checkbutton(root, text="Remember Me", variable=ticked_yes)
Radiobutton(root, text="Option1", variable=option1, value="option1") #radiobutton
Scale(root, label="Volume Control", variable=volume, from =0, to=10) # slider
Additionally, Tkinter provides access to the value of variables using set() and get() methods:
myvar.set("Wassup Dude") # setting  value of variable
myvar.get() # Assessing the value of variable from say a callback
A demonstration of the Tkinter variable class is available in the code file 1.12.py. The code generates a window like the following screenshot:
In this lesson, you learned:
- The
commandbinding to bind simple widgets to certain functions - Use of the
lambdafunction, if you need to process arguments - The
eventbinding using thewidget.bind(event, callback)method to bind keyboard and mouse events to your widgets and to invoke callbacks on the occurrence of some events - How to pass extra arguments to a callback
- How to bind events to an entire application or to a particular class of widget using
bind_all()andbind_class() - How to use the Tkinter variable class to set and get values of widget specific variables
In short you now know how to make your GUI program functional!
In addition to the bind method we previously saw, you might find these two event-related options useful in certain cases:
unbind: Tkinter provides theunbindoptions to undo the effect of an earlier binding. The syntax is as follows:widget.unbind(event)
The following are some examples of its usage:
entry.unbind('<Alt-Shift-5>') root.unbind_all('<F1>') root.unbind_class('Entry', '<KeyPress-Del>')- Virtual events: Tkinter also lets you create your own events. You can give these virtual events any name you want.
For example, imagine you want to create a new event called
<<commit>>, which is triggered by the F9 key. To create this virtual event on a given widget, use the syntax:widget.event_add('<<commit>>', '<F-9>')You can then bind
<<commit>>to any callback using a normalbind()method like:widget.bind('<<commit>>', callback)
Other event-related methods are listed in the Other event-related methods section in Appendix B, Quick Reference Sheets.
Now that you are ready to dive into real application development with Tkinter, let's spend some time exploring a few custom styling options that Tkinter offers. We will also see some of the configuration options commonly used with the root window.