
The text editor program that we developed as our previous project was set up in procedural code. While it offered some benefit of quick coding, it essentially ran as a single process.
We started encountering global variables. The function definitions needed to be defined above the code that called them and most importantly the code was not reusable.
Therefore, we need some way to ensure that our code is more reusable. This is why programmers prefer to use Object Oriented Programming (OOP) to organize their code into classes.
OOP is a programming paradigm that shifts the focus onto the objects we want to manipulate rather than the logic required to manipulate them.
This is in contrast to procedural programming that views a program as a logical procedure that takes input, processes it, and produces some output.
OOP provides several benefits such as data abstraction, encapsulation, inheritance, and polymorphism. In addition, OOP provides a clear modular structure for programs. Code modification and maintenance is easy as new objects can be created without modifying the existing ones.
Let us build our drum program using OOP to illustrate some of these features.
An indicative OOP structure for our drum program could be as follows (see the code in 3.01.py):
from Tkinter import *
class DrumMachine():
  def app(self):
    self.root = Tk()
    # all other code are called from here
    self.root.mainloop()

if __name__ == '__main__':
  dm = DrumMachine()
  dm.app()
The description of the code is listed as follows:
- We create a class called
DrumMachineand define a methodapp()to initialize the Toplevel window - If the program is run as a standalone program, a new object is created and the
appmethod is called to create the Toplevel window - This code creates a blank Toplevel window
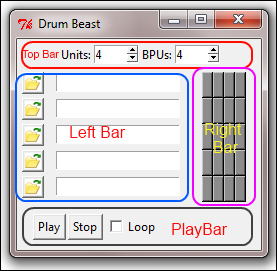
Now that we have our Toplevel window ready, let us add some widgets to it. In this iteration we will lay the top bar, left bar (the area that lets us upload drum samples), the right bar (that has buttons to define the beat patterns), and play bar at the bottom (which has a Play button, a Stop button, and a Loop check button).
The four areas have been demarcated in different squares to group widgets into separate frames, as shown in the following screenshot:
- First we will create the top bar. The top bar is one that holds the Spinbox widgets, which lets the user change the units and beats per unit in a rhythm pattern. These two together decide the tempo and the cyclical pattern of a rhythm as follows (see the code in
3.02.py):def create_top_bar(self): top_bar_frame = Frame(self.root) top_bar_frame.config(height=25) top_bar_frame.grid(row=0, columnspan=12, rowspan=10, padx=5, pady=5) Label(top_bar_frame, text='Units:').grid(row=0, column=4) self.units = IntVar() self.units.set(4) self.bpu_widget = Spinbox(top_bar_frame, from_=1, to=10, width=5, textvariable=self.units) self.bpu_widget.grid(row=0, column=5) Label(top_bar_frame, text='BPUs:').grid(row=0, column=6) self.bpu = IntVar() self.bpu.set(4) self.units_widget = Spinbox(top_bar_frame, from_=1, to=8, width=5, textvariable=self.bpu) self.units_widget.grid(row=0, column=7)
The description of the code is listed as follows:
- We first create a new method in order to create the top bar. We add a frame
top_bar_framefor the top bar and then add two spin boxes to keep track of the units and beats per unit values. We do not addcommandcallbacks now. The callbacks will be added later. - We define two Tkinter variables
self.unitsandself.bputo hold the current value of both the Spinbox widgets. This is defined as an object variable (self) because we will need these variables outside the scope of this method. - The widgets are placed using the
gridgeometry manager.
- We first create a new method in order to create the top bar. We add a frame
- Next we will create the left bar. The left bar is one that will let the user load drum samples. Each row in the left bar allows for loading one unique drum sample. The drum samples are normally small
.wavor.oggfile samples for different drums such as bass, snare, tom, bell, claves, or samples that the user decides.The buttons on the left bar will open an upload file. When the user uploads a drum sample, the name of the drum sample will automatically populate the Entry widget adjacent to that button.
Thus, each row has a Button and an Entry widget (refer to the code in
3.02.py):MAX_DRUM_NUM = 5 def create_left_pad(self): '''creating actual pattern editor pad''' left_frame = Frame(self.root) left_frame.grid(row=10, column=0, columnspan=6, sticky=W+E+N+S) tbicon = PhotoImage(file='images/openfile.gif') for i in range(0, MAX_DRUM_NUM): button = Button(left_frame, image=tbicon) button.image = tbicon button.grid(row=i, column=0, padx=5, pady=2) self.drum_entry = Entry(left_frame) self.drum_entry.grid(row=i, column=4, padx=7, pady=2)The description of the code is listed as follows:
- The maximum number of drum samples that can be loaded is defined as a constant
MAX_DRUM_NUM - We create another frame called
left_frameto hold various widgets in this area - Iterating over a loop, we create Button and Entry widgets for as many drum samples as we need to allow the user to load
- The maximum number of drum samples that can be loaded is defined as a constant
- Next we will create the right bar. The right bar is the area that lets the user define the beat pattern. This area consists of a series of buttons. The number of row of buttons is equal to the number of drum samples that can be loaded. The number of columns of buttons is decided by the number of units and number of beats per unit selected by the user from the spin boxes in the top bar. The number of columns of buttons is equal to product of the number of units and beats per unit.
We are not connecting the spin boxes with the buttons right now. For now, let us place buttons in four columns for each individual drum sample that can be loaded as follows (refer to the code in
3.02.py):def create_right_pad(self): right_frame = Frame(self.root) right_frame.grid(row=10, column=6,sticky=W+E+N+S, padx=15, pady=2) self.button = [[0 for x in range(4)] for x in range(MAX_DRUM_NUM)] for i in range(MAX_DRUM_NUM): for j in range(4): self.button[i][j] = Button(right_frame, bg='grey55') self.button[i][j].grid(row=i, column=j)The description of the code is listed as follows:
- We create another frame
right_frameto hold these buttons. - Using list comprehension, we create an empty list of size
4 *MAX_DRUM_NUM. - For now, we simply add four columns of buttons to occupy the place. The number of rows of buttons are kept equal to the maximum number of drum samples, to have one row of buttons corresponding to each sample.
Note
There is reason behind grouping widgets into different methods.
For example, we have created the left pad and the right pad using two separate methods
create_left_padandcreate_right_pad. If we had defined these two groups of widgets within the same method, the user would have to reload the drum samples every time the left buttons changed due to changes in BPU and units. This would have been counterproductive for the end user.As a rule of thumb, it is always advisable to keep related widgets within a single method. However, the deciding class structure is more of an art than science to be learned and refined over a lifetime.
- We create another frame
- Next we will create the play bar. The play bar at the bottom includes the Play button, the Stop button, and a Loop check button. Refer to the code in
3.02.py, as shown in the following code:def create_play_bar(self): playbar_frame = Frame(self.root, height=15) ln = MAX_DRUM_NUM+10 playbar_frame.grid(row=ln, columnspan=13, sticky=W+E, padx=15,pa dy=10) button = Button( playbar_frame, text ='Play') button.grid(row= ln, column=1, padx=1) button = Button( playbar_frame, text ='Stop')='Stop') button.grid(row= ln, column=3, padx=1) loop = BooleanVar() loopbutton = Checkbutton(playbar_frame, text='Loop',variable=loop) loopbutton.grid(row=ln, column=16, padx=1)
The description of the code is listed as follows:
- The code is pretty self-explanatory. It creates a frame
playbar_frameand puts two buttons and one check button within the frame. - A Tkinter
BooleanVar()is created to track the status of Checkbutton.
- The code is pretty self-explanatory. It creates a frame
- Now that we have created all the widgets, its now time to actually display them by explicitly calling the methods that created them. We do that within the main loop of our program as follows (refer to the code in
3.02.py):def app(self): self.root = Tk() self.root.title('Drum Beast') self.create_top_bar() self.create_left_pad() self.create_right_pad() self.create_play_bar() self.root.mainloop()Note
Rather than defining a separate method
app()to run our main loop, we could also have run the main loop by creating an initialization method called__init__.In that case, we would not have to call the
app()method explicitly to run the program. However, in case someone ever needs to use this class in another program, it would have needlessly created a GUI.Calling the
mainloopfunction explicitly from theapp()method leaves us room to use the code as a library for some other program.
This completes our first iteration. In this iteration we have managed to create the basic structure of our drum program. This includes creating the top, left, right, and bottom frames that holds different widgets as per the requirement of the drum program.
We have also seen one of the most common ways of structuring the Tkinter GUI program in an object-oriented style of programming.