
Let's now get down to setting the basic structure for our drawing program. We want to achieve a structure, as shown in the following screenshot:
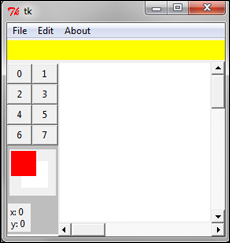
The structure here primarily consists of a top menu, which inherits from the GUI framework build_menu method that we created in the last iteration.
In addition, we create a top-bar frame towards the top(marked in yellow) with a method, create_top_bar(), and a toolbar frame to the left (marked with dark grey background) with create_tool_bar(). We also create a Canvas widget on the right side using the create_drawing_canvas() method, which is to serve as our drawing area.
We will not be reproducing the code for making the frames and canvas area, because we have done similar things in our previous projects and you should be comfortable making them by now. However, you can check the actual code in the file, 6.01.py.
The first thing to note here is that we import our previously created framework module here and inherit its property in our main class, as follows:
import framework
class GUI(framework.GUIFramework):
This enables us to use the build_menu method that we had defined in the framework as though it belongs to the child class.
Next, we define the actual menu items to build the top menu in a method defined create_menu, as follows:
def create_menu(self):
	self.menubar = Menu(self.root)
	self.menuitems = (
				'File- &New/Ctrl+N/self.new_file,									&Open/Ctrl+O/self.open_file,
				Save/Ctrl+S/self.save,
				SaveAs//self.save_as,
				Sep,
				Exit/Alt+F4/self.close',
				'Edit- Undo/Ctrl+Z/self.undo, Sep',
				'About- About//self.about')
	self.build_menu()
	self.root.config(menu=self.menubar)
The description of the code is listed as follows:
- This actually creates three menu buttons: File, Edit, and About, adding menu items to each of them as per preceding provided tuple.
- Creating the menu also necessitates the creation of their associated command callbacks again, as defined in the preceding tuple. Accordingly, we create the methods associated with these command callbacks.
- We will not reproduce the code for functionalities, such as
new_file,open_file,close,undo, andabout, because we have done similar coding in our previous projects. However, let's take a look at the undo and save operations.
Recall that the Tkinter text widget has built-in support for unlimited undo/redo functionality. The Canvas widget, however, does not have this built-in feature.
Here, we implement a very basic undo operation, which lets us delete the last drawn item on the canvas as follows:
def undo(self, event=None):
	self.canvas.delete(self.currentobject)
The description of the code is listed as follows:
- The Canvas widget provides a
widget.delete(items)method that deletes a given item from the canvas.Note
However, once you delete a canvas item, it is gone forever. You cannot restore it unless you have implemented a method which stores all the configurable options for that item before deleting.
While it is possible to implement fully-featured undo/redo operation by storing all configurations for an item being deleted in an undo stack, we will not implement it here, because it would be a deviation from our core topic.
Tkinter lets you save canvas objects as a postscript file using the command postscript(), as follows (see code 6.01.py):
def actual_save(self):
	self.canvas.postscript(file=self.filename, colormode='color')
	self.root.title(self.filename)
Note, however, that this command does not include the images and embedded widgets on the canvas.
Having coded command callbacks for all our menu items, let's now create buttons on the left toolbar. As per our original plan, we will need eight buttons on the toolbar. For now, let's show the button text as 0 through 7 as follows:
def create_tool_bar_buttons(self):
	for i in range(8):
		self.button = Button(self.toolbar, text=i, command=lambda i=i:self.selected_tool_bar_item(i))
		self.button.grid(row=i/2, column=1+i%2, sticky='nsew')
This creates eight buttons, arranging them in two columns depending on whether the button number is odd or even.
All buttons are attached to the same command callback, selected_tool_bar_item, which takes the button number as its argument. The callback method will be taken forward in the next iteration. However, for now, let's simply define the callback to print the number of the button that is clicked on, as follows:
def selected_tool_bar_item(self, i):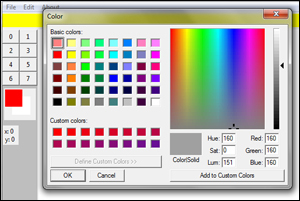
print'You selected button {}'.format(i)Lastly, let's create two color palettes to keep track of two colors named background and foreground color.
Note
Tkinter provides a tkColorChooser module that pops up a color chooser dialog. When a user selects a color and clicks the OK button, the module returns a tuple of the form:
((r,g,b), 'hex color code')
The first element of the returned tuple is itself a tuple specifying the RGB coordinates for the given color, while the second element is the hexadecimal color code for the selected color.
The idea here is that clicking on a palette should open a color chooser. When a user selects a given color, it should update the foreground and background color attributes of the object, as shown in the following screenshot:
The code to achieve this functionality is as follows(see code 6.01.py):
from tkColorChooser import askcolor
	def create_color_pallete(self):
		self.colorpallete= Canvas(self.toolbar, height=55, width =55)
		self.colorpallete.grid(row=10, column=1, columnspan=2, 							pady=5, padx=3)
		self.backgroundpallete = 									self.colorpallete.create_rectangle	(15, 						15,48,48,tags="backgroundpallete", 							outline=self.background, fill=self.background)
		self.foregroundpallete = 									self.colorpallete.create_rectangle(1,1,33,33,tags="foregroundpallete", outline=self.foreground, fill=self.foreground)
		self.colorpallete.tag_bind(self.backgroundpallete,
				"<Button-1>", self.set_background_color)
		self.colorpallete.tag_bind(self.foregroundpallete, 					"<Button-1>", self.set_foreground_color)
The description of the code is listed as follows:
- We add two different tags to each of the square pieces, and then use the
tag_bindcommand to bind them to the click of mouse button over them. Take a note of the difference between widget-level binding(widget.bind) and the item-specific binding using thetag_bindmethod - To create the color palettes, we first create a Canvas widget within the toolbar frame. Within this canvas, we create two square areas using
canvas.create_rectangleand bind them to a single mouse click event to callset_background_colorandset_foreground_colorrespectively.
Color of the background and foreground palette can be set as follows:
def set_background_color(self, event=None):
	self.background = askcolor()[-1]
	self.colorpallete.itemconfig(self.backgroundpallete, 					outline=self.background, fill=self.background)

def set_foreground_color(self, event=None):
	self.foreground = askcolor()[-1]
	self.colorpallete.itemconfig(self.foregroundpallete,outline=self.foreground, fill=self.foreground)
Finally, we add a static label to our toolbar frame to track the x and y coordinates of mouse movement. The actual tracking function will be created later but let's reserve the space by putting a static label for now, as follows:
self.curcoordlabel = Label(self.toolbar, text='x: 0
y:0') self.curcoordlabel.grid(row=13, column=1, columnspan=2, pady=5, 						padx=1, sticky='w')
This completes our second iteration. In this iteration, we set the basic structure for our drawing program.
Importantly, we saw how to inherit features from our previously created framework to create menu items with minimal coding.
We also added the color selection dialog using the tkColorChooser module, which sets in two attributes, self.background and self.foreground, to be used application-wide.