
So far, we have have relied on Tkinter to provide specific platform-based styling for our widgets. However, you can specify your own styling of widgets in terms of their color, font size, border width, and relief. A brief introduction of styling features available in Tkinter is covered in the following task.
Recall that we could specify widget options at the time of its instantiation as shown:
mybutton = Button(parent, **configuration options)
Alternatively, you could specify widget options using configure ():
mybutton.configure(**options)
Styling options are also specified as options to the widgets, either at the time of instantiation or later using the configure option.
Under the purview of styling, we will cover how to apply different colors, fonts, border width, relief, cursor, and bitmap icons to our widgets. We will also look at some of the root configurations later in the section.
Let's first see how to specify color options for a widget. You can specify two types of color for most of the widgets:
- Background color
- Foreground color
You can specify the color using hexadecimal color codes using the proportion of red, green, and blue. Commonly used representations are #rgb (4 bits), #rrggbb (8 bits), and #rrrgggbbb (12 bits).
For example, #fff is white, #000000 is black, and #fff000000 is red.
Alternatively, Tkinter provides mapping for standard color names. For a list of predefined colors, open the program titled pynche in the Tools folder within your Python installation directory (in my case, C:Python27Toolspynche). Within the program click on View | Color list Window.
Next, the easiest and the most common way to specify a font is to represent it as a tuple. The standard representation is as follows:
widget.configure( font= 'font family, fontsize, optional style modifiers like bold, italic, underline and overstrike')
Here are some examples to illustrate the method for specifying fonts:
widget.configure (font='Times, 8')
widget.configure  (font = 'Helvetica 24 bold italic')
The default border width for most Tkinter widgets is 2 pixels. You can change the border width of the widgets by specifying it explicitly, as shown in the following line:
button.configure (borderwidth=5)
The relief style of a widget refers to the difference between the highest and lowest elevations in a widget. Tkinter offers five possible relief styles: flat, raised, sunken, groove, and ridge.
button.configure (relief='raised')
Tkinter lets you change the style of mouse cursor when you hover over a particular widget. This is done using the option cursor as in the following example:
button.configure (cursor='cross')
For a complete list of available cursors, refer to the List of available cursors section in Appendix B, Quick Reference Sheets.
While you can specify styling options at each widget level, sometimes it may be cumbersome to do so individually for each widget. Widget-specific styling has several disadvantages:
Fortunately, Tkinter now offers a way to separate presentation from the logic and to specify styles in what is called the external "option database". This is nothing but a text file where you can specify the common styling options.
A typical option database text file may look like the following:
*font: Arial 10
*Label*font: Times 12 bold
*background: AntiqueWhite1
*Text*background: #454545
*Button*foreground:gray55
*Button*relief: raised
*Button*width: 3
The asterisk (*) symbol here means that the particular style applies to all instances of the given widget.
These entries are placed in an external text (.txt) file. To apply this styling to a particular piece of code, you simply call it using the option_readfile() call early in your code, as shown here:
root.option_readfile('optionDB.txt')Now that we are done discussing styling options, let us wrap up with a discussion on some commonly used options for the root window:
|
Method |
Description |
|---|---|
|
Specifying the title for the Title bar | |
|
You can specify the size and location of a root window using a string of the form | |
|
or |
Changing the Title bar icon to something different from the default Tk icon |
|
Removing the root border frame |
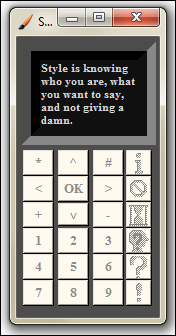
Now let's take a look at an example where we apply all the styling options and root window options as discussed previously (see the code 01.13.py):
from Tkinter import *
root = Tk()

#demo of some important root methods
root.geometry('142x280+150+200') #specify root window size and position
root.title("Style Demo") #specifying title of the program
self.root.wm_iconbitmap('brush1.ico')#changing the default icon
#root.overrideredirect(1) # remove the root border - uncomment #this line to see the difference
root.configure(background='#4D4D4D')#top level styling

# connecting to the external styling optionDB.txt
root.option_readfile('optionDB.txt')

#widget specific styling
mytext = Text(root, background='#101010', foreground="#D6D6D6", borderwidth=18, relief='sunken', width=16, height=5 )
mytext.insert(END, "Style is knowing
who you are, what
you want to say,
and not giving a
damn.")
mytext.grid(row=0, column=0, columnspan=6, padx=5, pady=5)

# all the below widgets derive their styling from optionDB.txt file
Button(root, text='*' ).grid(row=1, column=1)
Button(root, text='^' ).grid(row=1, column=2)
Button(root, text='#' ).grid(row=1, column=3)
Button(root, text='<' ).grid(row=2, column=1)
Button(root, text='OK', cursor='target').grid(row=2, column=2)
Button(root, text='>').grid(row=2, column=3)
Button(root, text='+' ).grid(row=3, column=1)
Button(root, text='v', font='Verdana 8').grid(row=3, column=2)
Button(root, text='-' ).grid(row=3, column=3)
fori in range(0,10,1):
  Button(root, text=str(i) ).grid( column=3 if i%3==0  else (1 if i%3==1 else 2), row= 4 if i<=3  else (5 if i<=6 else 6))

#styling with built-in bitmap images
mybitmaps = ['info', 'error', 'hourglass', 'questhead', 'question', 'warning']
for i in mybitmaps:
  Button(root, bitmap=i,  width=20,height=20).grid(row=(mybitmaps.index(i)+1), column=4,sticky='nw')

root.mainloop()
The description of the preceding code is listed as follows:
- The first segment of code uses some important root methods to define the geometry, title of the program, icon for the program, and method to remove the border of the root window.
- The code then connects to an external styling file called
optionDB.txtthat defines common styling for the widgets. - The next segment of code creates a Text widget and specifies styling on the widget level.
- The next segment of code has several buttons, all of which derive their styling from the centralized
optionDb.txtfile. One of the buttons also defines a custom cursor. - The last segment of code styles some buttons using built-in bitmap images.
Running this program would produce a window like the following screenshot:
In this task, we explored how to use styling options to modify the default styling of Tkinter. We saw how to specify custom colors, fonts, reliefs, and cursors for our GUI programs. We also saw how to separate styling from the logic using the option database. Finally, we explored some of the common options for configuring our root window.