
While we managed to leverage some built-in functionality to gain a quick advantage, we need a more precise control over the text area, so as to bend it to our will. This would require the ability to target each character or location of the text with precision.
The Text widget offers us the ability to manipulate its content using index, tags, and mark , which lets us target a position or place within the text area for manipulation.
Indexing helps you target a particular place within a text. For example, if you want to mark a particular word in bold style or in red or in a different font size, you can do so if you know the index of the starting point and the index of end point to be targeted.
The index must be specified in one of the following formats:
|
Index format |
Description |
|---|---|
|
The character that covers the | |
|
The end of the text. | |
|
The character after a named mark. | |
|
The first character in the text that has been tagged with a given tag. | |
|
The last character in the text that has been tagged with a given tag. | |
|
This corresponds to the current selection. The constants | |
|
The position of the embedded window whose name is | |
|
The position of the embedded image with the name | |
|
The position of the insertion cursor. | |
|
The position of the character closest to the mouse pointer. |
Indices can be further manipulated using modifiers and submodifiers. Some examples of modifiers and submodifers are as follows:
end - 1 charsorend - 1 crefers to the index of one character before the endinsert +5linesrefers to the index of five lines ahead of the insertion cursorinsertwordstart - 1 crefers to the character just before the first one in the word containing the insertion cursorend linestartrefers to the index of the line start of the end line
Indexes are often used as arguments to functions. For example, refer to the following list:
text.delete(1.0,END): This means you can delete from line 1, column 0 up till the endtext.get(0.0, END): This gets the content from 0.0 up till the endtext.delete(insert-1c, INSERT): This deletes one character at the insertion cursor
Tags are used to annotate text with an identification string that can then be used to manipulate the tagged text. Tkinter has a built-in tag called SEL, which is automatically applied to the selected text. In addition to SEL, you can define your own tags. A text range can be associated with multiple tags, and the same tag can be used for many different text ranges.
Some examples of tagging are as follows:
mytext.tag_add('sel', '1.0', 'end') # add SEL tag from start(1.0) to end
mytext.tag_add("danger", "insert linestart", "insert lineend+1c")
mytext.tag_remove("danger", 1.0, "end")
mytext.tag_config('danger', background=red)
mytext.tag_config('outdated', overstrike=1)
Note
You can specify the visual style for a given tag with tag_config using options such as background(color), bgstipple (bitmap), borderwidth (distance), fgstipple (bitmap), font (font), foreground (color), justify (constant), lmargin1 (distance), lmargin2 (distance), offset (distance), overstrike (flag), relief (constant), rmargin (distance), spacing1 (distance), tabs (string), underline (flag), and wrap (constant).
For a complete reference of text indexing and tagging, type the following command into your Python interactive shell:
>>> import Tkinter
>>> help(Tkinter.Text)
Equipped with a basic understanding of indexing and tagging, let's implement some more features in our code editor.
- The first feature that we will implement is the "Select All" feature. We know that Tkinter has a built-in
SELtag that applies a selection to a given text range. We want to apply thisseltag to the complete text contained in our widget.We simply define a function to handle this. Refer to the code in
2.04.pyas shown in the following code snippet:def select_all(): textPad.tag_add('sel', '1.0', 'end')After this we add a callback to our Select All menu item:
editmenu.add_command(label="Select All", underline=7, accelerator='Ctrl+A', command=select_all)Now, we are done adding the Select All functionality to our code editor. If you now add some text to the text widget and then click on the menu item select all, it should select the entire text in your editor. Note that we have not bound the Ctrl + A accelerator in the menu options. The keyboard shortcut will therefore not work. We will make the
acceleratorfunction in a separate step. - Next, let's complete the functioning of the Find menu item.
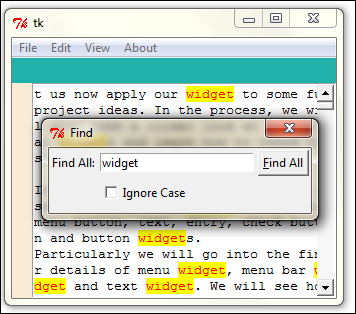
Here's a quick summary of the desired functionality. When a user clicks on the Find menu item, a new Toplevel window opens up. The user enters a search keyword, and specifies if the search is to be case-sensitive. When the user clicks on the Find All button, all matches are highlighted.
For searching through the document, we will rely on the
text.search()method. Thesearchmethod takes in the following arguments:search(pattern, startindex, stopindex=None, forwards=None, backwards=None, exact=None, regexp=None, nocase=None, count=None)
For our editor, we define a function called
on_findand attach it as a callback to our Find menu item (refer to the code in2.04.py):editmenu.add_command(label="Find", underline= 0, accelerator='Ctrl+F', command=on_find)We then define our function
on_findas follows (refer to the code in2.04.py):def on_find(): t2 = Toplevel(root) t2.title('Find') t2.geometry('262x65+200+250') t2.transient(root) Label(t2, text="Find All:").grid(row=0, column=0, sticky='e') v=StringVar() e = Entry(t2, width=25, textvariable=v) e.grid(row=0, column=1, padx=2, pady=2, sticky='we') e.focus_set() c=IntVar() Checkbutton(t2, text='Ignore Case', variable=c).grid(row=1, column=1, sticky='e', padx=2, pady=2) Button(t2, text="Find All", underline=0, command=lambda: search_for(v.get(), c.get(), textPad, t2, e)).grid(row=0, column=2, sticky='e'+'w', padx=2, pady=2) def close_search(): textPad.tag_remove('match', '1.0', END) t2.destroy() t2.protocol('WM_DELETE_WINDOW', close_search)#override closeThe description of the preceding code is as follows:
- When a user clicks on the Find menu item, it invokes a callback
on_find. - The first four lines of the
on_find()function creates a new Toplevel window, adds a titleFind, specifies it geometry (size, shape, and location), and sets it as a transient window. Setting it to transient means that it is always drawn on top of its parent or root window. If you uncomment this line and click on the root editor window, the Find window will go behind the root window. - The next eight lines of code are pretty self-explanatory in that they set the widgets of the Find window. It adds the Label, Entry, Button, and Checkbutton widgets and provides for two variables,
eandc, to track the value a user enters into the Entry widget, and whether or not the user has checked the check button. The widgets are arranged using thegridgeometry manager to fit into the Find window. - The Find All button has a
commandoption that calls a function,search_for(), passing the search string as the first argument and whether or not the search is to be case-sensitive as its second argument. The third, fourth, and fifth arguments pass the Toplevel window, the Text widget, and the Entry widget as parameters. - Prior to the
search_for()method, we override the Close button of the Find window and redirect it to a callback namedclose_search(). Theclose_search()method is defined within theon_find()function. This function takes care of removing the tagmatchthat was added during the search. If we do not override the Close button and remove these tags, our matched string will continue to be marked in red and yellow, even after our searching has ended.
- When a user clicks on the Find menu item, it invokes a callback
- Next we have the
search_for()function that does the actual searching. The code is as follows:def search_for(needle, cssnstv, textPad, t2, e) : textPad.tag_remove('match', '1.0', END) count =0 if needle: pos = '1.0' while True: pos = textPad.search(needle, pos, nocase=cssnstv,stopindex=END) if not pos: break lastpos = '%s+%dc' % (pos, len(needle)) textPad.tag_add('match', pos, lastpos) count += 1 pos = lastpos textPad.tag_config('match', foreground='red',background='yellow') e.focus_set() t2.title('%d matches found' %count)The description of the code is listed as follows:
- This part of code is the heart of the search function. It searches through the entire document using the
while Trueloop, breaking out of the loop only if no more text items remain to be searched. - The code first removes any previous search-related
matchtags as we do not want to append the results of the new search to previous search results. The function uses thesearch()method provided in Tkinter on the Text widget. Thesearch()function takes the following arguments:search(pattern, index, stopindex=None, forwards=None, backwards=None, exact=None, regexp=None, nocase=None, count=None)
The method returns the starting position of the first match. We store it in a variable with the name
posand also calculate the position of the last character in the matched word and store it in the variablelastpos. - For every search match that it finds, it adds a tag named
matchto the range of text starting from the first position to the last position. After every match, we set the value ofposto be equal tolastpos. This ensures that the next search starts afterlastpos. - The loop also keeps track of the number of matches using the count variable.
- Outside the loop, the tag
matchis configured to be of a red font color and with a background of yellow. The last line of this function updates the title of the Find window with the number of matches found.
Note
In the case of event bindings, interaction occurs between your input devices (keyboard/mouse) and your application. In addition to event binding, Tkinter also supports protocol handling.
The term "protocol" means the interaction between your application and the window manager. An example of a protocol is
WM_DELETE_WINDOW, which handles theclosewindow event for your window manager. Tkinter lets you override these protocols handlers by mentioning your own handler for the root or Toplevel widget. To override our window exit protocol, we use the following command:root.protocol("WM_DELETE_WINDOW", callback)Once you add this command, Tkinter bypasses protocol handling to your specified callback/handler.
- This part of code is the heart of the search function. It searches through the entire document using the
Congratulations! In this iteration, we have completed coding the Select All and Find functionality into our program.
More importantly, we have been introduced to indexing and tagging—two very powerful concepts associated with many Tkinter widgets. You will find yourself using these two concepts all the time in your projects.
In the previous code, we used a line that reads: t2.transient(root). Let's understand what it means here.
Tkinter supports four types of Toplevel windows:
- Main Toplevel window: These are the ones that we have constructed so far.
- Child Toplevel window: These are the ones that are independent of the root. The child Toplevel behaves independently of its root but it gets destroyed if its parent is destroyed.
- Transient Toplevel window: This always appears on top of its parent. The transient window is hidden if the parent is minimized and it is destroyed if the parent is destroyed.
- Undecorated Toplevel window: A Toplevel window is undecorated if it does not have a window manager decoration around it. It is created by setting the
overrideredirectflag to1. An undecorated window cannot be resized or moved.
See the code in 2.05.py for a demonstration of all these four types of Toplevel windows.