
One of the most important lessons aimed in this project is to learn to develop custom GUI frameworks. Tkinter in itself is a GUI framework. However, the kind of framework we intend to build here is a higher-level framework, built on top of Tkinter to suit our custom programming needs.
We will not develop a full-blown framework. Rather, we will develop only a small segment of it to give you a flavor of building a custom framework.
So why do we need another framework on top of Tkinter?
Consider a large program which has say 10 different menus, each menu having say 10 menu items. We will have to then write 100 lines of code simply to display these 100 menu items.
You not only need to make each widget by hand, but also have to link each of them manually to other commands besides having to set tons of options for each of them.
If we keep doing this for all our widgets, our GUI programming becomes an exercise in typing. Every extra line of code that you write adds to the program complexity, in a sense that it becomes more difficult for someone else to read, maintain, modify, and/or debug the code.
This is where developing a custom framework comes to our aid. Let's see what it means.
Assume that we anticipate that our drawing program will have a large number of menu items. Now we know how to add menu and menu items. Each new menu item would take at least one line of code to display.
To avoid writing so many lines of code, let's first make a framework to address this.
To ease the process of menu creation, we will write a piece of code that takes menu items listed as a tuple, and converts it to an equivalent menu code.
So given a tuple as follows:
menuitems = ('File- &New/Ctrl+N/self.new_file, &Open/Ctrl+O/self.open_file','Edit- Undo/Ctrl+Z/self.undo, Sep','About- About//self.about')should produce the corresponding menu items, where the first item of the string (before dash (-)) represents the menu button, and each subsequent part of string separated by commas represents one menu item, its accelerator key, and the attached command callback. The position of ampersand symbol (&) represents the position of the shortcut key to be underlined.
We also need to take care of adding separators between our menu items. To add a separator, we would add the string Sep at positions where it is required. More precisely, the string Sep must be capitalized.
In short, passing this tuple through our method should produce a GUI, as shown in the following screenshot:
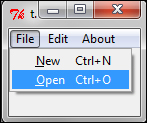
To extend our menu items, all we would need to do is to extend the preceding tuple and simultaneously adding the corresponding command callback method.
We build our framework in a file named framework.py, where we define a new class named GUIFramework as follows:
import Tkinter as tk
class GUIFramework(object):
	menuitems = None
	def __init__(self, root):
		self.root = root
		if self.menuitems is not None:
			self.build_menu()
The two methods of GUIFramework that are used to create menu builder are as follows:
def build_menu(self):
        self.menubar = tk.Menu(self.root)
        for v in self.menuitems:
            menu = tk.Menu(self.menubar, tearoff=0)
            label, items = v.split('-')
            items = map(str.strip, items.split(','))
            for item in items:
                self.__add_menu_command(menu, item)
            self.menubar.add_cascade(label=label, menu=menu)
        self.root.config(menu=self.menubar)

    def __add_menu_command(self, menu, item):
        if item == 'Sep':
            menu.add_separator()
        else:
            name, acc, cmd = item.split('/')
            try:
                underline = name.index('&')
                name = name.replace('&', '', 1)
            except ValueError:
                underline = None
            menu.add_command(label=name, underline=underline,
                           accelerator=acc, command=eval(cmd))
The description of the code is listed as follows:
- The method,
build_menu, operates on a tuple by the nameself.menubar, which must specify all desired menu and menu items in the exact format, as previously discussed. - It iterates through each item in the tuple, splitting the item based on
-delimiter, building the top-menu button for each item left to the-delimiter. - It then splits the second part of the string based on
,(comma) delimiter. - It then iterates through this second part, creating menu items for each of the parts, adding the accelerator key, command callback, and underline key using another method,
__add_menu_command. - The
__add_menu_commandmethod iterates through the string and adds a separator if it finds the stringSep. If not, it next searches for ampersand (&) in the string. If it finds one, it calculates its index position and assigns it to the underline variable. It then replaces ampersand value with an empty string, because we do not want to display the ampersand in our menu item. - If ampersand is not found in a string, the code assigns
Noneto the underline variable. - Finally, the code adds command callback, accelerator key, and underline value to the menu item.
Finally, we add a TestThisFramework class to our file to test if our framework in general and our build_menu method in particular, works as expected.
The code for the TestThisFramework class is as follows(framework.py):
class TestThisFramework(GUIFramework):
    menuitems = (
        'File- &New/Ctrl+N/self.new_file,&Open/Ctrl+O/self.openFile',
        'Edit- Undo/Ctrl+Z/self.undo, Sep',
        'About- About//self.about'
    )
    def new_file(self):
        print 'newfile tested OK'
    def openFile(self):
        print 'openfile tested OK'
    def undo(self):
        print 'undo tested OK'
    def about(self):
        print 'about tested OK'

if __name__ == '__main__':
	root= tk.Tk()
	app = TestThisFramework(root)
	root.mainloop()
The description of the code is listed as follows:
- Our
TestThisFrameworkclass inherits from theGUIFrameworkclass, thus being in a position to use thebuild_menumethod defined in the parent class. - It then adds a list of menu items,
menuitems, and calls the method,build_menu(). It is important that the tuple be defined by the name,menuitems, because ourbuild_menu()method is structured in the parentGUIFrameworkclass to build menu only on the tuples namedmenuitems. - The test class also adds dummy commands to handle command callbacks for each of the menu items.
- Running this test builds menu items as specified in the tuple. Try extending the tuple to add more menu items, and the framework will successfully include those items in the menu.
Tip
Like we added code to generate menus for us, we could have added similar code for other widgets that we foresee to be repeatedly used in our program. But we will leave the framework development there itself and proceed to developing our drawing application.
Developing a framework for smaller programs may be overkill, but they are invaluable assets for longer programs. Hopefully, you should now be able to appreciate the benefits of writing your own custom frameworks for larger programs.
Now that we have our build_menu ready, we can extend it to add as many menu items as required without having to write repetitive and similar code for each of them.
This ends our first iteration, where we laid the foundations for our custom GUI framework. We will not extend the framework further, but hopefully, you should now be in a position to extend it for other widgets, if required.
In this section, you also saw how our TestThisFramework class inherited features from our GUIFramework class. This is the first time we have used inheritance in our program.
So far, we have always passed objects created as classes as arguments to other classes, and then used them using the.(dot) notation. This is named composition
.
With inheritance, we do not need to access methods of another class using the dot notation. We can use the methods of a superclass in the subclass as though they belong to the subclass.
Inheritance brings in the advantage of dynamic binding and polymorphism.
Dynamic binding means the method to be invoked is decided at runtime, thus providing greater flexibility to design of our code. Polymorphism implies that variables of a superclass hold a reference to an object created from itself or from any of its subclasses.
Tip
Inheritance is fit for situations where the object of the subclass is of the same type as the superclass. In our example, menu items will remain the same whether you define them from the superclass or from the subclass. We, therefore, defined it in our superclass and inherited it in our subclass.
If, however, the object needs to appear or behave differently depending on an object's condition or state, composition is preferable.