
Although our program can draw basic shapes, these shapes are currently filled with the foreground color and the outline of the shape is done in black.
The Canvas widget lets you specify the fill color, outline color, and border width for most of the shapes as its configurable options.
In addition to these, the Canvas widget also has several other configurable options for many of these basic shapes. For instance, for a line, you can specify if it will have an arrow head shape at the end or if it will be dashed.
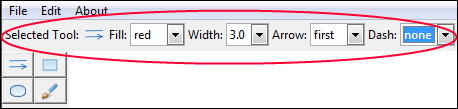
Let's accordingly modify our program to allow the user to select configurable options for each of the four basic shapes, as shown in the following screenshot:
Let's start with a simple thing first. When a user clicks on a button in the left toolbar, the top frame should display the text Selected Tool: followed by the icon representation for the selected button.
Because this event must occur on click of any button, we modify our selected_tool_bar_item method to include a call to two methods, as highlighted in the following code (see code 6.04.py):
def selected_tool_bar_item(self, i):
	self.selected_toolbar_func_index = i
	self.remove_options_from_topbar()
	self.show_selected_tool_icon_in_topbar()

def remove_options_from_topbar(self):
	for child in self.topbar.winfo_children():
		child.destroy()

def show_selected_tool_icon_in_topbar(self):
	Label(self.topbar,text='Selected Tool:').pack(side=LEFT)
	photo = PhotoImage(file='icons/'+								'self.all_toolbar_functions[self.selected_toolbar_func_index]+'.gif')
	label = Label(self.topbar, image=photo)
	label.image = photo
	label.pack(side=LEFT)
The description of the code is listed as follows:
- The
remove_options_from_topbarmethod ensures that when a new button is clicked, options for the previous button are deleted. Theshow_selected_tool_icon_in_topbarmethod actually displays the icon for the currently selected button.Note
widget.winfo_children()returns a list of all children for a given widget, in their stacking order from bottom to top.You can extract a lot of window-related information using one of the many
winfomethods. For a complete list of thewinfomethods, refer to the The basic widget methods section in Appendix B, Quick Reference Sheets.Alternatively, each widget has also its own children attribute, which is a dictionary where the keys are the IDs and the values are the widgets. So if the order is not relevant, this is the same as
widget.children.values().
Next, we need to define the selection combobox for a user to select options for fill, outline, width, arrow, and dash. We will use ttk Combobox to allow the user to make a selection, and as such, we import it into our current file, as follows:
import ttk
We will not reproduce the entire code here. However, for each of the preceding options, we define two methods: one that displays the combobox and the other sets the value of the current selection made by the user.
Thus, we set the following two definitions for fill option, as follows (see code 6.04.py):
def fill_options_combobox(self):
	Label(self.topbar,text='Fill:').pack(side=LEFT)
	self.fillcmbobx = ttk.Combobox(self.topbar, 							state='readonly', width=5)
	self.fillcmbobx.pack(side=LEFT)
	self.fillcmbobx['values'] = ('none', 'fg', 'bg', 'black', 'white' )
	self.fillcmbobx.bind('<<ComboboxSelected>>',	self.set_fill)
	self.fillcmbobx.set(self.fill)

def set_fill(self, event=None):
	fl = self.fillcmbobx.get()
	if fl == 'none': self.fill = '' #transparent
	elif fl == 'fg': self.fill = self.foreground
	elif fl == 'bg': self.fill = self.background
	else: self.fill = fl
We similarly define other pair of methods for each of the sets, namely (see code 6.04.py):
outline_options_combobox:set_outlinewidth_options_combobox:set_widtharrow_options_combobox:set_arrowdash_options_combobox:set_dash
Now that we have ways to set different values for fill, outline, arrow, and dash configurable options, let's modify our drawing code to include these in the actual drawing, as follows (see code 6.04.py):
def draw_line(self, x, y, x2, y2):
	self.currentobject = self.canvas.create_line(x, y, x2, y2,
		fill= self.fill, arrow=self.arrow, width=self.width, 				dash=self.dash )

def draw_rectangle(self, x, y, x2, y2):
	self.currentobject = self.canvas.create_rectangle(x, y,x2, 				y2, outline=self.outline, fill=self.fill, 						width=self.width)

def draw_oval(self, x, y, x2, y2):
	self.currentobject=  self.canvas.create_oval(x, y, x2, 				y2, outline=self.outline, fill=self.fill, 						width=self.width)

def draw_brush(self, x, y, x2, y2):
	if not self.all_toolbar_functions[self.selected_toolbar_func_index]=='draw_brush':
		self.canvas.bind("<Button1-Motion>", 						self.mouse_down_motion)
		return
	self.currentobject = self.canvas.create_line(x,y,x2,y2,				fill=self.fill, width=self.width)

self.canvas.bind("<B1-Motion>", self.draw_brush_update_xy)
Having defined all these methods, it is now time to call them from somewhere.
While the fill combobox would be applicable to all the four basic shapes, the arrow option would only be applicable to drawing lines. Because there will be a different set of comboboxes for different selections, we define the following methods (see code 6.04.py):
def draw_line_options(self):
	self.fill_options_combobox()
	self.width_options_combobox()
	self.arrow_options_combobox()
	self.dash_options_combobox()

def draw_rectangle_options(self):
	self.fill_options_combobox()
	self.outline_options_combobox()
	self.width_options_combobox()

def draw_oval_options(self):
	self.fill_options_combobox()
	self.outline_options_combobox()
	self.width_options_combobox()

def draw_brush_options(self):
	self.fill_options_combobox()
	self.width_options_combobox()
Finally, these methods have to be called from somewhere, depending on the selection made. So we modify our selected_tool_bar_item method to call a method dynamically, named by appending the string _options to the name of selected method as follows (see code 6.04.py):
def selected_tool_bar_item(self, i):
	self.selected_toolbar_func_index = i
	self.remove_options_from_topbar()
	self.show_selected_tool_icon_in_topbar()
	opt = self.all_toolbar_functions[ self.selected_toolbar_func_index] +'_options'
	fnc = getattr(self, opt)
	fnc()
The program user can now select from the various options provided for each of the toolbar buttons (see code 6.04.py).
More importantly, we saw some of the configuration options available for items drawn on the Tkinter Canvas widget. We were also introduced to the winfo methods. These methods can be used to extract a lot of data about a widget and are a useful tool to have when programming a GUI application in Tkinter.