
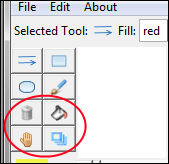
Next in line, let's add a few more features to our drawing program. In particular, we will add the ability to delete objects from the canvas, add a paint bucket, the ability to move items up and down the stack, and the ability to drag items on the canvas, as shown in the following screenshot:
As a first thing, let us extend our all_toolbar_functions method to make provisions for the new methods that we will define here, as follows (see code 6.05.py):
all_toolbar_functions = ('draw_line', 'draw_rectangle', 'draw_oval', 'draw_brush', 'delete_object', 'fill_object', 'move_to_top', 'drag_item')As usual, we have added icons to the icon folder by the same name as the method that would handle it. The buttons are automatically displayed in our left toolbar merely by adding new methods to this tuple and by adding corresponding icons to our icon folder because of the way we have designed the create_tool_bar_buttons method.
Before define the methods for handling the new features, let's pause and think about the kind of work we need to do here.
The operations that we want to do now are slightly different from their predecessors. Earlier, we were creating items on the canvas. Now we have to target items already present on the canvas.
The items that need to be targeted are the ones on which the user clicks on with his or her mouse.
We, therefore, need to identify the item on which mouse has been clicked before we can do any modification to the item itself. To do that, we modify our mouse_down method as follows (see code 6.05.py):
def mouse_down(self, event):
	self.currentobject = None
	self.lastx = self.startx = self.canvas.canvasx(event.x)
	self.lasty = self.starty = self.canvas.canvasy(event.y)
	if self.all_toolbar_functions[										self.selected_toolbar_func_index]
	in ['fill_object',	'delete_object', 'move_to_top', drag_item']:
		try:
			self.selected_object = 									self.canvas.find_closest(self.startx, self.starty)[0]
		except:
			self.selected_object = self.canvas
The description of the code is listed as follows:
- This small modification to the
mouse_downmethod means that if any of the last four buttons are clicked, the code locates the item located closest to the click position and assigns it to our newly defined attribute,selected_object, which stands for the current selected object. - If there are no items on the canvas, the entire canvas is set to the
selected_objectattribute.Note
The canvas method has a method named:
find_closest(x, y, halo=None, start=None).It returns the identifier for item closest to the given position on the canvas. This means that if there is only one item on the canvas, it will be selected regardless of how near or how far you click from it.
If on the other hand, you want that objects only within a certain distance are selected, the Canvas widget provides an alternate implementation named
find_overlapping.You will, however, have to place a small rectangle centered on the position to use this.
Now that we have a hold on the item to be manipulated, we can proceed to do whatever we want to do with the item.
The first method to delete items from canvas is delete_object, which simply deletes the selected item. So our delete_object method is defined as follows (see code 6.05.py):
def delete_object(self, x0, y0, x1, y1):
	self.canvas.delete(self.selected_object)
And, because our earlier code needed that for every method for which we define an options method, we define the method, delete_object_options, here. However, because we do not want to display anything in the option bar at the top, we simply ignore it with a pass statement, as follows:
def delete_object_options(self):
	pass
Next, we code our fill_object method, which acts somewhat like a paint bucket in common drawing programs.
This again is simple. You simply need to fill the color on the background of the selected item. If there is no item on the canvas, it simply fills the color on to the entire canvas, as follows:
def fill_object(self,x0,y0,x1,y1):
	if self.selected_object == self.canvas:
		self.canvas.config(bg=self.fill)
	else:
		self.canvas.itemconfig(self.selected_object, fill=self.fill)
And here, we want to let the user choose the fill color for the paint bucket. Hence, we call our previously defined method, fill_options_combobox, from within our fill_object_options method.
def fill_object_options(self):
	self.fill_options_combobox()
Let's now define the methods for the next button. The button marked with a small hand icon can be used to raise items on top of others.
Note
When you draw multiple items on the canvas, the items are placed in a stack. By default, new items get added on top of items previously drawn on the canvas. You can, however, change the stacking order using: canvas.tag_raise(item).
If multiple items match, they are all moved, with their relative order preserved.
However, this method will not change the stacking order for any new window item that you draw within the canvas.
Then there are find_above and find_below methods that you can use to find items above or below an item in the canvas stacking order.
In addition, there is a find_all method that returns a tuple containing identifiers for all items on the canvas.
Accordingly, the code for moving items to the top of stack is as follows (see code 6.05.py):
def move_to_top(self,x0,y0,x1,y1):
	self.canvas.tag_raise(self.selected_object)
def move_to_top_options(self):
	pass # no items to display on the top bar
Finally, let's add drag-and-drop feature for items on the canvas. The ability to drag an item on the canvas requires that after selection of the object to be dragged, we recalculate the x and y coordinates for mouse movement, and move the object to the new coordinates provided by the mouse movement at small intervals.
In many ways the concept here is similar to one that we used for defining our paint brush.
The idea is to call our
drag_items method after every small mouse movement using another method, drag_item_update_xy, which recalculates x and y coordinates after small mouse motion, moving the item to the newly calculated coordinates every time.
Then, we have a condition check, which breaks out of this loop if any other button is selected from the toolbar, as follows (see code 6.05.py):
def drag_item(self,x0,y0,x1,y1):
	if not self.all_toolbar_functions[ 							self.selected_toolbar_func_index] == 'drag_item':
		self.canvas.bind("<Button1-Motion>",									self.mouse_down_motion)
		return # break out of loop
	self.currentobject = self.canvas.move(									self.selected_object, x1-x0, y1-	y0)
	self.canvas.bind("<B1-Motion>", self.drag_item_update_xy)

def drag_item_update_xy(self, event):
	self.startx, self.starty = self.lastx, self.lasty
	self.lastx, self.lasty = event.x, event.y
	self.drag_item(self.startx, self.starty,self.lastx, 					self.lasty)

def drag_item_options(self):
pass # we want no options to be displayed at the topThis brings us to the end of this iteration. We have now successfully added four new features to our drawing program, namely: delete_object, fill_object, move_to_top, and drag_item.
In the process, we saw some of the methods provided by the Canvas widget for item manipulation. We also saw the strategy that one might adopt when working on existing items on the Canvas widget.
In this program, we extensively used the item identifier ID to target a particular item on the canvas. Recall that item identifier is the unique integer ID returned by the canvas method that creates the object.
So, for instance, when you create an oval item on your canvas, it returns an integer ID after creating the object. This is referred to its item identifier or the item handle, as follows:
my_item_identifier = self.canvas.create_oval(x, y, x2, y2)
Now you can act upon this oval using the handle, my_item_identifier.
However, this is not the only method by which you can identify an item on the canvas. Additionally, you can add tags to items, and then use these tags to identify the object for manipulation.
Let's now look at some of the common operations involved in working with Canvas tags.
To add a tag to an item, you specify the tag (which is a string) as its configurable option either at the time of creating the object or later using the itemconfig method, or add them using the addtag_withtag method, as follows:
rectid = canvas.create_rectangle(10, 10, 50, 50, tags="myshiny")
canvas.itemconfig(rectid, tags="shiv")
canvas.addtag_withtag("shiv", "takeonemore")
The same tag can be applied to more than one item on the canvas.
You can add multiple tags to an item together by passing in the tags as a tuple of strings, as follows:
canvas.itemconfig(rectid, tags=("tagA", "tagB"))To get all tags associated with a specific item handle, use gettags as follows:
printcanvas.gettags(rectid)
This returns a tuple of all tags associated with that item handle, as follows:
("myshiny", "shiv", "takeonemore", "tagA", "tagB")