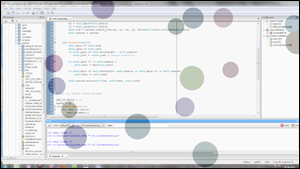
We will start by building a screen saver for our desktop. The screen saver will consist of several random-colored and random-sized balls bouncing all over the screen at random velocity, as shown in the following screenshot:

Carry out the following steps to create the screen saver:
- Let's create a class to generate balls with random attributes. Accordingly, we define a new class named
RandomBallto achieve this (refer to the7.01 screensaver.pyPython file, available in the code bundle):from random import randint class RandomBall: def __init__(self, canvas, scrnwidth, scrnheight): self.canvas = canvas self.xpos = randint(10, int(scrnwidth)) self.ypos = randint(10, int(scrnheight)) self.xvelocity = randint(6,12) self.yvelocity = randint(6,12) self.scrnwidth = scrnwidth self.scrnheight = scrnheight self.radius = randint(40,70) r = lambda: randint(0,255) self.color = '#%02x%02x%02x' % (r(),r(),r())The description of the code is as follows:
- The
__init__method takes three arguments, an instance of the Canvas widget, the screen width and the screen height. It then initializes the initial x and y positions for a ball as random numbers, starting from0up to the maximum screen coordinates. - It also initializes the velocity of the ball in x and y directions, the radius and color of the ball changes in a random fashion.
- Because the hexadecimal color coding system uses two hexadecimal digits for each of red, green and blue colors, there are 16^2 (256) possibilities for each color. We therefore create a lambda function that generates a random number from 0-255, and use this function to generate three random numbers. We convert this decimal number to its two-digit equivalent hexadecimal notation using the format %02x to generate a random color for the balls.
- The
- The second method creates the actual ball using the canvas
create_ovalmethod (refer to the7.01 screensaver.pyPython file available in the code bundle):def create_ball(self):x1 = self.xpos-self.radiusy1 = self.ypos-self.radiusx2 = self.xpos+self.radiusy2 = self.ypos+self.radiusself.itm =canvas.create_oval(x1, y1, x2, y2,fill=self.color, outline=self.color) - Let's now code the method to handle ball movement on the screen.
The method also checks if the ball has reached the end of the screen on any of the sides. If the ball has actually reached the end of the screen, it simply changes the direction by appending a negative sign to the velocity of the ball.
The method finally moves the ball using the
canvas.movemethod (refer to7.01 screensaver.py):def move_ball(self):self.xpos += self.xvelocityself.ypos += self.yvelocity#Check if the Direction of ball movement is to be changedif self.ypos>= self.scrnheight - self.radius:self.yvelocity = - self.yvelocity # change directionif self.ypos<= self.radius :self.yvelocity = abs(self.yvelocity)if self.xpos>= self.scrnwidth- self.radius or self.xpos<= self.radius:self.xvelocity = -self.xvelocity # change directionself.canvas.move(self.itm, self.xvelocity, self.yvelocity)That is all to our
RandomBallclass. We can use this class to create as many ball objects as we want to display in our screen saver. - Now, that we have coded methods to generate balls and to move them, let's create our screen saver. We now create a class named
ScreenSaverthat will show the actual screen saver:class ScreenSaver: balls = [] def __init__(self, num_balls): self.root = Tk() w, h = self.root.winfo_screenwidth(),The description of the code is as follows:
- The
__init__method of theScreenSaverclass takes the number of balls (num_balls) as its argument. - We then create a root window and calculate the height and width of the screen using the
winfomethod. - We use
root.overrideredirect(1)to remove the enclosing frame from the parent window. - We then specify the geometry of the parent window to fill the entire screen.
- We make the parent window transparent using
root.attributes('-alpha', 0.3). We add a transparency of0.3to make the window translucent. - We then bind the root to call our
quitcommand on the event of clicking the mouse button, pressing any keyboard button, or mouse motion. This is to ensure that our program behaves like a screen saver, exiting on any interactions from the user's end. - We then create a canvas to cover the entire screen with
Canvas(self.root, width=w, height=h). - We create several random ball objects outs of the
RandomBallclass, passing along the Canvas widget instance, the width, and the height of the screen as its arguments. - We finally make a call to run the screen saver with the
run_screen_saver()method within theScreenSaverclass, which is discussed in the following.
- The
- In this step, we will run the
ScreenSaverclass:def run_screensaver():for ball in balls:ball.move_ball()canvas.after(20, runScreenSaver)The description of the code is as follows:
- The
run_screensaver()method simply moves each ball by calling itself at a regular interval of 20 milliseconds - We also define the
quitmethod in ourScreenSaverclass to quit from the main loop and exit the program:def quit(event):root.destroy() - To run the screen saver, we instantiate an object from our
ScreenSaverclass, passing the number of balls as its argument:if __name__ == "__main__":ScreenSaver(18) ##18 is the number of balls
- The
Note
We have used two Toplevel window methods root.overrideredirect and root.attributes, in the previous code.
For a complete list of methods that can be applied to the Toplevel window, refer to the The Toplevel window methods section in Appendix B, Quick Reference Sheets.
Our screen saver is ready!
In fact, if you are working on a Windows platform, and when you learn to create an executable program from Python programs (discussed in Appendix A, Miscellaneous Tips), you can create an executable file with .exe extension for this screen saver. So then, you can change its extension from .exe to .scr and right-click, and select Install to add it to your list of screensavers!
