
Let's now build a simple Weather Reporter application. The goal of this project is to introduce you to the basics of network programming, as used in conjunction with Tkinter.
Python has great support for network programming. At the lowest level, Python provides a socket module that lets you connect and interact with the network using a simple-to-use object-oriented interface.
For those unaware of network programming, sockets are the fundamental concept behind any kind of network communications done by your computer. This is the lowest level at which a programmer can access the network. Underneath the socket layer lie raw UDP and TCP connections, which are handled by your computer's operating system with no direct access points for the programmers. For instance, when you type www.packtpub.com in your browser, the operating system on your computer opens a socket and connects to packtpub.com to fetch the web page and show it to you. Same happens with any application that needs to connect to the network.
Let's take a brief look at some of the APIs available in the socket module:
s = socket.socket(socket.AF_INET, socket.SOCK_STREAM) # create a #socket
socket.gethostbyname( host ) # resolving host IP from host name
s.connect((ip , port)) #Connect to remote server
s.sendall(message)
s.recv(message_size)
If you look at the 7.04 socket demo.py Python file in the code bundle of this project, you'll find that it sends a very obscure looking GET request to fetch the contents from the URL in the following line of code:
message = "GET / HTTP/1.1

"
The data received from the server is also sent in packets, and it is our task to collect all the data and assemble them at our end. All these make direct socket programming a tedious approach. We do not want to be writing code for all that to fetch data from the network.
We will therefore use a higher-level module named urllib, which is built on top of sockets module but is easier to use. The urllib module forms a part of Python standard library. With this protocol, fetching contents of a web page turns into a four-line code (see the code in 7.05 urllib demo.py):
import urllib
data =  urllib.urlopen('http://www.packtpub.com')
print data.read()
data.close()
This prints the entire HTML source code or whatever is the response from the web page http://www.packtpub.com. This is, in essence, the core of mining the Web for data and information.
Now that we know how to get data from a URL, let's apply it to build a small Weather Reporter application.
This application should take the location as an input from the user, and fetch relevant weather-related data.
- First, we will create the GUI of the application. This should now be easy for you. We create a class
WeatherReporter, and call it from outside the class within the main loop. See the code of7.06 weather reporter.py:def main(): root=Tk() WeatherReporter(root) root.mainloop() if __name__ == '__main__': main()The GUI component of the
WeatherReporterclass consists of two methods:top_frame()anddisplay_frame(). Thetop_frame()method creates an entry widget and a button that says Show Weather Info.The
display_frame()method creates a canvas where the actual weather data would be displayed:class WeatherReporter: def __init__(self, root): self.root = root self.top_frame() self.display_frame() def top_frame(self): topfrm = Frame(self.root) topfrm.grid(row=1, sticky='w') Label(topfrm, text='Enter Location').grid(row=1, column=2, sticky='w') self.enteredlocation = StringVar() Entry(topfrm, textvariable=self.enteredlocation).grid(row=1, column=2, sticky='w') ttk.Button(topfrm, text='Show Weather Info', command=self.show_weather_button_clicked).grid(row=1, column=3, sticky='w') def display_frame(self): displayfrm = Frame(self.root) displayfrm.grid(row=2, sticky='ew', columnspan=5) self.canvas = Canvas(displayfrm, height='410',width='300', background='black', borderwidth=5) self.canvas.create_rectangle(5, 5, 305, 415,fill='#F6AF06') self.canvas.grid(row=2, sticky='w', columnspan=5) - In the second step, we are going to fetch the weather data from a website.
There are two ways to fetch data from a website. The first method involves getting an HTML response from a website, and then parsing the received HTML response for data that is relevant to us. This type of data extraction is called site scraping .
Site scraping is a rather crude method which is employed only when a given website does not provide a structured way to retrieve data. On the other hand, some websites are willing to share data through a set of APIs, provided you query it for data using the specified URL structure. This is clearly more elegant than site scraping, because data is interchanged in a reliable and "mutually agreed" format.
For our Weather Reporter application, we want to query some weather channel for a given location, and in turn retrieve and display the data in our canvas. Fortunately, there are several weather APIs which lets us do that.
The OpenWeatherMap service provides free weather data and forecast APIs. This site collates weather data from more than 40,000 weather stations across the globe, and the data can be assessed by city name and geographic coordinates or their internal city ID.
The website provides weather data in two data formats:
- JSON (JavaScript Object Notation)
- XML
Note
XML and JSON are two popular interchangeable data serialization formats widely used for data-interchanging among different applications, which may be running on different platforms and using different programming languages, thus providing the benefit of interoperability.
JSON is simpler than XML, because its grammar is simpler and it maps more directly onto the data structures used in modern programming languages. JSON is better suited for data exchanging, but XML is good for document exchanging.
The API documentation for the website tells us that a query, such as
api.openweathermap.org/data/2.5/weather?q=London,ukreturns us weather data for London in a JSON format as follows:{"coord":{"lon":-0.12574,"lat":51.50853},"sys":{"country":"GB","sunrise":1377147503,"sunset":1377198481},"weather":[{"id":500,"main":"Rain","description":"light rain","icon":"10d"}],"base":"gdps stations","main":{"temp":294.2,"pressure":1020,"humidity":88,"temp_min":292.04,"temp_max":296.48},"wind":{"speed":1,"deg":0},"rain":{"1h":0.25},"clouds":{"all":40},"dt":1377178327,"id":2643743,"name":"London","cod":200}The syntax of JSON is simple. Any JSON data is a name/value pair where each data is separated from the others by commas. JSON uses curly braces
{}to hold objects and square brackets[ ]to hold arrays. We accordingly define a method to get the weather data in JSON format in our application (refer to7.06 weather reporter.pyavailable in the code bundle of this project):def get_weather_data(self): try: apiurl = 'http://api.openweathermap.org/data /2.5/weather?q=%s'%self.enteredlocation.get() data = urllib.urlopen(apiurl) jdata= data.read() returnjdata except IOError as e: tkMessageBox.showerror('Unable to connect', 'Unable toconnect %s'%e)This method uses
urllibto retrieve responses from the website. It returns the response in JSON format. - Now, we'll start processing the JSON data. The weather data returned using API is encoded in JSON format. We need to convert this data into Python data type. Python provides a built-in
jsonmodule that eases the process of "encoding-decoding" JSON data. We therefore import thejsonmodule into our current namespace.Then, we'll use this module to convert the retrieved JSON data into Python dictionary format (refer to
7.06 weather reporter.py):def json_to_dict(self, jdata): mydecoder = json.JSONDecoder() decodedjdata = mydecoder.decode(jdata) flatteneddict = {} for key, value in decodedjdata.items(): if key == 'weather': forke,va in value[0].items(): flatteneddict[str(ke)] = str(va).upper() continue try: fork,v in value.items(): flatteneddict[str(k)] = str(v).upper() except: flatteneddict[str(key)] = str(value).upper() returnflatteneddict - Finally, we'll display the retrieved weather data. Now that we have a dictionary of all weather-related information provided by the API, let's add a command callback to the button:
def show_weather_button_clicked(self):
    if not self.enteredlocation.get():
        return
    self.canvas.delete(ALL)
    self.canvas.create_rectangle( 5, 5,305,415,fill='#F6AF06')
    data = self.get_weather_data()
    data =self.json_to_dict(data)
    self.display_final(data)
The
display_finalmethod simply takes each item from the dictionary and displays it on the canvas usingcreate_text. We do not include the code fordisplay_finalbecause it merely displays the data on the canvas, and this idea should be self-explanatory by now. The API also provides an icon-related data. The icons are stored in a folder namedweatherimages(refer to the folder with the same name provided in the code bundle) and an appropriate icon is displayed usingcanvas.create_image.
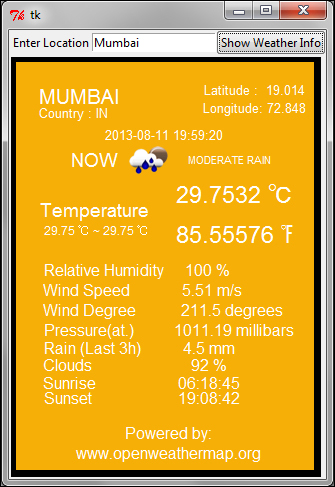
Our Weather Reporter application is now functional. In essence, the application uses the urllib module to query the weather API provided by our data provider. The data is fetched in JSON format. The JSON data is then decoded into a Python-readable format (dictionary).
The converted data is then displayed on the canvas using create_text and create_image methods.
When you access a server from your Python program, it is very important to send requests after small time gaps.
A typical Python program is capable of running several million instructions per second. However, the server that sends you the data at the other end is never equipped to work at that speed.
If you knowingly or unknowingly send large number of requests to a server within a short time-span, you may hamper it from servicing its routine requests from normal web users. This constitutes what is called the denial of service (DOS) attack on the server. You may be banned or, in worse case, sued for disrupting a server, if your program does not make a limited number of well-behaved requests.