
As mentioned, using the PowerShell upgrade is only supported from Dynamics NAV 2013 forward. There are ways to use PowerShell upgrade if you're running earlier versions, but that will be beyond the scope of this book. So, the simple rule is to get to at least Dynamics NAV 2013 to make your upgrade easier in the future.
If you are on older versions, the official documentation tells you to follow the Microsoft Dynamics NAV upgrade guide for the respective versions for details. Essentially, if you are coming from versions previous to X, you will have to follow guide Y, and so on. If you follow all the steps detailed in all the guides, it will take a long time. Hence the rule that the older the version you're on, the more time consuming and more complex is the upgrade.
But there is good news. If you are planning to upgrade from the older versions, you can skip some steps since the ultimate goal is to get to the latest version. In this section, we will look at the steps you need to follow to upgrade from Version 3.60 to Dynamics NAV 2016. You can use this section as a checklist for your upgrade process.
The steps that you will have to follow to upgrade from any version to Dynamics NAV 2016 can be spread out into three groups:
- Preparing to upgrade
- Upgrading the application code
- Upgrading the data
The first group will be the same for all the versions. The second and third groups will be different depending on which version you intend to upgrade to Microsoft Dynamics NAV 2016.
We will first enumerate the steps for the preparing to upgrade group, and then enumerate the steps in the other two groups depending on the version.
If you're currently using these versions, good for you! The PowerShell upgrade is ready for you to use. There are three steps you will need to follow to get to NAV 2016. They are:
Before anything can be done, you need to make sure your database is converted. Simply put, this just means that the foundation of the database has to be to the standards of NAV 2016.
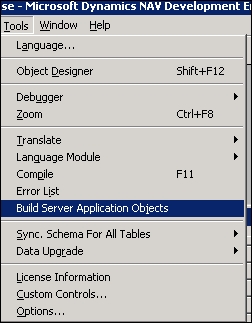
Make sure your existing database works. This is done by using Build Server Application Objects that can be found from the Microsoft Dynamics NAV Development Environment.

This step essentially converts the code you've written in C/AL into C# for Dynamics NAV middle tier.
Upload your Dynamics NAV 2016 license using the Development Environment. The license can be obtained from your Dynamics NAV partner or by logging into CustomerSource, a portal for Dynamics NAV customers. Once you have the license file (usually with a file extension of .flf), you can upload the license file onto your server by going to Tools | License Information.
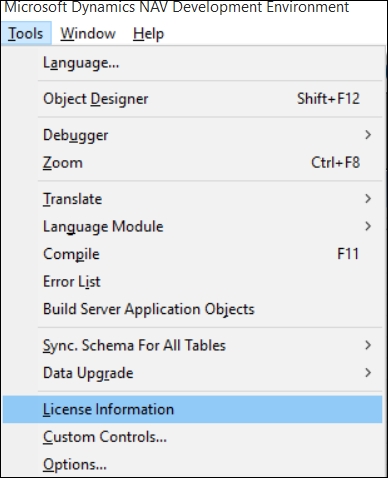
A new screen will pop up. Click on Upload and select the .flf file, and then your license will be updated to the latest version.
Start the Dynamics NAV 2016 Development Environment and open your old database. A warning message will appear to confirm your actions to convert the database.
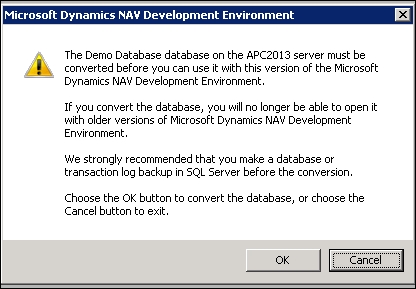
As the warning suggests, make sure you really want to proceed. There's no turning back!
After the process completes in a few minutes, you will receive the following message, basically telling you that you're ready to connect the new service tier to the database:
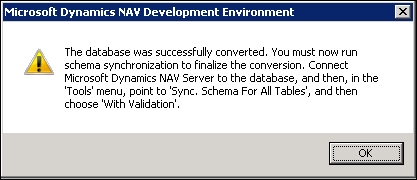
You now have your database with NAV 2013 functionalities that have the NAV 2016 foundation.
After the database has been converted, we will need to setup the service tier to connect to the upgraded database.
Start the Dynamics NAV 2016 administration, select the Dynamics NAV Server that was installed when you installed Dynamics NAV, and edit the Database Name to the name of your database.
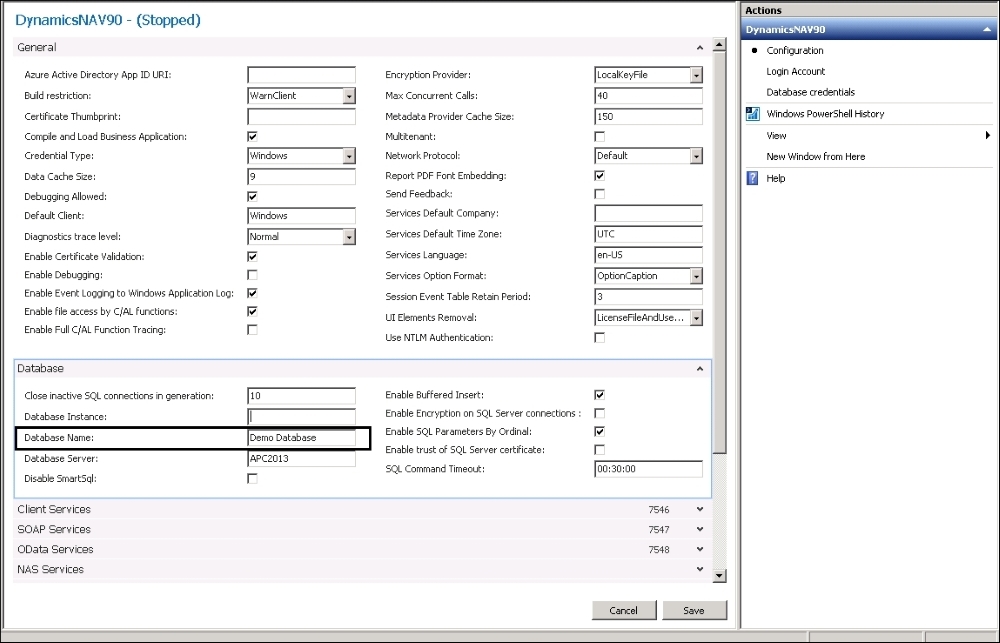
If you want further information on how to configure the service tier for Dynamics NAV, go to https://msdn.microsoft.com/en-us/library/hh165851(v=nav.90).aspx.
Once you've changed the database the service is pointing to, start the Dynamics NAV service.
Once the service is started, go back to the Development Environment for Dynamics NAV 2016 and synchronize the schema so the database matches with the service tier.
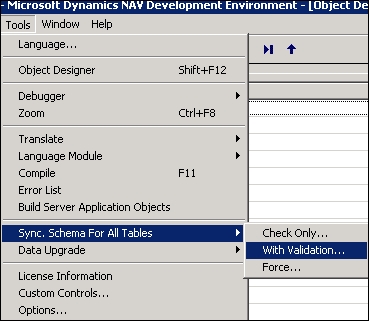
You will be prompted with a message and the ability to select the Dynamics NAV service you want to sync the schema with.
Once the schema is synchronized, click on Build Server Application Objects. This will push what we've done to the service tier.
Not too much coding here and we're done! You've now done what's called a technical upgrade. Basically, upgrading the platform without upgrading the application code or the data.
After the technical upgrade of the database to Dynamics NAV 2016, you will need to upgrade the application code.
The application code is basically where the functionalities in Dynamics NAV reside. Without upgrading the application code, you will not be able to utilize the new features with the new version.
To upgrade the application code using PowerShell upgrade, you will need the following:
- The original unmodified Dynamics NAV 2013 objects in text format. Note that if you've applied any hotfix into the application code, then you will need that version with the hotfix applied.
- Your current modified database objects in text format.
- The objects from the new version in text format.
Before you proceed to export the objects, let's first create the folders on your computer to store the files:
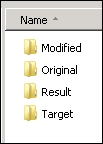
This will allow us to easily see what is being done and where.
In order to get the objects for these databases, you will need the original unmodified Dynamics NAV 2013 (with any hotfixes), your current NAV database, and a new Dynamics NAV 2016 database.
If you're using versions NAV 2013 R2 and prior, then in order to get these objects in text format, you will need a developer's license. In the object designer, you can export the objects by clicking on File | Export, then selecting the proper export format:

If you're using NAV 2015 or a newer version, you can use the ExportObjects cmdlet to start the Dynamics NAV 2016 Development Shell:
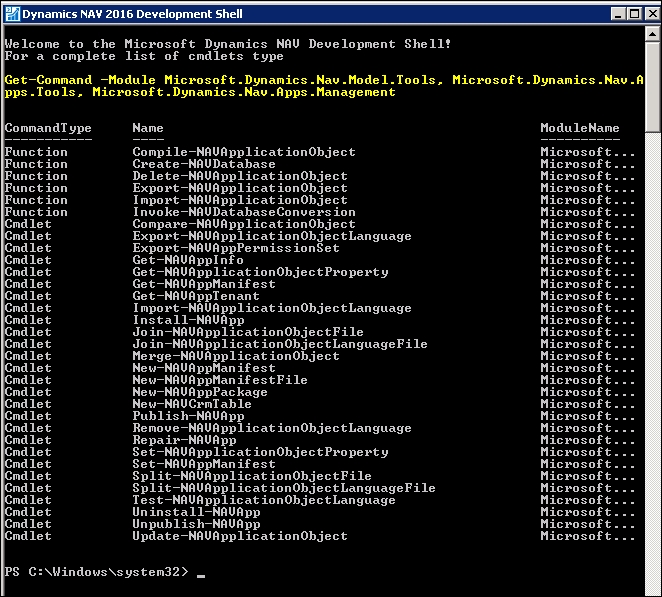
The cmdlet we want to use is Export-NAVApplicationObject. You will need the following when you run this command:
- The Dynamics NAV service name
- The database name
- The directory where you want to export the object in text format to
Once you've obtained the information, type in the information in the PowerShell as the following screenshot shows:
In this example, we're exporting the objects from the database that we did the technical upgrade on. You will need to repeat this process for the unmodified NAV 2013 database (after you do the technical upgrade) and the unmodified NAV 2016 database, and save it to the appropriate folders that we defined earlier.
The next step is to merge the modifications that you've done to your existing database into the new Dynamics NAV version.
The cmdlet we will use is Merge-NAVApplicationObject. In this example, the files are put into the appropriate folder in a sub path called upgrade.

You can select multiple files to merge. If there is only one file, you can push Enter to go to the next file it's asking for.
After the merge is done, it will list out what was merged, what has conflicts, what was inserted, and what was removed from the code. If there are any conflicts, they will be kept in the Conflicts folder in the Result folder. The conflicts will need to be resolved manually.
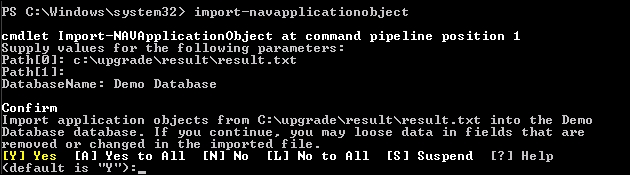
The merged file will be stored in the Results folder. You can now import the merged objects into your fresh Dynamics NAV 2016 database. You can do this by using the Import-NAVApplicationObject cmdlet.

Once the merged code is imported successfully, you will need to start the Dynamics NAV 2016 Development Environment and select all the objects and click on Tools | Compile.
Any errors that may come up will need to be resolved manually.
Congratulations! You've now upgraded the application code to the latest version of Dynamics NAV.
So we did a technical upgrade by converting the foundation to NAV 2016, and then we upgraded the application code so the functionalities are now in NAV 2016. The last step of the process is to upgrade the data so it utilizes the NAV 2016 functionalities.
First we will need to import the upgrade to the toolkit that's included in the Dynamics NAV installation files. These .FOB or object files are located in the UpgradeToolKit folder. Within the folder, you may see Data Conversion Tools or the Local Objects folder. If you see the Local Objects folder, you will want to use the contents in that folder since it's localized for your region.
Import the object into NAV by going to the Development Environment and clicking on File | Import.
The file you choose will depend on the version you're coming from:
Upgrade700900.US.fob: If you're upgrading from Dynamics NAV 2013Upgrade710900.US.fob: If you're upgrading from Dynamics NAV 2013 R2Upgrade800900.US.fob: If you're upgrading from Dynamics NAV 2015
Once the objects are imported, we can run the upgrade by clicking on Tools | Data Upgrade. Then choose Show Progress.
Once the process is complete, we're totally done!
As previously mentioned, there's a totally hands - off approach to upgrade to NAV 2016 using PowerShell scripts. Fortunately, Microsoft has provided sample scripts on automating that can be found in the installation files in the WindowsPowerShellScriptsApplicationMergeUtilities directory.
Configuring these scripts will be beyond the scope of this book. The scripts basically follow the same principle as the steps that are described in this section.
You can read more about these scripts at https://msdn.microsoft.com/en-us/library/dn414687(v=nav.90).aspx.
You need to get to at least NAV 2013 in order to get to NAV 2016. Upgrading to Dynamics NAV 2013 is officially supported only from those versions. In this section, we will enumerate the steps that have to be performed to upgrade from these versions.
The steps that have to be performed to upgrade the application code from Dynamics NAV 2009 to Dynamics NAV 2013 are listed as follows:
- Get the objects' versions.
- Convert the old objects' version files to Microsoft Dynamics NAV 2013 format.
- Compare your database objects to the standard objects of your current version to determine the objects that have been customized.
- Carry out your customizations to the new standard code for the new version of Microsoft Dynamics NAV.
- If you have a Microsoft Dynamics NAV 2009 classic client installation, transform your own forms to pages.
- If you have a Microsoft Dynamics NAV 2009 classic client installation, carry out your customizations on the existing forms and into its corresponding page object.
- Transform your reports to the new report definition of Microsoft Dynamics NAV 2013.
- Revise and modify your customized code for better performance in Microsoft Dynamics NAV 2013.
Data and field structure has changed between Microsoft Dynamics NAV 2009 and Microsoft Dynamics NAV 2013. That's why a data upgrade process has to be run. The data upgrade is done in two steps: one still in the old version and the other in the new version. The data conversion process can be seen in the following figure:
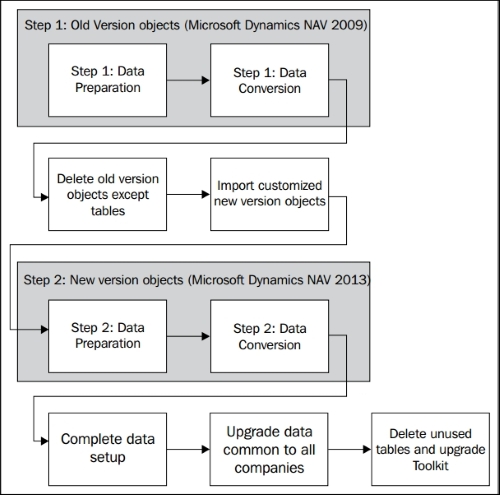
Follow these steps to perform the data conversion process:
- In your old customized database, import the file called
Upgrade Step 1 Objects. - Run the data conversion process for the objects of the old version.
- Create a new Microsoft Dynamics NAV 2013 database.
- Restore the database that was being upgraded.
- Import all the customized Microsoft Dynamics NAV 2013 objects.
- Import the file called
Upgrade Step 2 objects. - Run the data conversion process for the objects of the new version.
- Delete the upgrade toolkit objects.
To upgrade to Microsoft Dynamics NAV 2013 from any Microsoft Dynamics NAV 5.0 version, you will have to upgrade first to Microsoft Dynamics NAV 2009, and then follow the upgrade steps to upgrade from Microsoft Dynamics NAV 2009 to Microsoft Dynamics NAV 2013.
Even if having to upgrade first to NAV 2009, a full upgrade to the intermediate version will not be necessary. For example, you will not need to upgrade your application code to NAV 2009. The application code can be upgraded directly to Dynamics NAV 2013. You don't need to perform the data upgrade process while upgrading from Dynamics 5.0 to Dynamics 2009 since there is no table structure changes between these two versions.
The steps that have to be performed to upgrade the application code from Dynamics NAV 5.0 to Dynamics NAV 2013 are listed as follows:
- Import both your customized application code and the standard application code of your current version in a Dynamics NAV 2009 database. Compile all the objects. Use those objects that are converted to Dynamics NAV 2009 format for comparing and merging purposes.
- Get the objects' version (exporting them from the Dynamics NAV 2009 database).
- Compare your database objects to the standard objects of your current version to determine the objects that have been customized.
- Carry out your customizations to the new standard code for the new version of Microsoft Dynamics NAV.
- Transform your own forms to pages.
- Carry out your customizations on the existing forms to their corresponding page objects.
- Transform your reports to the new report definition of Microsoft Dynamics NAV 2013.
- Revise and modify your customized code for better performance in Microsoft Dynamics NAV 2013.
Data and field structure has changed between Dynamics NAV 5.0 and Dynamics NAV 2013. That's why a data upgrade process has to be run. However, the data and field structure did not change at all between Dynamics NAV 5.0 and NAV 2009. So the data upgrade tools available for NAV 2009 also apply to NAV 5.0. The only extra thing you will have to do is to convert your database to Dynamics NAV 2009. The data conversion process can be seen in the following figure:

The steps required to upgrade the data are listed as follows:
- Create a new Microsoft Dynamics NAV 2009 database.
- Restore your Microsoft Dynamics NAV 5.0 database in the new 2009 database.
- Import the file called
Upgrade Step 1 Objects. - Run the data conversion process for the objects of the old version.
- Create a new Microsoft Dynamics NAV 2013 database.
- Restore the database that was being upgraded.
- Import all the customized Microsoft Dynamics NAV 2013 objects.
- Import the file called
Upgrade Step 2 objects. - Run the data conversion process for the objects of the new version.
- Delete the upgrade toolkit objects.
To upgrade to Dynamics NAV 2013 from any Microsoft Business Solutions–Navision 4.0 version, you will have to upgrade first to NAV 2009, and then follow the steps to upgrade to Dynamics NAV 2013.
Even when having to upgrade to Dynamics NAV 2009 first, a full upgrade to the intermediate version will not be necessary. For example, you will not need to upgrade your application code to the intermediate version. The application code can be upgraded directly to Microsoft Dynamics NAV 2013.
You will, however, need to do a data upgrade though, from Microsoft Business Solutions–Navision 4.0 to Dynamics NAV 2009. To do so, an application code upgrade from 4.0 to 2009 will be needed. It will not be a complete code upgrade, however. Only the application code corresponding to the definition of all the tables' structures will have to be upgraded. This will be explained in detail in the upgrade steps in detail.
The steps that have to be performed to upgrade the application code from Microsoft Business Solutions–Navision 4.0 to Dynamics NAV 2013 are listed as follows:
- Import both your customized application code and the standard application code of your current version in a Microsoft Dynamics NAV 2009 database. Compile all the objects. Use those objects that are converted to Microsoft Dynamics NAV 2009 format for comparing and merging purposes.
- Get the objects' version (exporting them from the Microsoft Dynamics NAV 2009 database).
- Compare your database objects to the standard objects of your current version to determine the objects that have been customized.
- Carry out your customizations to the new standard code for the new version of Microsoft Dynamics NAV.
- Transform your own forms to pages.
- Carry out your customizations on the existing forms to their corresponding page objects.
- Transform your reports to the new report definition of Microsoft Dynamics NAV 2013.
- Revise and modify your customized code for better performance in Microsoft Dynamics NAV 2013.
- Compare your database table objects to the standard table objects of your current version to determine the changes in the data structure.
- Carry out your customizations to the table object's data structure. This will be similar to the standard table object's data structure of Microsoft Dynamics NAV 2009.
Data and field structure has changed between Microsoft Business Solutions–Navision 4.0 and Microsoft Dynamics NAV 2013. That's why a data upgrade process has to be run. However, the data upgrade tool available is only to upgrade from NAV 2009 to NAV 2013. Data and field structure also changed between Microsoft Business Solutions–Navision 4.0 and Microsoft Dynamics NAV 2009. We will first have to upgrade our data to Dynamics NAV 2009 data and field structure, and then we will be able to finish the upgrade process to Microsoft Dynamics NAV 2013.
The data upgrade from NAV 4.0 to NAV 2009 is very similar to the one described for NAV 2009 to NAV 2013. The steps are exactly the same, but the upgrade objects will be different. The data conversion process can be seen in the following figure:
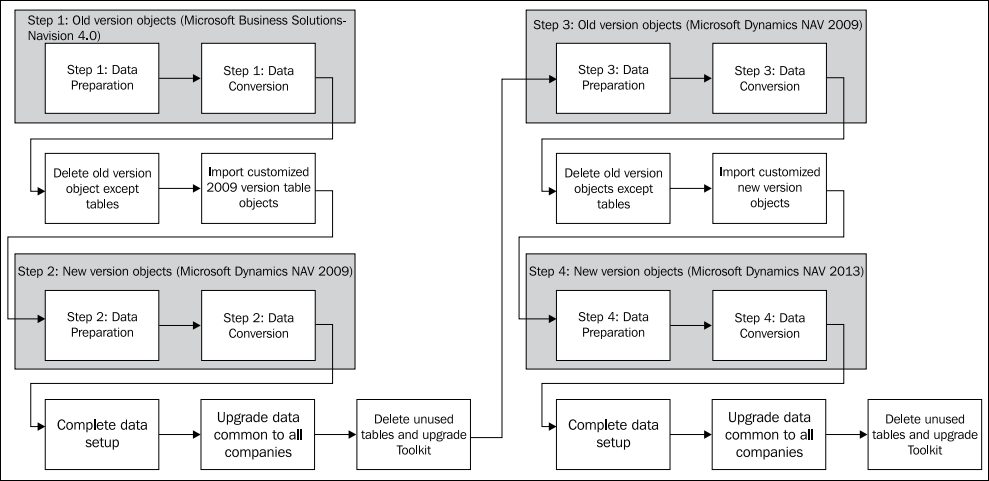
The steps required to upgrade the data are listed as follows:
- In your old customized database, import the file called
Upgrade Step 1 objectsfrom the upgrade toolkit found in the Microsoft Dynamics NAV 2009 installation media. - Run the data conversion process for the objects of the old version (Microsoft Business Solutions–Navision 4.0).
- Create a new Microsoft Dynamics NAV 2009 database.
- Restore the database that was being upgraded.
- Import the customized Microsoft Dynamics NAV 2009 table objects.
- Import the file called
Upgrade Step 2 objectsfrom the upgrade toolkit found in the Microsoft Dynamics NAV 2009 installation media. - Run the data conversion process for the objects of the new version (Microsoft Dynamics NAV 2009).
- Delete the upgrade toolkit objects.
At this point, the data upgrade from Microsoft Business Solutions–Navision 4.0 to Microsoft Dynamics NAV 2009 has been completed. From now on, the data upgrade to Microsoft Dynamics NAV 2013 will have to be done.
- In the Microsoft Dynamics NAV 2009 database, import the file called
Upgrade Step 1 objects. - Run the data conversion process for the objects of the old version (Microsoft Dynamics NAV 2009).
- Create a new Microsoft Dynamics NAV 2013 database.
- Restore the database that was being upgraded.
- Import all the customized Microsoft Dynamics NAV 2013 objects.
- Import the file called
Upgrade Step 2 objects. - Run the data conversion process for the objects of the new version (Microsoft Dynamics NAV 2013).
- Delete the upgrade toolkit objects.
To upgrade to Microsoft Dynamics NAV 2013 from any Navision Attain 3.xx version, you will have to upgrade first to Microsoft Dynamics NAV 2009 and then follow the upgrade steps to upgrade to Microsoft Dynamics NAV 2013.
Even when having to upgrade to Dynamics NAV 2009 first, a full upgrade to the intermediate versions will not be necessary. For example, you will not need to upgrade your application code to the intermediate versions. The application code can be upgraded directly to Microsoft Dynamics NAV 2013.
You will, however, need to do a data upgrade though, from Navision Attain 3.xx to Microsoft Dynamics NAV 2009. To do so, an application code upgrade from 3.xx to 2009 will be needed. It will not be a complete code upgrade, however. Only the application code corresponding to the definition of all the tables' structures will have to be upgraded. This will be explained in detail in the upgrade steps in detail.
The steps that have to be performed to upgrade the application code from Navision Attain 3.60 or 3.70 to Dynamics NAV 2013 are listed as follows:
- Import both your customized application code and the standard application code of your current version in a Microsoft Dynamics NAV 2009 database. Compile all the objects. Use those objects that are converted to Microsoft Dynamics NAV 2009 format for comparing and merging purposes.
- Get the objects' version (exporting them from the Microsoft Dynamics NAV 2009 database).
- Compare your database objects to the standard objects of your current version to determine the objects that have been customized.
- Carry out your customizations to the new standard code for the new version of Microsoft Dynamics NAV.
- Transform your own forms to pages.
- Carry out your customizations on the existing forms to their corresponding page objects.
- Revise and modify your customized code for better performance in Microsoft Dynamics NAV 2013.
- Compare your database table objects to the standard table objects of your current version to determine the changes in the data structure.
- Carry out your customizations in the table objects data structure to the standard table object data structure of Microsoft Dynamics NAV 2009.
The data and field structure has changed between Navision Attain 3.xx and Microsoft Dynamics NAV 2013. That's why a data upgrade process has to be run. However, the data upgrade tool available is only to upgrade from NAV 2009 to NAV 2013. The data and field structure also changed between Navision Attain 3.xx and Microsoft Dynamics NAV 2009. We will first have to upgrade our data to a Microsoft Dynamics NAV 2009 data and field structure, and then we will be able to finish the upgrade process to Microsoft Dynamics NAV 2013.
The data upgrade from NAV 3.xx to NAV 2009 is very similar to the one described for NAV 2009 to NAV 2013. The steps are exactly the same, but the upgrade objects will be different. The data conversion process can be seen in the following figure:
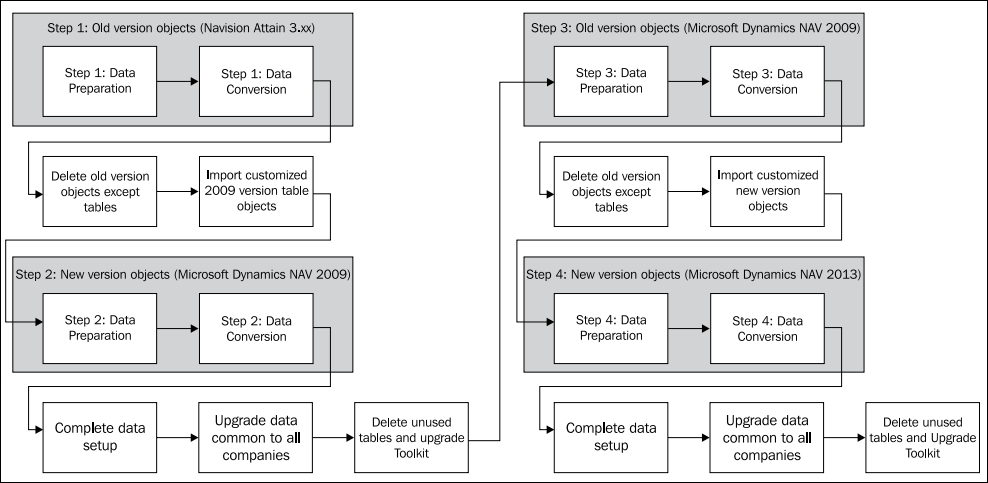
The steps required to upgrade the data are listed as follows:
- In your old customized database, import the file called
Upgrade Step 1 objectsfrom the upgrade toolkit found in the Microsoft Dynamics NAV 2009 installation media. - Run the data conversion process for the objects of the old version (Navision Attain 3.xx).
- Create a new Microsoft Dynamics NAV 2009 database.
- Restore the database that was being upgraded.
- Import the customized Microsoft Dynamics NAV 2009 table objects.
- Import the file called
Upgrade Step 2 objectsfrom the upgrade toolkit found in the Microsoft Dynamics NAV 2009 installation media. - Run the data conversion process for the objects of the new version (Microsoft Dynamics NAV 2009).
- Delete the upgrade toolkit objects.
At this point, the data upgrade from Navision Attain 3.xx to Microsoft Dynamics NAV 2009 has been completed. From now on, the data upgrade to Microsoft Dynamics NAV 2013 will have to be done.
- In the Microsoft Dynamics NAV 2009 database, import the file called
Upgrade Step 1 Objects. - Run the data conversion process for the objects of the old version (Microsoft Dynamics NAV 2009).
- Create a new Microsoft Dynamics NAV 2013 database.
- Restore the database that was being upgraded.
- Import all the customized Microsoft Dynamics NAV 2013 objects.
- Import the file called
Upgrade Step 2 objects. - Run the data conversion for the objects of the new version (Microsoft Dynamics NAV 2013).
- Delete the upgrade toolkit objects.