
There are several tools that help us in the upgrading process. Some of them must be used at some point of the upgrade process (such as the text format upgrade tool). Some others can be used to help us in the upgrade process, but are not mandatory (such as MergeTool). In this section, we will explain them all.
The upgrade toolkit is included in the Microsoft Dynamics NAV 2013 installation media.
For the W1 version of Microsoft Dynamics NAV 2013, the upgrade toolkit only includes two folders: Data Conversion Tools and Object Change Tools. For country versions, it also includes an extra folder: Local Objects.
In both the Data Conversion Tools and Local Objects folders, there are two .fob files that have to be used in the data upgrade process. If you are upgrading an old W1 version database, the objects found in Data Conversion Tools should be used. If you are upgrading any old localized version database, use the objects under the Local Objects folder instead.
In the Upgrading the data section, outlining the different versions of Microsoft Dynamics NAV, we have explained at what point these objects have to be imported and used.
In the Object Change Tools folder, there is a .exe file that helps us transform our new customized objects that have a Dynamics NAV 2009 object definition into objects with a Dynamics NAV 2013 object definition.
As part of the upgrade toolkit, there is a folder called Object Change Tools, which contains a tool called TextFormatUpgrade2013. This tool has to be used during the application code upgrade process.
There are several object properties, parts, triggers, text in code, and so on, that are no longer available in Microsoft Dynamics NAV 2013. Some of them have been replaced by other properties, parts, or triggers. Some of them have just been removed.
As part of the code upgrade to Dynamics NAV 2013, we have to get rid of all the old stuff and get a clean object for the new application version.
The text format upgrade tool does the following:
- Replaces the
LookupFormIDtable and page property withLookupPageID - Replaces the
DrillDownFormIDtable property withDrillDownPageID - Replaces the text form with the text page on the value of former table properties
LookupFormIDandDrillDownFormID - Replaces code
FORM.RUN(FORM::andFORM.RUNMODAL(FORM::withPAGE.RUN(PAGE::andPAGE.RUNMODAL(PAGE:: - Replaces all form variables declared in the application code with a page variable, taking the same variable ID and name
- Deletes the whole definition of the request form in reports
- Replaces the
UseRequestFormXMLport property withUseRequestPage - Replaces the value form with the value page in the
MenuSuiteproperty,RunObjectType - Replaces the
RunFormLinkpage property withRunPageLink - Replaces the
CardFormIDpage property withCardPageID - Replaces the
RunFormViewpage property withRunPageView - Replaces the
SubFormLinkpage property withSubPageLink - Replaces the
RunFormModepage property withRunPageMode
We may have skipped some individual replacements, but we are pretty sure you got the idea. Actually, to summarize, what the tool does is the following:
- Replaces all references to the former form object with the page object in the following:
- Object properties
- Application code
- Deletes the definition of request form in reports
So now, how do we use this tool? Well, it is a command-line tool that can just take one parameter, so it's pretty easy to use! Just follow these steps:
- Open the Microsoft Dynamics NAV 2009 database.
- Select all the objects except forms and dataports.
- Export them in the
.txtformat. - Open the command-line interface.
- Execute the following command:
TextFormatUpgrade2013.exe <PathToTheTxtFileOrFolder>
- Which can, for instance, be:
TextFormatUpgrade2013.exe C:ImplementingDynamicsNAV2013OldCustom.txt
- Or just:
TextFormatUpgrade2013.exe C:ImplementingDynamicsNAV2013
- In this second case, we have just specified the folder containing the different
.txtDynamics NAV files (OldBase.txtandOldCustom.txt) and the tool will convert all the text files inside the folder during the same execution.
- Which can, for instance, be:
- The tool will start its execution. Wait for the process to finish.
- The result of the execution of the tool will be a text file with the same name as the original text file, but it will be stored in a directory called
Convertedinside the directory where the original file was. - You can now use these new text files for merging purposes by following the instructions explained in the previous sections. If you use the old text files instead, any comparison to the new standard application code of Microsoft Dynamics NAV 2013 will result in hundreds or thousands of modifications, purely because of object property changes, even if the object has not changed between the two versions. Using these new files instead, will let us just compare real object modifications.
For those who upgrade to Microsoft Dynamics NAV 2013 from Microsoft Dynamics NAV 5.0 or previous versions, or from Microsoft Dynamics NAV 2009 in a classic environment, you have to know that your form objects have to be transformed to pages. Customizations done in the standard form objects have to be carried out to the corresponding standard page object and new custom form objects have to be fully transformed to new custom page objects.
This process is not new for Microsoft Dynamics NAV 2013. It was already a requisite if you wanted to upgrade to Microsoft Dynamics NAV 2009 in an RTC environment.
There was a form-transformation tool available with Microsoft Dynamics NAV 2009. You will find the tool in the Microsoft Dynamics NAV 2009 installation media, in a folder called TransformationTool.
There is no form-transformation tool shipped with Microsoft Dynamics NAV 2013. So, if you have to transform forms into pages, you will have to use the tool shipped with the 2009 version.
We will not explain how to use this tool in this book. If you have never used the tool and want to learn how to use it, you can consult the online help available at http://msdn.microsoft.com/en-us/library/dd338789.aspx.
With Microsoft Dynamics NAV 2009, a new way of reporting was introduced: Reporting Definition Language Client-side (RDLC). The old way of reporting, the classic way, was kept for compatibility reasons to use it with the classic client. That is, in Microsoft Dynamics NAV 5.0 and previous versions, only classic reporting was available; in Microsoft Dynamics NAV 2009, hybrid reporting was available (reporting in classic and RDLC at the same time); and now, in Microsoft Dynamics NAV 2013, only RDLC reporting is available.
For RDLC in Microsoft Dynamics NAV 2009, classic sections were the base to construct the layout of the report, and Report Viewer 2008 was used. In Microsoft Dynamics NAV 2013, the base of the RDLC layout is not the classic report structure anymore (because it has disappeared). The new report structure is the report dataset. Along with that, RDLC 2005 (the RDLC version used in Microsoft Dynamics NAV 2009) has been upgraded to RDLC 2008, and the report viewer used is the 2010 version.
All of this means that the old reports done in the previous versions of Microsoft Dynamics NAV 2013 will not run anymore in the new version. They have to be converted to the new report format and structure.
The method of upgrading reports to Microsoft Dynamics NAV 2013 differs for hybrid reports (those that have both a native Dynamics NAV and a RDLC definition) and classic reports (those that only have a native Dynamics NAV definition).
The steps required to upgrade a hybrid report to Microsoft Dynamics NAV 2013 are the following:
- Export the hybrid report in
.txtformat from the Microsoft Dynamics NAV 2009 database. - Use the text format upgrade tool described earlier in this section to transform its definition to a Microsoft Dynamics NAV 2013 format.
- Import them in the Microsoft Dynamics NAV 2013 database.
- Compile the imported reports. The reports must be compiled in order to finish the report transformation. If there is any report that does not compile because it refers to tables, fields, or any structure that does not exist in Dynamics NAV 2013 anymore, make the report compile by redefining it.
- In the Microsoft Dynamics NAV 2013 Development Environment, go to Tools | Upgrade Report.
When the Upgrade Report tool is run, the report data is upgraded to a valid Microsoft Dynamics NAV 2013 dataset definition and the layout is upgraded to RLDC 2008.
- Save and compile the report.
The steps required to upgrade a classic report to Microsoft Dynamics NAV 2013 are the following:
- Export the classic report in
.txtformat from the Microsoft Dynamics NAV 2009 database. - Use the text format upgrade tool described earlier in this section to transform its definition to a Microsoft Dynamics NAV 2013 format.
- Import them in the Microsoft Dynamics NAV 2013 database.
- Compile the imported reports. The reports must be compiled in order to finish the report transformation. If there is any report that does not compile because it refers to tables, fields, or any structure that does not exist anymore in Dynamics NAV 2013, make the report compile by redefining it.
- In the Microsoft Dynamics NAV 2013 Development Environment, go to Tools | Upgrade Report.
- When the upgrade report tool is run, the report data is upgraded to a valid Microsoft Dynamics NAV 2013 dataset definition, the request form is deleted, and the RDLC 2008 layout is generated by using the layout suggestion tool.
- Manually adjust the RDLC layout in Visual Studio.
- Manually create a request page if needed, or use the form-transformation tool to transform the former request form into a request page.
- Save and compile the report.
To upgrade your application code to a new version of Microsoft Dynamics NAV, you have to compare your customized application code with the old original standard application code to determine which customizations have been made and where they have been made.
A second comparison has to be done, between the old original standard application code and the new original standard application code to determine what differences exist between these two versions, so that we can decide whether the old customized objects can still be used (if the original object hasn't changed) or if the customization has to be manually carried out to the new version of Dynamics NAV.
There are several generic compare text tools that you can use for this purpose. A web search will present you with several tools that you can use. We will not explain any of these tools here. We just want to point out that you can use any of them for application code upgrade purposes.
MergeTool is a third-party application that can be used for free by Microsoft partners. This application is developed inside Microsoft Dynamics NAV. Using this application to help you out in your application code upgrade will probably save you a lot of time in analyzing text, as it will let you concentrate only on the real customizations.
When using any generic text compare tool, you have to deal not only with customizations but also with object structure changes that may exist between a Microsoft Dynamics NAV version and its preceding versions. Dealing with object structure changes is useless.
MergeTool can be downloaded from www.mergetool.com. In the download section of the web page, you will find a ZIP or RAR file containing all the objects of the application. Download it onto your hard disk and unzip the file.
The version of MergeTool at the time of writing was MGT1.30.37. This version contains four .fob files that can be imported into Microsoft Dynamics NAV 2013, two help files, one Microsoft Visio file, and one readme file.
The steps to install MergeTool are as follows:
- Create a new Dynamics NAV 2013 database.
- Open the Development Environment for the new database.
- Open the Object Designer page by navigating to Tools | Object Designer or by pressing Shift + F12.
- Navigate to File | Import.
- Select the
MGT1.30.37 NAV7 B33451.fobfile. - A message will be prompted saying that all the objects have been examined and no conflicts were found. Choose Yes to import all the objects.
The steps to install the help files for MergeTool are as follows:
- Copy the file
addin_e.hhto the folderC:Program FilesMicrosoft Dynamics NAV70ServiceENUin the server where Microsoft Dynamics NAV 2013 services are installed. - Copy the file
addin_e.chmto the folderC:Program FilesMicrosoft Dynamics NAV70RoleTailored Clienten-USin all the PCs where the Microsoft Dynamics NAV 2013 client is installed. - Restart the Microsoft Dynamics NAV 2013 service.
- Restart the Microsoft Dynamics NAV 2013 client.
MergeTool allows us to compare our customized application code with the old standard application code and merge the customizations to the new standard application code, creating a new customized application code.
Follow the steps explained in the upgrade steps in detail.
- Get the object's version to get the files
OldBase.txt,OldCustom.txt, andNewBase.txt. - Open your Microsoft Dynamics NAV MergeTool database.
- Open the MergeTool menu by navigating to Departments | MergeTool.
- In this menu, you will find everything that can be done with MergeTool.
- We will start by importing the old base version of our current Microsoft Dynamics NAV database. That is, the
OldBase.txtfile.
To import the old base version, follow these steps:
- Click on Versions.
- Click on the Import Object Text File process option that appears on the ribbon bar.
- Select the
OldBase.txtfile, give this version a name in the Version field, and put a checkmark on Navision Version. - Click on OK.
- The text file will be imported.
- In the example we are using, the old version is a Microsoft Dynamics NAV 2009 R2 database. This version has 4,232 different objects (excluding forms and dataports), which get reflected in the version list of MergeTool once the file is completely imported.
We will now import our old customized database, that is, the OldCustom.txt file:
- Click on the Import Object Text File process option that appears on the ribbon bar.
- Select the
OldCustom.txtfile, give this version a name in the Version field, select OLDBASE in the Based on Navision Version Code field and also in the Compare Old Version field, and select Delete Equal Objects. - Click on OK.
- The text file will be imported.
When importing the old custom version, we have selected a version in the Based on Navision Version Code and Compare Old Version fields and have also selected Delete Equal Objects because this will allow us to concentrate only on the customizations done on the base code.
By selecting Based on Navision Version Code, the import process will skip those objects in our custom version that do not exist in the base version. The objects that exist in a custom version but do not exist in its base version are objects that have been created for the customization. You don't need to compare them to anything; you will just import those in the new custom database. That's why we skip them.
By selecting Compare Old Version and Delete Equal Objects, the import process will first compare the custom objects against those in the base version and, if they have not changed at all, will skip them. As we saw in the first import process, a Microsoft Dynamics NAV database has thousands of objects. In a customization, probably not all of them have been customized. Probably only a few dozens or even some hundreds of objects have been modified, but all 7,000 objects are not customized. We want to skip objects that have not been modified because we want to concentrate only on those that have actually been modified.
Once the old custom version has been imported, compared against the old base version, and equal objects have been deleted, our old custom version has only 927 objects. Only 927! We don't need to go through all 4,232 objects for the application code upgrade. We only need to concentrate on those 927 that have actually been modified. That's great! That will save us a lot of time!
But we can further reduce these 927 objects by a little. How is that? Well, sometimes it happens that you open an object in the design mode through the Object Designer page because you want to check something. You finally leave the object without modifying anything at all, but the editor asks you whether you want to save the changes made to the object or not. If you say yes, the object properties such as Date and Time will be modified. Since there is something that has changed, even if it's just those object properties, MergeTool determines that you will have to compare and merge those objects. Wouldn't it be great to be able to delete those objects from comparison so that only real modifications have to be compared and merged?
This is possible with MergeTool. That's cool, right?
Let's see how to delete objects that have only object property changes (date, time, and version list):
- Navigate to Departments | MergeTool | Versions.
- Click on the Navigate tab that can be found on the ribbon bar.
- Click on Find Object Properties Changes.
- The Find Object Properties Changes process will open.
- Select the version OLDCUSTOM in the Version field.
- Select Delete Objects.
- If we go back to the Versions list, only 914 objects are on the OLDCUSTOM version now. That means that 13 objects had only object properties changes and have been removed. Great! As we go on, we will be saving more and more time. Now we will only have to concentrate on 914 objects!
Now it is time to import the new base version, that is, the NewBase.txt file.
- Click on the Import Object Text File process option that appears on the ribbon bar.
- Select the
NewBase.txtfile, give this version a name in the Version field, place a checkmark on Navision Version, and select OLDCUSTOM in the Must Exist in Version field. - Click on OK.
- The text file will be imported.
- When importing the new base version, we have selected a version in the Must Exist in Version field because this will allow us to concentrate only on the customizations done on the base code. In previous steps we saw that only 914 objects were really modified or new in the custom application code used in that example. For the new version, we only want to import these 914 objects. Microsoft Dynamics NAV 2013 has 4,053 objects. But we only want to focus on the 914 that were modified or are new in our custom version. For the rest of the objects, we will use the standard objects of Microsoft Dynamics NAV 2013. By selecting the OLDCUSTOM version in the Must Exist in Version field, we are telling MergeTool that we only want to import the new object of the new version if it was an object modified in our custom version.
- Only 182 objects are shown in the new base version. This means that 732 objects that were modified in the old custom version do not exist anymore in Microsoft Dynamics NAV 2013 or they were new customized objects.
- The main thing is that now we have just a few objects to concentrate on. Our customizations on those objects will have to be carried out to the new application code version.
- To do so, the first thing we need to know is if the standard code for these 182 objects has been modified at all. If there are no modifications in the standard code, carrying out our customizations will be easy. If there are modifications in the standard code, we will have to take a closer look to see how to carry out our customizations to the new objects.
Let's first compare the old base and new base versions:
- On the ribbon bar, click on Compare Objects.
- Select OLDBASE in the Old Version field.
- Select NEWBASE in the New Version field.
- Click on OK.
- The compare process will start.
- A message saying that the versions have been compared will appear once the compare process has finished.
- Click on OK.
Take a new look at the Versions list. Contrast fields have been updated. A contrast is a group of code lines that have some differences (change in code, added code, or deleted code) respective to the two versions. MergeTool does not treat modifications on a line-by-line basis. It actually treats modifications as groups of line codes.
Imagine that the modification in an object consists of creating a new function with hundreds of code lines and a call to that function from within the same object. There aren't hundreds of modifications for the hundreds of code lines added. There are only two modifications: added code for the definition of the function and added code for the call to that function. It's easier to deal with two modifications than with hundreds of modifications. And that's what MergeTool does.
MergeTool groups contrasts in Contrast Headers. There is one contrast header per object in the new base version. Each contrast header may have several contrasts inside.
NEWBASE was compared against OLDBASE and it tells us that there are 182 contrasts:
- Equal Contrast Headers – 9: These contrasts correspond to 9 whole objects out of the 182 new base version's contrasts that have not changed at all.
- Changed Contrast Headers – 168: These contrasts correspond to 168 objects that have changed.
- New or Added Contrast Headers – 5: These contrasts correspond to 5 objects that are new in NEWBASE (they did not exist in OLDBASE). Even if they did not exist in OLDBASE, they did actually exist in OLDCUSTOM. Otherwise they would not be on NEWBASE, because of the import options we have selected. Standard objects that were not in OLDBASE but were in OLDCUSTOM, now remain the same in NEWBASE. This may seem weird, but it's not. They probably correspond to hot fixes or new functionalities released by Microsoft that we have applied to our customized version of Microsoft Dynamics NAV and that were not part of the original standard code for our old version of the application.
We can navigate to the contrast to analyze the differences. To do so, click on the type of contrast you want to analyze (for all, click on the Contrast Headers field; for equal contrasts, click on the Equal Contrast Headers fields; for changed contrasts, click on the Changed Contrast Headers field; for new contrasts, click on the New Contrast Headers field) and the list of contrasts will be shown. Select then the specific contrast you want to analyze and click on Lines (log), which can be found on the ribbon bar.
We can see what a contrast looks like. The code lines in green remain the same in both the versions (Line Status is Equal). The code lines in red tell us what the code was in the old version (Line Status is Before). The code lines in orange tell us what the code is in the new version (Line Status is After).
In the example, a line of code has been replaced by three lines of code. The three lines of code are involved in the change but there is only one change—a local variable has been defined for an action in Page 143 Posted Sales Invoices.
In the Contrast Headers list, we can see how many groups of changes exist between the two versions. In the example, we have 182 contrast headers (objects) with a total of 4,018 groups of changes: 330 changes in properties groups, 2,368 changed groups, 893 inserted groups, and 427 deleted groups.
We definitely do not want to deal with all 4,018 groups of changes by manually looking at all the differences in code. We want MergeTool to deal with them automatically and just let us decide on those that cannot be merged automatically by the application. That's what we are going to do in the last part of this section.
We will go back to the version list page of MergeTool and we will follow these steps:
- Click on the Merge Version action that can be found on the ribbon bar.
- Select OLDBASE in the Old Base field.
- Select NEWBASE in the New Base field.
- Select OLDCUSTOM in the Custom Version field.
- Write NEWCUSTOM in the New Custom Version field.
- Give this new version a description in the New Custom Version Description field.
- Put a checkmark in the Skip if Manual Merge field. We select this option because on the first merge we want MergeTool to automatically merge everything that can be merged without our intervention. In the second run, we will uncheck this option to deal with those changes that MergeTool cannot automatically deal with.
- Leave the rest of the options to their default value.
- Click on OK.
- The merge process will start.
- When the merge process is completed, a message will appear saying that the
NEWCUSTOMversion has been created and the number of objects that require manual merging. - Click on OK.
- If we go back to the MergeTool version list, we will see that a new version, NEWCUSTOM, has been created with a few objects—the ones that were completely merged automatically.
- We will now do a second run of the merge process, unselecting the Skip if Manual Merge field. Once the merge process starts again, the process will prompt a page with all the versions (the old base code, the old custom code, the new base code, and the new merged custom code) when a manual merge is required. After MergeTool merges the changes to the new merged custom code, we have to decide if we accept the merge or if we want to do any extra modification. Let's see an example of this.
The first subpage corresponds to the old base code. Earlier, we had the assignation of a value to a field, then a record was inserted into the database, and finally the call to a function to store document dimensions.
The second subpage corresponds to the new base code. In the new application code, there is an extra code line between the assignation of a value to a field and the insertion into the database, and the call to a function to store document dimensions has disappeared.
The third subpage corresponds to the old custom base code. To see the whole customization, we will have to scroll through the subpage. The customization consists of a group of 11 code lines added between the assignation of a value to a field and the insertion of the record into the database.
The fourth subpage corresponds to the new custom code. There is a conflict. The custom code inserts the code lines in a specific place and the new code inserts different code lines in the same place. MergeTool cannot automatically merge this because the tool cannot decide if only the custom-added code lines have to be inserted, if only the new code lines have to be inserted, or if both the added code lines have to be inserted in the new custom version; and, in this case, in which order.
Let's take a better look at the fourth subpage, at the proposal made by MergeTool in the following screenshot:
As you can see, the merge proposal consists of using only the customized code. Even the old call to the StoreDocDim() function has been used in the custom-merged code. MergeTool has made this proposal because of the option Default Manual Merge Lines used in the merge options, which we left to its default value, Custom. That is, we have actually told MergeTool to use the custom version for the first proposal when merging lines manually.
In this particular example, we actually want both the groups of added lines (the ones coming from the old customization version and the ones coming from the new base version) to be added to the new customized version, and we want the call to the function to be deleted from the new customized version, as this function is no longer available in Microsoft Dynamics NAV 2013 because of the dimension functionality redesign.
The way to move the code lines from any version to the new customized version in MergeTool is through the New Line Number field that can be found in any of the subpages. If there is a number in the New Line Number field in any line code of the three first subpages, which correspond to the three code versions used for the merge process, that line will show up on the fourth subpage, in the new customized code. The number used in this field will determine the order in which the code lines will be shown in the fourth subpage.
In this particular example, we want to do the following:
- Delete the New Line Number field values on the third subpage (custom version) for lines 140 to 170. That is, we do not want the call to the
StoreDocDim()function to be in our new customized version. - Leave the proposed New Line Number field values as is, on the third subpage for lines 20 to 120. That is, we want our 11 customized code lines to be in our new customized version.
- Give a value of 15 to the New Line Number field on the second subpage (new version), to the second line:
SalesHeaderArchive.COPYLINKS(SalesHeader);
- To do so, we will use the functions found on the Actions tab of the ribbon bar.
- In the New Lines action, there are several functions to assign a value to the New Line Number field to code lines in the second subpage, the one corresponding to the new base version.
- In the Custom Lines action, we will find the same functions but they apply to the code lines in the third subpage, the one corresponding to the old custom version.
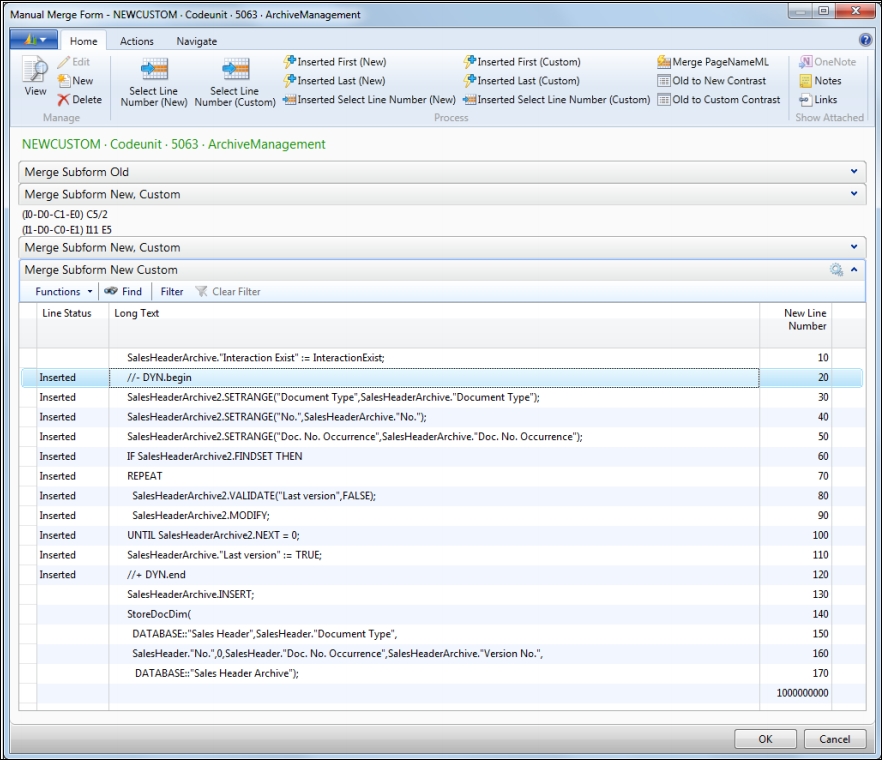
- The final result is the one that can be seen in the following screenshot:

- In the new custom version, we have our customized code and we have the code line added in the new version, and the call to the
StoreDocDim()function is not there anymore. - Once we are done, we will click OK and MergeTool will move on to the next merge conflict.
Once we are done with the whole merge process and we have a good new custom version, we can go back to the MergeTool versions list and export this version as a .txt file. To do so, there is an action in the Actions tab of the ribbon bar, called Export Object Text File. Select NEWCUSTOM as the version to export and select a destination folder and file name.
The last part of the merge process is to get a new database, with all the new objects, and import into that database the .txt file we have just exported with the customizations merged into the new code version. After importing the .txt file, we will have to compile all the objects and solve any additional issues that may exist.
And that's it! We have a brand new full application code with standard objects for all those objects that we have not modified in the old version and with the customizations carried out to this new version.
We still have to import into this new database the new objects created in our customization. To do so, we will first have to do the following:
- Transform form objects to pages
- Transform reports to the new RDLC definition