
Several actions will have to be performed to implement a functional change. All of them will have to be written down so that everyone is aware of what has to be done for the new functionality to work properly.
Let's examine the Requisition Worksheet implementation. The actions that have to be performed are as follows:
- Study the different reordering policies Microsoft Dynamics NAV offers.
- Determine which replenishment parameters apply to each reordering policy. Notice that some replenishment parameters are not editable when you select a specific reordering policy. This means that those parameters do not apply to the selected reordering policy.
- The Maximum Inventory field is non-editable when the Fixed Reorder Qty. reordering policy is selected.
- Establish which reordering policies will be used in every group of items. Different kinds of items will probably be the best fit in different reordering policies.
- Calculate the appropriate replenishment parameters for every item using statistical information of sales or any other information.
- Set the Vendor No. for every item.
- Set the Lead Time Calculation for every item.
- If the company manages different locations and replenishment parameters are different for every location, create stockkeeping units and inform the replenishment parameters in the stockkeeping unit card rather than on the item card.
- If the company uses item variants and replenishment parameters are different for every variant, create stockkeeping units and inform the replenishment parameters in the stockkeeping unit card rather than on the item card.
- If the company uses both different locations and item variants, create stockkeeping units per variant and per location.
That's a lot of clicks and some of them may require a lot of time and effort to complete. As you go on, you may find several other actions that have to be done. Write them all down so that nothing is forgotten. Consider using flow charts for a clearer picture of what has to be done and in which order, if the order matters.
If you have a reasonable amount of items, this project will not be difficult or time consuming.
If you have thousands of items, you may want a Dynamics NAV developer to help you out with some of the steps, especially in the calculation of the replenishment parameters. You could think of an algorithm to calculate and inform replenishment parameters in your items or stockkeeping units and ask a Dynamics NAV developer to develop it for you.
Imagine a company that has been using Microsoft Dynamics for a while. This company has never used the Fixed Assets functionality. Now they want to start managing their fixed assets with Dynamics NAV.
How many actions do you think will be needed to complete the project? Let's go through them:
- Get a list of the fixed assets. This may require that you perform a Fixed Asset Physical Inventory in your company.
- Check the existing FA posting groups. Modify the existing FA posting groups if they do not meet your accounting requirements, or create new ones if you need to. To do so, navigate to Departments/Financial Management/Administration and click on FA Posting Groups.
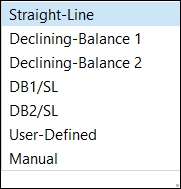
- Study the different depreciation methods Microsoft Dynamics NAV offers. The Depreciation Method field can be found on a fixed asset card; the options for this field are shown in the following screenshot:
- Choose the appropriate FA Posting Group for each fixed asset in your list.
- Choose the appropriate Depreciation Method for each fixed asset in your list.
- Determine Depreciation Starting Date and Depreciation Ending Date for each fixed asset in your list.
- Determine Acquisition Cost for each fixed asset in your list.
- Manually create all the fixed assets in Microsoft Dynamics NAV or choose a data migration tool and format to create fixed assets from an archive.
Note
You will find more information about data migration tools in Chapter 6, Migrating Master Data, Pending Entries, Pending Documents and Historical Data.
- Uncheck all G/L integrations of all depreciation books your company will be using. Fixed asset movements have to be posted with the acquisition cost and depreciation that your fixed assets have had prior to using the Microsoft Dynamics NAV Fixed Asset functionality. We do not want all of those movements to be posted to the General Ledger because they have probably already been posted to the General Ledger by posting manual transactions. That is why we want to uncheck all kinds of integrations between fixed assets and the General Ledger.
- Use the FA Journals to post an Acquisition Cost movement for each fixed asset. You can either create the lines in the FA Journal manually or use a data migration tool to create them from an archive.
- Use the FA Journal to post depreciation movements for each fixed asset. You can either create the lines in the FA Journal manually or use a data migration tool to create them from an archive.
- Make sure both acquisition costs and depreciation movements match with transactions previously posted to the General Ledger.
- Check the G/L integrations again of all the depreciation books your company will be using.
In this example, 13 actions had to be completed to implement this functional change. All the steps can be done by an end user using standard Dynamics NAV functionality.
If you have a reasonable amount of fixed assets, this project will not be difficult or time consuming.
If you have thousands of fixed assets, you may want a Dynamics NAV developer to help you out with some of the steps, especially in the creation of thousands of FA Journal lines to post acquisition costs and depreciations.
In this example, we are talking about turning on Item Tracking for existing items that have at least one Item Ledger Entry. This is a casuistry in which Dynamics NAV will not allow us to turn Item Tracking on.
In the previous section, we already talked about some of the steps that will have to be performed for this to be possible. We will follow the official workaround to implement this functional change, as we have seen that some other solutions can lead to data inconsistency, unpredictable behavior, or some other functionalities not working as expected.
Let's write down the list of actions we need to perform in order to turn on Item Tracking for existing items that have at least one Item Ledger Entry:
- Reduce the quantity in hand to zero by making negative adjustments of all items for which Item Tracking will be turned on.
- Rename all those items.
- Create new items and give them the name of the original items.
- Create and configure related data for the new items that include:
- Units of measure
- Sales prices
- Sales discounts
- Purchase prices
- Purchase discounts
- Vendors
- Item variants
- Extended texts
- Translations
- Cross references
- Stockkeeping units
- Bill of materials
- Substitutions
- Dimensions
- Customized related data
- Set up the Item Tracking Code for the new items.
- Do a physical inventory of those items, specifying quantities and their tracking (serial number, lot number, and expiration date).
- Increase the quantity in hand of the new items by making positive adjustments in which quantities and tracking will have to be specified.
- Review open documents and change the item number to point to the new item instead of the renamed one, so that the item that will be shipped, received, or manufactured is actually the new one and not the renamed one.
In this example, we are talking about a customized functionality in which Volume Discounts were calculated for each sales invoice line, according to a set of predefined rules, and stored as Volume Discount Ledger Entries.
The functionality had to be extended to allow users to apply those ledger entries to other Volume Discount Ledger Entries, so that they could know whether Volume Discount Ledger Entries were completely open, partially open, or closed.
In the Interactions with other functionalities section, we said that this extension actually had only interactions with the functionality itself, and we have already pointed out some of the actions that will have to be performed, such as creating Detailed Volume Discount Ledger Entries of the Initial Entry type for all existing Volume Discount Ledger Entries and doing a big initial application of Volume Discount Ledger Entries so that only real open Volume Discount Ledger Entries indicate so on their Open field.
The actions to be performed in this example are as follows:
- Develop the extended functionality as per requirements.
- Develop a process that will create Detailed Volume Discount Ledger Entries of the Initial Entry type for all existing Volume Discount Ledger Entries.
- Develop a process that will set the recently created Open field to Yes in the table Volume Discount Ledger Entry.
- Determine which existing Volume Discount Ledger Entries are actually open and what Remaining Amount they should have.
- Implement the development change.
- Execute the process that will create Detailed Volume Discount Ledger Entries of the type Initial Entry for all existing Volume Discount Ledger Entries.
- Execute the process that will set the recently created Open field to Yes in the table Volume Discount Ledger Entry.
- Use the new Volume Discount Application functionality to do a big initial application posting so that at the end of this process, only real open Volume Discount Ledger Entries are marked as open and they have the correct Remaining Amount.