After analyzing the standard functionality, if there needs to be custom development, it is important to develop the solution with the same structure that Dynamics NAV uses in its modules.
The users that are going to use the functionalities are users that are also going to use the standard parts of the application. To avoid confusing them, it is essential to use the same philosophy and the same structure everywhere. This way, once a user knows one part of the application, he/she can intuitively use the other modules.
This is something that will also help us; we do not have to reinvent the wheel every time. There is no need for us to consider how to structure our data on each development. Take the existing structure as your basis, and just grow its functionality to meet your needs. With this, we are not only making the developer's life easier, but also the life of others who will participate in the project, such as the consultant, the implementer, the trainer, and the person who will support the customer once they start to run with Dynamics NAV. To develop our own application, using the principles and structure of what already exists, it is important to know what already exists. This is what we will cover in the next section.
In Microsoft Dynamics NAV 2016, you can find seven basic object types. They are as follows:
|
Object |
Description |
|---|---|
|
|
This object is used to store data in the database. Most of the time it is within this object that data is validated or calculated so that it follows the business rules described in each application area. Understanding tables is the key to using all the other objects. |
|
|
This object is used to display data to the users. Pages allow the users to add records to a table, and to view and modify the records. Pages can also be exposed as web services so that the other applications can also read, insert, modify, or delete data, just like the users do. |
|
|
These objects are mostly used to summarize and print detailed information by using filters and sorting, selected by the users. On some occasions, reports are also used to batch process data. |
|
|
This object is used to export and import table data in XML format. |
|
|
This object is used to group code of a particular functional area. |
|
|
This object contains the menus that are displayed in the |
|
|
This object is used to specify a set of data from the Dynamics NAV database. |
Even if we talk about objects, it is important to note that Dynamics NAV is not object-oriented, but object-based. You have seven object types that you can use, but you cannot create new object types. This may seem limiting, but it also makes development work much easier.
Each object is created using a specific designer. For example, tables are created using Table Designer, pages are created with Page Designer, and so on.
To open the Development Environment, you have to install Dynamics NAV Development Environment. Open it and navigate to Tools | Object Designer (or press Shift + F12). The following window will open:

On the left-hand side, you will find a number of icons representing the different objects available. On the right-hand side, you will see a list of all the existing objects of the object type selected. In the previous screenshot, we can see a list of objects of the Table type.
All application objects are identified by an ID number. There are, however, restrictions about which numbers can be used while creating application objects. As a general rule, when you are developing for a customer, you use ID numbers between 50000 and 99999 when creating new objects, although you will have to check the exact IDs that can be used for a specific customer license. You will be allowed to modify the standard objects, but you cannot create them.
To modify an existing object, you must select it and then click on the Design button. This will open the object in its corresponding designer. In the following screenshot, we can see the Table 18 Customer - Table Designer window:
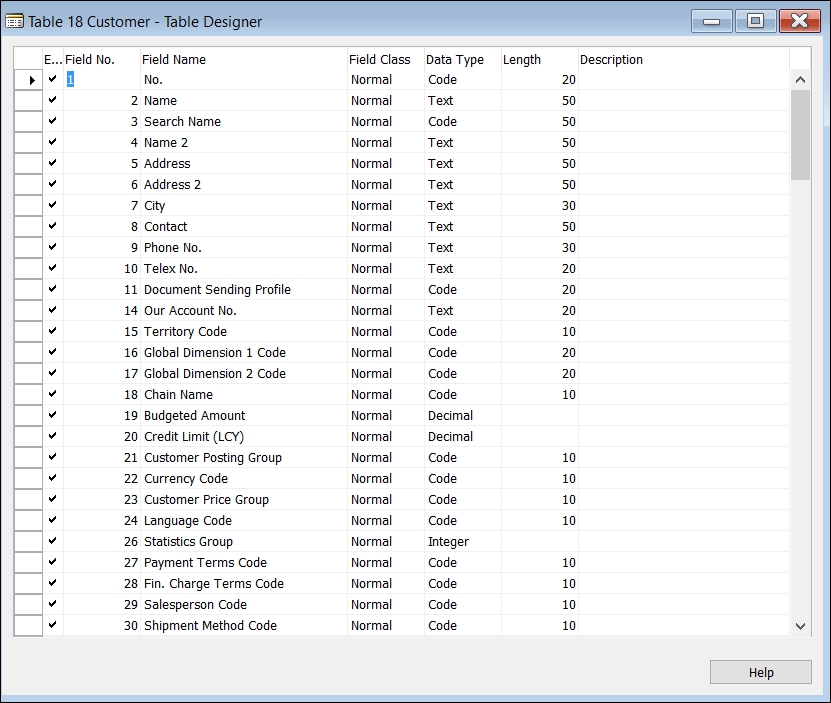
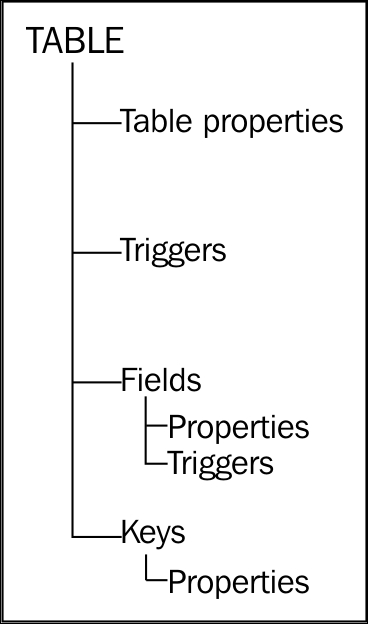
Each object has its own attributes. A table contains properties, triggers, fields, and keys, which are related to each other, as we can see in the following image:
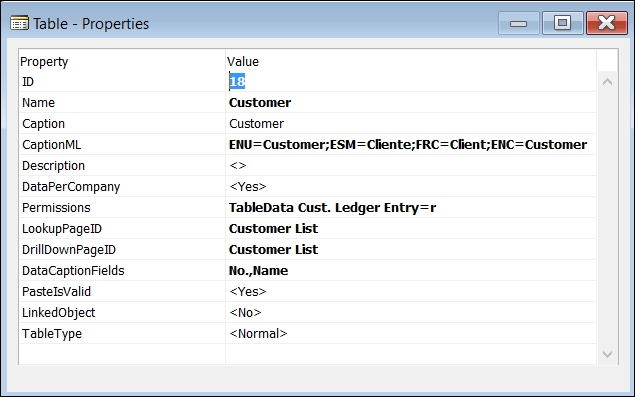
To access the table properties, scroll down from the Table Designer and put the cursor on an empty line at the bottom of the Table Designer. Then navigate to View | Properties, or click on the properties icon on the toolbar, or press Shift + F4. The Table - Properties window opens and shows the properties of the table. In the following screenshot, the developers can view and modify the properties for the Customer table:
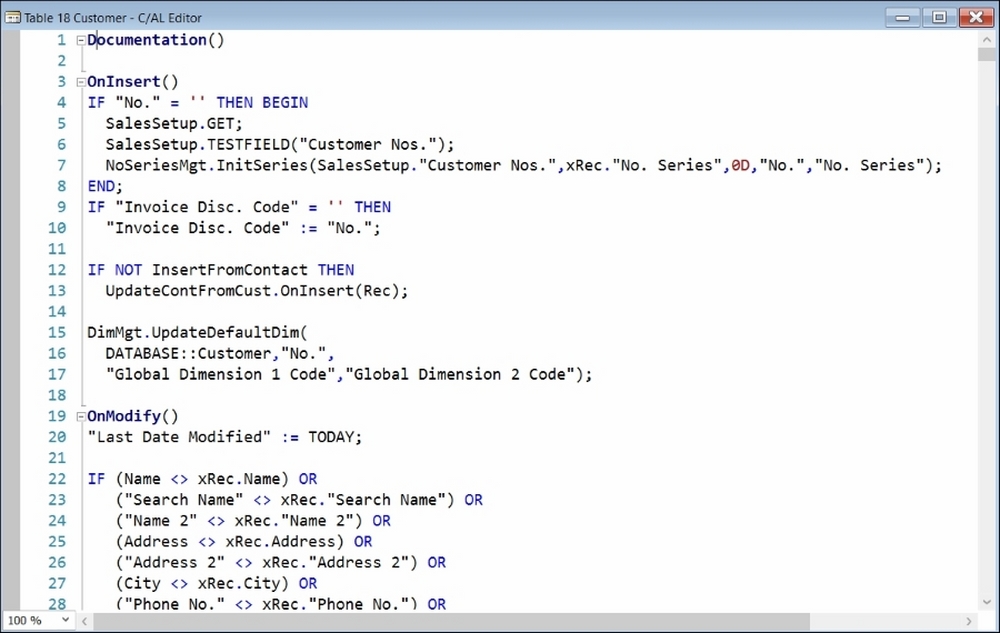
To access the triggers from the Table Designer, go to View | C/AL Code (or press F9). The following window will open, showing all the triggers of the table, including the field triggers:
Field properties can be accessed from the Table Designer. Put the cursor on the field you want to check and then navigate to View | Properties, or click on the properties icon on the toolbar, or press Shift + F4.
The Properties window for the selected field opens, as shown in the following screenshot:
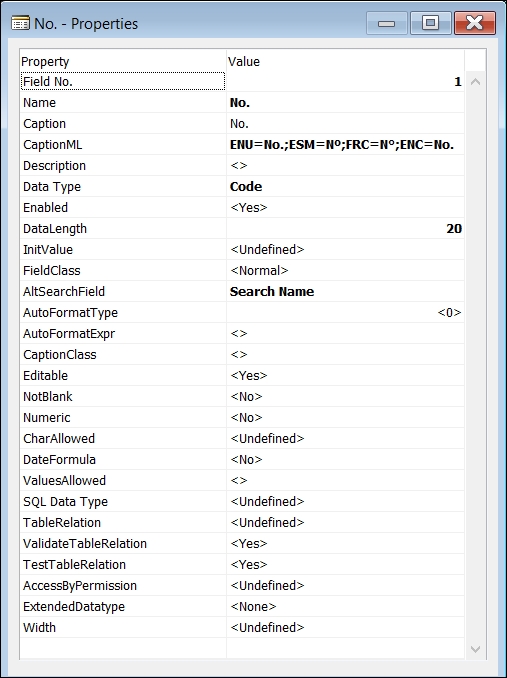
The properties that are changed from the default settings will be highlighted in bold. Keys can be accessed from the Table Designer by navigating to View | Keys, as shown in the following structure:
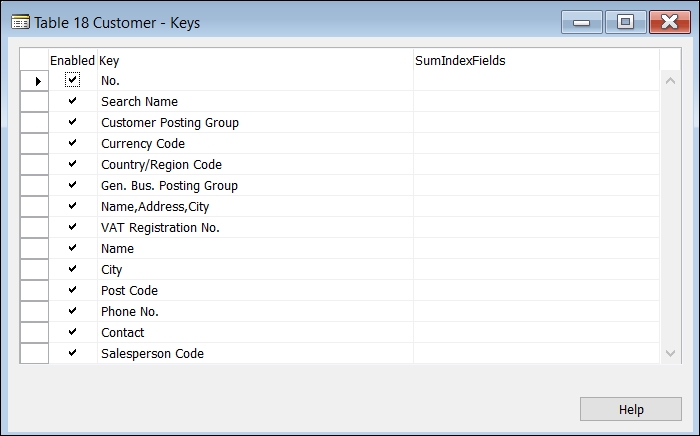
The properties of the keys can be accessed the same way you accessed the table properties or the field properties. Select the key you want to check, and navigate to View | Properties. Not all the objects have the same elements as the ones shown for the tables, but they have similar elements that can be accessed in a similar way.
Tables are the most fundamental objects among any databases. They store records that are collected through pages; for example, customers, sales, and inventories. These records are then presented to the users through pages and reports.
The table's structure is the base of the structure of the whole application. We have already covered the table structure in Chapter 3, Dynamics NAV – General Considerations, but we will go a bit deeper in this section. In the standard application, we find different kinds of tables that are used for different purposes:
- Master tables: We will find master tables in each area of the application; they are the ones that are used to store the more important information of each module. In the sales area, the most important table is the
Customertable; in the purchase area, it is theVendortable; and in the warehouse management module, theItemtable is the most important table. Therefore, they are called master tables. - Secondary or subsidiary tables: These are the tables that store secondary data, usually related to the master table, or that can be selected from a master table. An example of a secondary or subsidiary table is the
Customer Price Grouptable. This table contains the distinct price groups that are set up in theCompanytable. A value from this table can be selected and assigned to a customer from theCustomertable. - Setup tables: All the modules have their own setup table; different options can be selected to specify how the module is going to work.
- Document tables: We always find the document tables in pairs, because a document always has a
Headertable and aLinestable. Orders, shipments, or invoices are all examples of documents. The documents can also be divided between live documents and posted documents. The posted documents are stored in different tables that cannot be edited, but can be deleted. - Entry tables: Entry tables are used to keep track of all the transactions related to a master table. On the
Customer ledger Entrytable, for instance, we can find an entry for each invoice, credit memo, or payments for a single customer. - Register tables: Register tables are used to keep track of entries created on the same posting process. For instance, the posting of a single sales invoice creates different G/L entries (an entry in the customer account, another in the sales account, another in the VAT account, and so on). All these entries are grouped in the
G/L Registertable as they all belong to the same posting process, the posting of a specific sales invoice. - Journal tables: These are the tables that the posting process uses to create entries. It is the system that introduces data as a previous step on the journal tables while posting a document. The user can also manually introduce data on a journal table if he wants to post a transaction without a document. We can find many processes that create data on journal tables but don't post them. The user is responsible for checking that data and finally posting it. That's what the calculate depreciation process does. For each fixed asset, it calculates the corresponding depreciation, and creates a line that reflects those calculations. The user has to go to the journal, review the lines, and post them.
The best way to understand a concept is to see it in practice. This is why we are going to analyze the structure of the tables in a particular area, the warehouse management area.
The master table of the warehouse management area is the Item table. It holds the main data in this area and everything else relates to it. Usually, the primary key of a master table is a field named No.. Typically, a series number is used to assign a new No.value each time a new item is created. The field No. gets replicated on different tables to refer to a specific item.
In the item card, you will find fields that can be filled by selecting data from a secondary table, such as the Base Unit of
Measure field that can be filled by selecting data from the Item Unit of Measure table. For each item, you can indicate its sales price on the Sales Price table, which is also a secondary table.

Any table (it doesn't matter if it's a master table, a secondary table, a setup table, or any other kind of table) can be used in the other application areas. The Sales Price table, which we've seen, is also a secondary table of the sales area.
In the preceding example, we've only seen a couple of secondary tables related to the Item master table. We'll find many other secondary tables, such as the Item Category table, the Product
Group table, the Tariff Number table, the Item Tracking Code table, and the Item Variant table, just to give a few examples.
The setup table of the warehouse management area is called the Inventory Setup table. The number series used to code the items can be set up on this table. In addition, other information such as whether we want the item cost to get automatically posted to the general ledger or not is controlled through here. Other setup tables also affect how the warehouse management area works. For instance, in the General Ledger Setup table, you can indicate the rounding precision of the unit prices of the items in the Unit-Amount Rounding Precision field.
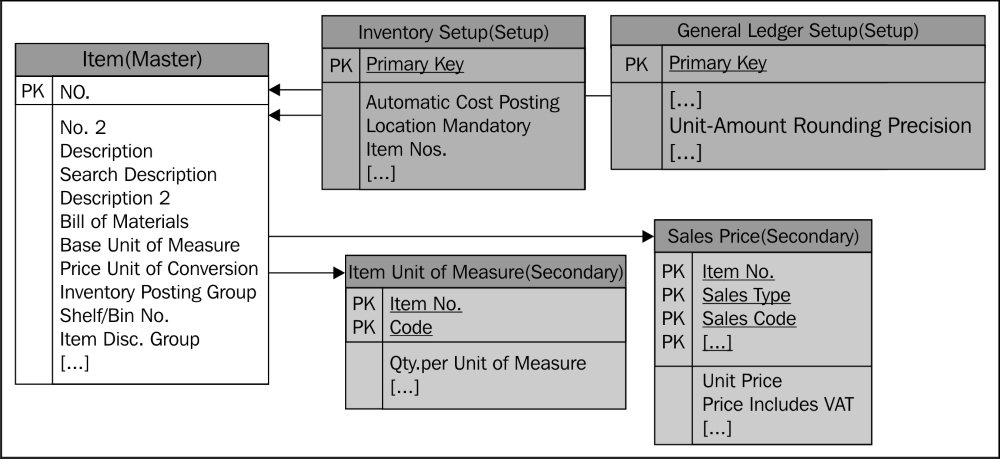
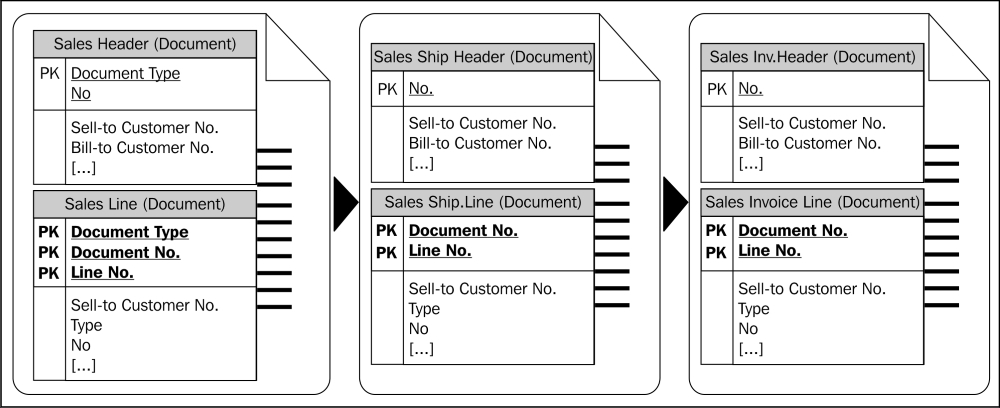
Now it's time to start using the item on documents, to purchase or sell them. The item can now be used on the lines of a document. In the following example, we will use a sales order to put in an item line in the sales order. There are other sales documents where an item can be used, such as the sales quote, the sales invoice, the sales return order, or the sales credit memo. In fact, all these sales documents are stored on a single document structure composed of the Sales Header table and the Sales Line table. Each one is identified by the Document Type field that is part of the primary key of the tables.

When an item is used in a document, not only is the item number stored in the Sales Line table, but many other fields from the Item table are also copied. Fields such as the Inventory Posting Group field, the Description and Description 2 fields, the Gen. Prod. Posting Group field, or the VAT Prod. Posting Group field—just to name a few—are copied from the Item table to the Sales Line table.
It may seem redundant; why are all these fields copied if the information is already stored in the item card? Well, this information is copied for two reasons. Firstly, this information is considered default data; and secondly, it gets copied to allow the users to change a field value on a specific order. As an example, you can change the item description, the sales unit of measure, or the item description on a specific order. Other fields, such as Inventory Posting Group, are also replicated on the Sales Line table, but the users cannot modify their value. It may take some time between creating the order and finally posting it. In the meantime, the item configuration may have changed. However, it is not acceptable for a specific order to post something different to when it was created, which is probably when the user checked it.
The same is true for the item price. When we create a sales order for the item, the system calculates and proposes a price for the item. This is the price we configure, either on the item card or in the Sales Price table. We tell our customer the selling price so that he can approve the order before we ship the item. Imagine that in the meantime, the item price changes. We all agree that the new price is for the new orders. It will be unacceptable for the system to change the existing price without warning.
Copying data from the master table to a document table is part of Dynamics NAV philosophy. It is something that we can find in all the application areas and in all the documents. It has a clear pro: it makes the system flexible. It also gives us a lot of traceability. It also has a con: any change on a master table is not reflected immediately. The existing document lines keep the old configuration. The user has to refresh the line if the new configuration is needed. From our experience, some users have difficulty understanding this. They don't know when to refresh a line. During training, we will have to invest time to tell them and make sure they understand when to refresh a line. When the order is ready and the item has been shipped to the customer, the order can be posted. The posting routines, which are explained later on, are in charge of verifying that all data is correct and creating all the required entries to reflect the transaction.
Concerning documents, a shipment is created by inserting records on the Sales Shipment Header and Sales Shipment Lines tables. In the next step, the invoice will be created by inserting the records on the Sales Invoice Header and Sales Invoice Lines tables.
Records representing the shipment and the invoice are almost the exact copies of the original order. Take a look at the fields found on the Sales Line table, which is shown in the following screenshot:
Now take a look at the fields found on the Sales Shipment Line table, which is shown in the following screenshot:
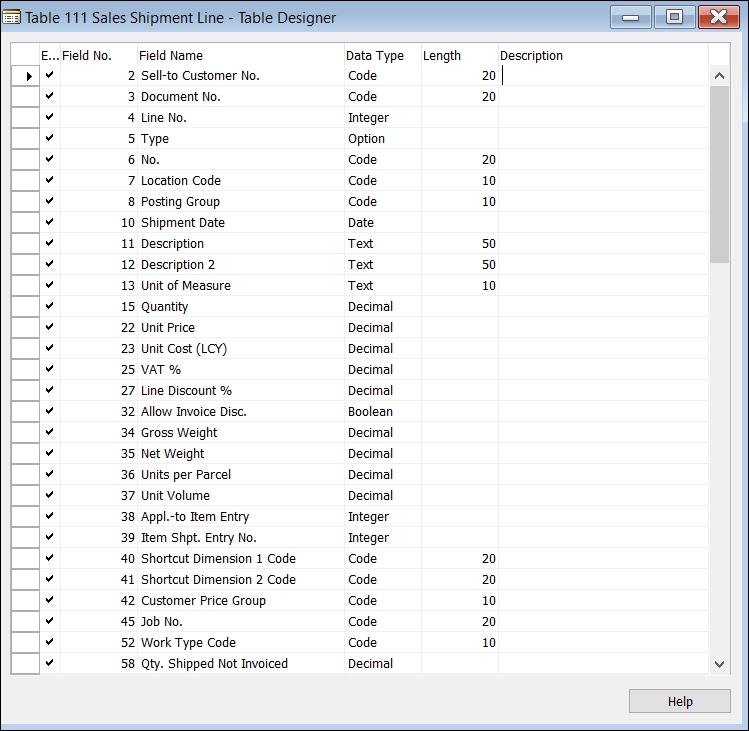
As you can see, we can find almost the same fields, with the same name and the same type. The most important part is that the fields have the same value in the Field No. property. This is important because to copy values from one table to another, the TRANSFERFIELDS instruction is used. This instruction copies the fields based on the Field No. property. For each field in the Record (the destination) table, the contents of the field with the same Field No. property in the FromRecord (the source) table will be copied, if such a field exists. Note that in order for the function to work, the fields that are being transferred need to have the same data type. You cannot transfer a text value into a date field. You will receive an error if the field type is different when this function is called.
So, if you create a new field on the Sales Line table and you need to copy the value of the field along the different documents, you just have to create the same field with the same Field No. property on the tables where the documents are stored. There is no need for extra coding.
There are other document tables related to the warehouse management area. For instance, the Transfer Header and Transfer Line tables, with their corresponding historical documents Transfer Shipment Header, Transfer Shipment Line, Transfer Receipt Header, and Transfer Receipt Line. Historical documents are part of the Dynamics NAV protected tables. Data on the protected tables cannot be changed and nor can you directly insert new records on these tables; the posting routines are the ones in charge of inserting data in these tables.
To refresh our memory, so far we have covered the types of tables that are shown in the following diagram:
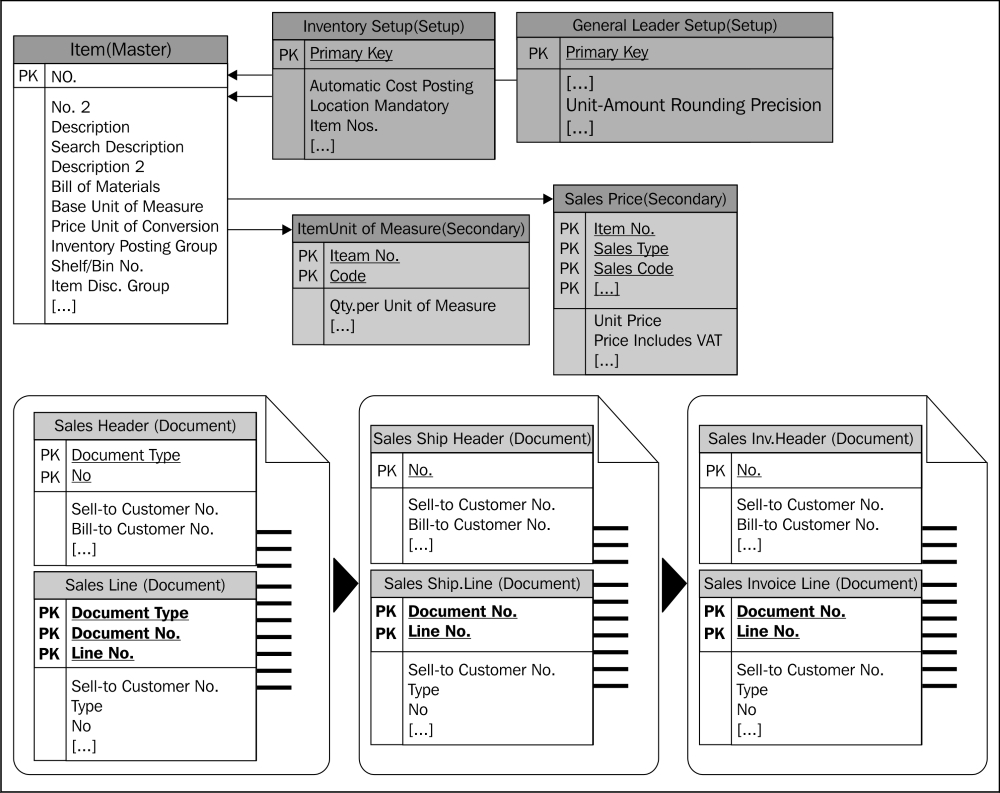
Only the
Entry and Journal tables are left and we will cover them in the following section.
As we have mentioned, the purpose of entry tables is to keep track of all the transactions done with a master table. Each time we purchase an item, we have to record the stock increase. Every time we sell an item, we have to record the stock decrease. It gives us valuable information about the item, such as the inventory quantity we have at any time.
One might think that we don't need an entry table to determinate the stock. When we purchase or sell, we create the appropriate purchase and sales document. Theoretically, we can just add all the purchases and sales document lines and get the same data. Again, we seem to be duplicating information. It is true that for one transaction the same information has to be copied to a lot of tables. However, in each case we want to see the information in a different way. Also, the tables that are used for sales and purchases documents are different; to get the stock, we will have to search between multiple tables. This will make the whole system slower.
Another element to consider is that on some occasions we need to register an item transaction but have no documents. What if we break an item? Or if an item "magically" disappears? We need to decrease the item stock but there is no document to reflect this. In this case, we will want to create a new record in the table entry without creating a purchase or sales document.
Some master tables will need more than one entry table. This is the case of the warehouse management area, where we find the Item Ledger Entry and Value Entry tables. The Value Entry table is used to store the costing details related to each item ledger entry.
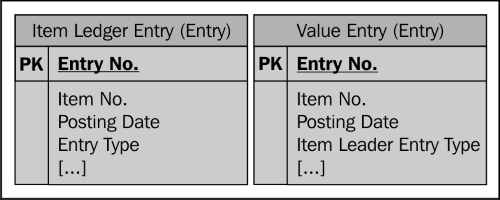
The primary key for all the entry tables is a field called Entry No., which is an auto-incremental integer. All the entry tables also have a field named Posting Date.
Additionally, when new records are inserted on the entry tables, the system also creates new records on tables called Register. In the warehouse management area, we find the Item Register table. The Item Register table is used to keep track of when entries are created (regardless of the posting date), which user created them, and also how many entries have been created for each transaction. The Item Register table can be considered a secondary table.

Last but not the least, we find the journal tables. Journal tables are very important since they contain most of the business logic of the application. All the posting processes found on the application are based on journal tables. In the warehouse management area, we find the Item Journal Line table.
If the posting is made from a document, the posting process converts the document lines to journal lines by creating temporary registers on the Item Journal Line table. The user can also manually create lines on the Item Journal Line table and then post them, without using a document at all.

And at last, we can see the final picture of how the tables are structured in Dynamics NAV, as shown in the following diagram:
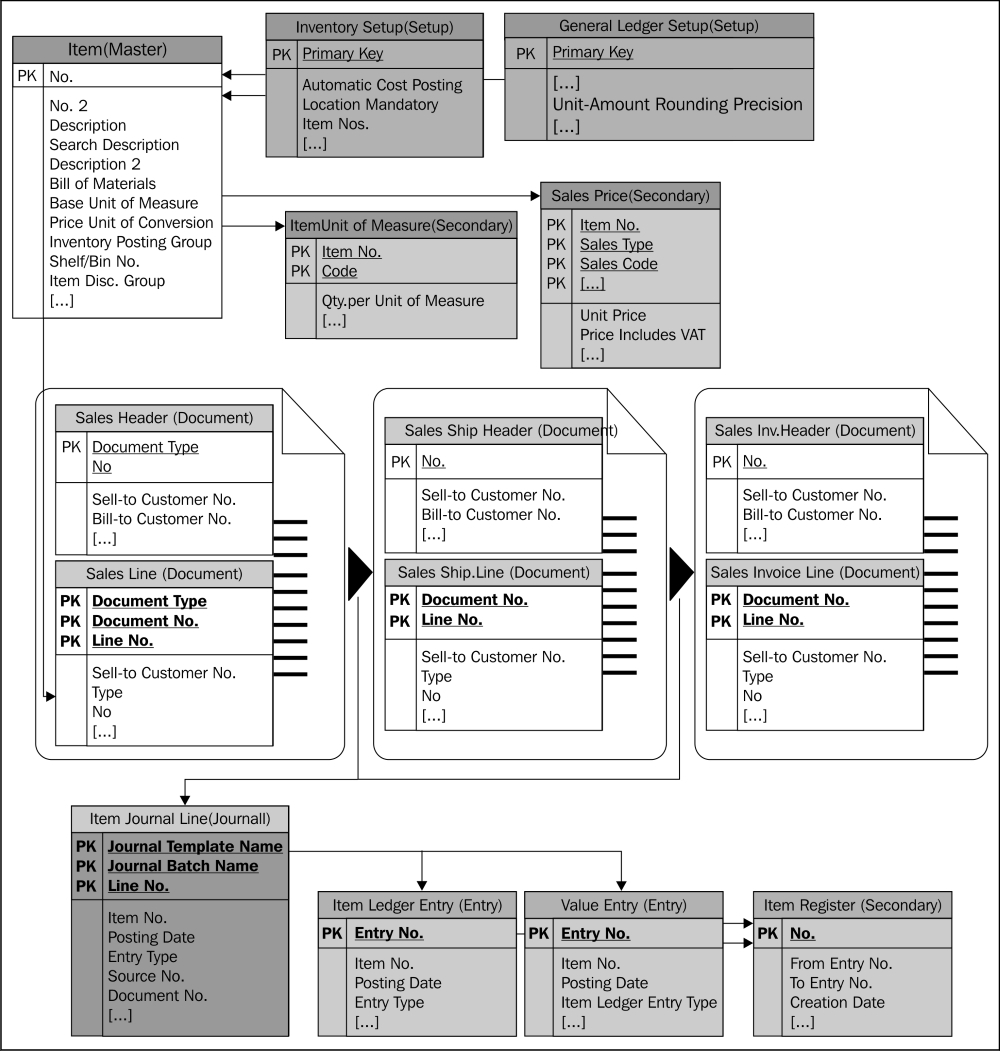
You will find many other secondary tables, setup tables, document tables, and entry tables that are not shown in the diagram, but the structure remains the same.
Remember that all the existing areas in the applications follow this structure; therefore users are used to it. Keep this structure in mind while building your own applications.
In the previous section, we saw the tables' structure and how important it is to keep the same structure in all the areas to help the users understand how the area works. Pages are also important; they are the objects through which the users interact with Dynamics NAV. The users do not see tables, but pages. Thus, maintaining consistency in the page structure is vital for the user to perceive the consistent application structure. In the standard application, we find different kinds of pages that are used for different purposes, such as:
- Role center pages: This is the first page that the users see when accessing Dynamics NAV. Depending on each user's role, the page shows a quick view of the work that the user is responsible for.
- Card pages: Card pages show data from a single table and also from a single record. All the master tables have a card page associated with them, which is also the only way to insert, edit, or delete records. Some secondary tables with sufficient entities (many fields) also use card pages.
- List pages: List pages show multiple records from a single table. For each card page, you will find a list page that shows data from the same table. In fact, the users access the card page from the list page. These pages are not editable and are only used to show data, not to modify or delete it. Most secondary tables don't have a card page, but all of them have a list page. When no card page can be found for a table, the list page is editable. We are allowed to insert, modify, or delete records from the list page.
- Document pages: These pages are used to show the two tables related to a document: the header and the lines. Document pages are used to show data related to the header, and they include a link to a ListPart page where the lines are shown.
- ListPart pages: ListPart pages are pages with the same characteristics as those of a list page, but the difference is that they are always used inside other pages.
- Worksheet pages: These pages are based on a template, batch, or name structure and have a control for selecting a template, batch, or name. Journals are a good example of worksheet pages.
- ConfirmationDialog pages: These are pages that pose a question to the user, have no input fields, and require that the user select Yes or No.
- NavigatePage pages: These pages are used for wizards, which consist of a number of user input screens or steps linked together, enabling the users to carry out infrequently performed tasks.
As in the previous section, we will analyze the structure of pages in a particular area, the warehouse management area.
The following screenshot shows the default role center page for a user who has the sales order processor profiles assigned:
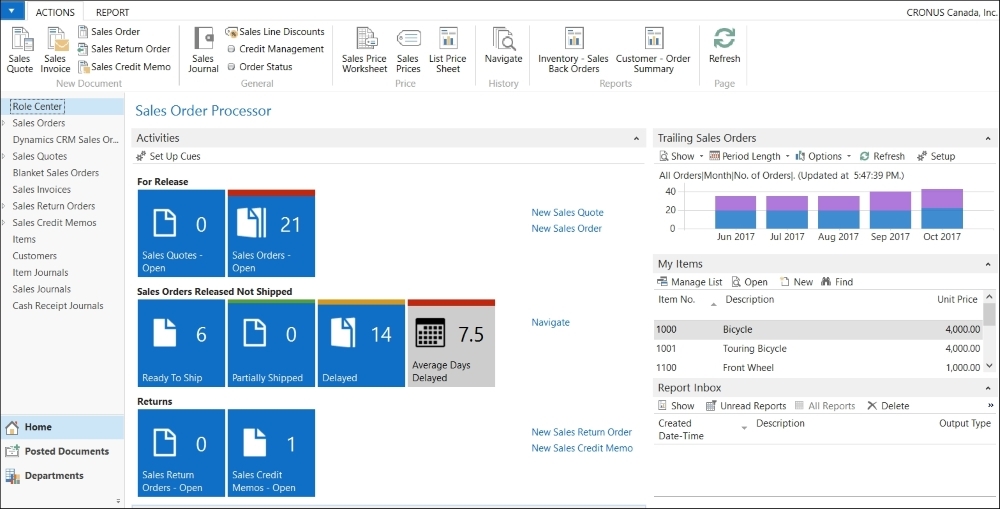
The role center page has a central area called Activities. This area contains a few cues that provide a visual indicator of the work that a user has to do each day. Cues are different for each role. The Activities area also contains actions so that the user can start new transactions right from the role center.
Card pages show data from a single table and also from a single record. In the following screenshot, you can see the Item Card page. It contains all the fields that can be stored in the Item table, except for a few fields that are used for internal purposes.
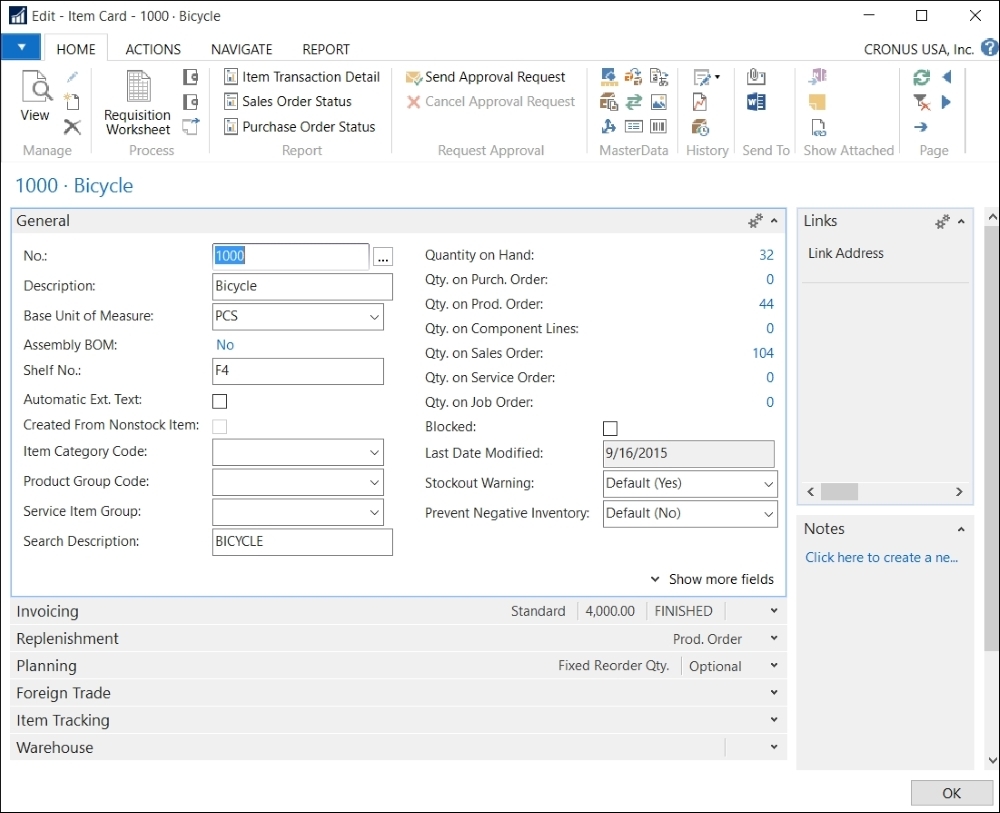
Data is shown in different tabs, grouping fields that are used for similar purposes. In the Item Card page, we can find all these tabs: General, Invoicing, Replenishment, Planning, Foreign Trade, Item Tracking, and Warehouse.
If you need to create your own card page, keep a similar structure. Keep in mind that all the cards start with a tab called General. The card pages are always editable, which means that the user can insert, modify, or delete data on this page. Only a few fields are not editable, such as the Last Date Modified field. But you don't have to define this as an editable page because it is a property of the field in the table where you define whether a field is editable or not.
There is one exception to this. If one field has to be editable only in certain circumstances, you cannot define it on the table. You will need to do that on the page.
Find the Planning tab from the item card. Note that fields such as Safety Stock Quantity can only be editable with certain values from the Reordering Policy field.

When the Reordering Policy field has no value entered into it, the Safety Stock Quantity field is not editable. This is recognizable because the field has a grey background. When you change the value to Lot-for-Lot, the Safety Stock Quantity field becomes editable. You can identify it because the fields have a white background.
As we mentioned earlier, this behavior has to be coded from the card page. Follow these steps to see how it is achieved in the item card page:
- Open Dynamics NAV Development Environment
- Navigate to Tools | Object Designer
Find Page 30 Item Card and click on the Design button.
Navigate to View | C/AL Code. The following screenshot shows what you will see:

Only a few lines of code are present for the non-editable fields, but no code for inserting or deleting a record or when validating a field.
List pages show multiple records from a single table. For each card page, you will find a list page that shows data from the same table. In fact, the users access the card page from the list page. These pages are not editable and are only used to show data, not to modify or delete it.
The following screenshot shows the item list page:
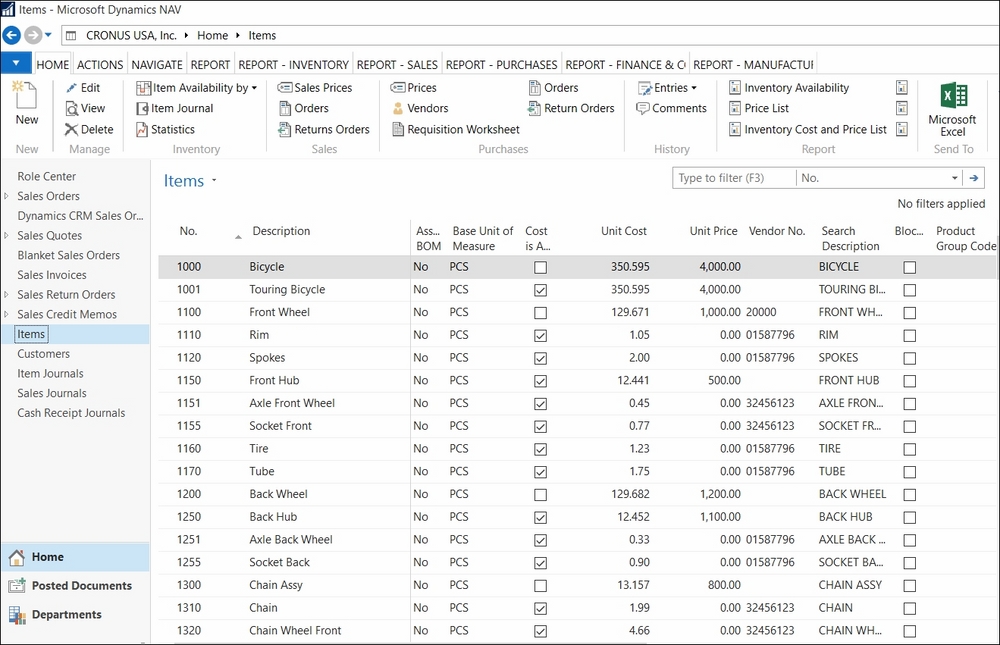
The list pages show fewer fields than the card pages. Only the most important fields of each master table are shown in the list.
All options that can be found on the Actions pane can also be found on the item card page. Therefore, while creating a new option, remember to make it accessible from the list page and also from its corresponding card page.
Most secondary tables don't have a card page, but all of them have a list page. When no card page can be found for a table, the list page is editable. We are allowed to insert, modify, or delete records from the list page.
This is the case of the Item Units of Measure page, which can be accessed from the Actions pane, the Navigate tab, the Item entry, and the Units of Measure icon. You will find the option both from the item card and the items list.
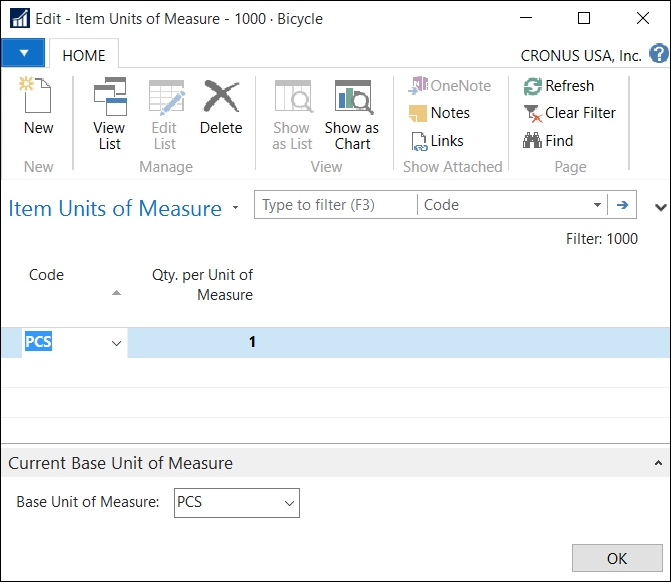
Those list pages need to show all the fields (except internal use fields) to the user, so that he/she can fill them with the required data. By default, the Item Units of Measure page shows only two fields, but many others are also available to the user.
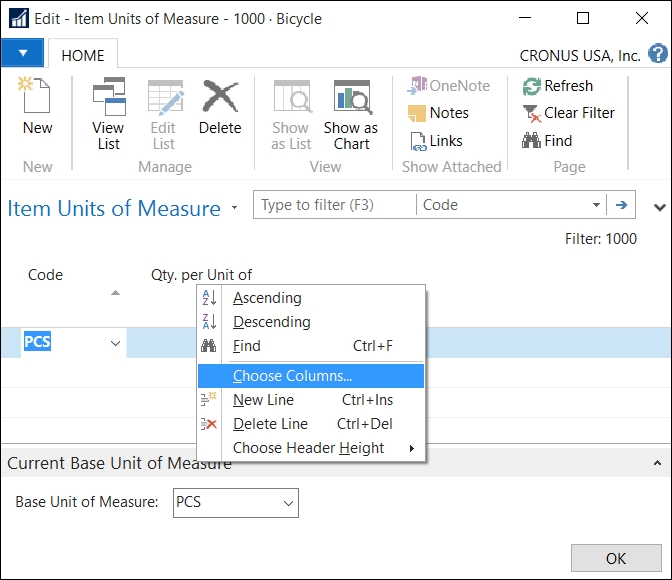
Put the cursor anywhere on the header of the table, where it says the name of the fields. Right-click on the mouse and select the Choose columns option as shown in the following screenshot:
A new window opens and allows the user to customize the page. On the Available columns grid, you will find all the fields that are available for the page but are not shown at the moment, as shown in the following screenshot:

Select one of them and click on the Add >> button. Do the same with all the remaining fields, and then click on the OK button. You will end up with the Item Units of Measure page, as shown in the following screenshot:
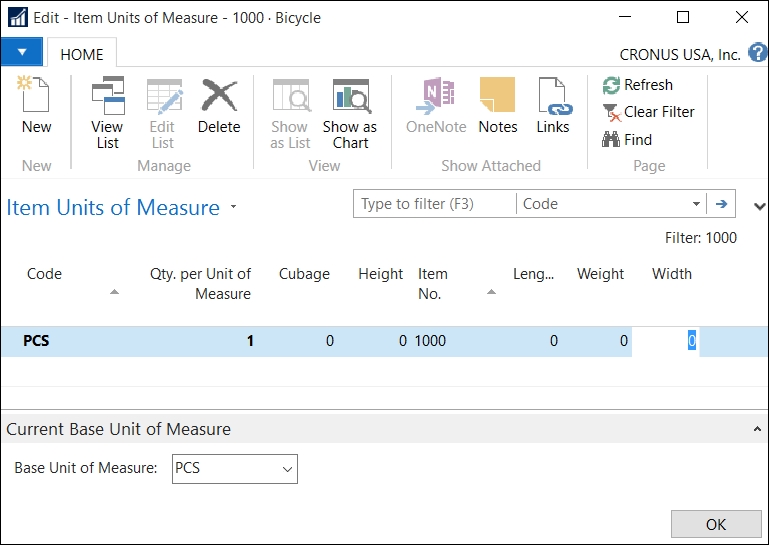
So remember that if you want a field from a secondary table to be filled by the users, you have to make the field available from the list page. With the master tables, you will have to make the field available from the card page and then decide if the new field is important enough to make it available on the list page.
These kinds of pages are used to show the two tables related to a document: the header and the lines. The document pages are used to show data related to the header, and they include a link to a ListPart page where the lines are shown.
An example of this is on the sales order page:
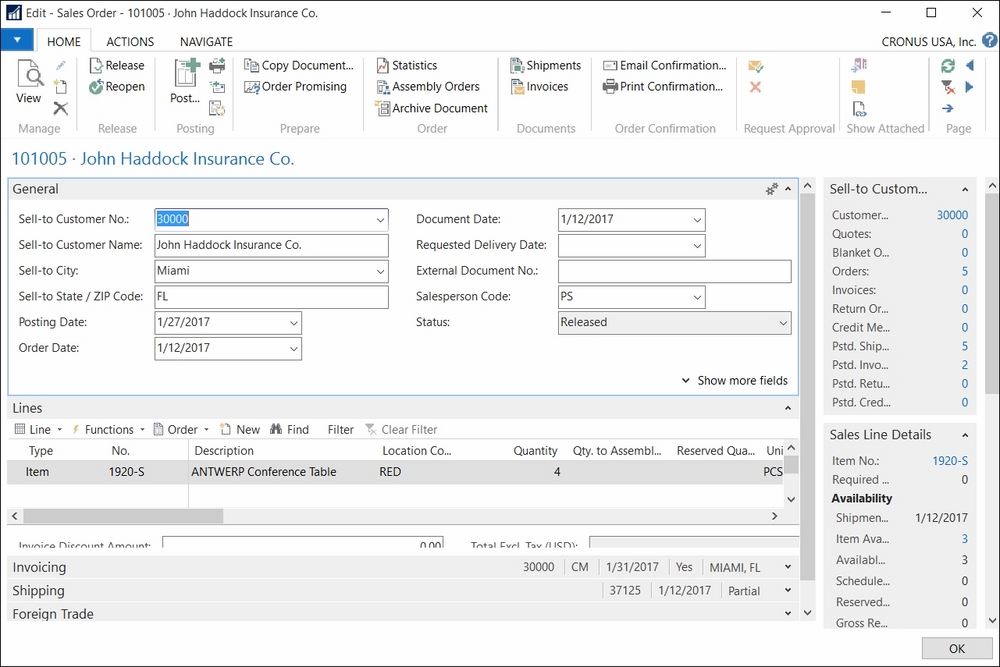
As with the card pages, the users access the document pages from a list page. The actions and related information found on the document page and its corresponding list page must remain the same while adding new options.
The document pages are organized in tabs, like the card page. The only difference is that the Lines tab shows another page—a ListPart page that is embedded into the document part.
On the right-hand side of the preceding screenshot, you can find a few tabs showing data related to the document, the customer, or the item on the order. These tabs are a particular type of page, called CardParts. These pages are associated to the FactBox pane of the document page.
ListPart pages are pages with the same characteristics as of a list page, but the difference is that ListPart pages are always used inside other pages. Actions can also be defined for ListPart pages.
In the example of the sales order page listed previously, the line area where you enter the items are created using the ListPart pages.
Worksheet pages are based on a template, batch, or name structure and have a control for selecting a template, batch, or name. Journals are a good example of worksheet pages, but there are other worksheet examples such as the account schedule or the requisition worksheet functionality. The following screenshot shows the Item Journal page:
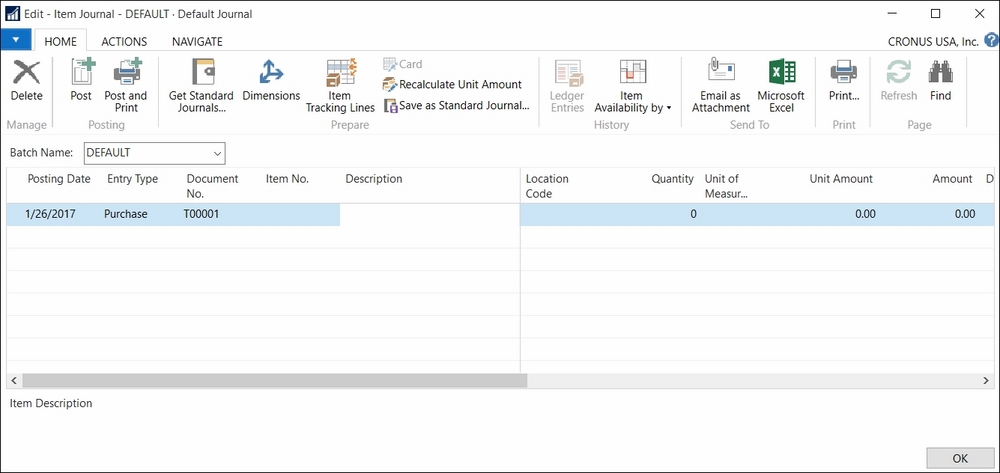
The Item Journal page is based on a batch and has a control for selecting the batch name. Only the lines associated with the selected batch are shown in the page. It's similar to the header-lines structure. In this case, the header is the batch and has only one field, its name.
The users can create as many batches as needed on each journal.
Different batches on a journal can be set up as a distinction between the journal adjustments for different people. In the Item Journal Batches page, the No. Series field, the Posting No. Series field, or the Reason Code field can be filled for each batch. You will find other options on other journals.
Another reason for creating different batches on the same journal is that different people can input data on the same journal but in different batches. Doing so, the users will not disrupt each other's work.
ConfirmationDialog pages are pages that pose a question to the user, have no input fields, and require that the user selects the Yes or the No button.
The Check Availability page shown in the following screenshot is a good example of a ConfirmationDialog page:
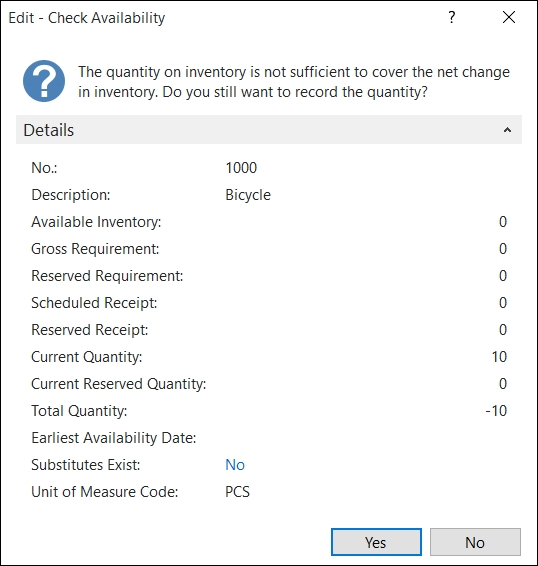
This page will pop up when the quantity filled in a line, either a document line or a journal line, is bigger than the current availability of the item.
These pages are used for wizards, which consist of a number of user input screens or steps linked together, enabling the users to carry out infrequently performed tasks.
Dynamics NAV has a functionality called Navigate, and the page that shows this functionality is a NavigatePage type of page.
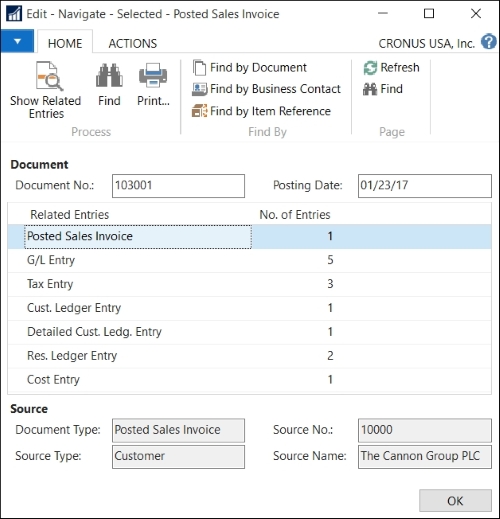
The Navigate functionality shows all the documents and entries posted using the same document number on the same posting date. This is a very useful way to see all the entries of a particular transaction that has been posted. If you create your own entry or posted document tables, don't forget to add them to the Navigate functionality.
