Analysis views are used to analyze the information about dimensions from general ledger entries, budgets, and cash flow forecast entries.
Let's first have a look at what dimensions are, and then we will be able to see how to analyze the information that dimensions provide using analysis views.
A dimension can be seen as information linked to an entry, something like a tag or a characteristic. The purpose of dimensions is to group entries with similar characteristics so that you can report on the data in a way that is meaningful to the company. Each company can define its own dimensions according to how they need to analyze their data.
Posted entries and posted documents can contain analyzable dimension information as well as budgets. The term dimension is used to describe how analysis occurs. A two-dimensional analysis, for example, would be sales per area. You can also apply more than two dimensions when posting a document or a journal. This will allow you to carry out a more complex analysis, for example, sales per sales campaign, sales per customer, or group per area.
Each dimension can have unlimited dimension values that are subunits of the dimension. For example, a dimension called
Department can have subunits called Sales, Administration, and so on. These departments are dimension values.
Dynamics NAV supports unlimited dimensions. This means that you can create as many dimensions as needed according to how you are currently categorizing areas of the business. However, even if you can create unlimited dimensions, there are some restrictions on how they are stored and how easy it is to access their information.
In Dynamics NAV, all dimensions are stored in special dimension tables. Some dimensions are also stored in fields inside the table they refer to. We can group dimensions in three categories according to their access level (how easy it is to access them):
- Global dimensions: Their value is stored on special dimension tables and also on fields inside the table they refer to. We can use up to two global dimensions.
- Shortcut dimensions: Their value is stored on special dimension tables. Although the value is not stored inside the table they refer to, in some occasions they are shown on pages as if they were stored on the table. We can use up to eight shortcut dimensions. Two of them correspond to global dimensions.
- The rest of the dimensions: Their value is only stored on special dimension tables.
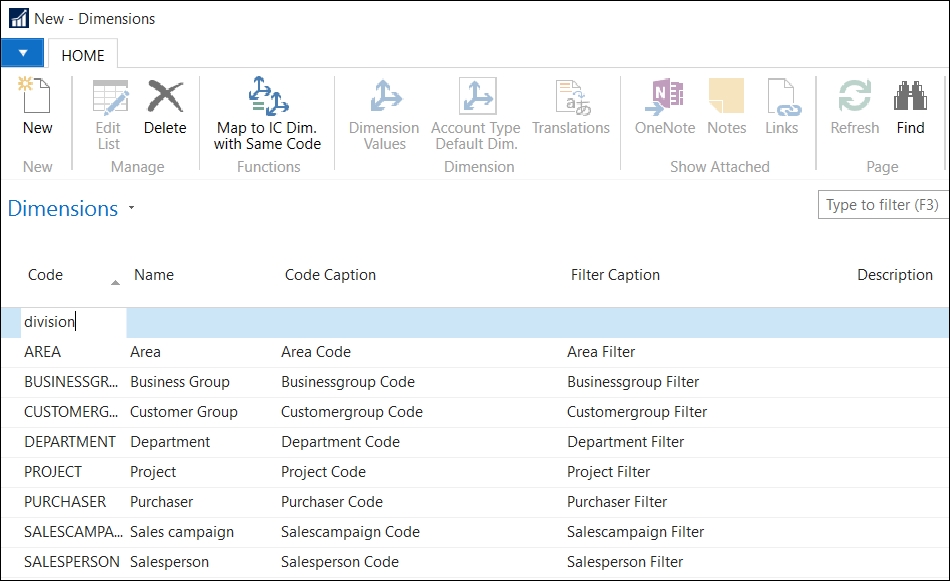
Imagine that in our company we have two different divisions: one responsible for selling items and another responsible for renting items. We decide to use dimensions to analyze the results of each division. So, we are going to create a dimension called DIVISION.
To create new dimensions, access Departments | Financial Management | Setup | Dimensions and follow the steps described in this section:
- Click on the New icon found on the ribbon bar.
- Create a new dimension by assigning some values, as shown in the following screenshot.
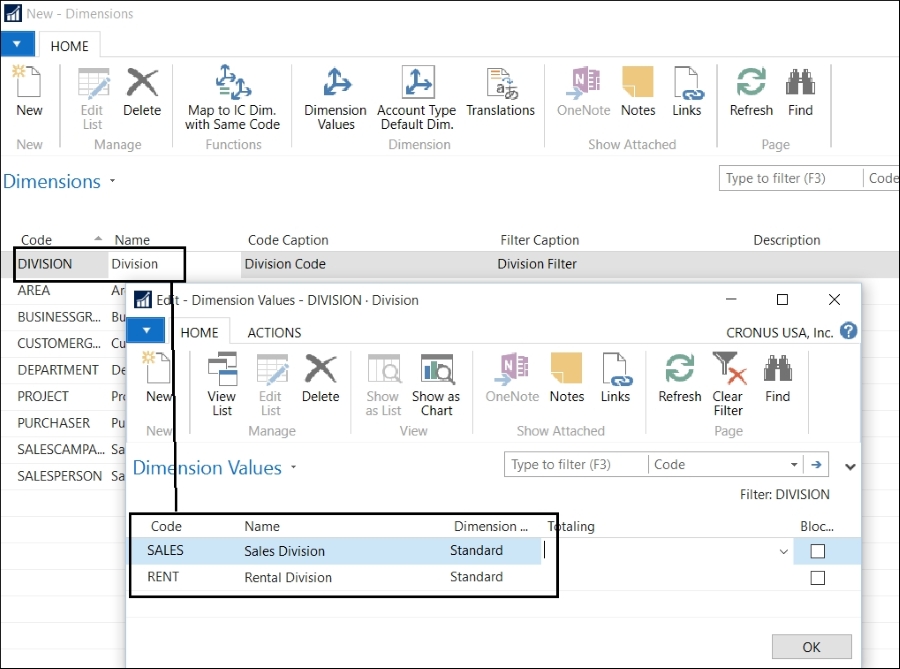
- Click on the Dimension Values icon found on the ribbon bar. A new page will open.
- Create two different dimension values by giving them the values shown in the following screenshot:
We have already created a new dimension along with its dimension values. Now we must determine if it is going to be a global dimension, a shortcut dimension, or one of the rest of the dimensions.
To do so, open General Ledger Setup by navigating to Departments/Financial Management/Setup/General Ledger Setup. Select the Dimensions tab.
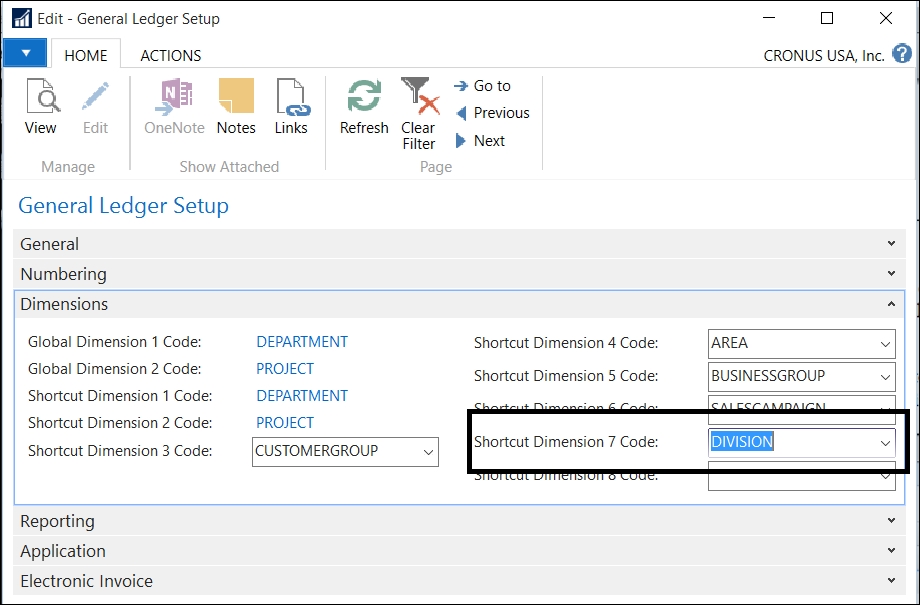
In the company CRONUS USA Inc., global dimensions are already defined. The company has already defined up to six shortcut dimensions.
Select DIVISION in the Shortcut Dimension 7 Code field, to define our new dimension as a shortcut dimension.
As we said earlier in this chapter, the difference between global, shortcut, and the rest of the dimensions is how easy it is to access them.
We are going to see how to access the DEPARTMENT global dimension, the DIVISON shortcut dimension, and the SALESPERSON dimension, which is one of the rest of the dimensions.
To see how dimensions can be accessed to fill them when creating documents, follow the given steps:
- Open the Sales Invoices page that you will find by navigating to Departments/Sales & Marketing/Order Processing/Sales Invoices.
- Click on the New icon found on the ribbon bar to create a new sales invoice.
- In the Sell-to Customer No. field, select customer 62000.
- Create a line for item
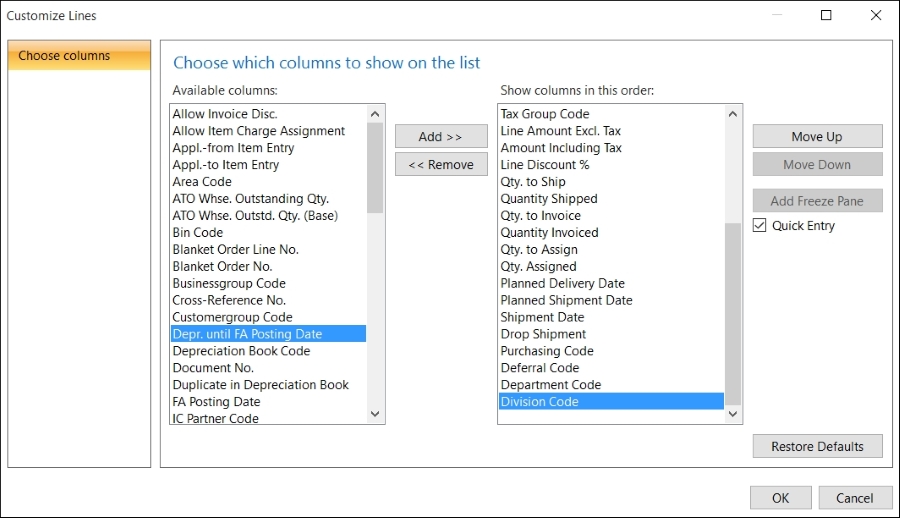
1000to sell1PCS. - On the Lines tab, click on the setup icon and select Choose Columns....
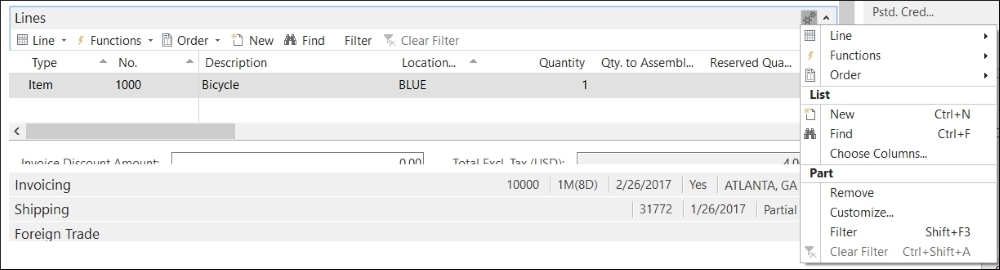
- Add Department Code and Division Code in the column titled Show columns in this order. Then click on OK.
Salesperson Code cannot be selected because it is not a global dimension or a shortcut dimension.
- Back to the sales line, fill in the value Sales for the Department Code field. Also fill in the value Sell for the Division Code field.
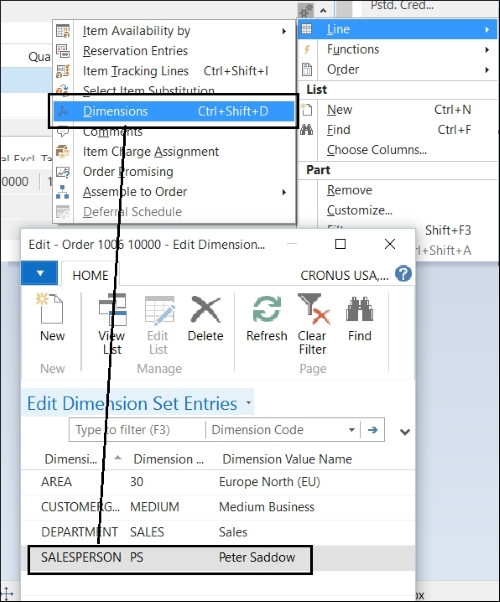
- To fill in a value in the Salesperson Code field, click on Line and then Dimensions to open the Edit Dimension Set Entries page.
- Post the Sales Invoice.
- Open the Posted Sales Invoices page. You will find it by navigating to Departments | Sales & Marketing | History | Posted Sales Invoices. Locate the invoice we have just posted and open it by double-clicking on it.
- Open the Customize Lines page, as we did in step 6.
- Add Department Code in the column titled Show columns in this order. Note that you will not find Division Code available in the column titled Available columns.
This is because Division is a shortcut dimension. As we said earlier, shortcut dimensions are, in some occasions, shown on pages as if they were stored on the table. Usually they are shown in pages meant to enter information, but not on pages meant to show posted information.
- Access all the dimensions by clicking on Line and then Dimensions, as we did in step 8.
As we have seen, there are several dimensions that are not easily accessed by the users, especially when the document or the entry has been posted. This is when we need to analyze the data.
Analysis views are specially meant to access all the dimensions in the same easy way, in groups of a maximum of four dimensions at the same time. The four dimension groups may seem a limitation, but it is not, since we can create as many analysis views as needed combining all the dimensions we want.
With an analysis view, we can view data from the general ledger. Entries are grouped by criteria, such as:
- G/L accounts
- Period
- Business units
- Up to four dimensions
In other words, if a G/L entry has been posted to a particular account with one of the four dimensions selected, the G/L entry information will be included in the analysis view as an analysis view entry. You can also include G/L budget entries in an analysis view to compare reality and budget.
Follow the given steps to set up an analysis view:
- Open the Analysis Views page by navigating to Departments/Administration/Application Setup/Financial Management/Dimensions/Analysis Views.
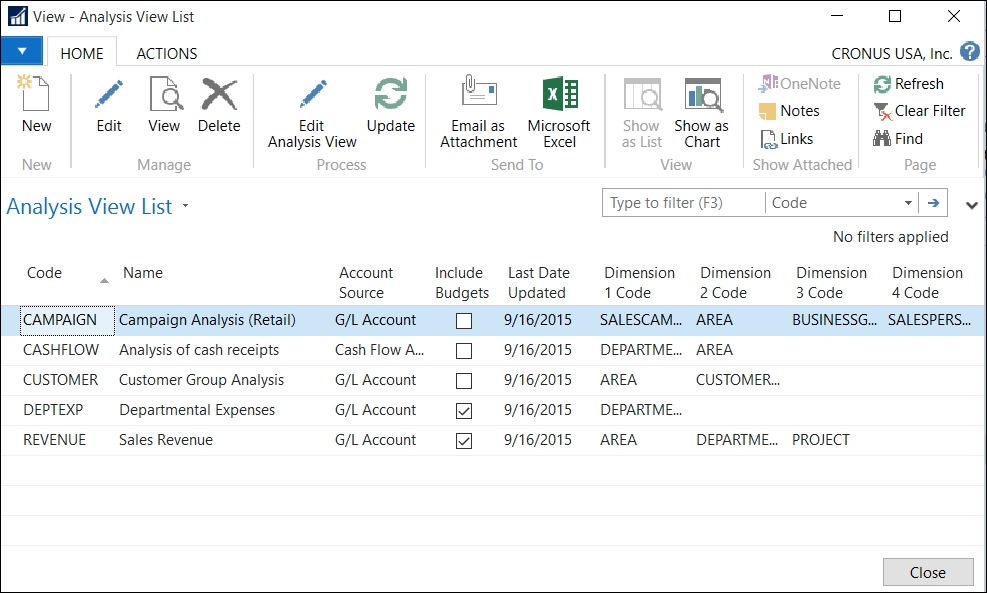
- The Analysis Views page will open showing the existing analysis views.
- Click on the New icon found on the ribbon bar. The Analysis View Card page will open.
- Fill up the Analysis View Card page with the data shown in the following screenshot:

- Click on the Update option found on the ribbon bar to create analysis view entries based on the criteria that you set up on the card.
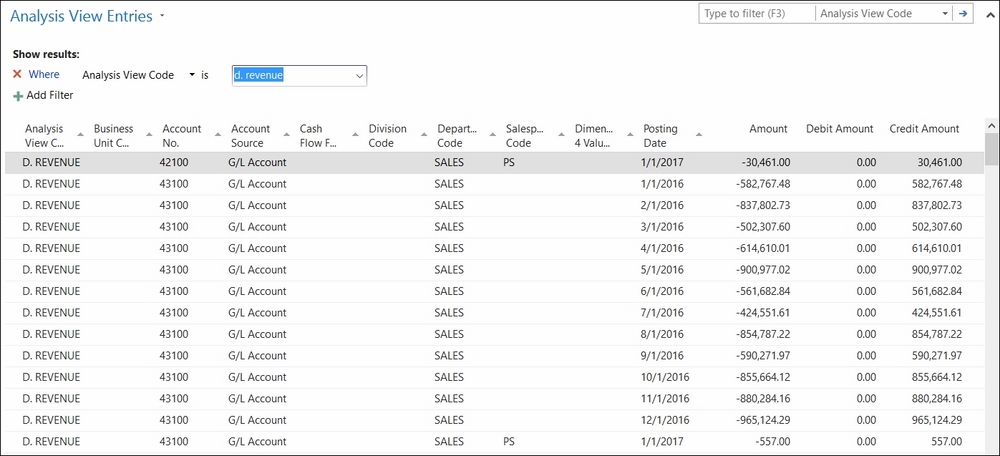
The system will create one summarized analysis view entry for each G/L account, period, and dimension combination.
In the preceding example, we will get one entry for each G/L account from account numbers 42000 to 49950, for each month, and also for each combination of dimension values of the Division, Salesperson, and Department dimensions.
- Open the Analysis View Entries page to see the entries created by the system. You can find it by navigating to Departments/Financial Management/General Ledger/History/Analysis View Entries.
An analysis view is a fixed photo of the posted G/L entries grouped with specific criteria.
If you change any of the fields found on the Analysis View Card page, for instance if you change the Starting Date field, you will get the following message:
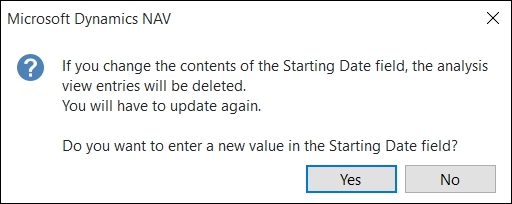
If you select Yes, all entries will be deleted and you will have to click on the Update option again to create analysis view entries according to the new criteria.
You will also have to use the Update action to include the new general ledger entries posted after you last updated the analysis view. You can also let the system update it automatically when new G/L entries are posted by checking the Update on Posting field found on the Analysis View Card page.
Analysis views can be used in different scenarios:
- In the Analysis by Dimensions functionality
- As source for account schedules
In this section, we are going to see an example of using analysis views on each of the scenarios detailed.
The analysis by dimensions functionality is used to display and analyze the amount derived from the existing analysis views.
Follow the steps to see an example of how Analysis by Dimensions works:
- Open the Analysis View List page by navigating to Departments/Financial Management/General Ledger/Analysis & Reporting/Analysis by Dimensions.
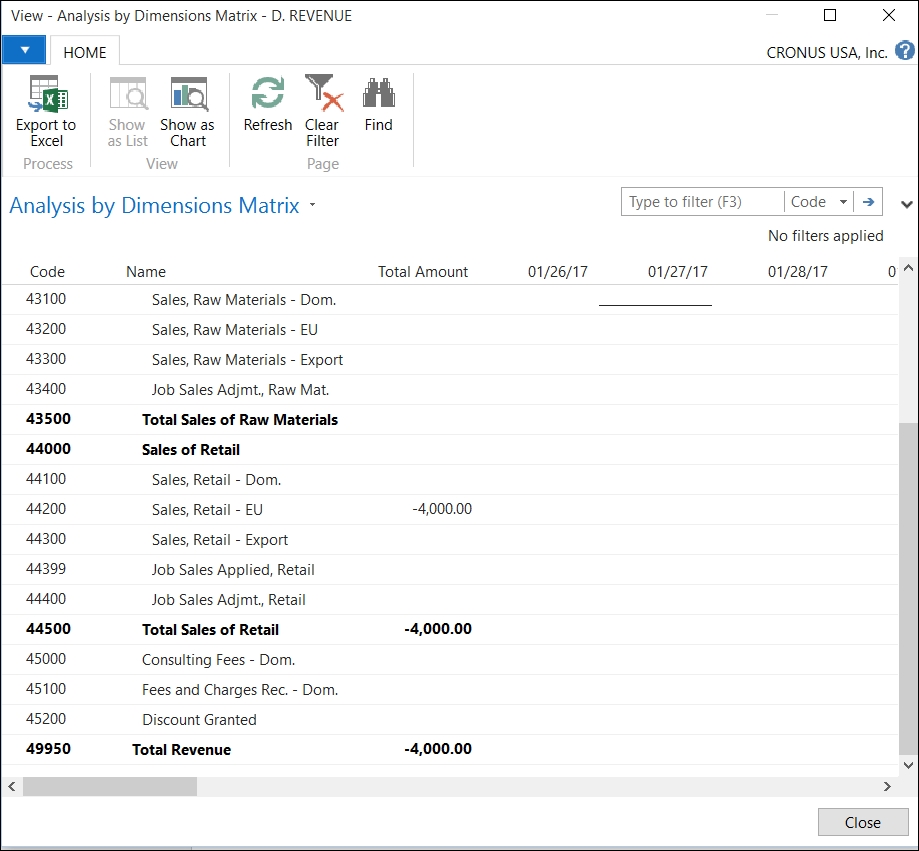
- Locate the D. REVENUE analysis view that we created earlier in this chapter. Then click on the Edit Analysis View option found on the ribbon bar.
- A new page opens. In the Division Filter field, select the value RENT.
- Click on the Show Matrix icon found on the ribbon bar. The Analysis by Dimensions Matrix page now shows the amounts posted on the general ledger under the RENT value of the Division dimension.
- Close the current page and go back to the Analysis by Dimensions page.
- Select different values for the following fields, and click on Show Matrix to see the results. The main fields you can change to analyze data are Show as Lines, Show as Columns, Dimension Filters, Show, Show Amount Field, View by, and View as.
If analysis views are selected as a source for account schedules, the amounts in the account schedules are calculated based on the analysis views entries. Since analysis views entries are based on general ledger entries, the result should be the same.
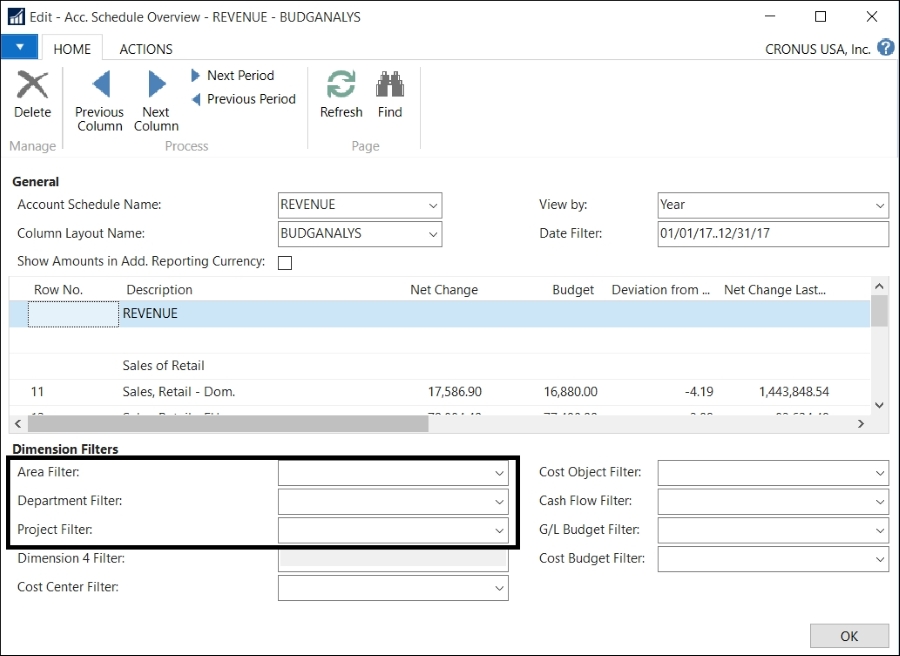
The difference is that, when analyzing account schedules, you can only filter the amounts based on global dimensions. If you use analysis views as a source for account schedules, then you can filter on any of the four dimensions selected on the Analysis View Card page. These dimensions can be global dimensions, shortcut dimensions, or any other dimensions.
To use analysis views as a source for account schedules, follow the given steps:
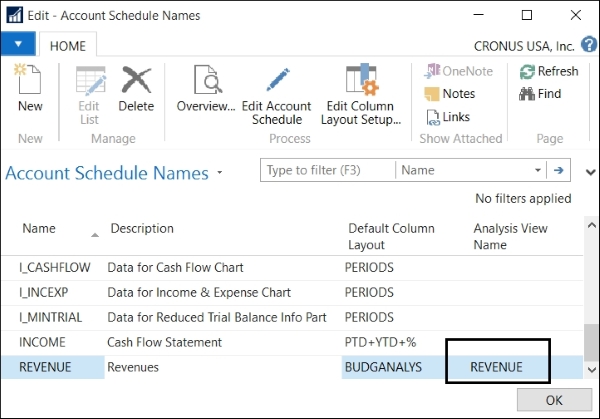
- Open Account Schedules Names by navigating to Departments | Financial Management | General Ledger | Analysis & Reporting | Account Schedules.
- Locate the REVENUE account schedule. Note that an analysis view is selected in the Analysis View Name field. This is what makes it possible to use the analysis view as a source for the account schedule.
- Click on the Overview option found on the ribbon bar.
- The Acc. Schedule Overview page opens. Note that you can now filter on any of the three dimensions that were set up on the analysis view. Select different values on these fields to see the results.