Queries, just as any other objects in Dynamics NAV, have their own designer or editor.
To open Query Designer, perform the following steps:
- Open the Microsoft Dynamics NAV Development Environment.
- The Object Designer window will open.
- On the left pane of the Object Designer window, click on Query to see the list of existing queries, as shown in the following screenshot:
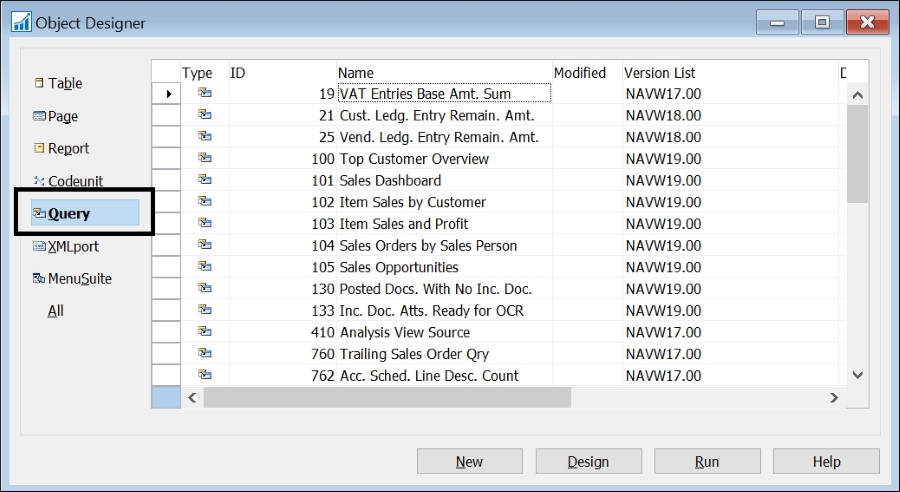
- Select the query 9150 My Customers (or any other existing query) and click on Design.
- The Query Designer window will open, as shown in the following screenshot:

The Query Designer window looks a lot like Page Designer or the new Report Dataset Designer. This will make it easier to get used to developing queries.
In the Query Designer window, we can select one or more DataItem values to define the database table from which we want to retrieve data for the query. Through properties, we can define the relationship between different DataItem values. We can also select the columns or fields that will be included in the query and specify the totaling methods and groupings for the fields. Finally, using properties, we will be able to define filters and to modify the behavior of certain columns, such as reversing their sign.
We will see the fields and properties of the Query Designer window by creating our first query.
In our first query, we will try to retrieve the items that our customers buy per month. To do so, we will use the Item Ledger Entry table as our main data source, but we will also use the Customer and the Item tables to get additional information from customers and items, such as their name or description.
First let's define the main data source and the fields that will be retrieved:
- Open the Object Designer window in the Microsoft Dynamics NAV Development Environment and select the Query object type on the left pane of the Object Designer window.
- Click on New to create a new query.
- An empty Query Designer window will open.
- On the first line, in the Type column, choose DataItem from the drop-down list.
- Select Item Ledger Entry in the Data Source column.
Tip
You can choose the up arrow that will appear on the right-hand side of the Data Source column when you select it to see a table list and select the desired table. You can also type in the name or the number ID of the table (if you know the name or the number ID of the table) you want to use on your query.
- The Name column will be automatically populated once a Data Source value has been selected. Default names are usually fine, but you can change them if you want to.
- Display the Properties window for the data item. To do so, select the DataItem row and click on View | Properties (or press Shift + F4).
- Select the
DataItemTableFilterproperty and click on the Assist Edit button. The Table Filter window will open. Set Field to Entry Type, Type to CONST, and Value to Sale. Click on OK. - Back at the Properties window, the value for the
DataItemTableFilterproperty should be what is shown in the following screenshot: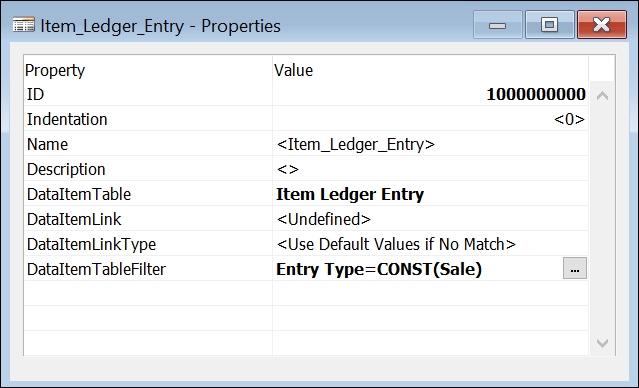
Using the
DataItemTableFilterproperty, we have applied a filter so that only entries of type Sale are retrieved on this query. We are analyzing sales; we do not want other types of entries to be shown in our query. - Close the Properties window.
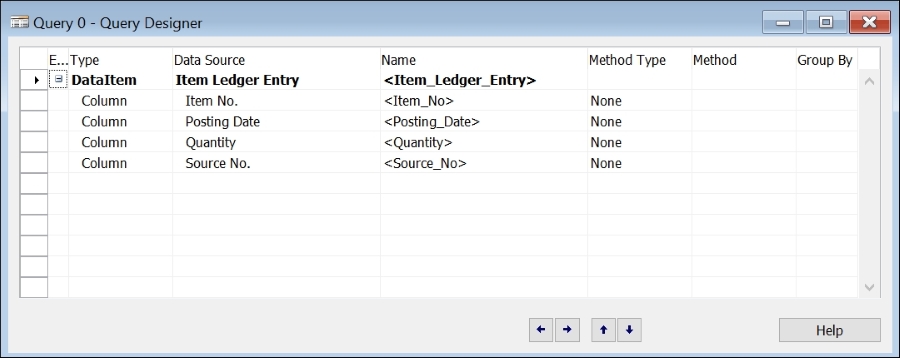
- For the Item Ledger Entry data item, select fields Item No., Posting Date, Quantity, and Source No. as Column in the rows below DataItem.
- Once you have selected all those fields, the Query Designer window should look like the following screenshot:
- For the row Posting Date, select Date as Method Type and Month as Method.
- For the row Quantity, select Totals as Method Type and Sum as Method.
Notice that, in the following screenshot, right after a Totals method type is selected, the Group By field is automatically selected for all the other columns in the query that are not of type Totals. This defines how the results of the query will be grouped.

- In the Properties window of the Quantity field, select Yes for the ReverseSign property.
We are analyzing sales. Sales represent a decrease in the item's inventory. Being a decrease, the Quantity field for entries of type Sale is a negative value. We want to reverse this sign because we want to see quantities sold as positive values.
- Save and compile the query. To do so, click on File | Save (or press Ctrl + S).
- We will be asked for an ID and a name for the query. We will set the ID attribute to
50000and the Name attribute toMy First Query. - The Query Designer window will be closed and we will be taken back to the Object Designer window. We will now run the query and take a look at the results. To do so, select Query 50000 My First Query and click on the Run button.
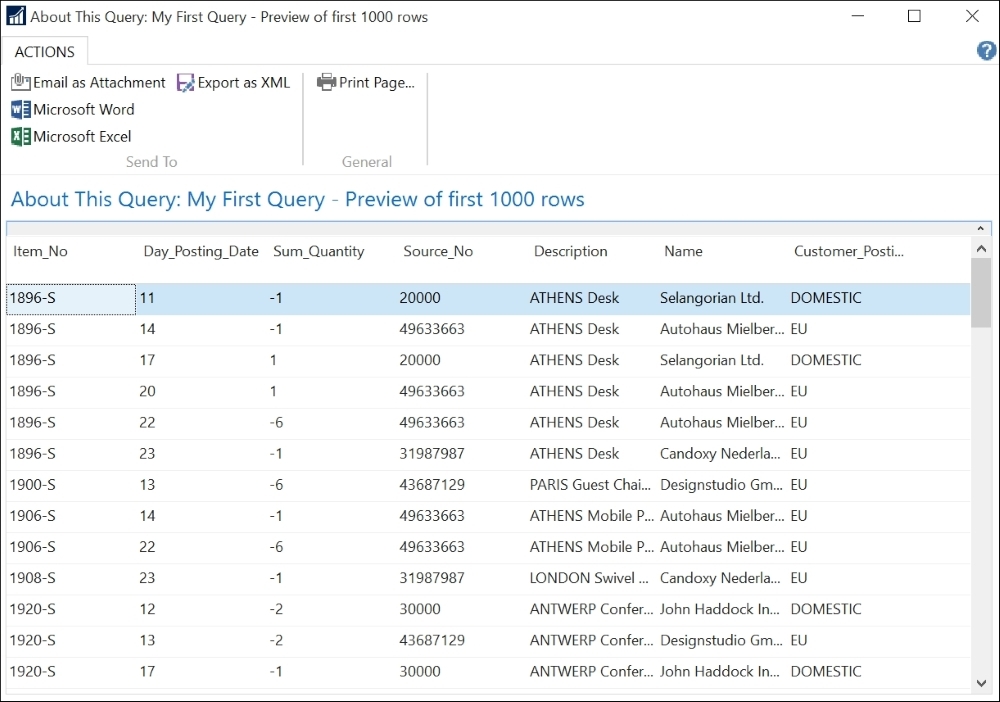
- The Windows client will open and the result of the query will be shown as follows:
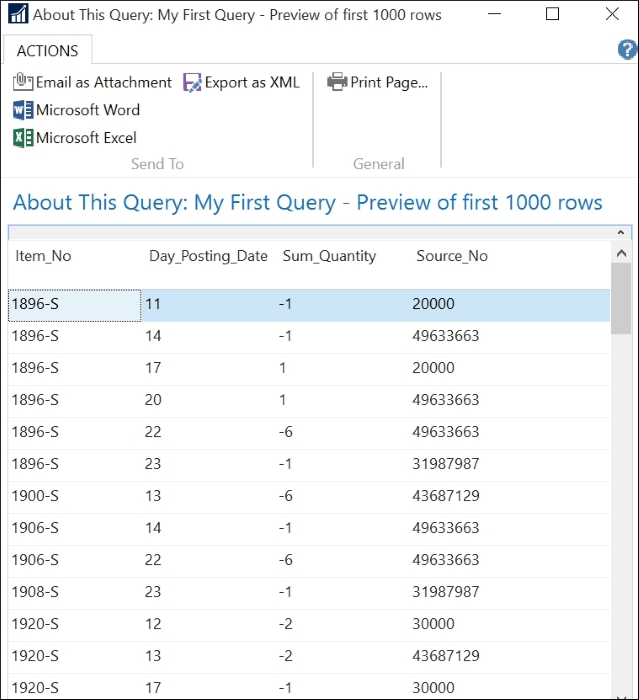
So far so good! We have defined a pretty simple query with a single data item, but we have already seen how to filter the results and the different method types, and how the results are grouped.
We will go further into the example by adding a couple of extra data items to the query.
- In the Object Designer window, select Query 50000 My First Query and click on the Design button. The Query Designer window will open with the query we were creating.
- On the first empty row, enter a DataItem value for the table Item.
- Open the Properties window for the Item data item.
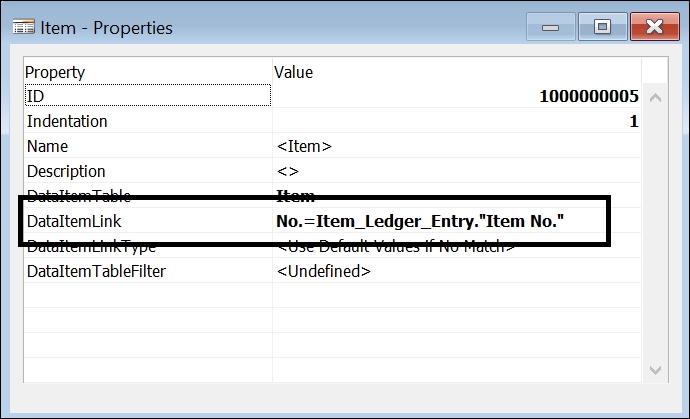
- Click on the Assist Edit button for the DataItemLink property. Select No. as the field, the Item_Ledger_Entry data item as reference DataItem, and Item No. as the reference field. Click on OK.
- Back at the Properties window, the value for the DataItemLink property should be what is shown in the following screenshot:
- Close the Properties window.
- For the Item data item, select the field Description as the Column type in the rows below the DataItem field.
- On the first empty row, enter a new data item and select Customer as the Data Source.
- Open the Properties window for the Customer data item.
- Click on the Assist Edit button. For the DataItemLink property, select No. as the field, the Item_Ledger_Entry data item as the reference data item, and Source No. as the reference field. Click on OK.
- Close the Properties window.
- For the Customer data item, select the fields Name and Customer Posting Group as the Column type in the rows below the DataItem field.
- Set the DataItemLink property to
No.=Item_Ledger_Entry."Source No.".The final query should look like the following screenshot:

- Save and compile the query.
- Run the query to see the results, as shown in the following screenshot: