
Applying AudioSuite Plug-ins to Master Clips
You can use AudioSuite plug-ins on master clips as well as on segments in a sequence. Applying an AudioSuite plug-in to a master clip lets you change the length of the media specifically for effects that perform time compression and expansion. For example, you can use a time compression/expansion plug-in to slow down the clip, thereby extending its duration, or you can lengthen the file in order to add a reverb trail. Let’s examine the use of the Time Shift plug-in on a master clip. The Time Shift plug-in can be a lifesaver when your voiceover talent is a slow or fast talker or if you want a deeper tone. The high-quality algorithm lets you adjust the duration of selected segments with or without changing pitch. Narration or even music can be adjusted to specific time lengths or timecode durations for synchronization.
To apply AudioSuite plug-ins to master clips:
1. Place the position indicator at the start of the sequence, then press the SPACE BAR to play the sequence until you reach the end of the first narration sentence, “It’s an hour into dinner service, and the blue team has just delivered their first entrée.”
2. This narration sounds a little rushed. Let’s check to see if there is room in the sequence for this narration to last longer. Place the position indicator over the first narration segment on track A8. Select track A8 and make sure all other tracks are deselected, then click the MARK CLIP button or press T to mark the clip.
3. Drag the position indicator past the end of the narration until Chef Ramsay comes on screen. This is the point where the dialogue on tracks A1 and A2 begins, so we cannot go any further than this point with the narration—roughly 01:29:11:13. (See Figure 1.22.)
4. Mark an OUT point. The center duration display at the top of the Composer window shows it is roughly 5:00 from the IN point to the OUT point. So that is how much we can extend the duration of the clip.
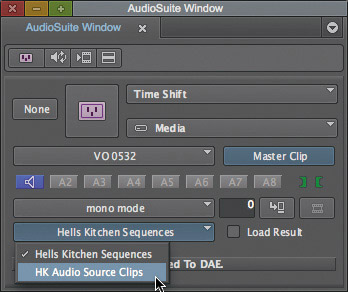
5. In the Hell’s Kitchen Project window, double-click the HK AUDIO SOURCE CLIPS bin to open it.
Figure 1.22 Drag the position indicator to the point where Chef Ramsay comes on screen.

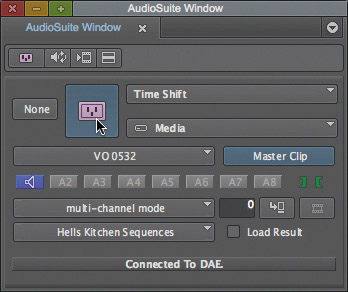
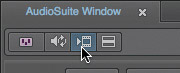
6. Choose TOOLS > AUDIOSUITE to open the AudioSuite window.
7. From the HK Audio Source Clips bin, drag the VO 05 32 clip onto the AudioSuite window.
Tip: You can drag more than one clip onto the window and then select the clip you want to work with through the Clip Selection menu.
8. To apply the Time Shift AudioSuite plug-in, choose it from the plug-in selection menu, then open the dialog box for the plug-in by clicking the ACTIVATE CURRENT PLUG-IN button, shown in Figure 1.23.
Figure 1.23 Choose the Time Shift plug-in and then click the Activate Current Plug-in button.
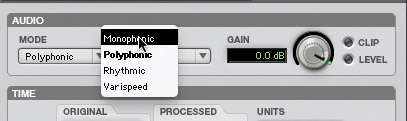
9. The Mode menu at the top of the Time Shift dialog box allows you to select the type of material you are working with. In this case it is narration, so choose MONOPHONIC from the MODE menu, as shown in Figure 1.24.
Figure 1.24 Choose Monophonic from the Mode menu when you are operating on dialogue or narration.
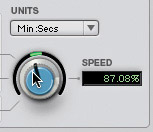
10. To change the clip’s length, rotate the SPEED knob until speed is at around 87%, as shown in Figure 1.25.
Figure 1.25 Set the Speed knob to around 87%.
11. Click the PREVIEW button at the top of the dialog box to preview the effect. After you listen to the preview play once or twice, click the BYPASS button to compare the original pace of the narration. Click the BYPASS button again to hear the affected narration. The narration is slightly slower, but the pitch of the voice is the same.
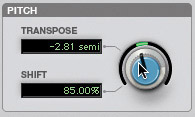
12. You can make adjustments while you are previewing the clip. Let’s adjust the pitch of the voice independently of the speed using the Pitch knob. We’ll give the narrator a slightly deeper voice. Drag the PITCH knob until the Shift field displays about 85%, as shown in Figure 1.26.
Figure 1.26 Set the Pitch knob to around 85% to create a deeper-sounding voice.
13. When Pitch is set, click the PREVIEW button to stop listening to the preview.
14. To complete the process, a new clip must be created at the new pitch and speed. Click the OK button at the top of the Time Shift dialog box, then in the AudioSuite window choose HK AUDIO SOURCE CLIPS as the bin where you want to save the new clip, as shown in Figure 1.27.
Figure 1.27 Choose HK Audio Source Clips as the bin where you want to save the new clip.
15. Click the RENDER button at the top of the AudioSuite window to start rendering, as shown in Figure 1.28.
Figure 1.28 Click the Render button to create the new clip.
When you click the Render button, Media Composer creates a new master clip in the target bin. It then names the new master clip by combining the original clip name with the effect name. The new master clip is ready to be edited into your sequence at any time.
Review/Discussion Questions
1. Where do you find the Audio EQ window?
2. The Audio EQ tool is which of the following?
a. A midrange band EQ
b. A four-band EQ
c. A three-band EQ
3. True or false: AudioSuite plug-ins are real-time plug-ins that do not require rendering.
4. Why would you use a compressor/limiter?
5. True or false: AudioSuite plug-ins can be applied only to segments in a sequence.
6. While listening to the affected clip in an AudioSuite plug-in, which button do you click to listen to the original audio?
a. Activate Current Plug-in
b. Bypass
c. Threshold
Lesson 1 Keyboard Shortcut
