
Using ExpertRender
In the previous section, you may have noticed that there was an ExpertRender In/Out menu option. ExpertRender is a feature designed to save you time in the render process, while ensuring that your system is capable of playing back all the effects in your sequence in real time. Like any automatic process in which decisions are made for you, it will do a great job sometimes and other times not so much.
First, ExpertRender uses your system’s playback performance, as indicated by the performance bars, to determine what sections of the Timeline need rendering. Then it analyzes the effects within those sections using a couple of basic rules to determine which individual effects to render.
ExpertRender selects segments in the recommended ranges using the following rules:
![]() Render any effect that isn’t completely covered by another effect that needs to be rendered.
Render any effect that isn’t completely covered by another effect that needs to be rendered.
![]() Render any non–real-time effects, unless completely covered by another effect that will be rendered. This includes nests that contain non–real-time effects.
Render any non–real-time effects, unless completely covered by another effect that will be rendered. This includes nests that contain non–real-time effects.
Note: Media Composer is always “testing” your system playback performance, regardless of the playback quality setting in the Timeline.
To render a sequence using ExpertRender:
1. From the RTS PT2 FX SEQUENCES bin, load the RTS PT2 FX LESSON XB sequence.
2. Verify that all tracks are enabled and the video monitor is set to the top track.
3. Set the VIDEO QUALITY menu to FULL QUALITY (green/green).
4. Play the sequence, taking note of any areas where the system drops frames.
5. Mark an IN point at the beginning of the sequence and an OUT point at the end.
6. Right-click the Timeline and select EXPERTRENDER IN/OUT. The ExpertRender dialog box opens, as shown in Figure B.8.
Figure B.8 Select Render Recommended Ranges to leverage your system’s performance data.
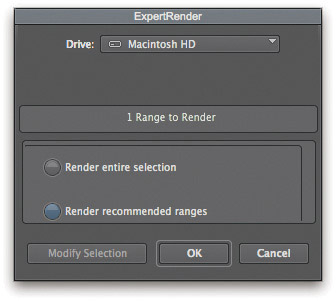
By default, the RENDER RECOMMENDED RANGES option is selected. This will render any effect segment where frames were dropped during playback and the effects just before that location.
7. Select the drive on which to create the render files and click OK. The segments it is rendering are highlighted, and a window shows the progress of the renders. When complete, the sequence can be played back in real time.
Note: In the ExpertRender dialog box, the Render Entire Selection option will apply the logic of ExpertRender without taking into account your system’s performance capability. This will result in a very conservative render selection and is only slightly faster than rendering all effects in the sequence.
The logic of ExpertRender errs on the side of caution, taking a conservative approach to how many effects need to be rendered. If you are going to play a sequence directly to broadcast from the Timeline, or are simply screening a scene for the client, Avid assumes that you’d rather spend an extra minute rendering than have the system hiccup during playback. But let’s be realistic: Not every time you render is it for a high-stakes playback situation. As a result, there are times that you may wish to change the selection of ExpertRender.
Improving ExpertRender
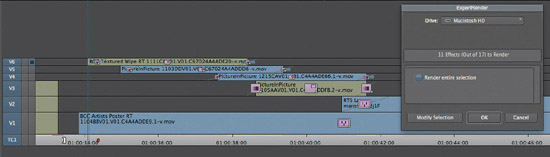
As mentioned before, ExpertRender understands that if a segment is completely covered by a segment on a higher track that needs to be rendered, the lower effect can be skipped. But what if it sticks out a little bit, like the clip on V4, as shown in Figure B.9? Most of the effect is covered by another effect, but ExpertRender will want to render it completely.
Figure B.9 ExpertRender naturally selects these effects for render.
Depending on how much the lower effect sticks out, you may be able to get away with rendering only the top effect. As usual, there is an easy way to override the automatic function.
To override the ExpertRender selection:
1. If it’s not already open, load the RTS PT2 FX LESSON sequence.
2. Open the MARKERS tool from the TOOLS menu and double-click MARKER 0003. The position indicator will jump to that location in the Timeline.
3. Mark an IN mark before the first effect in this effect composite and an OUT point after the last effect.
4. Right-click on the Timeline and select EXPERTRENDER IN/OUT.
5. Click the MODIFY SELECTION button. The ExpertRender dialog box disappears, but the effect segments remain selected in the Timeline.
6. Shift-click the segments on V1 and V2 to deselect them.
7. Click the RENDER EFFECT button in the Timeline. A Render Effect dialog box opens.
8. Select the drive on which to create the render files and click OK. All the selected segments are rendered.
Tip: Another way to improve ExpertRender’s selection is to use the Add Edit command to divide a segment so the portion that sticks out is rendered by itself.
If you change the ExpertRender selection, it’s always a good idea to test playback of the sequence when the render is complete—just to be sure you are still able to play all the effect composites in real time.
Controlling Render Speed and Quality
If you’re like most editors, your first inclination is always to want the best quality possible. This produces beautiful images, but it’s also the slowest way to go.
During the edit process, you may find yourself building complex effects and simply need a quick view of how well all the animated elements work together. Once all effects are finished, you can re-render at a high quality before showing the director or client.
This approach is often the most efficient way to work with effects-heavy sequences. There are two keys to this workflow:
![]() Changing the render quality setting
Changing the render quality setting
![]() Clearing existing renders to be able to re-render
Clearing existing renders to be able to re-render
Changing the Render Setting
The Render setting, found in the Settings pane of the Project window, has a number of options that control the quality of renders and image scaling, as well as the default render method used for motion effects.
To set the render quality for fast, draft-quality renders:
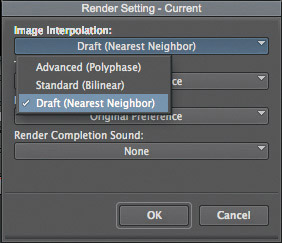
1. Open the RENDER setting from the Settings pane of the Project window. The Render Setting window opens, revealing several drop-down menus. The top one, Image Interpolation, controls the algorithm used to calculate effects, thereby controlling both the quality and the time it takes to complete.
2. Click the IMAGE INTERPOLATION menu.
3. Select DRAFT (NEAREST NEIGHBOR), as shown in Figure B.10.
Figure B.10 Use draft interpolation for “quick and dirty” renders.
With the system configured like this, all the effects will be rendered as fast as possible but at a lower image quality.
This is the ideal configuration when working on an effects-heavy sequence in which you will be doing numerous renders and want to minimize render time during the creative process. Before final output, you should re-render the effects at a higher quality setting.
To set the render quality for mastering-quality renders:
1. Open the RENDER setting from the Settings pane of the Project window.
2. Click the IMAGE INTERPOLATION menu.
3. Select ADVANCED (POLYPHASE).
Render Settings and Video Scaling
Media Composer lets you mix video of any size and format in the same Timeline. Any shots that don’t fit the native format of the project will automatically be scaled to fit, and the frame rate will be adapted automatically to the project.
The Image Interpolation setting within Media Composer affects the quality of this scaling operation. For example, if you’re cutting an HD project and have mixed in some SD video, Media Composer is capable of automatically scaling that to an HD image size at broadcast quality, but only if Image Interpolation is set to Advanced. If Image Interpolation is set to Standard or Draft, the quality of the upscaled SD images may be unacceptable.
Clearing Renders
Once an effect is rendered, Media Composer won’t automatically render it again. This is a convenient feature most of the time. For example, suppose you’ve rendered several effects in the sequence, and you want to render the rest of the effects before output. You could simply render the entire sequence; no time will be wasted re-rendering any effects already rendered.
However, in this case you’ve rendered some effects at draft quality, and you want to re-render at mastering quality. The default behavior won’t do at all. Not to worry, you can easily get around it with the Clear Renders command, which breaks the link between an effect and its render file, leaving the effect again unrendered.
Tip: If you accidentally clear renders on an effect that you didn’t mean to, press Ctrl+Z (Windows) or Command+Z (Mac) to undo the action. Media Composer will relink the render file to the effect.
To clear renders:
1. If it’s not already open, load the RTS PT2 FX LESSON XB sequence.
2. Mark an IN point at the beginning of the sequence and an OUT point at the end.
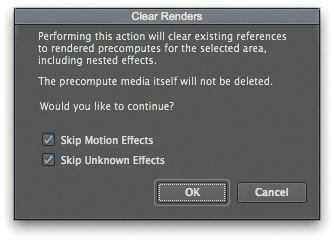
3. Enable all tracks, then right-click in the Timeline and select CLEAR RENDERS IN/OUT. A dialog box opens, as shown in Figure B.11. The default settings will protect the render files from any motion effects as well as any plug-in effects not installed on your system—a.k.a. “unknown effects.” These would have been created by another editor sharing the sequence.
Figure B.11 The Clear Renders dialog box.
4. Click OK. All effects within the selected area of the Timeline will now be unrendered, ready for you to render at a higher quality.
Note: Clear Renders doesn’t delete the render files, because you may be sharing that media with other editors. Be sure to go back and delete the precomputes (render files) for the project using the Media tool when the project is complete.
Congratulations! Armed with the knowledge you’ve gained in this lesson and this course, you can create a wide variety of effects in Media Composer. Just as important, you know how to manage system resources to work the most efficient way possible. In a world where time is money, this is a big advantage!