
Audio EQ Tool
You’ve probably used an equalizer before if you’ve ever adjusted the bass or treble frequency on your stereo or car radio. Although a bit more advanced, the Audio EQ (equalization) tool in Media Composer lets you boost or cut the bass, midrange, and treble frequencies of an audio clip. It also includes a number of EQ presets that make it easy to get commonly used EQ settings without a lot of fiddling.
In this lesson, you’ll use a scene from the reality cooking competition television series Hell’s Kitchen. First, you’ll EQ some dialogue and then learn about AudioSuite plug-ins and all the sound design tools built into Media Composer.
To prepare to use the Audio EQ tool:
1. Open Media Composer. The Avid Projects folder should be located on your desktop if you followed the installation instructions, so they won’t show in the Select a Project list by default.
2. Click the BROWSE button. (See Figure 1.1.) The Browse for Folder (Windows) or Project Directory (Mac) dialog box opens.
Figure 1.1 Click the Browse button and navigate to the Avid Projects folder on your desktop.

3. Navigate to and select the AVID PROJECTS folder located on your desktop, then click OK (Windows) or OPEN (Mac).
4. Select HELL’S KITCHEN PT2 in the Projects list and click OK. The Project window opens and lists all the bins associated with this project. The bin you’ll use in this lesson is HK Audio FX, which contains sequences you’ll use throughout this lesson.
5. Double-click the HK AUDIO FX bin in the Project window.
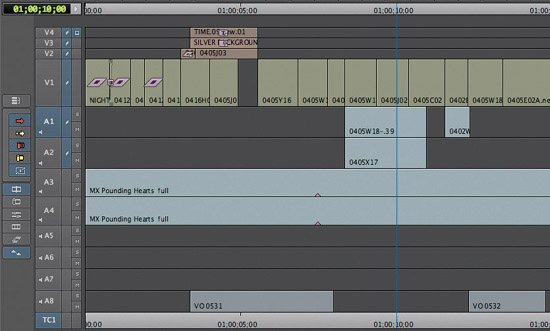
6. In the bin that opens, double-click HK AUDIOFX START. The sequence appears in the Record monitor (see Figure 1.2). This is a scene from the Hell’s Kitchen television show.
7. Whenever you begin working on a sequence, you should always watch it to get an understanding of the content. Place the position indicator at the start of the sequence by pressing the HOME key on the keyboard. (If you are on a Mac without a Home key, press the FUNCTION+LEFT ARROW keyboard shortcut.)
Figure 1.2 Viewing the HK AudioFX-START sequence in the Record monitor.

8. Press the SPACE BAR to play the sequence until the end. As you view the sequence, take particular notice of the dialogue and voiceover narration.
9. When done listening to the sequence, place the position indicator over the first segment on tracks A1 and A2, as shown in Figure 1.3. This is the first dialogue with Chef Ramsay.
Figure 1.3 Place the position indicator over the first segment on tracks A1 and A2.
10. Select tracks A1 and A2 and make sure all other tracks are deselected, and then click the MARK CLIP button or press T to set IN and OUT points around the clips.
11. To clearly hear your EQ, it’s best to solo the tracks. Click the SOLO buttons for tracks A1 and A2 (see Figure 1.4).
Figure 1.4 Solo tracks A1 and A2.

To use the Audio EQ tool:
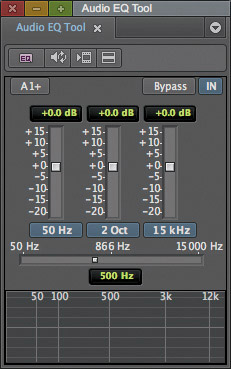
1. With A1 and A2 selected and marked, select TOOLS > AUDIO EQ. The Audio EQ tool opens. (See Figure 1.5.) The Audio EQ tool provides three “bands” of EQ: The left slider is the bass or low shelf, which affects all low frequencies from 240 Hz to 50 Hz and below. The far right slider is the treble or high shelf, which affects all high frequencies from 6 kHz to 20 kHz and higher. The middle slider is the midrange, which affects frequencies between the low shelf and the high shelf as narrow as ¼ octave or as wide as two octaves.
Figure 1.5 The Audio EQ tool provides three bands of EQ: low shelf, midrange and high shelf.
Note: Audio EQ is applied only to an entire segment or to multiple segments between IN and OUT points. To affect portions of a segment, you can use the Add Edit button to create smaller segments.
Vibrations in the air, called frequencies, cause sound. If there are 240 vibrations, the sound is described as being at 240 hertz (Hz). The lower the Hz, the lower the pitch. The higher Hz, the higher the pitch. When adjusting EQ, the low, mid, and high bands are determined by the range of frequencies that they adjust. The midrange EQ can be as wide as two octaves. An octave is the range between two pitches, one of which is twice the frequency of the other. A sound at the frequency of 240 Hz is an octave lower than a sound at the frequency of 480 Hz.
2. Click the Audio EQ tool FAST MENU button and select SET EQ IN/OUT (see Figure 1.6) to apply any adjustments to the marked segments.
Figure 1.6 From the Fast menu, select Set EQ IN/OUT.

3. To play the currently selected audio clip, click the AUDIO LOOP PLAY button from the basic tools in the upper part of the EQ window. Click it again after you have heard the entire clip.
Tip: If no IN and OUT points are set, the Fast menu option applies the EQ effect to the entire tracks that are selected.
4. The Audio EQ tool Fast menu provides access to a number of predefined EQ templates. Click the Audio EQ tool FAST MENU button and choose MALE VOICE WITH PRESENCE, as shown in Figure 1.7. An EQ icon appears on the Timeline segment that was selected, indicating that an EQ effect is applied.
5. Click the AUDIO LOOP PLAY button to hear the applied template.
6. While the audio plays, click the BYPASS button to listen to the original audio and then click BYPASS again to hear the change.
Tip: Depending on your system performance, it may take a few seconds for the changes to be heard as you adjust the EQ. You can improve the response time by not monitoring the video track.
Figure 1.7 Choose Male Voice with Presence from the Fast menu.

7. If you aren’t happy with the templates, you can return to the EQ adjustments and set the EQ yourself. Click the OVERRIDE WITH DEFAULT EQ button. The EQ tool returns to display the EQ parameter adjustments.
8. As a general rule, when dialogue or narration will be over a soundtrack, it’s best to aim for a thinner-sounding EQ (less bass, more treble and midrange). Click the MIDRANGE slider and drag it up, boosting it by 10 or 15 dB. (See Figure 1.8.) It’s helpful to boost a slider significantly at first, to hear the change more noticeably. The bottom half of the Audio EQ tool shows a frequency response curve. As you make adjustments, the horizontal center line of the frequency response curve moves above the zero line (or below if you drag the slider down), indicating that the corresponding frequencies are emphasized.
Figure 1.8 Drag the Midrange slider up by 10 or 15 dB.

Tip: The human voice has a frequency range of approximately 100–5,000 Hz. As a general guideline, if you have a person with a nasal voice on camera, try to deemphasize the 1 KHz range; for bothersome plosives and rumblings, deemphasize below 100 Hz; and to add clarity, boost the range above 2 KHz. Above all, don’t use EQ just because you can; use it with a goal in mind.
9. The center slider you adjusted is a sweepable midrange slider. The horizontal slider under the three EQ sliders (see Figure 1.9) is called the Frequency Range slider, and it is used to set the midrange anywhere within a wide frequency range. To add more clarity or presence, place the FREQUENCY RANGE slider around 2,500 HZ.
Figure 1.9 Drag the Frequency Range slider to around 2,500 Hz.

10. After adjusting different areas of the midrange, return the slider to the zero setting. Then start boosting the slider in small steps until you reach what you consider to be the best sound, somewhere around 5 dB.
11. The EQ you have created can probably be used for other dialogue in this program. To reuse this EQ on other segments, you can save it as an EQ effect setting. To save EQ settings, drag the effect icon in the upper left of the Audio EQ tool (see Figure 1.10) to the HK AUDIO SOURCE CLIPS bin. Once you have saved an EQ effect to a bin, you can drag the effect icon from the bin to any audio segments in the Timeline.
Figure 1.10 Drag the effect icon in the Audio EQ tool to a bin to save it as an effect.

Tip: You can remove audio EQ effects with the Audio EQ tool Fast menu, with the Remove Effect button, or by selecting the segment with the Segment Smart tool and pressing the Delete key. You will learn more about removing effects in Lesson 2, “Introduction to Visual Effects.”
12. Close the Audio EQ tool and disable the SOLO button on both the A1 and A2 tracks.
13. Place the position indicator at the start of the sequence by pressing the HOME key on the keyboard. (If you are on a Mac without a Home key, press the FUNCTION+LEFT ARROW keyboard shortcut.)
14. Press the SPACE BAR to play the sequence through your EQ-affected segments.
You now have clear-sounding dialogue that cuts through the music. Although EQ might be the most common audio processing used in post-production, Media Composer includes a number of other options that can improve your sound design as well. Those other options are included as audio plug-ins called AudioSuite.
Understanding AudioSuite Plug-ins
Once you get beyond level, pan, and the basic three-band EQ controls, all of Media Composer’s audio processing is handled by AudioSuite plug-ins. AudioSuite, Avid’s audio plug-in standard, opens up your audio processing to plug-ins developed by Avid and by third-party developers. From fix-it style plug-ins like noise removal and time compression/expansion to creative delays and lo-fi sound simulators, plug-ins perform a wide range of audio processes for post-production. Media Composer includes over three dozen audio-processing effects, and there are many more to choose from if you want to expand your options. To start, let’s highlight a few AudioSuite plug-ins and their uses; then we’ll work with some of the most popular ones.
![]() BF Essential Clip Remover. If audio isn’t monitored constantly during production, it can exceed the maximum level of your recording device. This can cause clipping, which is when the loudest peaks of audio are not even recorded, they are just “clipped” off. The BF Essential Clip Remover, shown in Figure 1.11, repairs clipped audio recordings, potentially saving you from having to re-record.
BF Essential Clip Remover. If audio isn’t monitored constantly during production, it can exceed the maximum level of your recording device. This can cause clipping, which is when the loudest peaks of audio are not even recorded, they are just “clipped” off. The BF Essential Clip Remover, shown in Figure 1.11, repairs clipped audio recordings, potentially saving you from having to re-record.
Figure 1.11 BF Essential Clip Remover repairs clipped audio recordings.

![]() De-Esser Dyn 3. High-frequency noises that can occur from “ess” and “shh” sounds in narration can cause peaks in an audio signal and lead to distortion. The De-Esser Dyn 3 plug-in, shown in Figure 1.12, reduces these unwanted sounds to produce a smoother voiceover.
De-Esser Dyn 3. High-frequency noises that can occur from “ess” and “shh” sounds in narration can cause peaks in an audio signal and lead to distortion. The De-Esser Dyn 3 plug-in, shown in Figure 1.12, reduces these unwanted sounds to produce a smoother voiceover.
Figure 1.12 The De-Esser Dyn 3 plug-in reduces high-frequency noises like “ess” and “shh” sounds in narration.

![]() D-Verb. Digital reverberation processing can simulate natural reflections and echoes of sound that occur in different-sized rooms. Reverberation can take relatively dull source material and create an environment that gives audio a perceived weight and depth in a mix. D-Verb, shown in Figure 1.13, provides control over these reverberation parameters so that extremely natural-sounding reverb effects can be produced.
D-Verb. Digital reverberation processing can simulate natural reflections and echoes of sound that occur in different-sized rooms. Reverberation can take relatively dull source material and create an environment that gives audio a perceived weight and depth in a mix. D-Verb, shown in Figure 1.13, provides control over these reverberation parameters so that extremely natural-sounding reverb effects can be produced.
Figure 1.13 D-Verb can simulate natural reflections of sound that occur in different-sized rooms.

![]() Expander/Gate Dyn 3. Expanders operate on low-level audio to make quiet sounds quieter. A threshold is set, and any noise below that threshold is decreased. It is most often used as a form of noise reduction, and that is why it is combined with the Gate function, which is a more heavy-handed noise-reduction tool. (See Figure 1.14.)
Expander/Gate Dyn 3. Expanders operate on low-level audio to make quiet sounds quieter. A threshold is set, and any noise below that threshold is decreased. It is most often used as a form of noise reduction, and that is why it is combined with the Gate function, which is a more heavy-handed noise-reduction tool. (See Figure 1.14.)
Figure 1.14 Expanders operate as a form of noise reduction on low-level audio.

![]() Normalize. Normalize raises the peak of the audio signal as high as it can be without distortion; the remaining audio signal is adjusted by the same amount. Normalize is used when volume faders can’t make a quiet segment loud enough and re-recording is not an option. (See Figure 1.15.) But be warned, Normalize increases the signal and therefore increases the noise.
Normalize. Normalize raises the peak of the audio signal as high as it can be without distortion; the remaining audio signal is adjusted by the same amount. Normalize is used when volume faders can’t make a quiet segment loud enough and re-recording is not an option. (See Figure 1.15.) But be warned, Normalize increases the signal and therefore increases the noise.
Figure 1.15 Normalize raises the peak of the audio signal as high as it can be without distortion.

Media Composer supports a second type of AudioSuite plug-in called Real-Time AudioSuite, or RTAS. RTAS plug-ins are audio effects that you apply to tracks rather than to segments within your sequence. Unlike AudioSuite plug-ins, RTAS plug-ins are processed on tracks in real time, without being rendered first. This lets you add a type of audio track effect that is supported in all versions of Avid Pro Tools.
When you use more than one plug-in on a track, Media Composer processes them in a series. Each effect is added to any previous effect (moving from left to right in the Track Control panel).
Avid qualifies a number of RTAS plug-ins manufactured by Avid for use with the current version of Media Composer. Avid also supports some plug-ins from third-party vendors that you can purchase separately. To explore additional audio plug-ins for purchase, choose Media Composer Marketplace > Audio Plugins.
If you move your sequence from one Avid editing application to another system and the RTAS plug-in is not installed on that system, “Unavailable Effect,” the name of the effect, and other information appears in the RTAS tool.