
Using AudioSuite Plug-ins
Now that you understand what AudioSuite is and some of the more essential plug-ins, let’s put a couple of the most popular ones into action. The Compressor/Limiter Dyn 3 plug-in automatically adjusts the audio signals that exceed a specific threshold in order to smooth out volume changes. A classic example of when to use a compressor/limiter is an interview on camera with the person wearing a lavalier microphone. Every time the interviewee looks down, the volume increases because his mouth moves closer to the microphone. In our sequence, the compressor/limiter can help with the more subtle variations in the narration.
To use the Compressor/Limiter Dyn 3 plug-in:
1. Place the position indicator at the start of the sequence then press the SPACE BAR to play the sequence until you reach the end of the second narration sentence, “But Chef Ramsay is a little suspicious.” (See Figure 1.16.)
Figure 1.16 Play through the second narration line “But Chef Ramsay is a little suspicious.”

2. After listening to the sequence, place the position indicator over the second narration segment on track A8.
3. Select track A8 and make sure all other tracks are deselected, and then click the MARK CLIP button or press T to set IN and OUT points around the segment.
4. Solo track A8 so you are not distracted by the music tracks.
5. Choose TOOLS > AUDIOSUITE to open the AudioSuite window.
6. To apply the Compressor/Limiter Dyn 3 AudioSuite plug-in, choose it from the plug-in selection menu. (See Figure 1.17.)
Figure 1.17 Choose Compressor/Limiter Dyn 3 from the plug-in selection menu.

7. To open the dialog box for the plug-in, click the ACTIVATE CURRENT PLUG-IN button, shown in Figure 1.18.
Figure 1.18 Click the Activate Current Plug-in button to open the dialog box.

8. The plug-in dialog box opens, showing the controls for the particular plug-in. (See Figure 1.19.) Although the Compressor/Limiter controls appear intimidating, there are two primary controls: Ratio and Thresh (short for Threshold). The Ratio knob displays ratios—1:1, 2:1, 3:1, etc. The ratio reflects how many input decibels are needed to produce one decibel of change in the output. A very high ratio setting would flatten all of the dynamics. For speech, a ratio from 2:1 to 4:1 will give the right amount of compression while still sounding natural. Drag the RATIO knob to about 4.0:1.
Figure 1.19 Drag the Ratio knob to 4.0:1 to add natural-sounding compression for narration.

9. To hear the change, click the PREVIEW button at the top of the Compressor/Limiter dialog box. Once the entire narration is played, click the BYPASS button to hear the original audio. Click BYPASS again to return to the affected audio.
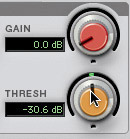
10. Thresh will set the point at which the compressor will start to kick in. By setting Thresh, you can choose to have the compressor start working on low volumes or work when the volume gets loud. Drag the THRESH knob to about –30 DB to lower the threshold for compression. (See Figure 1.20.)
Figure 1.20 Drag the Thresh knob to –30 dB to set the trigger point for the compression.
11. To hear the change, click the PREVIEW button at the top of the Compressor/Limiter dialog box. Once it has played through the entire narration, click the BYPASS button to hear the original audio. Click BYPASS again to return to the affected audio.
12. The Compression settings have the side effect of lowering the volume of the audio segment. Increase the GAIN knob to between roughly 6.0 and 7.0 DB to compensate for the compression. As you preview the segment, watch the Output level meters on the left side of the dialog box to ensure the peak signal levels are still well below 0 dB after increasing the gain. (See Figure 1.21.)
Figure 1.21 Increase the Gain knob to 7.0 dB to compensate for the compression.

13. Unlike RTAS plug-ins, AudioSuite plug-ins need to be rendered to play in the sequence. Rendering creates a file on disk for the affected portion of the clip, which is then used to play in the sequence. Click the RENDER button at the top of the Compressor/Limiter Dyn 3 dialog box to render the effect. In the Render Effect dialog box, select the drive where you want to store the file, and then click OK.
14. Close the Compressor/Limiter Dyn 3 dialog box and then close the AudioSuite window.
15. Click the SOLO button on track A8 and press the SPACE BAR to hear the full mix with the newly compressed audio.
When you have the AudioSuite plug-in applied to your sequence, the segment will have an audio plug-in icon. The icon indicates you have a plug-in effect on the segment, making it easy to locate the segments with AudioSuite processing applied.