
Adding Segment Effects
In Media Composer, effects can be broken down into three different types:
![]() Transition effects. As you’ve learned, these are applied at the transition point between two clips, often to emphasize a change of time or theme. Transition effects include dissolves, dip-to-color transitions, wipes, pushes, squeezes, and spins.
Transition effects. As you’ve learned, these are applied at the transition point between two clips, often to emphasize a change of time or theme. Transition effects include dissolves, dip-to-color transitions, wipes, pushes, squeezes, and spins.
![]() Segment effects. These are applied to an entire clip within a sequence to change the look of a clip. Segment effects include color effects, masks, and resizes.
Segment effects. These are applied to an entire clip within a sequence to change the look of a clip. Segment effects include color effects, masks, and resizes.
![]() Motion effects. These are applied to entire clips within a sequence or to source clips to vary the frame rate or motion of the footage. Motion effects are covered in more depth later in this book.
Motion effects. These are applied to entire clips within a sequence or to source clips to vary the frame rate or motion of the footage. Motion effects are covered in more depth later in this book.
Note: No matter which type of effect you want to apply, you can access it from the Effect Palette.
Media Composer offers more than 90 customizable transition and segment effects. All segment effects are accessed through the Effect Palette.
To add segment effects:
1. If the Effect Palette isn’t open already, choose TOOLS > EFFECT PALETTE or press CTRL+8 (Windows) or COMMAND+8 (Mac) to open the Effect Palette.
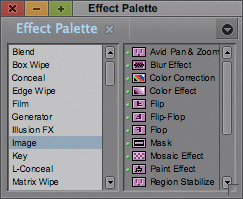
2. Click the IMAGE entry on the left side of the Effect Palette to show all effects in the Image category, as shown in Figure 2.29. The Image category has a number of commonly used segment effects that can be useful in any project.
Figure 2.29 Displaying effects in the Image category.
3. Review the project to find a shot that requires a change. To begin, press the HOME key to place the position indicator at the start of the project. (If you use a Mac with no Home key, press the FUNCTION+LEFT ARROW keyboard shortcut.)
4. Press the SPACE BAR to play the sequence. Press it again to stop playback after Matt Damon says, “With people and cultures as unpredictable as the landscape.”
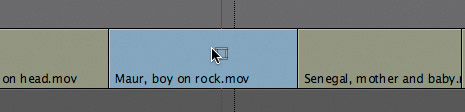
5. The narration plays over a series of people shots, from the Woman with Bag on Head shot to the night shot of people dancing around a pole. During these shots, your eye must dart back and forth across the screen because each shot has its subject framed on opposite sides. It would be less strenuous if your eye could stay in a similar area of the frame for at least two consecutive shots. To make this so, drag the position indicator in the Timeline back and forth over the BOY ON ROCK clip (see Figure 2.30) and the MOTHER WITH BABY clip, around 17 seconds into the sequence.
Figure 2.30 The Boy on Rock clip.

6. Moving the boy to the other side of the frame would align it better with the mother and baby. To enact this, drag the FLOP icon from the right side of the Effect Palette to the BOY ON ROCK segment in the Timeline. As shown in Figure 2.31, the segment becomes highlighted.
Figure 2.31 Dragging the Flop effect to the Boy on Rock segment.
7. Release the mouse button. The effect is applied, and the Flop icon appears on the clip.
Tip: If you apply an effect to a segment or transition that already has an effect, the new effect replaces the old one.
8. Let’s review the segment effect. Press the HOME key to place the position indicator at the start of the project. (If you use a Mac with no Home key, press the FUNCTION+LEFT ARROW keyboard shortcut.)
9. Press the SPACE BAR to play the sequence. Press it again to stop playback after Matt Damon says, “With people and cultures as unpredictable as the landscape.”