
Nesting Effects
As you’ve learned previously, effects can be placed on any clip in the Timeline. But if an effect is already applied to that clip, the new effect replaces the existing effect. This is fine when you are experimenting to see which type of effect works best. But what if, for example, you want to both resize a clip and desaturate it?
Avid Media Composer allows you to apply multiple effects to a single clip via a process known as nesting. At the most basic level, a nest contains multiple effects on a single video segment. Nests, however, can be much more complex, with multiple layers all nested within a single clip.
In this lesson we’ll look at simpler forms of nests, and in the next lesson we’ll look at multilayer nests as part of our discussion of layering.
Let’s load the sequence we’ll be working with in this lesson.
To load the lesson sequence:
1. If the Running the Sahara project is not open from the last lesson, start Media Composer, select the RUNNING THE SAHARA project on the left side of the Open Project dialog box, and click the OPEN button.
The Project window opens and lists all the bins associated with this project. The bin you’ll use in this lesson is the RTS PT2 FX Sequences bin, which contains a number of sequences you’ll use throughout this book.
2. Double-click the RTS PT2 FX SEQUENCES bin in the Project window to open it.
We’d like to create a freeze frame of a clip already edited into the sequence, and fortunately that’s very easy to do.
3. In the RTS PT2 FX Sequences bin window, double-click the RTS FX PT2 LESSON 06 sequence. The sequence appears in the Record monitor.
Autonesting
If you need to apply more than one effect to a clip, the easiest approach is to use a technique known as Autonesting. This technique adds a new effect on top of an existing effect, such as a Resize effect on top of a Color Correction effect.
To load the first clip we want to work on:
1. Choose TOOLS > MARKERS to open the Markers window.
2. Double-click on the marker named FIX ASPECT RATIO to jump to that location in the Timeline.
Notice that this shot has a color correction already applied to it. In addition, it has been letterboxed, and there’s a timecode readout burned into the frame over the upper letterbox region. This clip was obviously designed to be displayed in a standard 4×3 aspect ratio rather than the 16×9 aspect ratio of all other clips. As a result, it doesn’t match anything else in the sequence, and the material inside the clip is distorted. We can correct this by resizing the clip vertically until the black bars are outside of the visible frame and the aspect ratio has been corrected.
We don’t want to lose the correction, though, which is what would happen if we were to just drag and drop the Resize effect onto the clip.
To Autonest one effect on top of another:
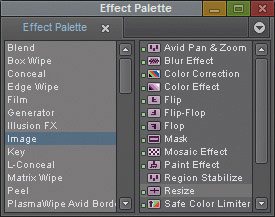
1. Choose TOOLS > EFFECT PALETTE to open the Effect Palette.
2. Click on the IMAGE category on the left side of the window. (See Figure 6.1.)
Figure 6.1 Image effects category.
3. Hold the ALT key (Windows) or OPTION key (Mac) down and apply the RESIZE effect to the clip.
The effect icon changes, and instead of a Color Correction effect icon we see a Resize effect icon. If you held the Alt key (Windows) or Option key (Mac) down throughout the entire drag-and-drop operation, the Resize effect was Autonested on top of the Color Correction effect, and the system should be showing the composited result of both effects. (The Resize effect, however, isn’t actually doing anything yet. We’ll modify its parameters in a moment.)
If, however, you saw the shot of the man in the turban change its appearance (with the beard becoming grayer and the shadows in the turban less well defined), then you didn’t hold the Alt key (Windows) or Option key (Mac) key down through the entire drag-and-drop action. You’ll need to undo your action and redo step 3, making sure that you hold the Alt key (Windows) or Option key (Mac) down until after you release the mouse.
You could continue to Autonest additional effects on top. This can be very beneficial, especially in advanced effects operations where you need to apply multiple treatments to a clip using, for example, both a Color Correction effect or a Color Effect and third-party plug-in effects. (Third-party plug-in effects are discussed in Appendix A, “Using AVX Third-Party Plug-ins.”)
Other than the image appearing to still be color corrected, how can you tell that two effects are applied to the shot? You can use the Effect Editor, or you can display the nest in the Timeline. Let’s look at each of those approaches.
Seeing Multiple Effects in the Effect Editor
If you have nested multiple effects on a single clip, the parameters for every effect applied are available in the Effect Editor.
To see and manipulate nested effects in the Effect Editor:
1. If you aren’t already, park on the clip on which you Autonested the Resize effect.
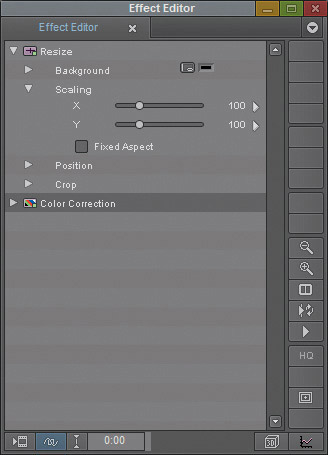
2. Click on the EFFECT MODE button in the Timeline palette to enter Effect mode. (See Figure 6.2.) Notice that the Effect Editor shows both the Resize and Color Correction effects.
Figure 6.2 Effect Editor with two effects displayed.
While we’re here, let’s adjust the settings of the Resize effect to fix the shot’s problem.
To convert a 16×9 letterboxed clip to a 16×9 widescreen clip:
1. If it isn’t already, open the SCALING parameter group by clicking on the right-pointing triangle to the left of the group name.
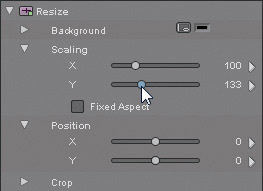
2. Click on the Y parameter control and set the parameter to 133, as shown in Figure 6.3. The black bars are no longer visible, and the image’s distortion has been corrected.
Figure 6.3 Position Y set to 133.
3. Scrub or play through the clip to see the finished effect.
Tip: If you know the specific value you want to use for an effect parameter, you can enter that value using the numbers on your keyboard. Simply click the parameter slider to activate it, and then type the desired value.
Displaying a Nest in the Timeline
The second way you can see effects within a nest is to display the nest in the Timeline. Two methods are available: simple nesting and expanded nesting.
Method One: Simple Nesting
In this method you travel down inside a nest, and the video Track monitor travels with you, allowing you to see the lower effects in isolation from the effects above them. This is a very useful technique, especially for complex effect nests, as it allows you to “lift up” higher effects so that you can focus on the effects beneath.
To step into an effect nest:
1. If you aren’t already there, park the position indicator on the clip in the Timeline to which you just added the Resize effect.
2. Make sure that the V1 track is active.
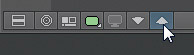
3. Click the STEP IN button at the bottom of the Timeline. (See Figure 6.4.)
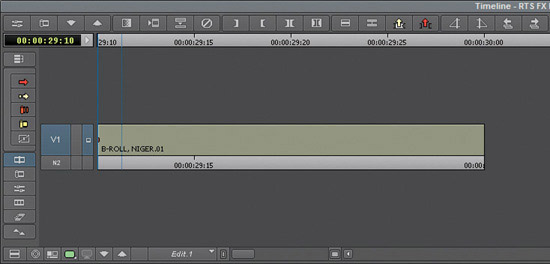
Once you step into a nest, the Timeline view changes, and only the contents of the nest (i.e., what’s beneath the Resize effect) are visible, as shown in Figure 6.5.
Figure 6.5 Resize effect nest contents.

When you are inside a nest, you can access only the contents of that nest. This means that not only are the clips before and after the effect you stepped into not accessible while you are inside the nest, but neither is audio.
We can continue to step in as long as there are effects to step into.
4. Click the STEP IN button again to step into the Color Correction effect to see the contents of that effect. (See Figure 6.6.)
Figure 6.6 Color Correction effect nest contents.
Since there are no additional effects, the content of the Color Correction effect is the original clip. When you have stepped into a nest, you can always tell how deep you are by looking at the track patching panel. Beneath the video tracks appears a nest depth indicator, as shown in Figure 6.7.
Figure 6.7 Nest depth indicator.

In this case we are at nest level two, or two levels deep. The first nest level is inside the Resize effect, and the second level (where we are currently) is inside Color Correction effect. Effects are always processed from the bottom of the nest up. In this case, that means that Color Correction effect is processed, and then the results of the correction are fed into the Resize effect. This order of processing is significant and can have an impact on the final effect, as we’ll see shortly.
Let’s step back out to the top of the sequence.
To step out of an effect nest:
1. Click the STEP OUT button at the bottom of the Timeline. (See Figure 6.8.)
You are now back to nest level one, above the Color Correction effect but below the Resize effect. Let’s step out to the top of the nest.
2. Click the STEP OUT button once more to step out of the nest.
Now let’s look at the other method of stepping into a nest, expanded nesting.
Method Two: Expanded Nesting
Compared to simple nesting, expanded nesting lets you see the sequence and the nest contents simultaneously. It also allows you to listen to audio and access all material in the sequence before and after the effect nest you are working with.
In addition, as opposed to simple nesting, the video monitor is always positioned at the top of the nest and cannot travel into the nest. As a result, with expanded nesting you are able to edit the contents of a nest but still see the composite of all effects within the nest.
Let’s step into the same Resize effect nest as before, using expanded nesting.
1. If you aren’t already there, park the position indicator on the clip in the Timeline to which you just added the Resize effect.
2. Make sure that the V1 track is active.
3. Alt-click (Windows) or Option-click (Mac) the STEP IN button at the bottom of the Timeline. The Timeline displays the tracks inside and outside the nest, with the tracks inside the nest appearing directly above the track that contains the nest, as shown in Figure 6.9.
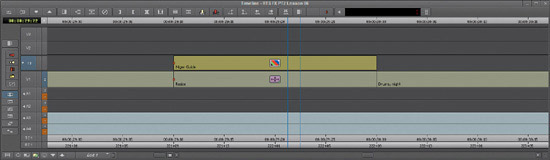
Tip: You can also enter and exit expanded nesting by double-clicking a highlighted segment. This can be disabled via the Timeline setting.
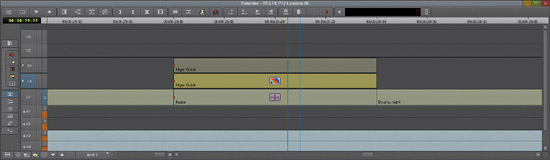
4. Now let’s step in once more. Alt-click (Windows) or Option-click (Mac) the STEP IN button at the bottom of the Timeline again. The Timeline displays both levels of the nest, as shown in Figure 6.10.
Figure 6.10 Expanded nesting showing both levels of the nest.
As with simple nesting, the Track panel indicates the nest level for each element within the nest, this time using two numbers separated by a period instead of just one. (See Figure 6.11.)
Figure 6.11 Expanded nesting track indicators.
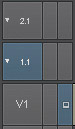
The first number indicates the nest level of the track. The number 1 indicates the track is on the first level of the nest, and the number 2 indicates that you are stepped in twice (the source of an effect within an effect).
The second number indicates the track number at that layer of the nest (i.e., video track 1 at that nest layer, video track 2 at that nest layer, and so on).
In addition, each level of the nest is assigned a different track color to help differentiate it from other nest levels.