
Creating Motion Effects
With Motion effects, you control the frame rate at which a clip plays, resulting in fast, slow, or jerky motion. When creating Motion effects, the more noticeable the motion is in a clip, the more careful you should be when you choose a frame rate or render method. For example, if someone is running quickly through the frame, not all frame rates and render methods will create acceptable results.
As with freeze frames, Motion effects are generated from clips in the Source monitor, rather than clips already edited into a sequence.
This time, rather than choosing a source clip from a bin, let’s generate a Motion effect from a clip already in the sequence.
To create a Motion effect with a clip already edited into the sequence:
1. Choose TOOLS > MARKERS to open the Markers window.
2. Double-click the marker named MOTION EFFECT to jump to that location in the Timeline.
3. Ensure that V1 is active, and turn off all audio and other video tracks.
4. The frame we start the Motion effect with is located at the head of the edit. Click the MATCH FRAME button (see Figure 4.8) in the Composer window FAST menu.
Figure 4.8 Match Frame button.

5. The clip that was edited into the sequence is loaded into the Source monitor and the frame that you were parked on in the sequence is displayed and marked with an IN point. Now let’s create a Motion effect from that clip. Click the MOTION EFFECT button (see Figure 4.9) in the Composer window FAST menu. The Motion Effect dialog box appears. (See Figure 4.10.)
Figure 4.9 Motion Effect button.

Figure 4.10 Motion Effect dialog box.

Note: You cannot use the Motion Effect button in the Timeline palette to create a Motion effect. This button is used only to modify a Motion effect that has already been created in the sequence.
6. We’d like to add an element of drama by speeding up the setting of the sun. Set the SPEED PERCENTAGE to 1500%.
The footage that we are working with was captured with progressive format, so we should use Both Fields.
Setting the Proper Render Method
As with the freeze frame, we need to set the proper render method. Because the final effect will be moving, however, this choice is even more important than it is for freeze frames. The following options are available:
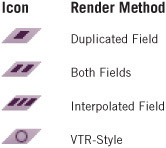
![]() Duplicated Field. The default choice. This option reduces the vertical resolution by half because it drops one field of the image, resulting in a lower-quality image. This option does not require rendering (which is probably why it’s the default). Be aware that Duplicated Field should never be used in a project intended for broadcast (unless it is deliberately used to create a stylization) as it cuts the video’s vertical resolution in half. It is only intended for offline use.
Duplicated Field. The default choice. This option reduces the vertical resolution by half because it drops one field of the image, resulting in a lower-quality image. This option does not require rendering (which is probably why it’s the default). Be aware that Duplicated Field should never be used in a project intended for broadcast (unless it is deliberately used to create a stylization) as it cuts the video’s vertical resolution in half. It is only intended for offline use.
![]() Both Fields. Good for shots without interfield motion, progressive video (where both fields are from the same film frame or time instance), and still shots. For best results, you should also use evenly divisible frame rates with this option.
Both Fields. Good for shots without interfield motion, progressive video (where both fields are from the same film frame or time instance), and still shots. For best results, you should also use evenly divisible frame rates with this option.
![]() Interpolated Field. Calculates the Motion effect at the field level rather than the frame level by combining field line pairs. Because the system considers all fields when creating the effect, the smoothest motion results. This method is best for video-originated material or film-originated material shot at 24 fps. Because it combines fields to create new fields, the resulting Motion effect may be slightly soft.
Interpolated Field. Calculates the Motion effect at the field level rather than the frame level by combining field line pairs. Because the system considers all fields when creating the effect, the smoothest motion results. This method is best for video-originated material or film-originated material shot at 24 fps. Because it combines fields to create new fields, the resulting Motion effect may be slightly soft.
![]() VTR-Style. Calculates the Motion effect at the field level rather than the frame level by shifting field information by a scan line. This creates very smooth Motion effects without any reduction in detail. At very slow speeds, a slight vertical jitter (due to the field shifts) may be noticeable.
VTR-Style. Calculates the Motion effect at the field level rather than the frame level by shifting field information by a scan line. This creates very smooth Motion effects without any reduction in detail. At very slow speeds, a slight vertical jitter (due to the field shifts) may be noticeable.
To set the Motion effect render option and generate the effect:
1. Choose BOTH FIELDS as the render option for the Motion effect. With the exception of reverse Motion effects and very high-speed Motion effects, it is not typically necessary to render Motion effects if you are editing on modern computer hardware and drives. If we were slowing down the clip or speeding it up by a factor of three or five, we would not have to render the clip. But since we are increasing the speed by a factor of 15, we should render the clip.
Tip: Even though reverse and high-speed Motion effects cannot play in real time without being rendered, you can scrub through them prior to rendering.
2. Select CREATE AND RENDER to generate the Motion effect. As with the freeze frame, an additional dialog box will be displayed, allowing you to choose the bin to store the newly created Motion effect.
3. Select the bin you wish to save to and click OK. A progress bar is displayed while the clip is rendered. This should take only a few seconds.
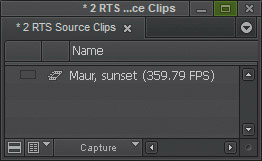
4. Look at the bin you selected. Motion effect clips have the same clip icon as a freeze frame but are named to indicate the change in frame rate applied to the clip. (See Figure 4.11.) As with freeze frames, the newly created clip is automatically loaded into the Source monitor.
Figure 4.11 Motion effect in bin.
Making the Edit
Finally, let’s edit the Motion effect into our Timeline. As we did with the freeze frame, we are going to replace a clip in the sequence. To help you quickly jump to the right location, we’ve set a marker.
To edit the Motion effect into the bin:
1. Click the Record monitor in the Composer window to make the sequence active.
2. Ensure that V1 is active and turn off all audio and other video tracks.
3. Click the MARK CLIP button at the top of the Timeline or press T on the keyboard to mark the video clip.
4. Click the OVERWRITE EDIT button in the Composer window between the two monitors or press the B key on the keyboard to replace the shot.
5. Play through this area of the sequence to see the completed effect.
Take a look at the edit we just made on the Timeline. Like other effects, and unlike freeze frames, Motion effects have an icon. This icon not only tells us that the clip is a Motion effect, but it also tells us the render method used to generate it. This extra bit of information is extremely useful in the later stages of editing, especially if a previous editor used the wrong type of Motion effect—for example, Duplicated Field. The following shows the different icons and what they indicate.
Creating Motion Effects Using Fit to Fill
Motion effects can also be created using the Fit to Fill button. Fit to Fill will create a Motion effect of the source clip and then edit the resulting effect into the Timeline. The marked durations of the source clip and the sequence are used to determine the Motion effect rate. Be aware that creating Motion effects in this way can cause fractional frame rates that may not produce as good a result as even frame rates. Despite this, they can still be an efficient way to generate things like a very high-speed version of a long, slow shot. The Fit to Fill command creates Motion effects using the Both Fields rendering method.
Let’s redo the effect we just created, this time using the Fit to Fill command to help us use the entire sunset action, rather than just a speeded-up version of a portion of it.
To create a Fit to Fill Motion effect:
1. Double-click on the MOTION EFFECT marker to jump to that location in the Timeline.
2. Ensure that V1 is active, and turn off all audio and other video tracks.
3. Click the MARK CLIP button at the top of the Timeline or press T on the keyboard to mark the video clip in the sequence.
4. As the locator was placed on the very first frame of the clip we want to replace, we can use the Match Frame button to bring the original clip up in the Source monitor. Click the MATCH FRAME button in the Composer window FAST menu.
5. When Match Frame is used on a Motion effect, the effect is brought up in the Source monitor as that is the “source” that was edited into the Timeline. We want, however, to use the source clip from which the Motion effect was generated. When an effect clip is loaded into the Source monitor, we can use Match Frame on that effect clip to bring up the source for the effect. Click the MATCH FRAME button again in the Composer window FAST menu.
Tip: Since the Source monitor was active within the Composer window, the Fast menu command operates on it (which contains the Motion effect clip) rather than the sequence.
6. We’d like to use the material in the clip from the frame we matched all the way to the end of the clip. Since the Match Frame button marks an IN at the frame we matched, we can simply jump to the end of the clip and mark an OUT. Press the END key on the keyboard to move to the end of the clip.
7. Press either the R or O key on the keyboard to mark an OUT. The Fit to Fill is not mapped by default to any key on the keyboard or onscreen button. It can, however, be accessed via the Command palette.
8. Choose TOOLS > COMMAND PALETTE to open the Command palette.
9. Click the EDIT button at the top of the palette to display the Edit pane. The Fit to Fill button is located at the bottom of the second column of commands. (See Figure 4.12.)
Figure 4.12 Fit to Fill button.

10. Before we can use the button we must make sure the Command palette is in Active Palette mode. The other two buttons are used to map commands to either the keyboard or the onscreen buttons. The Active Palette button should be illuminated to indicate that it is selected. If it is not (for example, because one of the other buttons is selected), you have to click it to select it. If necessary, click the ACTIVE PALETTE button at the bottom of the Command palette.
11. Click the FIT TO FILL button to perform the edit. A dialog box will be displayed to choose the bin to store the newly created Motion effect clip.
12. Select the desired bin and click OK. The Motion effect is rendered and edited into the sequence. Fit to Fill Motion effects are always rendered using the previously selected render method, and the medium is rendered to the default location on your system. Depending on your system configuration, this may be the internal hard drive or an external media drive.
13. Play through this area of the sequence to see the completed effect.