
Locking Down Shaky Camera Movement
Another stabilization technique aims to create a locked-down shot. All camera movement is removed, and the clip appears as if the camera were on a tripod. The same Stabilize effect is used, but instead of letting it perform an automatic stabilization, you intervene and set some parameters.
To create a locked-down shot:
1. From the Markers window, double-click the third marker with the comment “Stabilize: Lock Down Shot.” Again, the position indicator jumps to the marker’s location in the Timeline, ready to play the clip before adding any effects.
2. Make sure only the V1 track is highlighted; then press T to mark the clip, as shown in Figure 3.11.
3. Click the PLAY IN TO OUT button under the Record monitor or press 6 on the keyboard. This is a short clip that would look better locked down than moving around, considering its duration. You’ll use the same Stabilize effect but cancel automatic stabilization to create a locked-down result.
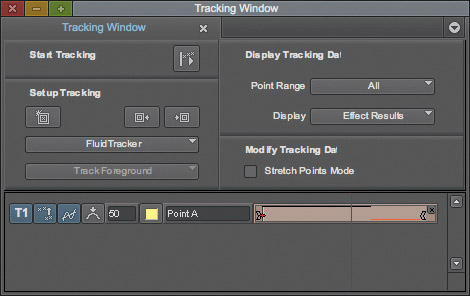
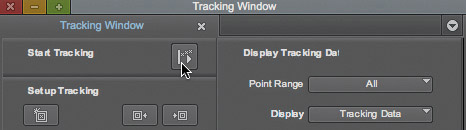
4. From the Effect Palette, drag the STABILIZE effect onto the highlighted clip in the Timeline. When the Tracking window appears (see Figure 3.12), press the SPACE BAR to stop the automatic tracking process that begins. The Tracking window that opens when you apply the Stabilize effect is where you can select a different tracking engine, add tracking data points, and enable or disable the Steady Glide option, which smoothes the camera movement. Although you could use the same Fluid Stabilizer that you used in the previous section, you’ll choose a new engine to learn the difference.
Figure 3.12 The Tracking window is used to select a tracking engine and other tracking options.
5. In the Tracking window, choose the CORRELATION TRACKER from the pop-up menu.
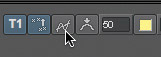
6. To lock down the stabilization and not just smooth the camera move, disable the STEADY GLIDE option, shown in Figure 3.13.
Figure 3.13 Disabling the Steady Glide option creates a locked-down shot.
Note: Stabilization is based on the ability to track regions of an image over a number of frames. Tracking creates motion data that can be used to stabilize a clip or to match the movement from one shot in order to composite another shot or object on top. In either case, Media Composer includes three different tracking engines you can choose from when stabilizing or match moving:
![]() Fluid Stabilizer. This is the primary tracking engine. This engine automatically analyzes multiple tracking regions in an image over a number of frames to create motion data. It is best used for smoothing jittery camera movement, and it should be your first choice in most cases.
Fluid Stabilizer. This is the primary tracking engine. This engine automatically analyzes multiple tracking regions in an image over a number of frames to create motion data. It is best used for smoothing jittery camera movement, and it should be your first choice in most cases.
![]() Correlation Tracker. This is a more traditional tracking engine. After you select a high-contrast region, the Correlation Tracker will follow it frame by frame to create the motion data used to stabilize. The benefit is that it is fast and accurate as long as you have a well-defined, high-contrast region to track throughout the entire clip.
Correlation Tracker. This is a more traditional tracking engine. After you select a high-contrast region, the Correlation Tracker will follow it frame by frame to create the motion data used to stabilize. The benefit is that it is fast and accurate as long as you have a well-defined, high-contrast region to track throughout the entire clip.
![]() Fluid Tracker. This is used in very specific situations involving corner pinning or tracking objects that start outside the visible frame. It may be faster than the Correlation Tracker if the region you are trying to track is a large area of the frame.
Fluid Tracker. This is used in very specific situations involving corner pinning or tracking objects that start outside the visible frame. It may be faster than the Correlation Tracker if the region you are trying to track is a large area of the frame.
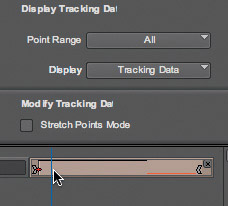
7. From the DISPLAY pop-up menu, choose TRACKING DATA to see the tracking data points and path.
8. In the Tracking window Timeline, drag the position indicator all the way to the left, to the first frame of the clip, as shown in Figure 3.14.
Figure 3.14 Move the Tracking window Timeline position indicator to the first frame.
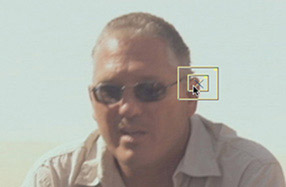
The yellow tracking data point is now displayed in the Effect Preview monitor. Ideally, you position the tracking data point over a well-defined, high-contrast region of the image that remains onscreen and unobstructed for the duration of the segment. In this shot, the sand and sky are not good selections because there is almost no detail. The man’s face might work, but the features of his face move as he speaks, which will add a secondary motion that you don’t want in the stabilization. His ear is probably a good first choice. It is high contrast against the sky, and it doesn’t move as he speaks.
Tip: When using the Correlation Tracker, only one tracking data point is required if the camera is moving up, down, and side to side. If the camera is also rotating or zooming, then an additional tracking data point is required.
9. In the Effect Preview monitor, drag the tracking data point so it is placed over the top of the man’s ear, as shown in Figure 3.15.
Figure 3.15 Place the tracking data point over the top of the ear.
10. In the Tracking window, click the START TRACKING button to begin tracking, as shown in Figure 3.16. Very quickly the segment moves forward frame-by-frame in the Effect Preview monitor. For every frame advance, the tracking data point searches within the outer yellow search rectangle to locate the same region you initially selected. When the tracking is complete, a yellow tracking path will appear in the Effect Preview monitor, which indicates how the camera moves during the segment.
Figure 3.16 Click the Start Tracking button to being tracking.
Tip: On fast-moving shots, it’s very possible that the region you select will fall outside the outer yellow search rectangle as the frame advances. In that case, you can resize the outer search rectangle to increase the search size and try retracking. Increasing the search size will also increase the time it takes to complete the track.
11. To see the stabilization results, choose EFFECT RESULTS from the DISPLAY pop-up menu and press the 6 key on the keyboard to play IN to OUT. Then close the Tracking window and the Effect Editor.
The segment no longer has any camera movement. In some cases, you may want to try a new point to see if you can get better results. Just select Tracking Data in the Display pop-up menu, place the position indicator at the start of the Tracking window Timeline, reposition the tracking data point, and click Start track.