
Animating Objects in a Scene
Now that the text is formatted, aligned, textured, and saved, it’s time to focus on the other parts of the title. Next we’ll look at how the Marquee animation mode works and we’ll adjust the timing in the Timeline.
To create movement on text:
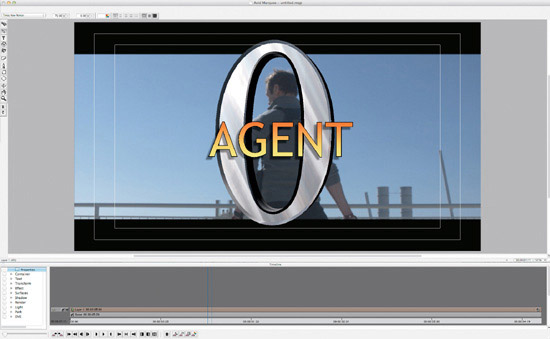
1. The easiest way to show the basic animation tools is to select a toolset. Select TOOLSET > BASIC ANIMATION. The Basic Animation toolset adds the Animation Mode button at the top of the toolbox and places the Timeline at the bottom of the Marquee window, as shown in Figure 9.23.
Figure 9.23 The Basic Animation toolset adds the Animation Mode button at the top of the toolbox and places the Timeline at the bottom of the Marquee window.
2. Click the ANIMATION MODE button at the top of the toolbar to enable it. (See Figure 9.24.) When the Animation Mode button is enabled, any change you make to an object either on screen or by changing a property value will create a keyframe.
Figure 9.24 Click the Animation Mode button to enable it.
3. Make sure the blue position indicator is at the start of the Timeline. (You may need to scroll the Timeline window to be sure you at the beginning.) Then drag the AGENT text to the left side of the screen. (See Figure 9.25.)
Figure 9.25 Drag the AGENT text on the left side of screen.

4. Click the timecode bar to move the blue position indicator to the middle of the Timeline, as shown in Figure 9.26.
Figure 9.26 Move the position indicator to the center of the Timeline.

5. Drag the AGENT text back to its original position in the center of the screen. You’ve now created an animation.
6. To play the animation, go back to the start of the Timeline and press the SPACE BAR or click the PLAY button at the bottom of the Timeline.
7. Choose EDIT > UNDO TRANSLATE OBJECT; then choose it again to undo the animation completely.
8. Click the ANIMATION MODE button to disable it. (Leaving it on could lead to animations you never intended to create.)
As you’ve just seen, the Marquee Timeline works similarly to Media Composer. Just like Media Composer, the Marquee Timeline enables you to move to specific points in time and shows you the relationships among objects in a scene. A scene is constructed of layers that contain stacked tracks representing the objects. Layers and objects on higher tracks appear in front of layers and objects on lower tracks. You can see and modify where various objects start and end in time, as well as how object properties change value over time. Next we’ll trim a clip, add a fade up, and add an animation with keyframes. First, however, you must expand the layer container that the objects are within.
To trim a clip, add a fade up, and add an animation:
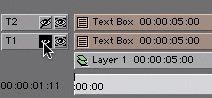
1. Click the EXPAND button on the right side of the L1 track to access the objects as shown in Figure 9.27. Two objects appear above L1: one for the number 0 and the other for the AGENT text.
Figure 9.27 Click the Expand button on the right side of the track to access the objects inside.
2. To ensure you are working on the correct object, click the MUTE button on the left side of the T1 track as shown in Figure 9.28. The number 0 is hidden in the Marquee window. Click the same MUTE button again to unmute the number 0.
Figure 9.28 Click the Mute button on the left side of the T1 track to hide and unhide the object.
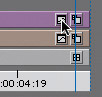
3. To change the starting point for the number 0, you trim the T1 track just like you would in Media Composer. Place the pointer over the left end of the T1 track. The pointer changes to a Trim icon, indicating that you can click and drag to change the starting point of that track.
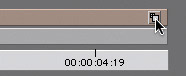
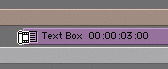
4. Click and drag the left edge of the T1 track a little less than halfway through the Timeline, until the track’s duration indicates 03:00, as shown in Figure 9.29.
Figure 9.29 Click and drag the left edge of the track until the duration indicates 03:00.
5. Click the PLAY button at the bottom of the Timeline to view the edited track. The AGENT text is onscreen alone, and then roughly halfway through, the number 0 pops on behind it.
6. You can easily fade text on and off screen using the Quick Fade button. In the Timeline window, move the position indicator a few frames past the start of the T1 track by dragging in the Timecode track. Place it roughly where you want the number 0 to be at full opacity. Then click the MARK IN button in the Transport controls or press I.
Tip: If you place both the IN or OUT points outside the object’s duration, the object will not be affected.
7. Click the QUICK FADE button in the Timeline as shown in Figure 9.30. Without an OUT point, the number 0 gets a fade-up and stays on screen until the end of the scene.
Figure 9.30 Click the Quick Fade button in the Timeline.
8. Drag the position indicator to the start of the scene and click the PLAY button at the bottom of the Timeline. The number 0 now fades into view behind the AGENT text. Once you’ve finished watching the scene, you can then focus on animating the AGENT text.
9. Select the AGENT text in the Marquee window and then click the ANIMATION MODE button in the toolbox, as shown in Figure 9.31. To animate the AGENT text, you’ll use keyframes to change its rotation over time. Any change to a property such as position, rotation, or size normally affects that property for the duration of the title. When you are in Animation mode, a change that you make to a property affects that property only at the current point. When you set different values for a property at two different points, Marquee interpolates or fills in the values in between for that property, resulting in animation.
Figure 9.31 Click the Animation Mode button in the toolbox.
10. Let’s have the AGENT text tilt down at its starting position. Select WINDOW > PROPERTIES > TRANSFORM to open the Transform Properties window. Instead of dragging the rotation rings, you can more precisely enter values in the Transform window.
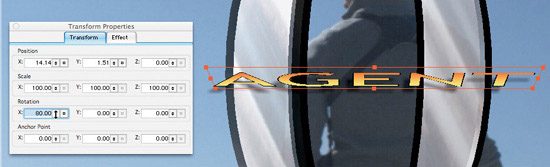
11. Click and drag the X ROTATION value shuttle until the value reaches around 80 degrees and the AGENT text is almost completely downward facing but still visible (see Figure 9.32). You’ve now set the first position in your animation.
Figure 9.32 Drag the X Rotation value shuttle until the AGENT text is facing downward.
Tip: You can reset the rotation in the Transform Properties window by clicking the Reset button for the X, Y, or Z control to the right of the Rotation value shuttle, or right-clicking (Windows) or Control-clicking (Mac) the object in the Marquee window and selecting Reset Rotation from the pop-up menu.
12. In the Timeline, click the TIMECODE track at the far left of the Timeline to have the blue position indicator jump to the end of the Timeline. Now you can position the text for the end of the animation.
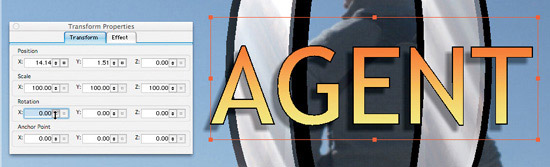
13. Click and drag the X ROTATION value shuttle until the value reaches around 0 and the AGENT text is facing forward (see Figure 9.33).
Figure 9.33 Drag the X Rotation value shuttle until the AGENT text is facing forward.
14. To play your animation, click twice on the GO TO PREVIOUS EDIT button at the bottom of the Timeline to place the position indicator at the start of the sequence, and then click PLAY.
15. In addition to animating properties using the property value shuttles, you can also animate an object through the property curves in the Timeline window. These curves show the change in a property’s value over time. To begin animating with the property curves, click the SHOW CURVES button on the right side of the T1 track as shown in Figure 9.34. The T1 property curve graph appears below the track’s title bar.
Figure 9.34 Click the Show Curves button on the right side of the T1 track.
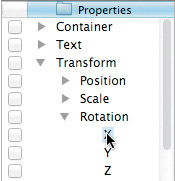
16. To view an existing animation curve, you must enable the Animated property in the Properties list. In the Properties list on the left side of the Timeline window, click the + sign (Windows) or disclosure triangle (Mac) for TRANSFORMS and then again for ROTATION.
17. The Properties list now shows the X, Y, and Z rotation properties. Click the X property as shown in Figure 9.35 to view the rotation animation curve you created previously.
Figure 9.35 Click the + sign (Windows) or disclosure triangle (Mac) for the Transform and Rotation properties.
18. To create new animation, first enable the property you want to change. In the Properties list, click the + sign (Windows) or disclosure triangle (Mac) for TEXT and then enable the KERNING check box. A red animation curve appears for the Kerning property.
19. You can change the starting point by adjusting the starting keyframe. First, place the position indicator at the start of the Timeline. Hover the mouse over the first keyframe at the start of the kerning animation curve.
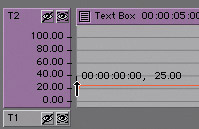
20. When the pointer changes to an up arrow, click and drag the keyframe up until the tool tip that is displayed next to the keyframe reaches around 25 as shown in Figure 9.36. Kerning spreads the letters evenly to the right since the text is right-justified by default.
Figure 9.36 When the pointer changes to an up arrow, click and drag the keyframe.
21. Click the center JUSTIFY button in the Marquee toolbar at the top of the window to have kerning spread the letters from the center. That sets our first keyframe.
22. To animate, you’ll recall that we need at least two keyframes. To add another keyframe for kerning, place the position indicator around the same location that the number 0 comes on screen.
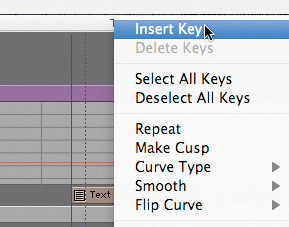
23. Right-click (Windows) or Control-click (Mac) the kerning animation curve and select INSERT KEY from the pop-up menu as shown in Figure 9.37.
Figure 9.37 Right-click (Windows) or Control-click (Mac) on the kerning animation curve and select Insert Key.
24. Hover the pointer over the newly added keyframe; the pointer changes to an up arrow. Click and drag the keyframe down until the tool tip displayed next to the keyframe reaches around 5.
25. To play your animation, place the position indicator at the start of the sequence. Then click PLAY at the bottom of the Timeline.
You’ve created your first animation in Marquee. Now it’s time to save it to Media Composer.