
Timewarp Effects
Timewarp effects are an advanced type of Motion effect. They differ from traditional Motion effects in several ways:
![]() Timewarp effects are applied to segments in a sequence, not to original source clips. When a regular Motion effect is created, its duration is determined by the motion rate selected. Timewarp effects do not change the duration of a segment in the Timeline. The duration is modified using standard trim techniques.
Timewarp effects are applied to segments in a sequence, not to original source clips. When a regular Motion effect is created, its duration is determined by the motion rate selected. Timewarp effects do not change the duration of a segment in the Timeline. The duration is modified using standard trim techniques.
![]() Timewarp effects do not have a fixed rate of speed. The speed can be varied over time. The editor can use keyframes to set multiple rates of speed, and the system will smoothly ramp between them. Optionally, the editor can specify start and end frames, and the system will calculate the rate required.
Timewarp effects do not have a fixed rate of speed. The speed can be varied over time. The editor can use keyframes to set multiple rates of speed, and the system will smoothly ramp between them. Optionally, the editor can specify start and end frames, and the system will calculate the rate required.
![]() Timewarp effects contain additional, higher-quality render methods. These new methods add the capability to blend field data, resulting in much smoother motion.
Timewarp effects contain additional, higher-quality render methods. These new methods add the capability to blend field data, resulting in much smoother motion.
Timewarp Preset Effects
Avid Media Composer ships with a number of prebuilt Timewarp effects. These are accessible via the Timewarp category in the Effect Palette. (See Figure 4.13.)
Figure 4.13 Effect Palette, Timewarp category.
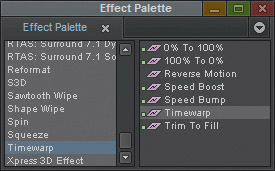
Most of the preset effects are designed to generate variable-speed Motion effects. For example, the 0% to 100% preset ramps the speed gradually between a freeze frame and the clip’s native speed. The 100% to 0% preset does the opposite, gradually slowing down from the clip’s native speed until stopping at a freeze frame.
An extremely useful preset is Reverse Motion. This enables you to instantly reverse the motion of a clip that you’ve already inserted into the Timeline. Depending on the type of work you do, this may become one of your “go-to” effects.
Finally, among the preset effects you’ll also find an effect called Timewarp, which does nothing by default. It provides access to the full capabilities of the Timewarp effect.
Applying a Reverse Motion Timewarp Preset
Though the use of a Reverse Motion effect may often seem obvious, sometimes it can be used as a subtle way to actually improve the perceived motion of a clip in the sequence.
To apply a Reverse Motion Timewarp preset:
1. Click the Markers window.
Tip: You can choose Tools > Markers to open this window if you can’t readily locate it.
2. Double-click the marker named REVERSE to jump to that location in the Timeline.
3. Play through the clip and notice that, due to camera movement, the runners appear to be moving backward. Let’s see if reversing the motion makes the shot work more effectively.
4. Choose TOOLS > EFFECT PALETTE to open the Effect Palette.
5. Click the TIMEWARP category.
6. Select the REVERSE MOTION preset and drag it to the RUNNERS, FOCUS ON RUNNER 1 clip. Two key changes occur. First, the name of the clip has been appended with (–100%) to indicate that the clip has been reversed. Second, there is a blue dot in the lower-right corner of the effect icon. This blue dot indicates that the effect cannot be played in real time and must be rendered. Let’s render the effect so we can see the result.
7. Make sure the position indicator is parked on the clip and click the RENDER EFFECT button in the Timeline button bar. (See Figure 4.14.) The Choose Render Drive dialog box will appear.

8. Choose the appropriate render drive and click OK to render the effect.
9. Play through this portion of the sequence to see the result.
Creating a Timewarp Freeze Frame
As we mentioned earlier, the Timewarp is a very powerful effect and includes the ability to keyframe Motion effects. Let’s take advantage of this capability to create a version of the freeze frame that can be created entirely from within the sequence. This more modern version of the freeze frame has several advantages over the traditional freeze frame:
![]() The rendering method can be changed without re-creating the effect.
The rendering method can be changed without re-creating the effect.
![]() It can be easily modified to change the frame that is frozen, which can help avoid problems that may be encountered in later stages of post-production.
It can be easily modified to change the frame that is frozen, which can help avoid problems that may be encountered in later stages of post-production.
![]() It is much easier to run and therefore much easier for the online editor to troubleshoot and correct problems.
It is much easier to run and therefore much easier for the online editor to troubleshoot and correct problems.
In this case, rather than doing a complete shot as a freeze frame as we did earlier, we’re going to take advantage of the ease of creation and use this effect to correct an editorial problem.
To create a Timewarp freeze frame:
1. Click the Markers window.
2. Double-click the marker named TIMEWARP FREEZE FRAME to jump to that location in the Timeline.
3. Play through the clip. The camera operator turns at the end of the shot, creating an undesired pan. The motion is only a few frames long, but perhaps the shot would work better if we covered the unwanted pan with a freeze frame.
Tip: This type of corrective effect is quite common during the online or finishing stage of editing, especially if the audio is locked and the shot cannot be slipped or trimmed to correct the problem. If you watch television reality or documentary shows and look for these types of effects, you’ll start to notice them in nearly every show. This is just one of the effect tricks in the online editor’s bag to fix problems in the program.
4. Click the Markers window and double-click the TIMEWARP FREEZE FRAME marker again to jump to the frame where we wish to apply the Timewarp freeze frame.
5. Enable track V1 and make sure that all other tracks are disabled.
6. Choose TOOLS > EFFECT PALETTE to open the Effect Palette.
7. Click the TIMEWARP category.
8. Select the TIMEWARP effect and drag it to the AGADEZ, RUNNERS, REUNION clip.
Modifying the Timewarp Effect
If you play through the newly added effect, you’ll notice that nothing has apparently changed. By default, the Timewarp effect does essentially nothing, just like other effects such as Resize. We must manipulate its parameters to create the effect. But unlike other effects, the Timewarp effect does not use the Effect Editor; instead, it has its own editor. This is due to the unique characteristics of a Timewarp effect.
To prepare to edit the Timewarp effect:
1. Click the Markers window.
2. Double-click the marker named TIMEWARP FREEZE FRAME to jump to that location in the Timeline.
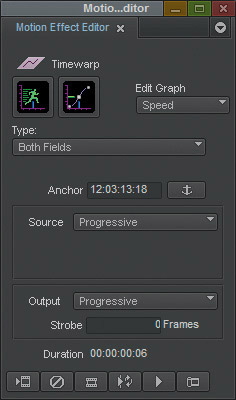
3. Click either the EFFECT MODE or MOTION EFFECT EDITOR button in the Timeline palette. (See Figure 4.15.) The Motion Effect Editor opens. (See Figure 4.16.)
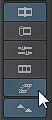
Figure 4.16 Motion Effect Editor.
Although some of the function in this window will be immediately apparent from your experience with the traditional Motion Effect dialog box, the Motion Effect Editor manipulates the effect via two pop-out graphs: the speed graph and the position graph. (See Figure 4.17.) We’ll work with only the speed graph in this course.
Figure 4.17 Speed Graph and Position Graph buttons.

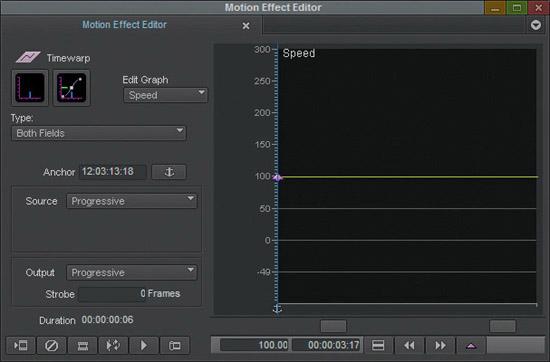
4. Click the SPEED GRAPH button to expand the Motion Effect Editor window to reveal the speed graph, as shown in Figure 4.18.
Figure 4.18 Motion Effect Editor with the speed graph displayed.
Understanding the Speed Graph
The speed graph allows you to set the speed of the Timewarp effect using keyframes. For illustrative purposes, Figure 4.19 uses the graph of the 100% to 0% Timewarp preset.
Figure 4.19 The speed graph’s functions.
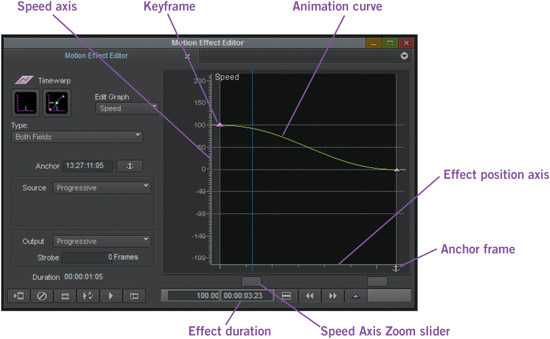
![]() Speed axis. Displays a range of speeds available. 100 is equal to sound speed (29.97 fps in NTSC, 25 fps in PAL). By default, the speed axis displays speeds between 300% and –100%.
Speed axis. Displays a range of speeds available. 100 is equal to sound speed (29.97 fps in NTSC, 25 fps in PAL). By default, the speed axis displays speeds between 300% and –100%.
![]() Speed Axis Zoom slider. Zooms in and out on the speed axis. Drag left to reveal additional rates of speed and right to show fewer rates of speed.
Speed Axis Zoom slider. Zooms in and out on the speed axis. Drag left to reveal additional rates of speed and right to show fewer rates of speed.
![]() Effect position axis. Displays position information. By default, the effect position axis displays only the duration of the effect.
Effect position axis. Displays position information. By default, the effect position axis displays only the duration of the effect.
![]() Position Axis Zoom slider. Zooms in and out on the effect position axis. Drag left to reveal position information beyond the effect duration and right to zoom in on the effect duration.
Position Axis Zoom slider. Zooms in and out on the effect position axis. Drag left to reveal position information beyond the effect duration and right to zoom in on the effect duration.
![]() Effect duration. The duration of the effect is displayed as black in the position graph. Areas outside of the effect duration are displayed as dark gray. Dark purple vertical lines indicate the beginning and end of the effect duration.
Effect duration. The duration of the effect is displayed as black in the position graph. Areas outside of the effect duration are displayed as dark gray. Dark purple vertical lines indicate the beginning and end of the effect duration.
![]() Animation curve. Indicates the speed or change in speed created with the Timewarp effect. Drag the position indicator to see the speed at any point along the curve.
Animation curve. Indicates the speed or change in speed created with the Timewarp effect. Drag the position indicator to see the speed at any point along the curve.
![]() Keyframe. Used to set the rate of speed at a given position.
Keyframe. Used to set the rate of speed at a given position.
![]() Anchor frame. Indicates the point where the source footage is anchored in the effect.
Anchor frame. Indicates the point where the source footage is anchored in the effect.
Note that after zooming in and out, the curve can often be offset and partially offscreen. To reposition the curve in the image, hold down the Alt key (Windows) or Option key (Mac) and drag the graph to the desired position.
Creating the Freeze Frame
Now let’s create the freeze frame. As you can see, there is a single keyframe on the speed graph, at the beginning of the effect. All Timewarp effects have this single keyframe. Additional keyframes can be added, just as they can in other effects, and we want to add a new keyframe at the marker’s position.
To turn this effect into a keyframe, we simply need to change the value of this keyframe from 100 to 0 and can do so by dragging the keyframe downward to the zero value on the speed, or Y, axis.
To create the freeze frame:
1. Make sure you are parked on the frame with the marker.
2. Click the ADD KEYFRAME button in the lower-right region of the Motion Effect Editor to add a keyframe to the current frame. (See Figure 4.20.)
Figure 4.20 Add Keyframe button.
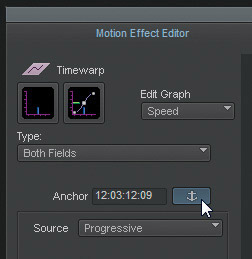
3. Before we go any further, we want to ensure that the source frame we are parked on is always the frame that the freeze frame occurs on. We can do this by setting this keyframe as the anchor frame. This will “anchor” this frame in the source to this point in the Timeline. Click the SET ANCHOR button on the left side of the Motion Effect Editor to set the selected keyframe to the anchor. (See Figure 4.21.)
Figure 4.21 Set Anchor button.
Tip: Any time you want to ensure that a Timewarp does not shift the position of a specific frame, you should set a keyframe at that frame and then set an anchor. This is especially useful when you want to sync a particular action in the effect to a cue in the music. Note that you can only have one anchor in a Timewarp effect.
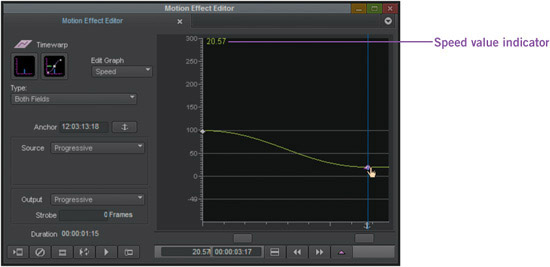
4. Now let’s change the keyframe’s speed to zero (0) so that the picture freezes at this frame. Click the pink keyframe and drag it downward until you reach the zero value. The keyframe snaps to the zero value. You can also see the exact value you are dragging to via the green indicator at the top of the graph. This indicator replaces the word “Speed” while you are dragging a keyframe as shown in Figure 4.22.
Play through the effect. That isn’t exactly what we wanted, is it? Rather than instantly freezing at the frame with the marker, the clip gradually slows down until it freezes at the frame. What we want instead is for the clip to play at full speed until it reaches the marker and then instantly freeze.
Figure 4.22 Speed value indicator.
The reason it slows down gradually between the two keyframes is that, by default, a smooth change in speed occurs between any two keyframes. Although this is the default type of keyframe, there are actually four different types of keyframes:
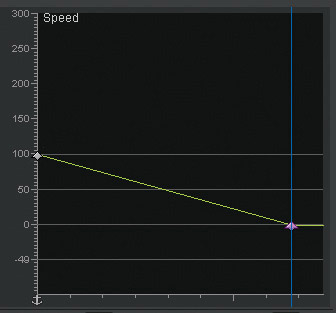
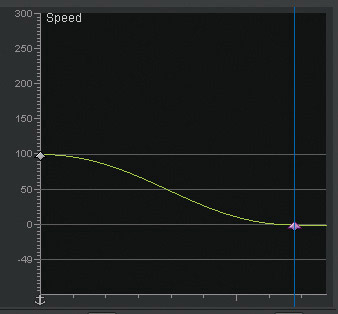
![]() Linear. Creates a direct path between two keyframe values. In a linear keyframe, the rate of change is continuous between the two keyframes, and there is no gradual acceleration (ease-in) or deceleration (ease-out) from one keyframe into another. (See Figure 4.23.)
Linear. Creates a direct path between two keyframe values. In a linear keyframe, the rate of change is continuous between the two keyframes, and there is no gradual acceleration (ease-in) or deceleration (ease-out) from one keyframe into another. (See Figure 4.23.)
![]() Spline. Creates a path with a natural ease-in and ease-out at every keyframe. The amount of ease-in and ease-out is automatically calculated to create a smooth transition into and out of keyframes and cannot be adjusted. (See Figure 4.24.)
Spline. Creates a path with a natural ease-in and ease-out at every keyframe. The amount of ease-in and ease-out is automatically calculated to create a smooth transition into and out of keyframes and cannot be adjusted. (See Figure 4.24.)
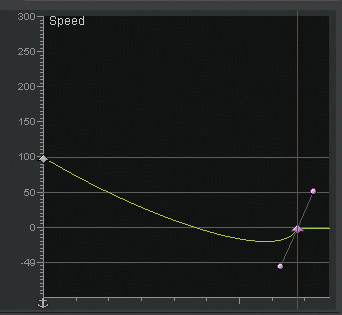
![]() Bézier. Creates a path with a natural ease-in and ease-out at every keyframe. Unlike spline interpolation, the shape of the animation curve can be adjusted on either side of the keyframe by manipulating the Bézier curve handles. (See Figure 4.25.) Bézier curves are beyond the scope of this book, but you can learn more about them in the Avid Media Composer Effects Guide.
Bézier. Creates a path with a natural ease-in and ease-out at every keyframe. Unlike spline interpolation, the shape of the animation curve can be adjusted on either side of the keyframe by manipulating the Bézier curve handles. (See Figure 4.25.) Bézier curves are beyond the scope of this book, but you can learn more about them in the Avid Media Composer Effects Guide.
![]() Shelf. Holds a keyframe’s value until the next keyframe. This interpolation type is used to cause the parameter to jump instantly from one value to another. (See Figure 4.26.)
Shelf. Holds a keyframe’s value until the next keyframe. This interpolation type is used to cause the parameter to jump instantly from one value to another. (See Figure 4.26.)
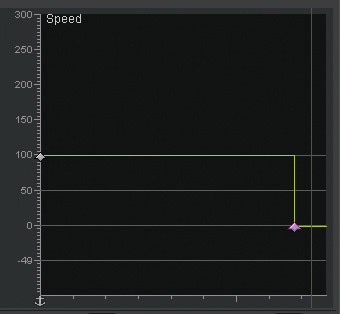
This last type of keyframe is what we want for our effect. It will keep the clip playing at full speed until our keyframe, at which point the clip will instantly freeze.
To configure the effect to instantly freeze:
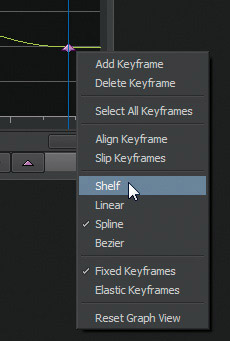
1. Right-click the second keyframe in the speed graph and select SHELF from the pop-up menu, as shown in Figure 4.27. The graph changes to reflect the new keyframe type.
Figure 4.27 Keyframe pop-up menu.
2. Confirm that the render type is set to BOTH FIELDS. Since the source footage for this project is 23.976p, you should use this option.
3. Play through this area of the sequence to see the effect you applied. The freeze frame may be very obvious to you, but that is because you are aware that it is there. If you play through it several times, you brain will adjust, and it will no longer be as apparent.
Tip: Now that you’ve created this effect, if you wish to change the frame at which the freeze occurs, you can simply move the keyframe to another point. Hold the Alt+Shift (Windows) or Option+Shift (Mac) keys down while dragging the keyframe to move it to an earlier or later frame in the clip.
Corrective effects should be used sparingly until you become very familiar with them. Certainly they can be extremely useful in the final stages of an edit, but they should not become a crutch to cover problems that may be better solved editorially, especially in the early stages of the edit.
Review/Discussion Questions
1. What are the three types of Motion effects?
2. How are freeze frames created?
a. They are generated from a source clip.
b. They are applied to a clip in the sequence.
3. Why is it important to set the freeze frame render type?
4. How are Motion effects created?
a. They are generated from a source clip.
b. They are applied to a clip in the sequence.
5. How does creating a Motion effect via the Fit to Fill command differ from creating one via the Motion Effect command?
6. How are Timewarp effects created?
a. They are generated from a source clip.
b. They are applied to a clip in the sequence.
7. What are the benefits of creating a Timewarp freeze frame versus a traditional freeze frame?
8. What are the four different types of keyframes?
9. Which keyframe is the most appropriate to use for a Timewarp freeze frame?