
- Go to Page Manager and click the New Page button on its toolbar. The Create Web page wizard opens asking you to select a template.
- Select Base Template under Custom Templates—that's the template that you created in Chapter 5 for your website. Click Next. The wizard asks you to choose page properties.
- Type the name of the section you're creating this page for in the Page title text box. I'm creating this page for the About the Book section. So, I'll enter About the Book.
- Type the web address for this page in the Web address textbox. Recall that the web address is a unique address for a web page that appears in a browser's address bar. I'll type aboutthebook.
- Select the Show this page in the Navigation bar checkbox. Office Live Small Business automatically fills in About the Book in the Navigation title textbox. That's fine with me.
- I want this page to be at the top level of navigation, which is where Office Live Small Business has automatically put it in the Select parent drop-down box. That's fine with me too. The Choose page properties page is shown as follows:

- Click Finish.
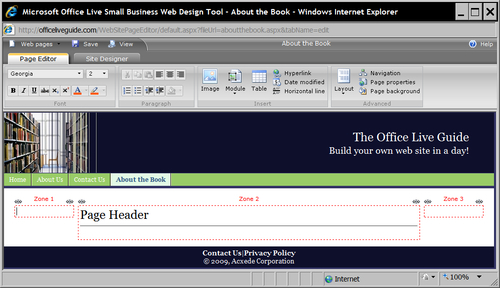
- Office Live Small Business creates the new page and opens it in Page Editor in a new window.
- Save your work and preview the website. It should look something like this:
- Notice that About the Book is now a new link on the site's main navigation bar. But there's a small problem. The new link is right at the end. I'd rather have it between Home and About Us. Let's fix that right away.
- Close the preview window and return to Page Editor.
- Click the Page properties button in the Advanced group of Page Editor's ribbon. The Choose page properties dialog opens.
- Click the Edit navigation position button in the dialog window. The page's Navigation dialog opens, as shown:

- Click the About the Book entry in the Select the page you want to move selection box on the left. The About the Book entry in the Page order selection box on the right automatically gets highlighted.
- Click the Move up button twice until the link is between Home and About Us. Click OK. The Navigation dialog closes.
- Click OK. The Choose page properties dialog closes and you return to Page Editor.
- Notice that the About the Book link in the navigation bar has moved to its intended location.
- While you're there, select the words Page Header in Zone 2 and overwrite them with About the Book.
- Save your work and preview the site. It should now look something like this:

- Close the preview window and return to Page Editor.
- Close the Page Editor and return to Page Manager.
You just created your first information section page. As you can see, you didn't have to do anything different to create the page. You followed, essentially, the same steps you followed in creating the pages in Chapter 5.
The only thing that you did differently here was to move the page to a different location on the site's main navigation. In fact, you can change the location of absolutely any page that's on the navigation bar by following these exact steps.
If your information hierarchy has more than one section, you'll have to create a page for each of them. Go ahead and do so now. And remember to position the new pages appropriately on your site's main navigation bar.
..................Content has been hidden....................
You can't read the all page of ebook, please click here login for view all page.