In this chapter, I introduce the Razor view engine, which is responsible for generating HTML responses that can be displayed directly to the user (as opposed to the JSON and XML responses, which are typically consumed by other applications). Views are files that contain C# expressions and HTML fragments that are processed by the view engine to generate HTML responses. I show how views work, explain how they are used in action methods, and describe the different types of C# expression they contain. In Chapter 22, I describe some of the other features that views support. Table 21-1 puts Razor views in context.
Table 21-1.
Putting Razor Views in Context
Question
Answer
What are they?
Views are files that contain a mix of static HTML content and C# expressions.
Why are they useful?
Views are used to create HTML responses for HTTP requests. The C# expressions are evaluated and combined with the HTML content to create a response.
How are they used?
The View method defined by the Controller class creates an action response that uses a view.
Are there any pitfalls or limitations?
It can take a little time to get used to the syntax of view files and the way they combine code and content.
Are there any alternatives?
There are a number of third-party view engines that can be used in ASP.NET Core MVC, but their use is limited.
Use the AddControllersWithViews and MapControllerRoute methods to set up the required services and endpoints
1–5
Returning an HTML response from a controller action method
Use the View method to create a ViewResult
6
Creating dynamic HTML content
Create a Razor view that uses expressions for dynamic content
7–9, 20, 21
Selecting a view by name
Provide the view name as an argument to the View method
10, 11
Creating a view that can be used by multiple controllers
Create a shared view
12–14
Specifying a model type for a view
Use an @model expression
15–19
Generating content selectively
Use @if, @switch or @foreach expressions
22–26
Including C# code in a view
Use a code block
27
Preparing for This Chapter
This chapter uses the WebApp project from Chapter 20. To prepare for this chapter, open a new PowerShell command prompt and run the command shown in Listing 21-1 in the WebApp folder to install a new package. If you are using Visual Studio, you can install the package by selecting Project ➤ Manage NuGet Packages.
Next, replace the contents of the Startup class with the statements shown in Listing 21-2, which remove some of the services and middleware used in earlier chapters.
Tip
You can download the example project for this chapter—and for all the other chapters in this book—from https://github.com/apress/pro-asp.net-core-3. See Chapter 1 for how to get help if you have problems running the examples.
using System;
using System.Collections.Generic;
using System.Linq;
using Microsoft.AspNetCore.Builder;
using Microsoft.Extensions.DependencyInjection;
using Microsoft.Extensions.Configuration;
using Microsoft.EntityFrameworkCore;
using WebApp.Models;
namespace WebApp {
public class Startup {
public Startup(IConfiguration config) {
Configuration = config;
}
public IConfiguration Configuration { get; set; }
public void ConfigureServices(IServiceCollection services) {
services.AddDbContext<DataContext>(opts => {
opts.UseSqlServer(Configuration[
"ConnectionStrings:ProductConnection"]);
opts.EnableSensitiveDataLogging(true);
});
services.AddControllers();
}
public void Configure(IApplicationBuilder app, DataContext context) {
app.UseDeveloperExceptionPage();
app.UseStaticFiles();
app.UseRouting();
app.UseEndpoints(endpoints => {
endpoints.MapControllers();
});
SeedData.SeedDatabase(context);
}
}
}
Listing 21-2.
Replacing the Contents of the Startup.cs File in the WebApp Folder
Dropping the Database
Open a new PowerShell command prompt, navigate to the folder that contains the WebApp.csproj file, and run the command shown in Listing 21-3 to drop the database.
dotnet ef database drop --force
Listing 21-3.
Dropping the Database
Running the Example Application
Select Start Without Debugging or Run Without Debugging from the Debug menu or use the PowerShell command prompt to run the command shown in Listing 21-4.
dotnet run
Listing 21-4.
Running the Example Application
The database will be seeded as part of the application startup. Once ASP.NET Core is running, use a web browser to request http://localhost:5000/api/products, which will produce the response shown in Figure 21-1.
Figure 21-1.
Running the example application
Getting Started with Views
I started this chapter with a web service controller to demonstrate the similarity with a controller that uses views. It is easy to think about web service and view controllers as being separate, but it is important to understand that the same underlying features are used for both types of response. In the sections that follow, I configure the application to support HTML applications and repurpose the Home controller so that it produces an HTML response.
Configuring the Application
The first step is to configure ASP.NET Core to enable HTML responses, as shown in Listing 21-5.
using System;
using System.Collections.Generic;
using System.Linq;
using Microsoft.AspNetCore.Builder;
using Microsoft.Extensions.DependencyInjection;
using Microsoft.Extensions.Configuration;
using Microsoft.EntityFrameworkCore;
using WebApp.Models;
namespace WebApp {
public class Startup {
public Startup(IConfiguration config) {
Configuration = config;
}
public IConfiguration Configuration { get; set; }
public void ConfigureServices(IServiceCollection services) {
public void Configure(IApplicationBuilder app, DataContext context) {
app.UseDeveloperExceptionPage();
app.UseStaticFiles();
app.UseRouting();
app.UseEndpoints(endpoints => {
endpoints.MapControllers();
endpoints.MapControllerRoute("Default",
"{controller=Home}/{action=Index}/{id?}");
});
SeedData.SeedDatabase(context);
}
}
}
Listing 21-5.
Changing the Configuration in the Startup.cs File in the WebApp Folder
HTML responses are created using views, which are files containing a mix of HTML elements and C# expressions. The AddControllers method I used in Chapter 19 to enable the MVC Framework only supports web service controllers. To enable support for views, the AddControllersWithViews method is used. The AddRazorRuntimeCompilation method is used to enable the feature provided by the package installed in Listing 21-1, which makes it easier to work with views during development, as explained shortly.
The second change is the addition of the MapControllerRoute method in the endpoint routing configuration. Controllers that generate HTML responses don’t use the same routing attributes that are applied to web service controllers and rely on a feature named convention routing, which I describe in the next section.
Creating an HTML Controller
Controllers for HTML applications are similar to those used for web services but with some important differences. To create an HTML controller, add a class file named HomeController.cs to the Controllers folder with the statements shown in Listing 21-6.
using Microsoft.AspNetCore.Mvc;
using System.Threading.Tasks;
using WebApp.Models;
namespace WebApp.Controllers {
public class HomeController: Controller {
private DataContext context;
public HomeController(DataContext ctx) {
context = ctx;
}
public async Task<IActionResult> Index(long id = 1) {
The Contents of the HomeController.cs File in the Controllers Folder
The base class for HTML controllers is Controller, which is derived from the ControllerBase class used for web service controllers and provides additional methods that are specific to working with views.
...
public class HomeController:Controller {
...
Action methods in HTML controllers return objects that implement the IActionResult interface, which is the same result type used in Chapter 19 to return specific status code responses. The Controller base class provides the View method, which is used to select a view that will be used to create a response.
Notice that the controller in Listing 21-6 hasn’t been decorated with attributes. The ApiController attribute is applied only to web service controllers and should not be used for HTML controllers. The Route and HTTP method attributes are not required because HTML controllers rely on convention-based routing, which was configured in Listing 21-5 and which is introduced shortly.
The View method creates an instance of the ViewResult class, which implements the IActonResult interface and tells the MVC Framework that a view should be used to produce the response for the client. The argument to the View method is called the view model and provides the view with the data it needs to generate a response.
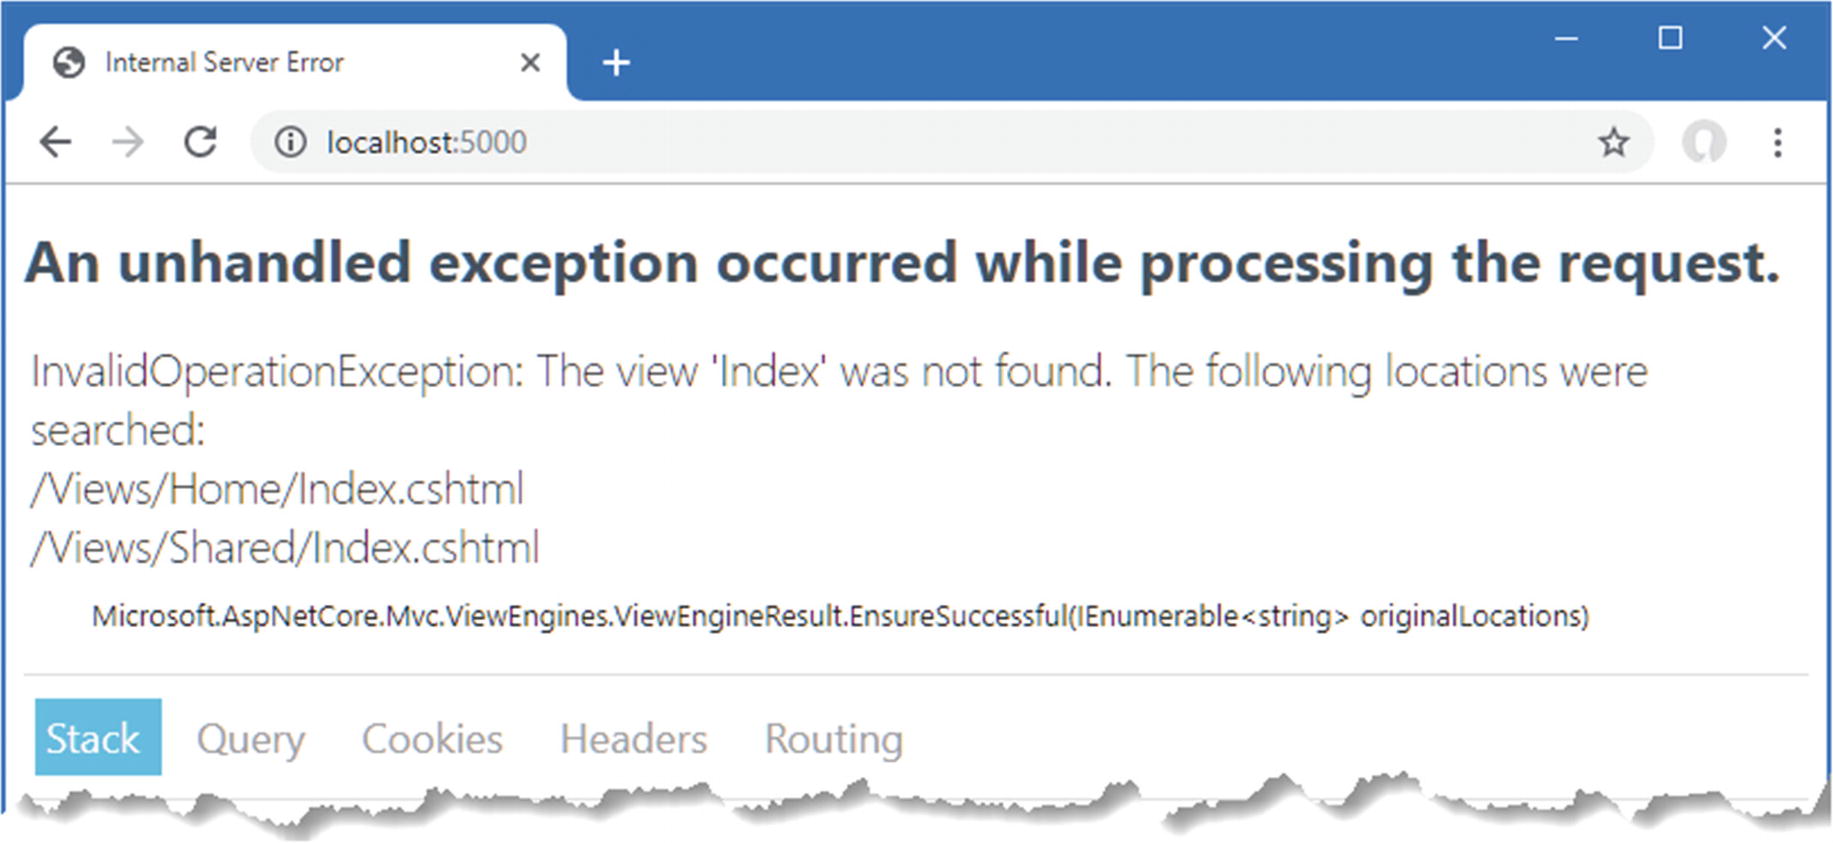
There are no views for the MVC Framework to use at the moment, but if you restart ASP.NET Core and use a browser to request http://localhost:5000, you will see an error message that shows how the MVC Framework responds to the ViewResult it received from the Index action method, as shown in Figure 21-2.
Figure 21-2.
Using a view result
Behind the scenes, there are two important conventions at work, which are described in the following sections.
Note
There are two features that can expand the range of search locations. The search will include the /Pages/Shared folder if the project uses Razor Pages, as explained in Chapter 23.
Understanding Convention Routing
HTML controllers rely on convention routing instead of the Route attribute. The convention in this term refers to the use of the controller class name and the action method name used to configure the routing system, which was done in Listing 21-6 by adding this statement to the endpoint routing configuration:
The route that this statement sets up matches two- and three-segment URLs. The value of the first segment is used as the name of the controller class, without the Controller suffix, so that Home refers to the HomeController class. The second segment is the name of the action method, and the optional third segment allows action methods to receive a parameter named id. Default values are used to select the Index action method on the Home controller for URLs that do not contain all the segments. This is such a common convention that the same routing configuration can be set up without having to specify the URL pattern, as shown in Listing 21-7.
...
public void Configure(IApplicationBuilder app, DataContext context) {
app.UseDeveloperExceptionPage();
app.UseStaticFiles();
app.UseRouting();
app.UseEndpoints(endpoints => {
endpoints.MapControllers();
endpoints.MapDefaultControllerRoute();
});
SeedData.SeedDatabase(context);
}
...
Listing 21-7.
Using the Default Routing Convention in the Startup.cs File in the WebApp Folder
The MapDefaultControllerRoute method avoids the risk of mistyping the URL pattern and sets up the convention-based routing. I have configured one route in this chapter, but an application can define as many routes as it needs, and later chapters expand the routing configuration to make examples easier to follow.
Tip
The MVC Framework assumes that any public method defined by an HTML controller is an action method and that action methods support all HTTP methods. If you need to define a method in a controller that is not an action, you can make it private or, if that is not possible, decorate the method with the NonAction attribute. You can restrict an action method to support specific HTTP methods by applying attributes so that the HttpGet attribute denotes an action that handles GET requests, the HttpPost method denotes an action that handles POST requests, and so on.
Understanding the Razor View Convention
When the Index action method defined by the Home controller is invoked, it uses the value of the id parameter to retrieve an object from the database and passes it to the View method.
...
public async Task<IActionResult> Index(long id = 1) {
When an action method invokes the View method, it creates a ViewResult that tells the MVC Framework to use the default convention to locate a view. The Razor view engine looks for a view with the same name as the action method, with the addition of the cshtml file extension, which is the file type used by the Razor view engine. Views are stored in the Views folder, grouped by the controller they are associated with. The first location searched is the Views/Home folder, since the action method is defined by the Home controller (the name of which is taken by dropping Controller from the name of the controller class). If the Index.cshtml file cannot be found in the Views/Home folder, then the Views/Shared folder is checked, which is the location where views that are shared between controllers are stored.
While most controllers have their own views, views can also be shared so that common functionality doesn’t have to be duplicated, as demonstrated in the “Using Shared Views” section.
The exception response in Figure 21-2 shows the result of both conventions. The routing conventions are used to process the request using the Index action method defined by the Home controller, which tells the Razor view engine to use the view search convention to locate a view. The view engine uses the name of the action method and controller to build its search pattern and checks for the Views/Home/Index.cshtml and Views/Shared/Index.cshtml files.
Creating a Razor View
To provide the MVC Framework with a view to display, create the Views/Home folder and add to it a file named Index.cshtml with the content shown in Listing 21-8. If you are using Visual Studio, create the view by right-clicking the Views/Home folder, selecting Add ➤ New Item from the popup menu, and selecting the Razor View item in the ASP.NET Core ➤ Web category, as shown in Figure 21-3.
Tip
There is a menu item for creating views in the Add popup menu, but this relies on the Visual Studio scaffolding feature, which adds template content to create different types of view. I don’t rely on the scaffolding in this book and instead show you how to create views from scratch.
The Contents of the Index.cshtml File in the Views/Home Folder
The view file contains standard HTML elements that are styled using the Bootstrap CSS framework, which is applied through the class attribute. The key view feature is the ability to generate content using C# expressions, like this:
I explain how these expressions work in the “Understanding the Razor Syntax” section, but for now, it is enough to know that these expressions insert the value of the Name and Price properties from the Product view model passed to the View method by the action method in Listing 21-6. Restart ASP.NET Core and use a browser to request http://localhost:5000, and you will see the HTML response shown in Figure 21-4.
Figure 21-4.
A view response
Modifying a Razor View
The package I added in Listing 21-1 and configured in Listing 21-5 detects and recompiles Razor views automatically, meaning that the ASP.NET Core runtime doesn’t have to be restarted. To demonstrate the recompilation process, Listing 21-9 adds new elements to the Index view.
Adding Elements in the Index.cshtml File in the Views/Home Folder
Save the changes to the view and reload the browser window without restarting ASP.NET Core. The changes to the view will be detected, and there will be a brief pause as the views are compiled, after which the response shown in Figure 21-5 will be displayed.
Note
This feature applies only to views and not the C# classes in a project. If you make a change to a class file, then you will have to restart ASP.NET Core for the change to take effect.
Figure 21-5.
Modifying a Razor view
Selecting a View by Name
The action method in Listing 21-6 relies entirely on convention, leaving Razor to select the view that is used to generate the response. Action methods can select a view by providing a name as an argument to the View method, as shown in Listing 21-10.
using Microsoft.AspNetCore.Mvc;
using System.Threading.Tasks;
using WebApp.Models;
namespace WebApp.Controllers {
public class HomeController: Controller {
private DataContext context;
public HomeController(DataContext ctx) {
context = ctx;
}
public async Task<IActionResult> Index(long id = 1) {
Selecting a View in the HomeController.cs File in the Controllers Folder
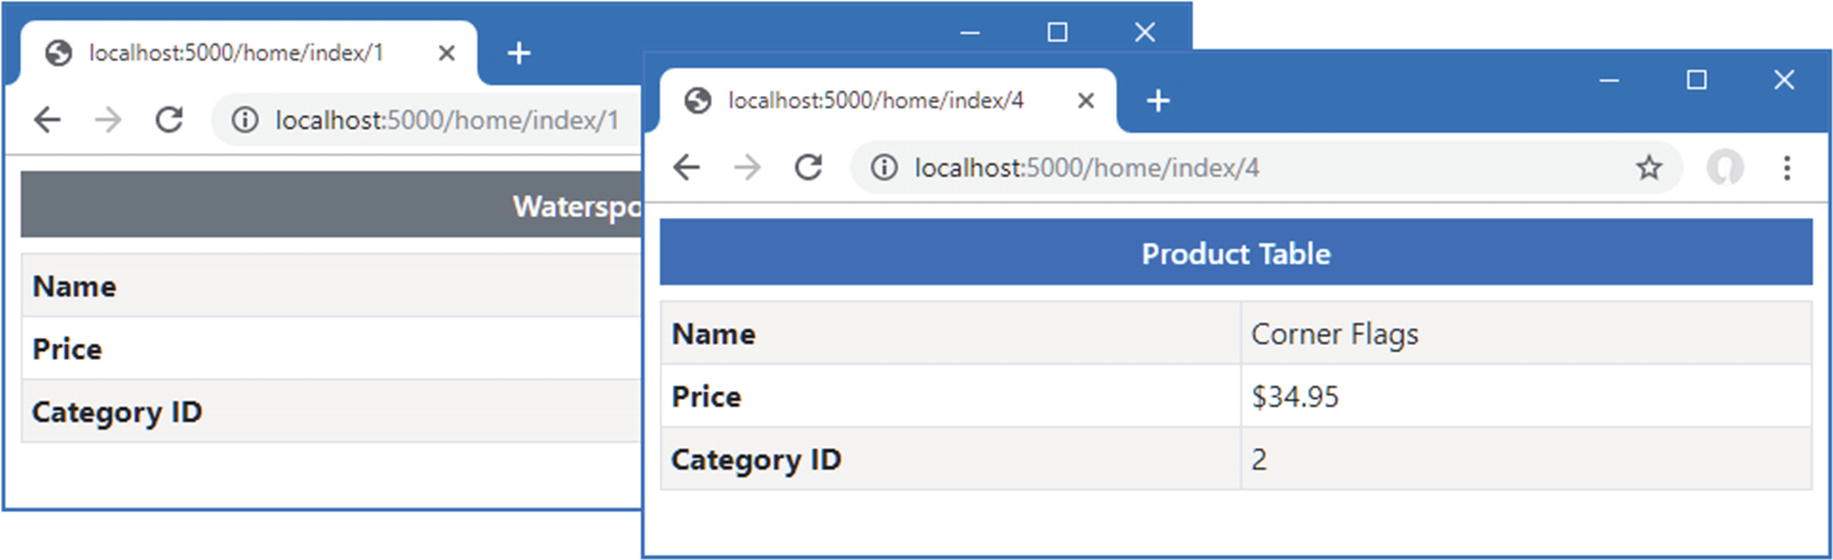
The action method selects the view based on the CategoryId property of the Product object that is retrieved from the database. If the CategoryId is 1, the action method invokes the View method with an additional argument that selects a view named Watersports.
...
return View("Watersports", prod);
...
Notice that the action method doesn’t specify the file extension or the location for the view. It is the job of the view engine to translate Watersports into a view file. To create the view, add a Razor view file named Watersports.cshtml file to the Views/Home folder with the content shown in Listing 21-11.
The Contents of the Watersports.cshtml File in the Views/Home Folder
The new view follows the same pattern as the Index view but has a different title above the table. Since the HomeController class has been changed, restart ASP.NET Core and request http://localhost:5000/home/index/1 and http://localhost:5000/home/index/4. The action method selects the Watersports view for the first URL and the default view for the second URL, producing the two responses shown in Figure 21-6.
Figure 21-6.
Selecting views
Using Shared Views
When the Razor view engine locates a view, it looks in the View/[controller] folder and then the Views/Shared folder. This search pattern means that views that contain common content can be shared between controllers, avoiding duplication. To see how this process works, add a Razor view file named Common.cshtml to the Views/Shared folder with the content shown in Listing 21-12.
Adding an Action in the HomeController.cs File in the Controllers Folder
The new action relies on the convention of using the method name as the name of the view. When a view doesn’t require any data to display to the user, the View method can be called without arguments. Next, create a new controller by adding a class file named SecondController.cs to the Controllers folder, with the code shown in Listing 21-14.
using Microsoft.AspNetCore.Mvc;
namespace WebApp.Controllers {
public class SecondController : Controller {
public IActionResult Index() {
return View("Common");
}
}
}
Listing 21-14.
The Contents of the SecondController.cs File in the Controllers Folder
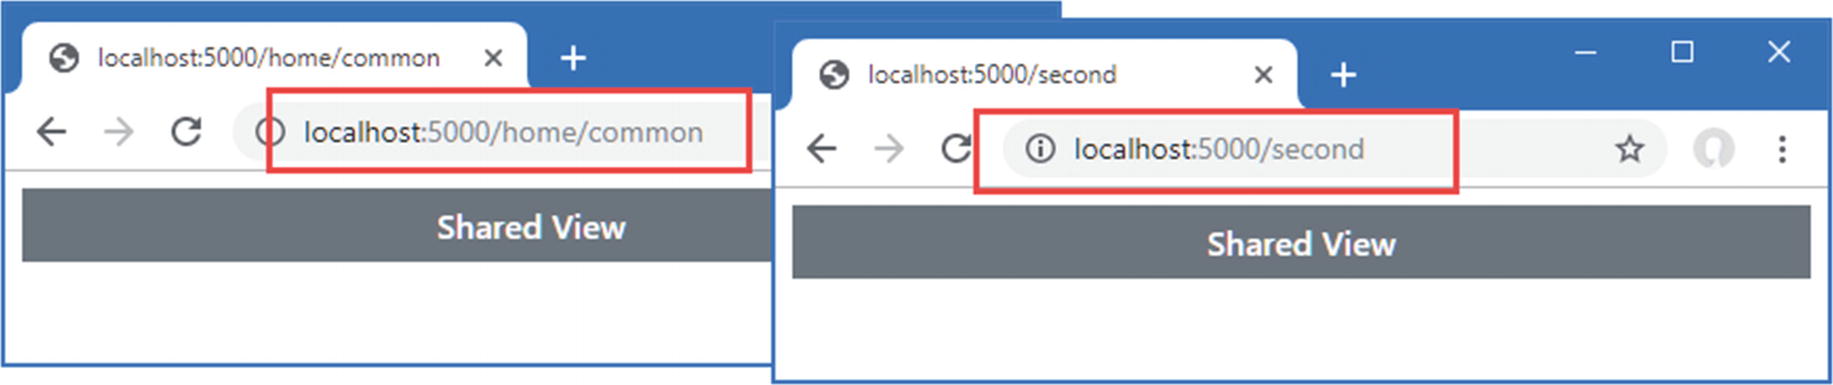
The new controller defines a single action, named Index, which invokes the View method to select the Common view. Restart ASP.NET Core and navigate to http://localhost:5000/home/common and http://localhost:5000/second, both of which will render the Common view, producing the responses shown in Figure 21-7.
Figure 21-7.
Using a shared view
Specifying a View Location
The Razor view engine will look for a controller-specific view before a shared view. You can change this behavior by specifying the complete path to a view file, which can be useful if you want to select a shared view that would otherwise be ignored because there is a controller-specific view with the same name.
...
public IActionResult Index() {
return View("/Views/Shared/Common.cshtml");
}
...
When specifying the view, the path relative to the project folder must be specified, starting with the / character. Notice that the full name of the file, including the file extension, is used.
This is a technique that should be used sparingly because it creates a dependency on a specific file, rather than allowing the view engine to select the file.
Working with Razor Views
Razor views contain HTML elements and C# expressions. Expressions are mixed in with the HTML elements and denoted with the @ character, like this:
...
<tr><th>Name</th><td>@Model.Name</td></tr>
...
When the view is used to generate a response, the expressions are evaluated, and the results are included in the content sent to the client. This expression gets the name of the Product view model object provided by the action method and produces output like this:
...
<tr><th>Name</th><td>Corner Flags</td></tr>
...
This transformation can seem like magic, but Razor is simpler than it first appears. Razor views are converted into C# classes that inherit from the RazorPage class, which are then compiled like any other C# class.
Tip
You can see the generated view classes by examining the contents of the obj/Debug/netcoreapp3.0/Razor/Views folder with the Windows File Explorer.
The view from Listing 21-11, for example, would be transformed into a class like this:
using Microsoft.AspNetCore.Mvc.Razor;
using System.Threading.Tasks;
using Microsoft.AspNetCore.Mvc.Rendering;
using Microsoft.AspNetCore.Mvc;
using Microsoft.AspNetCore.Mvc.ViewFeatures;
namespace AspNetCore {
public class Views_Home_Watersports : RazorPage<dynamic> {
public IViewComponentHelper Component { get; private set; }
public IJsonHelper Json { get; private set; }
public IHtmlHelper<dynamic> Html { get; private set; }
public IModelExpressionProvider ModelExpressionProvider { get; private set; }
}
}
This class is a simplification of the code that is generated so that I can focus on the features that are most important for this chapter. The first point to note is that the class generated from the view inherits from the RazorPage<T> class.
...
public class Views_Home_Watersports : RazorPage<dynamic> {
...
Table 21-3 describes the most useful properties and methods defined by RazorPage<T>.
Caching Responses
Responses from views can be cached by applying the ResponseCache attribute to action methods (or to the controller class, which caches the responses from all the action methods). See Chapter 17 for details of how response caching is enabled.
Table 21-3.
The RazorPage<T> Members
Name
Description
Context
This property returns the HttpContext object for the current request.
Layout
This property is used to set the view layout, as described in Chapter 22.
Model
This property returns the view model passed to the View method by the action.
RenderBody()
This method is used in layouts to include content from a view, as described in Chapter 22.
RenderSection()
This method is used in layouts to include content from a section in a view, as described in Chapter 22.
TempData
This property is used to access the temp data feature, which is described in Chapter 22.
ViewBag
This property is used to access the view bag, which is described in Chapter 22.
ViewContext
This property returns a ViewContext object that provides context data.
ViewData
This property returns the view data, which I used for unit testing controllers in the SportsStore application.
Write(str)
This method writes a string, which will be safely encoded for use in HTML.
WriteLiteral(str)
This method writes a string without encoding it for safe use in HTML.
The expressions in the view are translated into calls to the Write method, which encodes the result of the expression so that it can be included safely in an HTML document. The WriteLiteral method is used to deal with the static HTML regions of the view, which don’t need further encoding.
Tip
See Chapter 22 for more details about HTML encoding.
The result is a fragment like this from the CSHTML file:
...
<tr><th>Name</th><td>@Model.Name</td></tr>
...
This is converted into a series of C# statements like these in the ExecuteAsync method:
...
WriteLiteral("<th>Name</th><td>");
Write(Model.Name);
WriteLiteral("</td></tr>");
...
When the ExecuteAsync method is invoked, the response is generated with a mix of the static HTML and the expressions contained in the view. When the statements in the generated class are executed, the combination of the HTML fragments and the results from evaluating the expressions are written to the response, producing HTML like this:
...
<th>Name</th><td>Kayak</td></tr>
...
In addition to the properties and methods inherited from the RazorPage<T> class, the generated view class defines the properties described in Table 21-4, some of which are used for features described in later chapters.
Table 21-4.
The Additional View Class Properties
Name
Description
Component
This property returns a helper for working with view components, which is accessed through the vc tag helper described in Chapter 25.
Html
This property returns an implementation of the IHtmlHelper interface. This property is used to manage HTML encoding, as described in Chapter 22.
Json
This property returns an implementation of the IJsonHelper interface, which is used to encode data as JSON, as described in Chapter 22.
ModelExpressionProvider
This property provides access to expressions that select properties from the model, which is used through tag helpers, described in Chapters 25–27.
Url
This property returns a helper for working with URLs, as described in Chapter 26.
Setting the View Model Type
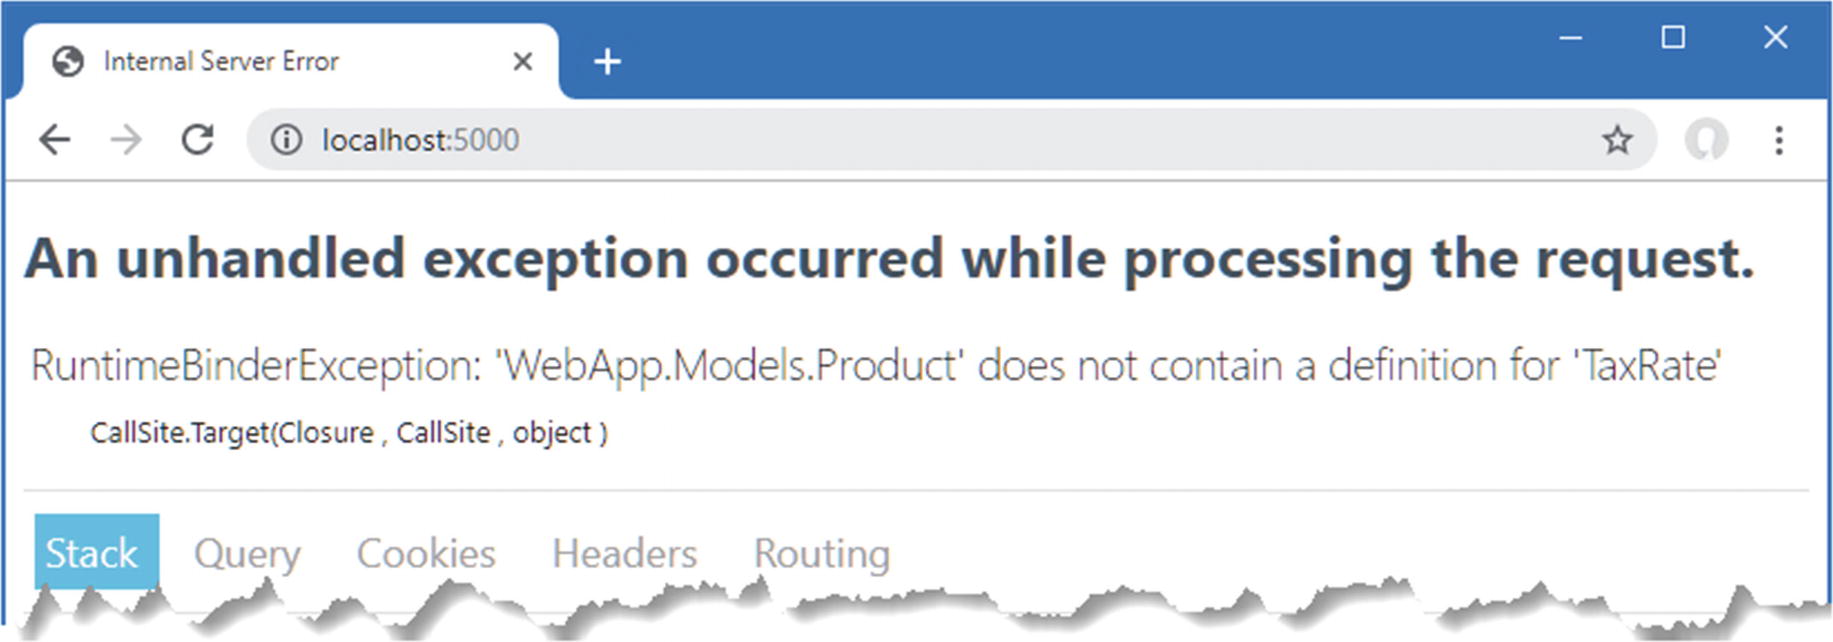
The generated class for the Watersports.cshtml file is derived from RazorPage<T>, but Razor doesn’t know what type will be used by the action method for the view model, so it has selected dynamic as the generic type argument. This means that the @Model expression can be used with any property or method name, which is evaluated at runtime when a response is generated. To demonstrate what happens when a nonexistent member is used in an exception, add the content shown in Listing 21-15 to the Watersports.cshtml file.
Adding Content in the Watersports.cshtml File in the Views/Home Folder
Use a browser to request http://localhost:5000, and you will see the exception shown in Figure 21-8.
Figure 21-8.
Using a nonexistent property in a view expression
To check expressions during development, the type of the Model object can be specified using the model keyword, as shown in Listing 21-16.
Tip
It is easy to get the two terms confused. Model, with an uppercase M, is used in expressions to access the view model object provided by the action method, while model, with a lowercase m, is used to specify the type of the view model.
Declaring the Model Type in the Watersports.cshtml File in the Views/Home Folder
An error warning will appear in the editor after a few seconds, as Visual Studio or Visual Studio Code checks the view in the background, as shown in Figure 21-9. The compiler will also report an error if you build the project or use the dotnet build or dotnet run command.
Figure 21-9.
An error warning in a view file
When the C# class for the view is generated, the view model type is used as the generic type argument for the base class, like this:
...
public class Views_Home_Watersports : RazorPage<Product> {
...
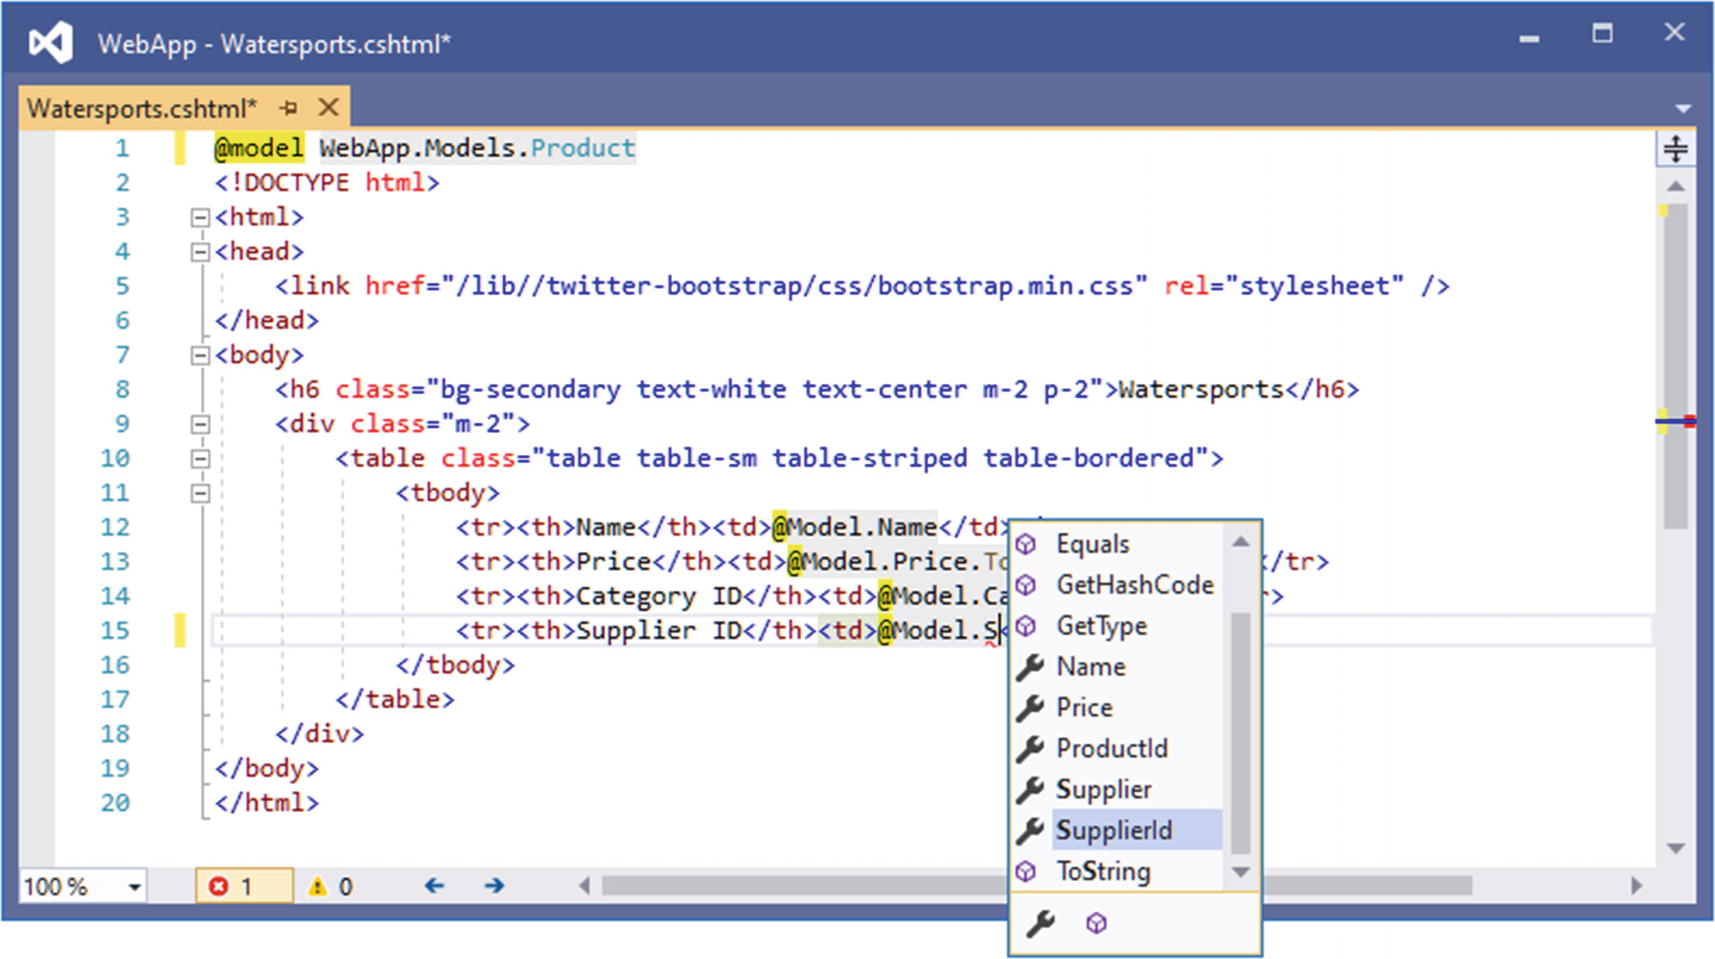
Specifying a view model type allows Visual Studio and Visual Studio Code to suggest property and method names as you edit views. Replace the nonexistent property with the one shown in Listing 21-17.
Replacing a Property in the Watersports.cshtml File in the Views/Home Folder
As you type, the editor will prompt you with the possible member names defined by the view model class, as shown in Figure 21-10. This figure shows the Visual Studio code editor, but Visual Studio Code has a comparable feature.
Figure 21-10.
Editor suggestions when using a view model type
Using a View Imports File
When I declared the view model object at the start of the Watersports.cshtml file, I had to include the namespace that contains the class, like this:
...
@model WebApp.Models.Product
...
By default, all types that are referenced in a Razor view must be qualified with a namespace. This isn’t a big deal when the only type reference is for the model object, but it can make a view more difficult to read when writing more complex Razor expressions such as the ones I describe later in this chapter.
You can specify a set of namespaces that should be searched for types by adding a view imports file to the project. The view imports file is placed in the Views folder and is named _ViewImports.cshtml.
Note
Files in the Views folder whose names begin with an underscore (the _ character) are not returned to the user, which allows the file name to differentiate between views that you want to render and the files that support them. View imports files and layouts (which I describe shortly) are prefixed with an underscore.
If you are using Visual Studio, right-click the Views folder in the Solution Explorer, select Add ➤ New Item from the pop-up menu, and select the Razor View Imports template from the ASP.NET Core category, as shown in Figure 21-11.
Figure 21-11.
Creating a view imports file
Visual Studio will automatically set the name of the file to _ViewImports.cshtml, and clicking the Add button will create the file, which will be empty. If you are using Visual Studio Code, simply select the Views folder and add a new file called _ViewImports.cshtml.
Regardless of which editor you used, add the expression shown Listing 21-18.
@using WebApp.Models
Listing 21-18.
The Contents of the _ViewImports.cshtml File in the Views Folder
The namespaces that should be searched for classes used in Razor views are specified using the @using expression, followed by the namespace. In Listing 21-18, I have added an entry for the WebApp.Models namespace that contains the view model class used in the Watersports.cshtml view.
Now that the namespace is included in the view imports file, I can remove the namespace from the view, as shown in Listing 21-19.
Tip
You can also add an @using expression to individual view files, which allows types to be used without namespaces in a single view.
Simplifying the Model Type in the Watersports.cshtml File in the Views/Home Folder
Save the view file and use a browser to request http://localhost:5000, and you will see the response shown in Figure 21-12.
Figure 21-12.
Using a view imports file
Understanding the Razor Syntax
The Razor compiler separates the static fragments of HTML from the C# expressions, which are then handled separately in the generated class file. There are several types of expression that can be included in views, which I describe in the sections that follow.
Understanding Directives
Directives are expressions that give instructions to the Razor view engine. The @model expression is a directive, for example, that tells the view engine to use a specific type for the view model, while the @using directive tells the view engine to import a namespace. Table 21-5 describes the most useful Razor directives.
Table 21-5.
Useful Razor Directives
Name
Description
@model
This directive specifies the type of the view model.
@using
This directive imports a namespace.
@page
This directive denotes a Razor Page, described in Chapter 23.
@section
This directive denotes a layout section, as described In Chapter 22.
@addTagHelper
This directive adds tag helpers to a view, as described in Chapter 25.
@namespace
This directive sets the namespace for the C# class generated from a view.
@functions
This directive adds C# properties and methods to the C# class generated from a view and is commonly used in Razor Pages, as described in Chapter 23.
@attribute
This directive adds an attribute to the C# class generated from a view. I use this feature to apply authorization restrictions in Chapter 38.
@implements
This directive declares that the C# class generated from a view inherits an interface or is derived from a base class. This feature is demonstrated in Chapter 33.
@inherits
This directive sets the base class for the C# class generated from a view. This feature is demonstrated in Chapter 33.
@inject
This directive provides a view with direct access to a service through dependency injection. This feature is demonstrated in Chapter 23.
Understanding Content Expressions
Razor content expressions produce content that is included in the output generated by a view. Table 21-6 describes the most useful content expressions, which are demonstrated in the sections that follow.
Table 21-6.
Useful Razor Content Expressions
Name
Description
@<expression>
This is the basic Razor expression, which is evaluated, and the result it produces is inserted into the response.
@if
This expression is used to select regions of content based on the result of an expression. See the “Using Conditional Expressions” section for examples.
@switch
This expression is used to select regions of content based on the result of an expression. See the “Using Conditional Expressions” section for examples.
@foreach
This expression generates the same region of content for each element in a sequence. See the “Enumerating Sequences” for examples.
@{ ... }
This expression defines a code block. See the “Using Razor Code Blocks” section for an example.
@:
This expression denotes a section of content that is not enclosed in HTML elements. See the “Using Conditional Expressions” section for an example.
@try
This expression is used to catch exceptions.
@await
This expression is used to perform an asynchronous operation, the result of which is inserted into the response. See Chapter 24 for examples.
Setting Element Content
The simplest expressions are evaluated to produce a single value that is used as the content for an HTML element in the response sent to the client. The most common type of expression inserts a value from the view model object, like these expressions from the Watersports.cshtml view file:
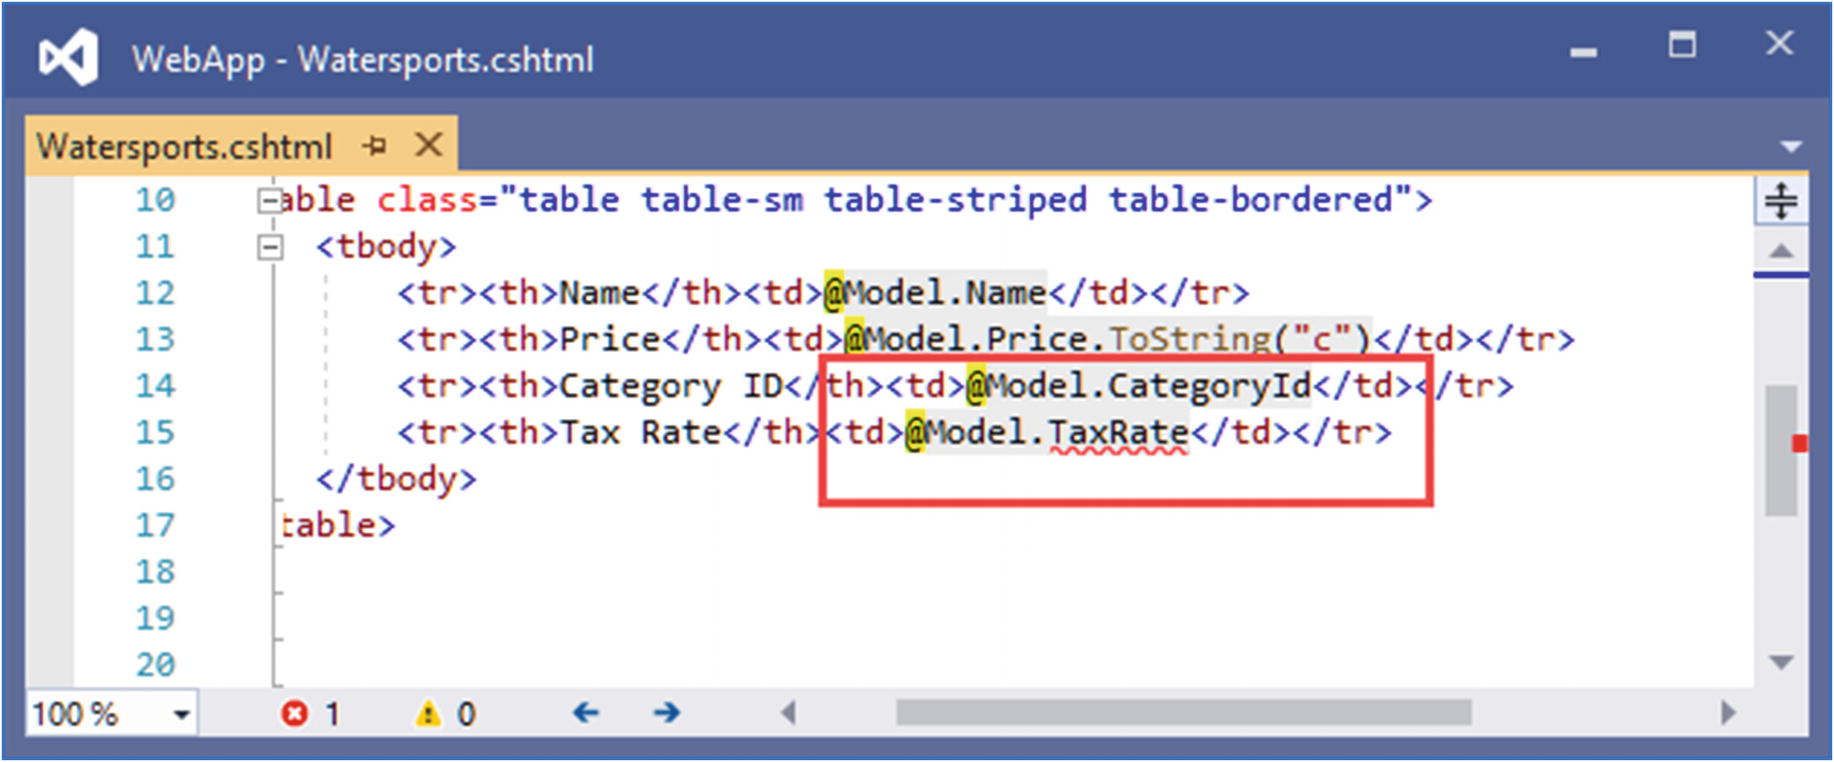
This type of expression can read property values or invoke methods, as these examples demonstrate. Views can contain more complex expressions, but these need to be enclosed in parentheses so that the Razor compiler can differentiate between the code and static content, as shown in Listing 21-20.
Adding Expressions in the Watersports.cshtml File in the Views/Home Folder
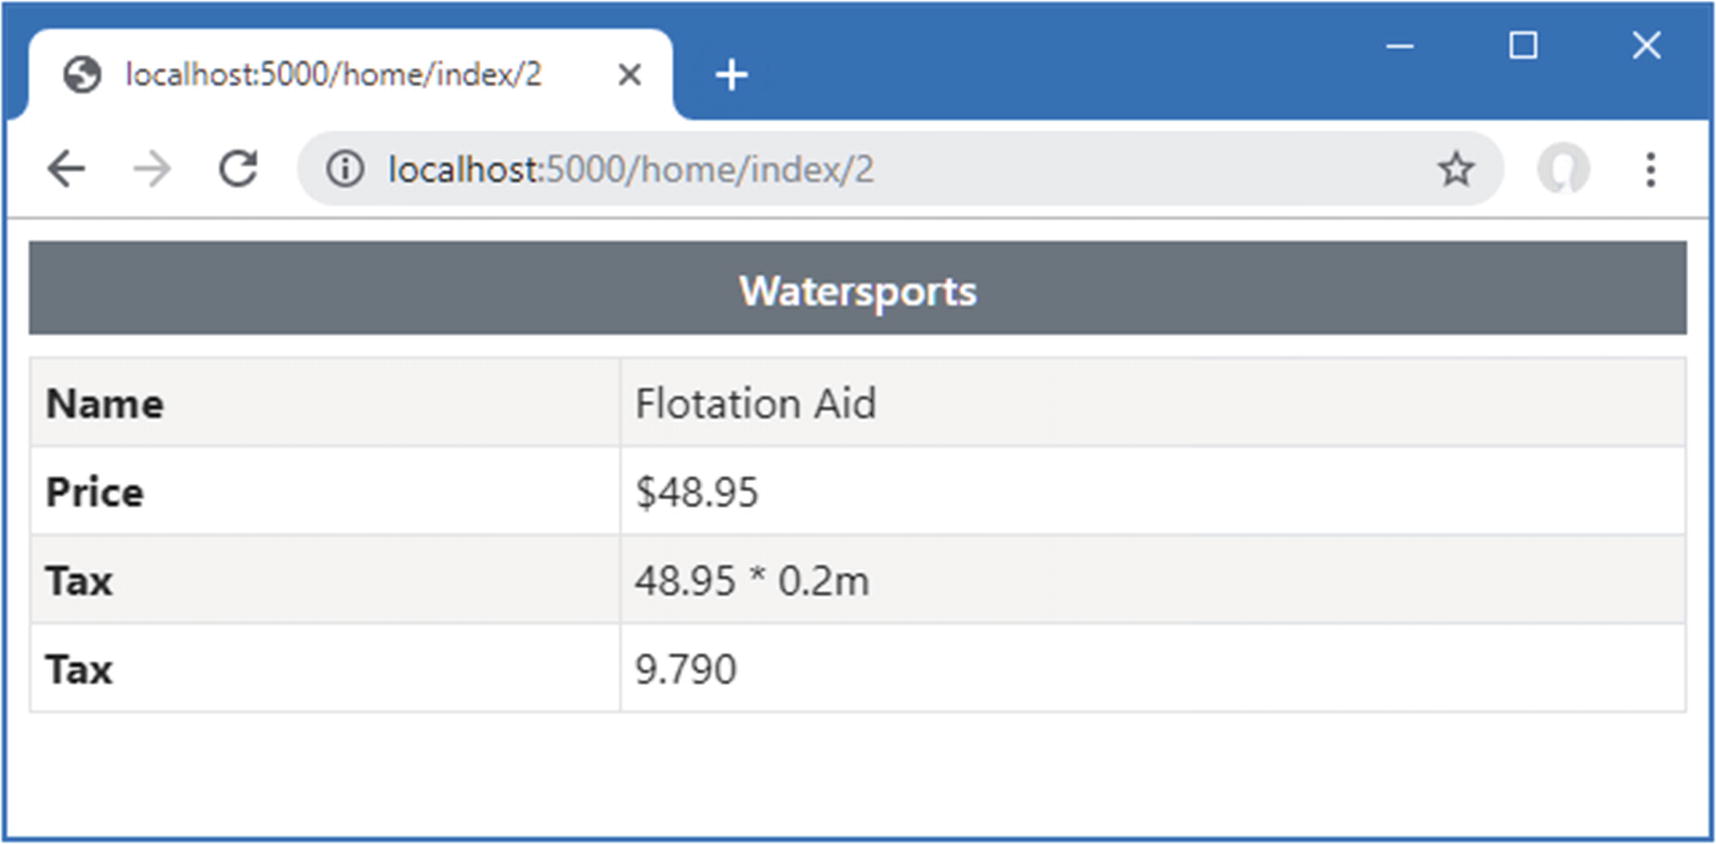
Use a browser to request http://localhost:5000; the response, shown in Figure 21-13, shows why parentheses are important.
Figure 21-13.
Expressions with and without parentheses
The Razor view compiler matches expressions conservatively and has assumed that the asterisk and the numeric value in the first expression are static content. This problem is avoided by parentheses for the second expression.
Setting Attribute Values
An expression can be used to set the values of element attributes, as shown in Listing 21-21.
Setting an Attribute in the Watersports.cshtml File in the Views/Home Folder
I used the Razor expressions to set the value for some data attributes on the table element.
Tip
Data attributes, which are attributes whose names are prefixed by data-, have been an informal way of creating custom attributes for many years and have been made part of the formal standard as part of HTML5. They are most often applied so that JavaScript code can locate specific elements or so that CSS styles can be more narrowly applied.
If you request http://localhost:5000 and look at the HTML source that is sent to the browser, you will see that Razor has set the values of the attribute, like this:
Razor supports conditional expressions, which means that the output can be tailored based on the view model. This technique is at the heart of Razor and allows you to create complex and fluid responses from views that are simple to read and maintain. In Listing 21-22, I have added a conditional statement to the Watersports view.
Using an If Expression in the Watersports.cshtml File in the Views/Home Folder
The @ character is followed by the if keyword and a condition that will be evaluated at runtime. The if expression supports optional else and elseif clauses and is terminated with a close brace (the } character). If the condition is met, then the content in the if clause is inserted into the response; otherwise, the content in the else clause is used instead.
Notice that the @ prefix isn’t required to access a Model property in the condition.
...
@if (Model.Price > 200) {
...
But the @ prefix is required inside the if and else clauses, like this:
...
<tr><th>Name</th><td>Luxury @Model.Name</td></tr>
...
To see the effect of the conditional statement, use a browser to request http://localhost:5000/home/index/1 and http://localhost:5000/home/index/2. The conditional statement will produce different HTML elements for these URLs, as shown in Figure 21-14.
Figure 21-14.
Using a conditional statement
Razor also supports @switch expressions, which can be a more concise way of handling multiple conditions, as shown in Listing 21-23.
Using a Switch Expression in the Watersports.cshtml File in the Views/Home Folder
Conditional expressions can lead to the same blocks of content being duplicated for each result clause. In the switch expression, for example, each case clause differs only in the content of the td element, while the tr and th elements remain the same. To remove this duplication, conditional expressions can be used within an element, as shown in Listing 21-24.
Setting Content in the Watersports.cshtml File in the Views/Home Folder
The Razor compiler needs help with literal values that are not enclosed in HTML elements, requiring the @: prefix, like this:
...
@:Small Boat
...
The compiler copes with HTML elements because it detects the open tag, but this additional help is required for text content. To see the effect of the switch statement, use a web browser to request http://localhost:5000/home/index/2, which produces the response shown in Figure 21-15.
Figure 21-15.
Using a switch expression with literal content
Enumerating Sequences
The Razor @foreach expression generates content for each object in an array or a collection, which is a common requirement when processing data. Listing 21-25 adds an action method to the Home controller that produces a sequence of objects.
using Microsoft.AspNetCore.Mvc;
using System.Threading.Tasks;
using WebApp.Models;
namespace WebApp.Controllers {
public class HomeController : Controller {
private DataContext context;
public HomeController(DataContext ctx) {
context = ctx;
}
public async Task<IActionResult> Index(long id = 1) {
Adding an Action in the HomeController.cs File in the Controllers Folder
The new action is called List, and it provides its view with the sequence of Product objects obtained from the Entity Framework Core data context. Add a Razor view file named List.cshtml to the Views/Home folder and add the content shown in Listing 21-26.
The Contents of the List.cshtml File in the Views/Home Folder
The foreach expression follows the same format as the C# foreach statement. In the example, the variable p is assigned each object in the sequence provided by the action method. The content within the expression is duplicated for each object and inserted into the response after the expressions it contains are evaluated. In this case, the content in the foreach expression generates a table row with cells that have their own expressions.
...
<tr><td>@p.Name</td><td>@p.Price</td></tr>
...
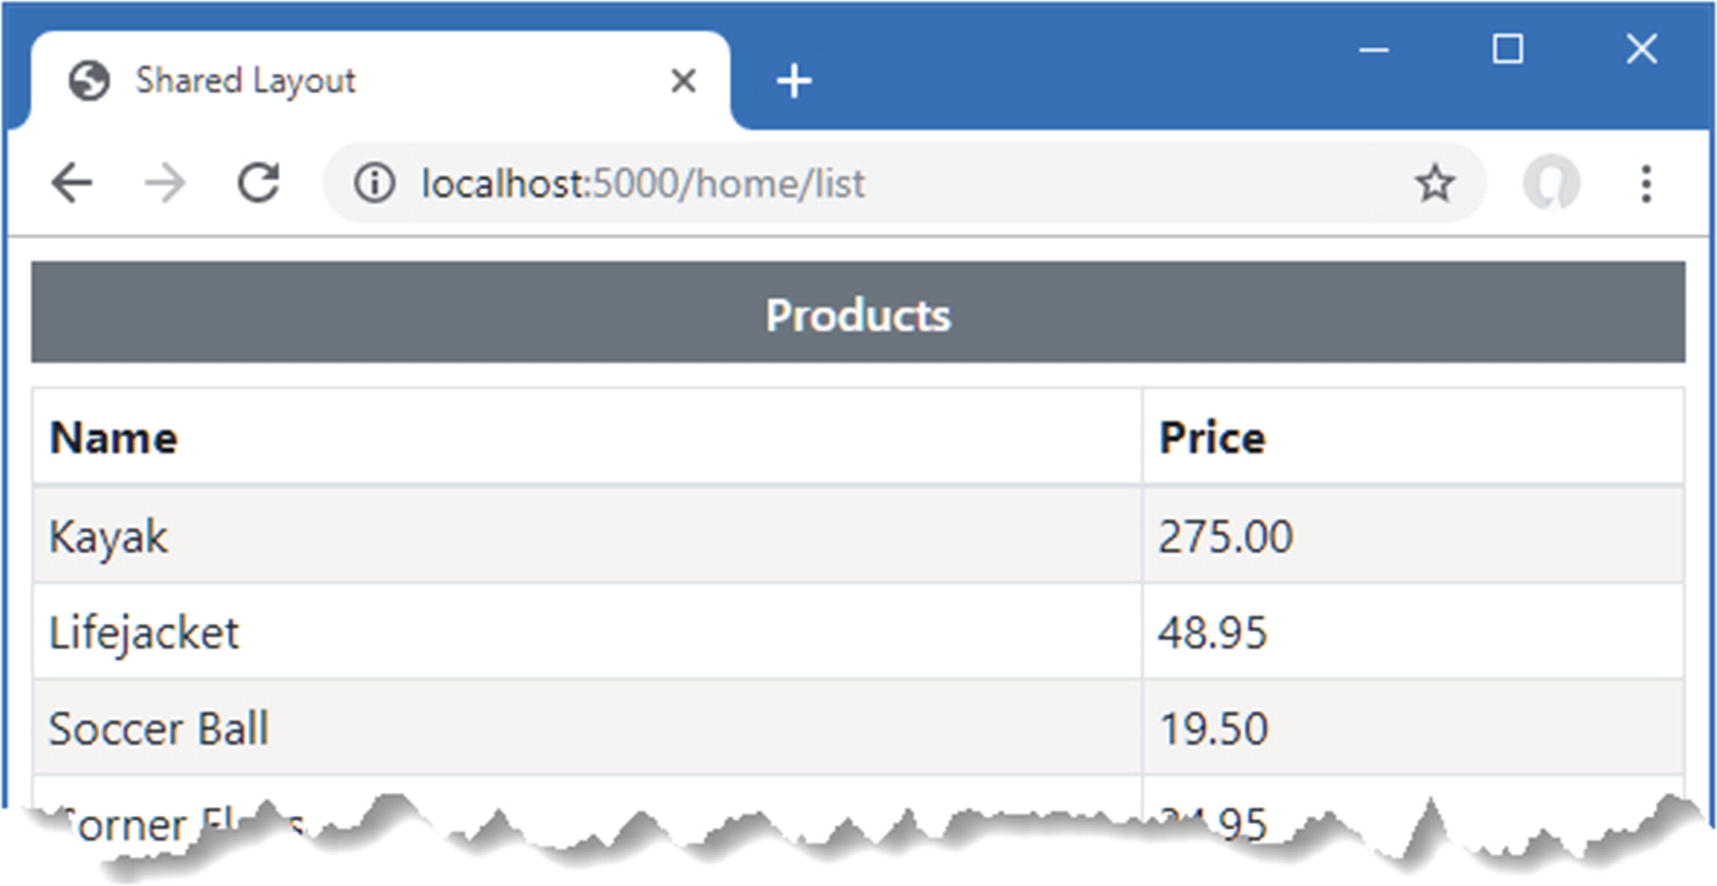
Restart ASP.NET Core so that the new action method will be available and use a browser to request http://localhost:5000/home/list, which produces the result shown in Figure 21-16, showing how the foreach expression populates a table body.
Figure 21-16.
Using a foreach expression
Using Razor Code Blocks
Code blocks are regions of C# content that do not generate content but that can be useful to perform tasks that support the expressions that do. Listing 21-27 adds a code block that calculates an average value.
Tip
The most common use of code blocks is to select a layout, which is described in Chapter 21.
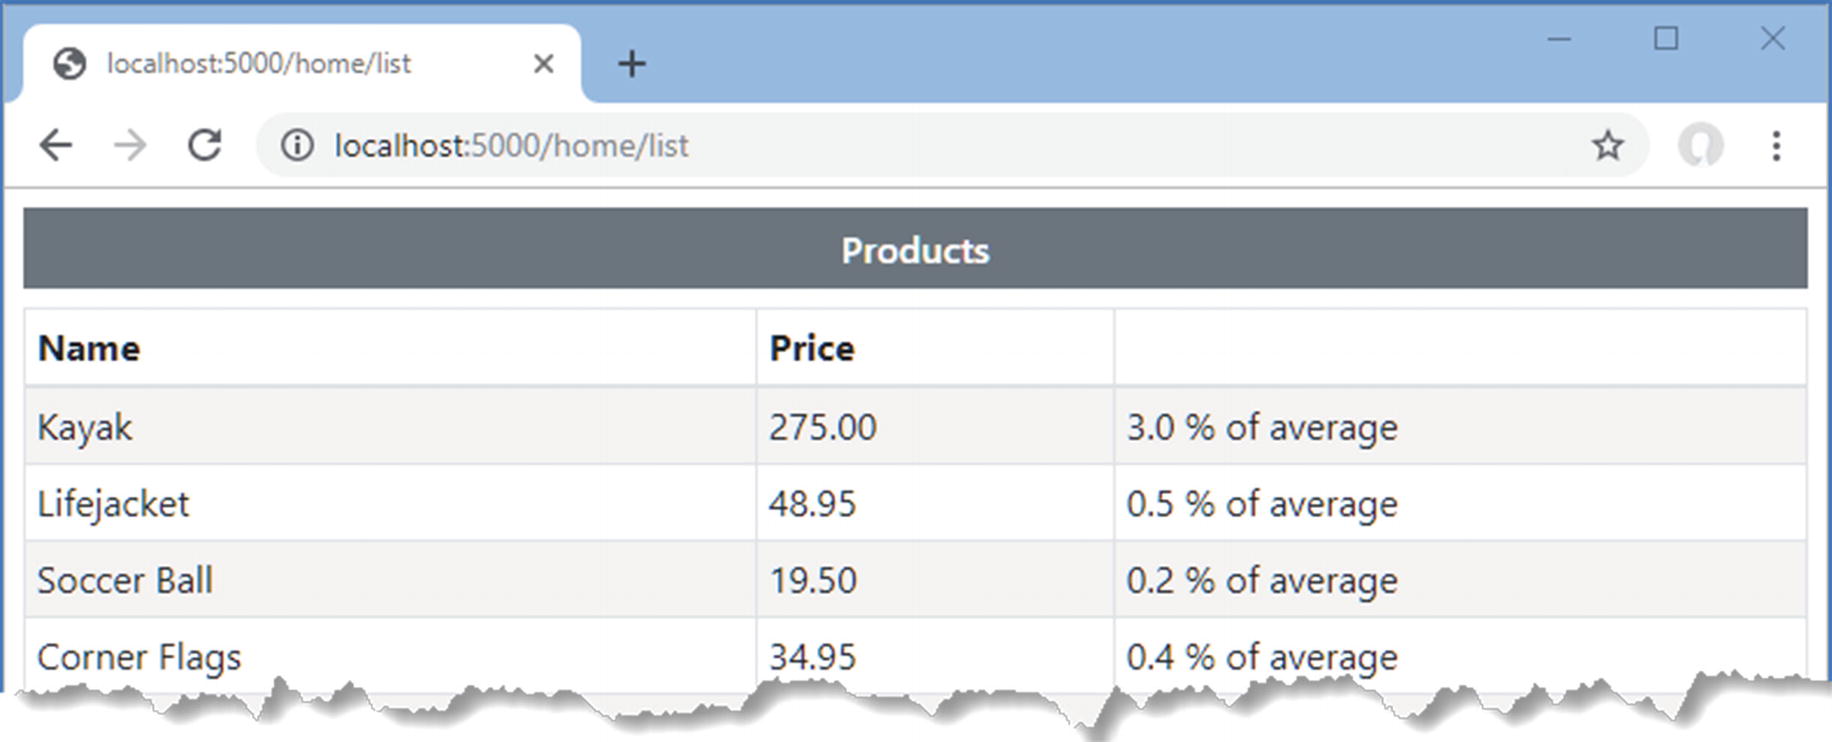
Using a Code Block in the List.cshtml File in the Views/Home Folder
The code block is denoted by @{ and } and contains standard C# statements. The code block in Listing 21-27 uses LINQ to calculate a value that is assigned to a variable named average, which is used in an expression to set the contents of a table cell, avoiding the need to repeat the average calculation for each object in the view model sequence. Use a browser to request http://localhost:5000/home/list, and you will see the response shown in Figure 21-17.
Note
Code blocks can become difficult to manage if they contain more than a few statements. For more complex tasks, consider using the view bag, described in Chapter 22, or adding a nonaction method to the controller.
Figure 21-17.
Using a code block
Summary
In this chapter, I introduced Razor views, which are used to create HTML responses from action methods. I explained how views are defined, how they are transformed into C# classes, and how the expressions they contain can be used to generate dynamic content. In the next chapter, I continue to describe how controllers can be used with views.