
Chapter 13. Finding Information All Over Windows
In This Chapter:
- Find files and folders fast
- Search when you don’t know a file’s location
- When to use the Search folder
- Narrowing your search results
- Modifying search locations
- Perform Boolean searches
- Save searches to reuse later
Hard disks are getting big...very big. As a terabyte of space—that’s 1,000 gigabytes—comes closer to becoming a standard storage capacity, you have more room to store more data in more places than ever before. When you want some of that data, you want to be able to locate the data quickly. (If you can’t find it quickly, the data isn’t very helpful.)
Windows Vista comes to the rescue with an entirely redesigned search system that permeates your entire operating system environment. Unlike the sluggish search features that previous versions of Windows offered, Vista’s search is quick and helpful. Vista’s Search boxes—called Instant Search boxes—are all over Vista; you’ll find them on your Start menu and throughout your Explorer windows. Vista’s Instant Search is a desktop searching tool that scans your files and folders at lightening speed locating data you want to find. Many times you don’t even have to know exactly what to search for or exactly how to spell what you want to find, and still Vista can usually find what you’re looking for.
Introducing Search
Open the Start menu and you’ll see an Instant Search box, located at the bottom of the menu, just above the Start button. As Chapter 3, “Clicking Your Start Button,” explained, Microsoft put a Search box on the Start menu to make Search easy to get to.
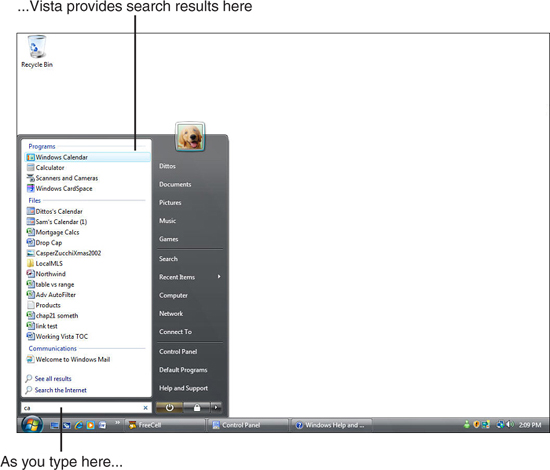
You don’t even have to click your mouse button to search for something on your Start menu. The moment you open the Start menu, your text cursor is already in the Search box. The moment you start typing, Vista goes to work. Figure 13.1 shows a search in progress. The user typed the letters co and Vista instantly began looking for programs and folders whose names begin with the letters co.
Figure 13.1. Vista provides intelligent and quick help that starts showing you search matches before you finish typing what you want to find.
Notice that when you search from the Start menu, the search is intelligent enough to look for programs and folders (but not documents and music files) that begin with the letters co. Throughout your use of Vista, Vista’s Search boxes look for context-related data. If you display your Music Explorer window and search for something with the Search box, Vista knows to look through your music files first and only then look through unrelated program and folder names.
By the Way
Surprisingly, one of the few places where the Search box does not begin displaying results the moment you start typing is in the Help system’s Search box. You must type your search term in the help system’s Search box and press Enter to start a search for help related to that topic.
Searching for Files and Folders
When searching in a large folder such as your Documents folder (formerly called My Documents), manually locating a particular file might be daunting. Your Documents folder will grow with files and subfolders as you use your computer. In such a Windows Explorer window, your Search box helps you locate the files and folders you want to locate. The Search box locates files whose filenames contain the characters you’re searching for as well as the file contents themselves. For example, search for Colt 1911 and Vista returns a list of files with Colt 1911 in their filenames as well as a list of files (including emails, spreadsheets, and anything else that might include the search test) from locations outside the current folder that contain the text, Colt 1911. Such an intensive search would have taken a long time in previous Windows versions but since Vista constantly updates its search indexes the search is rapid.
It’s important to note that when you search from within a Windows Explorer window, such as your Documents window, Vista searches Documents and all the subfolders within Documents, but no location outside the Documents hierarchy. If the search fails, the file or folder you’re looking for might not reside in Documents at all. (Another possibility is that you typed a wrong or misspelled name in the Search box.) Figure 13.2 shows the contents of a folder named My Novel that appears inside the Documents folder.
Figure 13.2. Before you start searching, all files appear in the folder’s window.
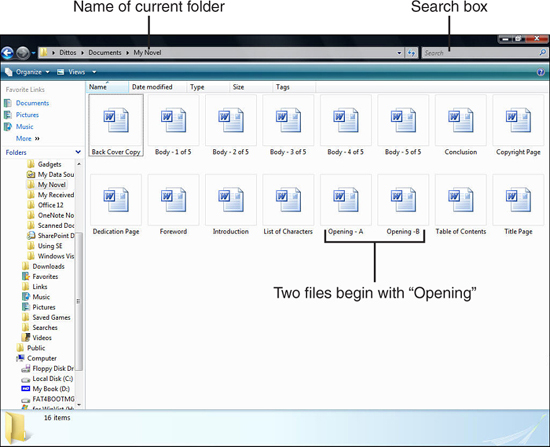
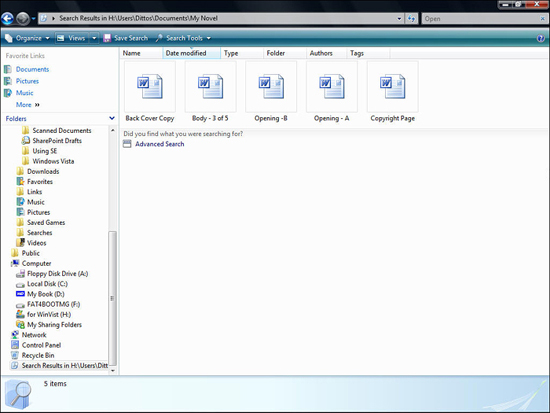
You’ll notice that two files whose names both start with the letters Opening appear in this folder. The files are Opening-A and Opening-B. It’s good to see what takes place when you start typing Open in the Search box at the top of the window.
The moment you type O, Vista instantly begins filtering out all the files from the current folder that don’t match that criteria. Figure 13.3 shows that five files now display because only those files contain Open in their filename or inside the documents themselves. The nice thing about the incremental way that Search box searches and locates files as you type the name is that you don’t have to spell out the entire search term. Usually, just three or four letters will enable you to zero in on the file you want to locate.
Figure 13.3. Vista filters out all files that don’t match your search term as you type the search term’s letters.
After the Search box filters enough of the file and folder entries down in the Explorer window, you’ll see the file you’re looking for.
How to Search When You Don’t Know a File’s Location
Using the Search box from your Documents or other Explorer window is nice when you know the general location of a file. Because you’ll store most of the data files that you create with your word processor and other application programs in your Documents window, you’re likely to begin your search there, as the previous section explained.
Other times you’ll need to locate a file or folder that might not be in your Documents folder. Perhaps it’s a program file or a downloaded utility folder that you want to copy to another computer. Before you can copy the item, you must find where it’s located.
When you want to locate something but you don’t know its general location, use the Search folder. The Search folder is a general-purpose search window that acts a lot like the other Explorer windows when you use their Search box, but the Search folder is more generic in where it looks. To open your Search folder, click your Start button and then select Search from your Start menu’s right pane. A Search folder like the one in Figure 13.4 opens.
Figure 13.4. Use the Search folder when you have no idea where a file or folder is located.
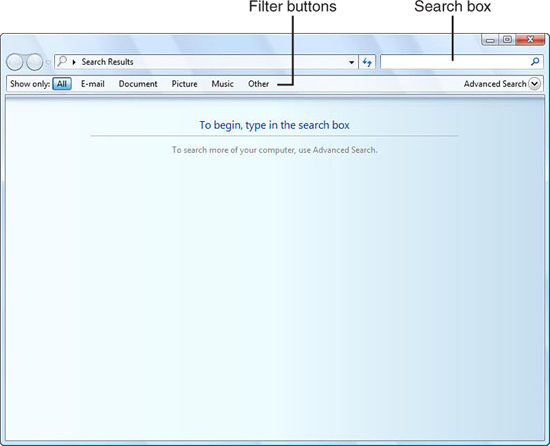
As you type a search phrase into the Search folder’s Search box, Vista begins displaying matching files in the search result area. The files don’t necessarily begin with your search phrase, but they will contain it.
Narrowing the Search Folder to Specific File Types
If you’re looking for a document file, and you use the Search folder to find it, you’ll get matching file and folder names that aren’t always document files. Some results might be an audio file; for example, if a CD whose music you ripped to your hard disk has a name similar to the one you’re looking for.
If your search results begin to fill with too many unrelated matches, click one of the filter buttons in the Search folder’s toolbar to narrow your search to a specific type of file. The default search is for all files and folders, so the Search folder uses the All filter button as the default. When you click another filter button, such as the Document button, Vista eliminates all files from the search results that are not document file types.
Changing Search Locations
The Advanced Search button opens a panel at the top of your Search window with several ways to refine your search. For example, you can search in locations outside your typical default disk drive. By clicking the Location button you can search your computer (which by default includes your internal hard disk drives, but not external drives, USB flash memory, or CD and DVD drives), all drives and devices, a specific user’s files, or a specific location on any drive on your computer.
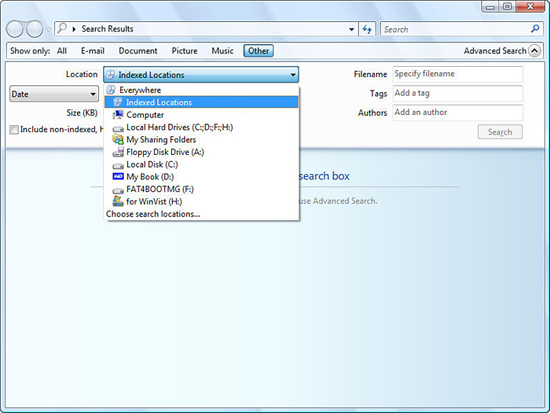
If, for example, you wanted to search an external drive set up as drive I: on your system, you would click the Advanced Search, then click Location. From the locations that appear, you could scroll down and select the H: drive (see Figure 13.5).
Figure 13.5. You can select a specific location anywhere on your computer or network to search for.
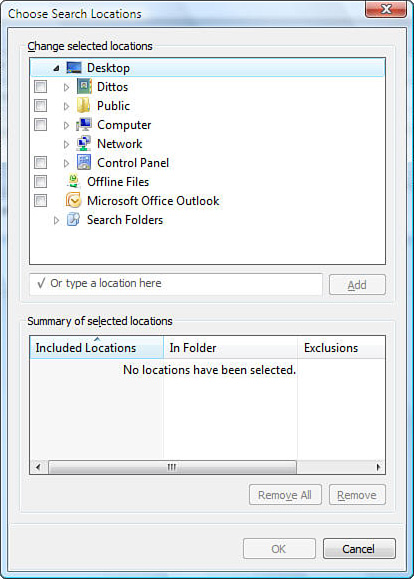
Clicking the Choose Search Locations button on the Location drop-down list produces the Choose Search Locations dialog box shown in Figure 13.6. Here you can build a specific list of locations where you want to search. Suppose, for example, you had two folders where you routinely stored your work and you wanted to search only those folders. Inside the Choose Search Locations dialog box, you would click to select the first folder and Vista would begin to build a search list with that location showing. You then can scroll to a different folder, click there to add a second search location, and so on. You’ve now specified exactly where Vista is to look for a particular file or folder.
Figure 13.6. You can select a specific location anywhere on your computer or network to search for.
Watch Out!
Searches outside your computer’s hard drives can take substantially longer than searches you perform on your own computer’s hard disk drives. Vista continually indexes your hard disk and updates its search list as you use your computer so that it finds files quickly. Vista does not, however, index CDs, DVDs, and external and networked drives that your computer doesn’t recognize as being always-connected drives. Therefore, Vista must perform a file-by-file, folder-by-folder search on those places when you look for something there. You must press Enter every time you search a nonindexed location such as a DVD drive so that Vista knows you’ve finished typing the search phrase and that the search is to begin.
Narrowing Your Search
The Advanced Search button provides several additional tools that can help you refine your searches. In addition to multiple locations as you learned about in the previous section, you can search for a specific date range or file size. You can also limit your search to specific filenames, tags, and authors who create those files.
Click the Date drop-down listbox to select from one of these two options:
- Date
- Date Modified
- Date Created
When you select the kind of date you want to limit your search to, you then select from the second drop-down box one of these three options:
- Is
- Is Before
- Is After
You then select a date. Therefore, these kinds of searches are possible that you’ve limited by date:
- Date Modified Is Before July 7, 2007
- Date Accessed Is After September 1, 2008
To limit your search to files of a certain size, select from the drop-down listbox to the right of the Size entry one of these options:
- Any
- Equals
- Is Less Than
- Is Greater Than
These options allow you to narrow a search down to all files whose file size is less than a specific value that you enter.
In the Filename box you can enter letters to limit the search to specific filenames. For example if you typed opening then only files with the word opening in their title would be searched.
By the Way
The Tags and Authors option boxes change depending on the type of file you’re searching for. If you click the E-mail button to limit searches to emails, Vista changes the Filename box to a Subject box and the Tag and Authors boxes to From Names and To Names option boxes. Clicking Picture to limit the search to picture files changes the Author box to a Title box so you can easily search through your picture titles (the digital image files you’ve added titles to). If you limit a search to music files, then the Tags and Authors boxes change to Artists and Album.
You can combine these Advanced Search options. Figure 13.7 shows a search in progress looking for all files modified before October 16, 2006 with the word dog in the filename and the names Casper or Zucchi (or both) in the tag.
Figure 13.7. You can build advanced searches to locate files with the exact pattern you require.

Saving Your Search Results
If you find yourself routinely performing the same searches, you can save your searches. Vista calls this saving your search results and you’ll see that phrase in Vista’s help screens, but it is somewhat misleading. You don’t actually save the search results from a specific search. If that were the case then no matter what changes you made to your files, the originally saved search would repeatedly show the same search results from the first time you saved the search.
Instead, when you save search results, what you’re really doing is saving a set of search commands and options. Vista creates an Explorer window for each search you save. Every time you open that window to view it, you’ll see the current results of that saved search. If you add or remove files that would produce a new set of search results, you see the updates when you reopen that saved search’s window.
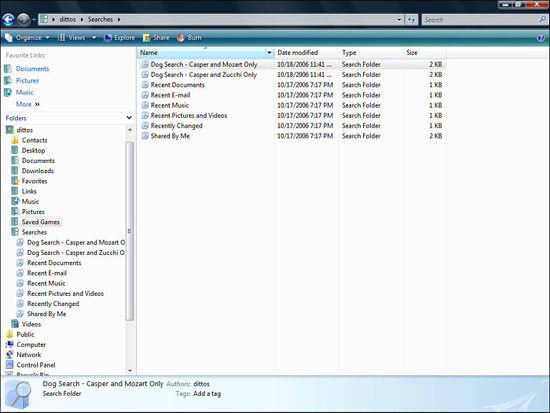
After completing a search that you might want to perform again, click the Search window’s Save Search button on the toolbar. Vista requests a name for the search and then saves your search in the Searches folder, which is located within your User folder (see Figure 13.8). Instead of rebuilding a complicated set of options each time you wish to search for something again, you need only open your Searches folder and select one of the searches you’ve saved; Vista performs the search again and opens the results window.
Figure 13.8. Vista comes pre-supplied with common searches and you can add your own.
Did you Know?
Before you save a search, Vista already has a list of common searches that you might perform. When you click Searches from any Windows Explorer window, you’ll see a list of searches as shown in Figure 13.8. As you create saved searches, your search results folders will appear in the Saved Searches folder.
Chapter Wrap-Up
This chapter helped you find information you need on both your own PC and any networked computers. Get in the habit of using the Search box and the Search folders to locate the things you need. You can search for any file and folder using a myriad of methods that Vista offers. When you locate the file or folder you are looking for, double-click that item to run the program, open the data file, or display the contents of the folder you found.
The next chapter begins a new part in the book called “Making Things Happen with Windows Vista.” The next few chapters explore Vista’s multimedia capabilities. Vista’s multimedia support goes far beyond any previous version of Windows. The role of the computer has morphed into a computing and entertainment system, and Windows Vista is up to the task of helping you manage your multimedia files such as songs, videos, pictures, and slideshows.