
Chapter 33. Configuring Windows Vista
In This Chapter:
- Change your computer’s startup options
- Modify the programs that load when Vista loads
- Set your computer’s clock and calendar
- Change regional settings when you travel
- Add a second or third clock to your taskbar
- Synchronize your computer’s clock to accurate Internet time
- Change event sounds
- Work with Windows themes
- View all your system settings
Throughout a lot of this book you’ve been configuring Windows Vista. You customized your screen’s theme and colors as well as its background image in Chapter 7, “Changing Windows Vista’s Look.” You set up speech recognition and trained your computer to understand your voice in Chapter 23, “Speaking to Your Computer.” You learned how to upgrade your entire Windows Vista system to a higher version in Chapter 24, “Controlling Windows Vista.” You changed default programs that Vista automatically runs in Chapter 25, “Setting Up Windows Program Defaults.” You learned how to change your user account picture in Chapter 26, “Separating Users Gives Each the Access They Need.” Just about every time you learn something new about Vista, you learn a way to make Vista behave in a way that suits your computing needs better.
Microsoft had to make a lot of guesses when determining which features and options would be included and turned on for each new Windows Vista installation. Although the default Vista installation truly is a remarkable tribute to a programming effort that produced an amazing operating system, Microsoft knows that everybody works a little differently and that everybody likes various combinations of features. That’s why Windows Vista is so customizable.
This chapter works as a catch-up chapter, filling in some of the configuration gaps that didn’t really fit elsewhere. So much of Vista is changeable. You can change which Windows programs load at startup. You can change the behavior of your taskbar’s clock. You can even change the sounds that Vista makes. In this chapter, you’ll learn these and other ways to keep your computer running accurately and behaving the way you like it.
Configuring Startup Options
Although it’s highly technical and can cause severe problems if you inadvertently change the wrong settings, there might come a time when you need to run the System Configuration program to make a change to your Windows startup settings. You start System Configuration in one of two ways and neither is all that elegant:
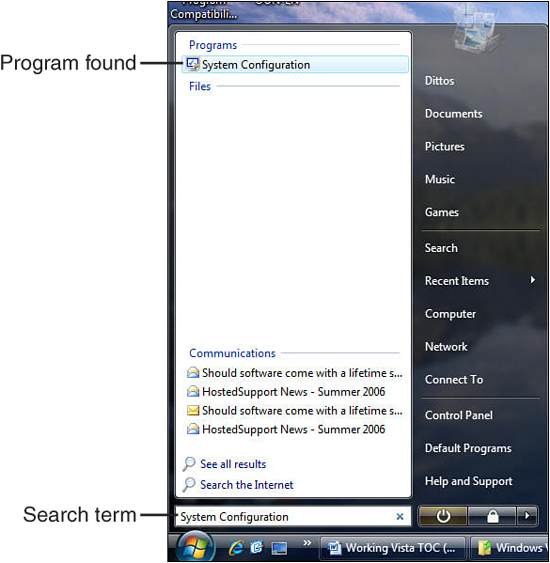
- Click your Start button to display your Start menu and begin typing
System Configurationin the Search box. Windows locates the program and lists it in your Start menu as shown in Figure 33.1.
Figure 33.1. Use the Search box to locate your System Configuration program.
- Press Windows+R to open Vista’s Run dialog box, type
msconfig, and press Enter.
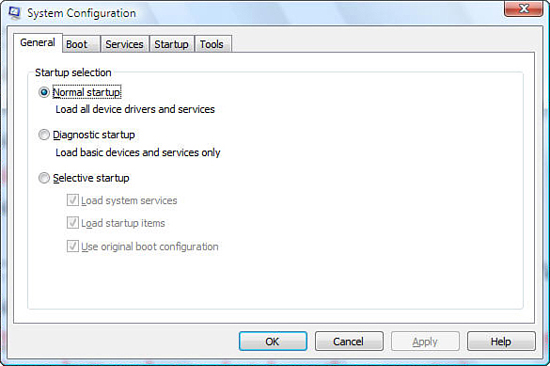
Whichever method you use to start the System Configuration program, you’ll soon see the program window open as shown in Figure 33.2. As usual, Vista confirms your administrative privileges before opening the System Configuration program.
Figure 33.2. The System Configuration program enables you to make changes to your Windows Vista’s behavior.
By the Way
Msconfig.exe is the filename of the System Configuration program. Because it’s located in the Windows/system32 folder—a folder that’s always searched in when you type a filename in the Run box—Vista locates the program and executes it.
System Configuration is a system program that can change the way Windows behaves and can dramatically affect your operating system’s performance and behavior for all users on the computer. Only an Administrator user account has the power to make such universal changes, so Vista verifies your administrative privileges before allowing you to work in the program.
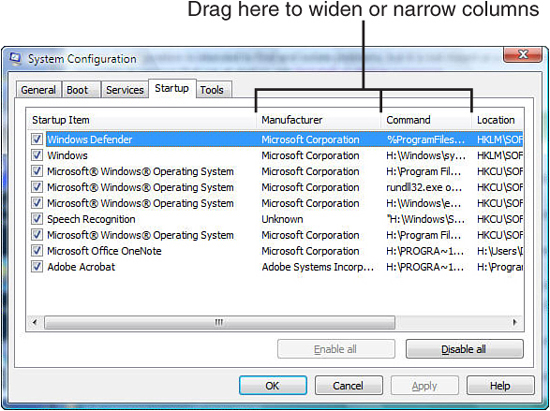
Although the System Configuration program enables you to adjust several internal system services, the most common reason that people run System Configuration is to change the way Windows starts up. Click the program’s Startup tab to display your current Vista startup settings. You will see a window that looks something like Figure 33.3 although, depending on your computer settings and the programs you’ve installed, the details of your Startup page might be very different from what’s shown here.
Figure 33.3. The Startup tab displays the System Configuration program’s Startup page where you control which programs load and which don’t the next time you start Windows.
Watch Out!
If you’re following along, from this point forward be very careful about what you click inside the System Configuration window. Any change you inadvertently make will change the way Vista starts up.
Did you Know?
Drag the column dividers left or right to see more room in whatever column you’re interested in. For example, the default column width for the Startup Item is so narrow that you probably can’t read most of the items there. This first column is important, so drag the Command or Location column divider to the left to make more room for the Startup Item column. It would be nice if Microsoft would allow users to maximize this window to full-screen size. Users have been requesting this since Windows 95 arrived on the scene. For more than a decade (and with Vista it appears that another decade might go by before it changes), the small, fixed System Configuration window size has been woefully inadequate to work in safely; it’s too easy to change something incorrectly because it’s so difficult to see all the words in each column.
You’ll notice that each item listed in your System Configuration program has a check mark next to it. (If a check box in your program window is not checked, someone or some process has already turned off one of your startup routines.) Each entry on the Startup page is a program that runs automatically every time Vista starts up. In Figure 33.3, for example, Windows Defender always starts first. This helps ensure that the files on that computer have protection from spyware, as explained in Chapter 27, “Managing Your Windows Security.” The rest of Windows loads afterward.
It’s true that many programs, especially those supplied by Microsoft, are difficult to discern. Because of the Windows entry that follows Windows Defender and the four subsequent entries labeled Microsoft Windows Operating System, it appears from the Startup page shown in Figure 33.3 that Windows loads five times.
A little sleuthing will tell you what most of these Windows programs really are. It’s not true that Windows is loading five times.
Did you Know?
Locate the web site http://sysinfo.org/ and add it to your Favorites Center. There you can type names of programs you find in your System Configuration window and find out what those programs are used for.
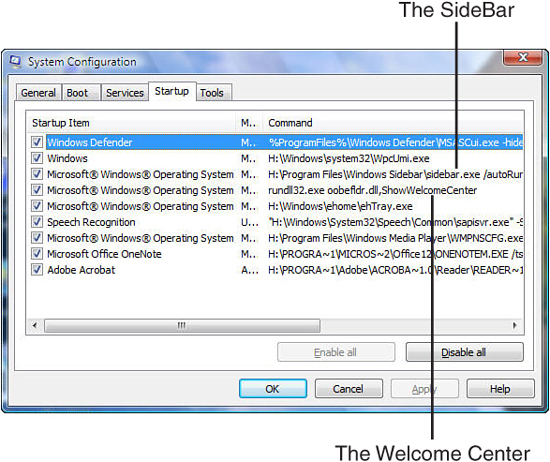
Expanding the Command column enough to see the rightmost portion of its data reveals many of the programs that start, as Figure 33.4 shows. It’s not easy to know what all the processes do, but the Sidebar is the third item that loads on the system. The Welcome Center runs next, opening the Welcome Center window that you learned about in Chapter 2, “Exploring the Welcome Center.” Following that is a program named ehTray.exe, which is the taskbar and notification area that you see at the bottom of your screen as you use Windows. As you can see, looking at the command gives you insight into what is taking place for those system processes with inadequate names.
Figure 33.4. After adjusting the column widths and scrolling to the right (if necessary), you can see the actual files that run during startup.
Here’s how you can use this knowledge: Suppose that you notice Windows isn’t starting properly because of a system error that appears on your screen. Or perhaps your display won’t stay in a high-resolution state. You should first attempt to load a restore point from back at a time when Windows started better. This gets tedious, but the best way to do it is to restore the latest restore point that you think will solve the problem, reboot, and see whether the problem goes away. If it does not, redo the restore as you learned how to do in Chapter 31, “Restoring Your Windows System to a Previous State,” and restore the next restore point back in time. Continue restoring and undoing until the problem goes away.
The problem will persist or you’ll solve it. If it persists, you should suspect that one of your startup programs is causing your problem and start working on that theory. Open System Configuration, click to display the Startup page, uncheck one item, and then reboot. It’s best to work your way back, so uncheck the bottom item first, and reboot to see whether the problem goes away. If so, in the case shown in Figure 33.3, you would then uninstall Adobe Acrobat Reader. If Windows still reboots nicely, either leave Adobe Acrobat Reader off your computer or reinstall the latest version from the Adobe.com website.
By the Way
It would be highly unusual if Adobe Acrobat Reader causes you any startup problems. It just happens to be the final item loaded in Figure 33.3 and because you always work your way back, Adobe Acrobat Reader is the example used here.
Why not just uninstall Adobe Acrobat Reader and omit the Startup page process where you click to uncheck Adobe and then reboot? The reason is your problem might not be Adobe’s Acrobat Reader and probably is not Adobe Acrobat Reader, so completely uninstalling the program just in case is a lot of work and a potential waste of time. It’s far easier to leave Adobe Acrobat Reader installed but turned off so that it doesn’t load automatically. You can then rule it out or determine it’s the reason for your startup problem.
If Adobe is not the problem, click to check Adobe Acrobat Reader (using Figure 33.3’s example) so that the program starts the next time you reboot and click to uncheck the OneNote program, the next-to-last program in Figure 33.3. Then reboot to see whether OneNote is the culprit. After you find the troublesome program, you should uninstall the program and reinstall it or stop using it altogether.
Another use for the System Configuration Startup page is to turn off certain startup programs just because you don’t want them to run for some reason unrelated to system problems. For example, you might want to install Dragon Naturally Speaking, a powerful speech recognition program. You could turn off Vista’s speech recognition program temporarily by clicking to uncheck it from your set of startup programs. Vista will not load its own speech recognition program as long as you have the program unchecked on your Startup page. If it turns out that you don’t want to use Dragon Naturally Speaking, you can uninstall Dragon and click to check Vista’s speech recognition option.
Did you Know?
System Configuration has a Disable All button that disables every program that Vista loads at startup so that you start with a vanilla Windows Vista environment the next time you reboot. If you are experiencing major problems but you can boot to Windows, you might have to resort to turning all your startup programs off. Doing so allows Windows to settle down long enough to install a driver that you need to install or perhaps to copy some data files that weren’t saved on your most recent backup off the computer so that you can reinstall Windows and start with a clean slate. Such a restore is dramatic but sometimes required if Windows is damaged badly enough.
Configuring Your Clock, Language, and Region
Far less technical than your System Configuration options, the clock in your taskbar’s notification area sits there quietly updating the time as you work. Point to your taskbar’s time and Vista pops open a small window above your taskbar to show you the date as well. If you followed the tip about increasing the size of your taskbar in Chapter 6, “Taking Your Taskbar to Task,” you won’t have to point to the time to see the date because you’ll always see both the time and the date on your taskbar, as in Figure 33.5. (If you moved your taskbar to the left or right edge of your screen, drag its inner edge toward the center of your screen to see the date.)
Figure 33.5. After you increase your taskbar’s height, you can see both the time and the date.

Did you Know?
If you cannot resize your taskbar, right-click a blank area in your taskbar and click the Lock the Taskbar option to uncheck it. After you resize the taskbar, you can right-click and check the Lock the Taskbar option again. By locking your taskbar in place, you keep your taskbar from being moved, resized, or changed inadvertently.
When you increase the size of your taskbar, you reduce the amount of room on the rest of your screen. That’s why Vista’s Auto-Hide feature is so nice. When turned on, Auto-Hide hides your taskbar until you move your mouse cursor to the bottom of the screen, which causes the taskbar to appear. That way you see the Taskbar only when you need to, but it’s always there for you when you do. Many Windows users use Auto-Hide even for their one-line taskbars to maximize their screen real estate. Refer to “The Taskbar Properties Menu” section in Chapter 6 to learn how to turn on and off the Auto-Hide feature.
Quickly Display a Clock and Calendar
Click your taskbar’s time and Vista opens a window containing an analog clock and a complete calendar for the month, as Figure 33.6 shows. Click the arrows to the left or right of the month and the calendar shows you future or previous months as you click to scroll through them. Click today’s date at the top of the window to return the month view to the current month.
Figure 33.6. The pop-up time and date window does more than display today’s date and time.
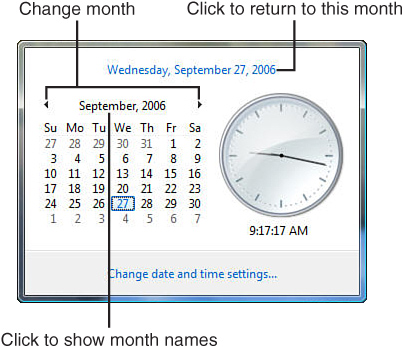
Click the month name above the monthly calendar and the names of the 12 months of the year appear. Now when you click the arrows to the left or right of the year, you move forward or backward one year. This is handy if you want to see what day a certain meeting or vacation falls on.
If you really want to move forward or backward in time, click the year at the top of the window in the year view and the window changes to show 12 years at a time through which you can quickly move forward and backward. Click once more to see an entire century! This helps you zero in on a far-off year that you want to look at for a specific day. You’ll be able to confirm such trivia as the fact that the Wright Brothers flew the very first airplane on a Thursday (December 17, 1903).
To close the clock’s window press Esc, select a desktop icon to start a program, or display your Start menu.
By the Way
Unfortunately, the Windows clock does not interact at all with Windows Calendar, Microsoft Outlook, or any other appointment-making program, so the Taskbar clock shows no indication of reminders when appointments are scheduled.
Change Your Date and Time Settings
To change your clock or date settings, click your taskbar’s time to open the clock window described in the previous section. Click the Change Date and Time Settings link to open the Date and Time window shown in Figure 33.7.
Figure 33.7. The Date and Time window does much more than it first appears.
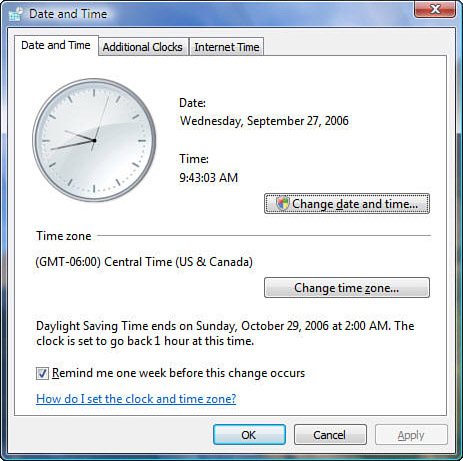
If the time or date is incorrect, first check the time zone displayed in the center of the window to make sure that your time zone is set. You can change the time zone by clicking the Change Time Zone button and selecting the correct time zone from the drop-down list box. If your state adjusts for daylight saving time, make sure that option is checked. (Some states such as Arizona and Hawaii don’t.)
Did you Know?
Notice that Windows offers to display a reminder a week before the daylight saving time change. The reminder enables you to get a lot of sleep the week before you lose an hour due to the spring time change. You can use this reminder to check batteries and electrical connections if you follow the extremely wise advice of checking your smoke detectors every six months when the time changes.
Assuming that the time zone is set correctly, you can adjust the computer clock’s date or time by clicking the Change Time Zone button. After Vista confirms your administrative privileges, the Date and Time window opens. You can click to select the correct date; click an hour, minute, second or AM/PM indicator to change any part of the time. When you click OK, your computer’s internal date and time will update.
Watch Out!
An internal backup battery maintains your computer’s time. If you notice that your date and time are always wrong and you’ve been using the same computer for a couple of years or more, it’s possible that you need to replace the battery inside the unit. This usually requires a trip to a computer repair center or a trip to the manufacturer’s website to determine which battery to replace. Usually, more than your time and date will be affected—your internal default settings might also be reset. The typical internal computer battery lasts at least five years, which in the world of computers is a very long time indeed, longer than many people keep a computer before upgrading to a more powerful machine. If you pass down your computer to other members of your family and network the old ones to the new ones, there’s a good chance that you’ll own the computer more than five years, so keep the replacement possibility in the back of your mind when it becomes obvious that the computer’s battery has gone bad.
Adding a Second Clock
If one clock is nice, why not add a second one to your taskbar? You can add a second and even a third clock. Click the Additional Clocks tab to display the Additional Clocks page shown in Figure 33.8.
Figure 33.8. Add a second clock to Windows Vista to keep track of the time in two locations.
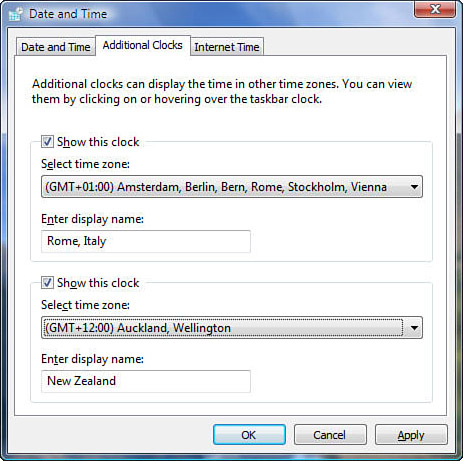
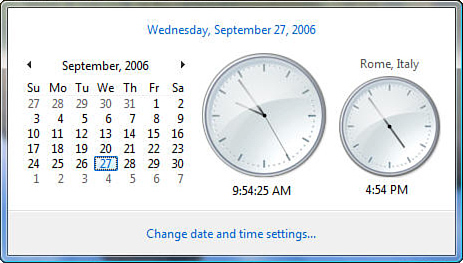
The reason you might want to monitor one or two extra clocks is because when you travel, your laptop can monitor the time in up to two places you’re traveling while you keeping track of the time at home for those daily phone-home calls. You can keep up to two clocks selected. In Figure 33.8, the two clocks are for Rome and New Zealand. (If you travel to those two places often, you are extremely fortunate indeed.) In addition, you can click to check the country you’re going to on your laptop’s time, and uncheck the country you aren’t going to on the current trip. Both clocks stay set up, but only one secondary clock is active. Clicking the taskbar’s time displays both your home and your travel clocks, as Figure 33.9 demonstrates.
Figure 33.9. You can now easily monitor the time both where you travel and back at home.
Set Your Clock to Synchronize with the Internet
Your computer’s clock can access the http://time.windows.com online clock and access the correct time. The website is not a page you can browse with your browser, but contains a special interface that Windows understands and can access if you want to keep your clock up-to-date and accurate.
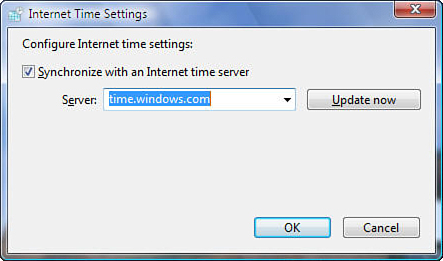
To set up your computer to synchronize with Internet time, click the Date and Time window’s Internet Time tab to display Figure 33.10’s Internet Time Settings dialog box. (Vista first confirms you have administrative privileges.) Several clock-setting sites are available and you can choose one from the Server drop-down list box. The default site, http://time.windows.com, works well and there’s really no reason to change it unless the site goes down for some reason, or you notice your clock’s time or day settings are out of sync and you suspect the site is faulty.
Figure 33.10. Let the Internet set your computer’s clock so that you don’t have to.
By the Way
The website sets your time based on Greenwich Mean Time. Vista takes that time and adjusts your computer clock to the time zone you selected.
The Internet clock-synchronizing feature is on by default when you install or upgrade to Windows Vista. Vista synchronizes your computer’s clock to the website’s once a week. This, of course, requires an active Internet connection.
Did you Know?
You can click the Internet Time Settings window’s Update Now button to correct the time immediately instead of waiting for the weekly Vista check. You might do this if you just replaced your computer’s battery and want to set the clock accurately based on the Internet clock’s time. You can also do this any time you need an exact time setting; a radio station, for example, schedules commercials, songs, and talk to the exact second each needs to happen. If you work at a station, you might find it best to update your computer’s clock daily to keep the seconds accurate on your machine.
Each week, Windows Vista synchronizes your computer’s clock in the background (as long as there’s an Internet connection) and doesn’t bother you with the process or open any web pages to do so.
Customizing Your Region and Language Options
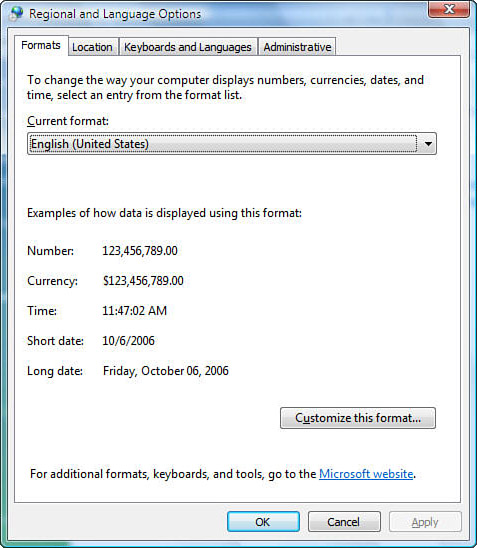
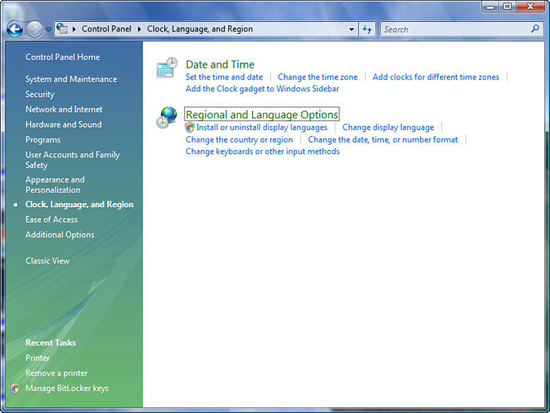
Your Control Panel’s Clock, Language, and Region group contains a Regional and Language option you can select to open Figure 33.11’s Regional and Language Options window. In general, after these settings are correct you won’t need to change them. If you bought a computer from someone who lives in another country, though, you’re almost sure to need to change the settings. In addition, if you move to another region, you’ll need to change your computer’s settings. Last, if you interact often with others who live in other regions and countries you might want to change your computer’s region settings temporarily so that the work you do reflects that region’s usage.
Figure 33.11. Change the region settings that your computer should assume when you want to work with that region’s settings for your program options and keyboard layout.
By the Way
The programs you work with often use your Windows Vista region settings to determine how to display numeric formats, currencies, and your own keyboard’s layout. For example, in the United States, the decimal point is a period and commas separate numeric amounts after every three digits. In Europe, decimal placement uses a comma and periods separate numeric amounts every three digits.
When working with Excel, therefore, if you format a cell as currency, Excel looks at your regional settings and uses that settings structure to display the money format. If you select a European region, all Excel currency amounts will use the comma for the decimal. If you are working on a worksheet that you plan to fax or print to mail overseas, by adopting that country’s region settings while you work on the worksheet, it will appear normal to those you send it to. You then can change back your regional settings for your own country’s use.
The Location tab of the Regional and Language Options dialog box controls the country you want your computer to assume. This option might at first seem redundant to the Formats tab, where you select a current format such as English (United States), German (Austria), German (Germany), and Hebrew (Israel), but your computer uses the Location tab for a different purpose from the Formats tab. The Formats tab controls the currency format and other data-related program settings that produce data for that region or language; the Location tab tells software what country the computer’s user actually resides in (no matter what language or country is set in the Formats tab) so that country-specific information such as the weather or local news will be accurate.
By the Way
To help clarify the distinction between the Formats tab and the Location tab, suppose that you’re an American vacationing overseas in Florence, Italy. You would keep your Formats tab set to English (United States) because the writing and financial work you brought with you has to remain American-based so that the formats will be correct when you get home. While in Florence, however, you might change the Location tab to Italy so that the programs you work with that access weather, news, and sports access the local Italian information—that way you know what’s happening in that part of the world. (It might also help if you speak Italian, so parla l’italiano bene!)
Not all countries adopt the same alphabet and not all countries use the same keyboard. Therefore, if you are working on a dramatically different keyboard layout, as you would if you are in Greece, you have to tell Windows about the keyboard layout so that Windows properly interprets your keys and does not assume a standard American layout, for example.
Click the Keyboards and Languages tab to change the keyboard layout and language Windows Vista assumes. Suppose that you travel to Greece for business quite a bit, you’re well versed in Greek, and you take along a Greek keyboard to use with your laptop when you want to manage your Greece-related work.
You would click the Change Keyboards button to display the Text Services and Input Languages dialog box shown in Figure 33.12, click Add, and click the plus sign next to the Greece (Greek) keyboard to open the selection of possible keyboards. Select one of the Greek entries (such as Greek or Greek Latin); the first item listed for a country is usually the most common, so click to select that choice if you’re unsure of which option matches the keyboard you have.
Figure 33.12. You can add multiple keyboards to Vista’s collection and select the one you want to use, depending on what work you need to accomplish.
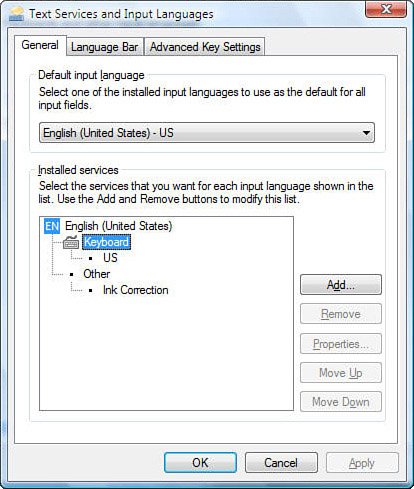
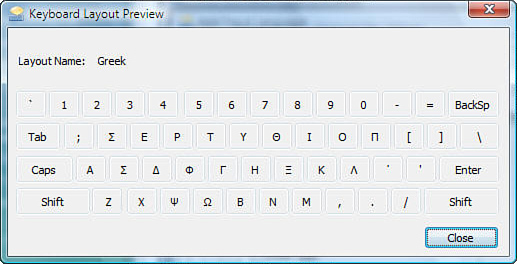
Click the Preview button to display a preview of the keyboard Vista expects you to have for that selection. For example, Figure 33.13 shows a Greek keyboard that Vista assumes when you select the first Greek keyboard available in the list. If this matches the Greek keyboard you have with you, click the Close key and then click OK. Your Text Services and Input Languages dialog box will now show both the English and the Greek keyboards. Select the Default Input Language (Greek in this case) if you want Vista to assume that you’re typing from the Greek keyboard when you enter data; otherwise, Vista knows the Greek keyboard is available but does not assume that you’re using it.
Figure 33.13. Make sure that the country and language whose keyboard you select matches the keyboard you have to use.
Watch Out!
Don’t uninstall the keyboard settings you normally use for your country when you travel and use a second keyboard. Keep your original one set up so that you can switch back to it easily when you come home.
When you click OK to close the Text Services and Input Languages dialog box, Vista displays a language bar on the Windows taskbar to the left of your notification area. A button displays the first two letters of your default language and keyboard to indicate that language you’re using. For example, the EN button appears when your keyboard and input language are set to English. Double-click the button and Vista pops up a selection of languages: one for each keyboard and input language you’ve set up so far.
Figure 33.14 shows how simple it is now to move between your English and Greek keyboards. Click the language button, select a different language, and then plug in that language’s USB keyboard to your laptop to move to the second language. When you’re done with the second keyboard, remove it from the Text Services and Input Languages dialog box and keep just your regular keyboard; the language bar disappears from your taskbar when you opt for a single keyboard.
Figure 33.14. Click to switch between keyboards and languages.
Did you Know?
You can set up more than two languages and keyboards and quickly move among them in this manner.
Event Sounds
Perhaps you’ve already heard some sounds coming out of your PC’s speakers as you’ve worked with Windows Vista. If you like the sounds, you’re going to learn here how to add new sounds and change ones that you want to change. If you don’t want the sounds, you can eliminate them. Vista gives you control of your system sounds; the sounds should help point out things that are happening, such as warning messages that appear when you make a mistake, but the sounds should never be irritating.
A Windows event usually triggers a sound. An event is something that takes place when you use Windows, such as starting a program.
By the Way
The Windows Vista event sounds can help those who are visually impaired. The audio feedback verifies that an event took place, and can also signal that an error has occurred.
Some Windows users do not like sounds attached to events, whereas others do. You can request sounds for all the following common events:
- Dialog box opening and closing
- User errors
- Starting Windows
- Exiting Windows
- Minimizing and maximizing windows
- Starting programs
- Displaying menus
- Displaying help screens
In addition to these common events, you can assign sounds to several more events. You can attach sounds to some networking events, such as the appearance of an email message. In addition, you can customize the sounds that Windows uses.
Assign Your Own Event Sounds
If you want to assign a specific sound to every Windows Vista event, or only some Windows events, you can do so. Many kinds of sounds are available, and as you familiarize yourself with the available sounds, you can customize your Windows system so that anyone within hearing range can know it’s you using Windows and nobody else. Follow these steps to assign sounds to Windows events:
1. Open your Control Panel’s Hardware and Sound group. Click to select the Sound dialog box and click the Sounds page to display the window shown in Figure 33.15.
Figure 33.15. Specify event sounds with the Sound dialog box.
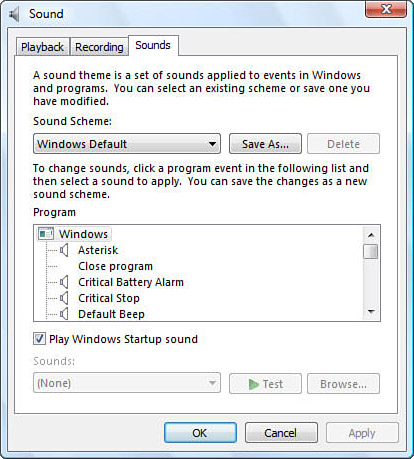
2. Scroll through the Program list to see all the events to which you can assign sounds. The event list sorts by application and the first application is Windows itself. As you scroll through the list, you’ll see specific events listed for Windows Explorer, Speech Recognition, and Photo Gallery.
Some of the events might seem cryptic to you, but as you use Windows more, you’ll better understand each event’s purpose. For example, the Windows Exclamation event occurs when an application displays a message box that shows a system error message that you should pay attention to. It signals that you can’t do something you tried to do, or that Windows ran across a problem when doing something you requested (such as trying to write to a USB-based flash drive that you removed from the drive before all the data finished writing to it).
By the Way
Events that show a speaker icon to their left have associated sounds. Events without a speaker icon do not have sounds associated with them, but you can add sounds to them, as you’ll do in this task.
Select the Maximize event. Unless you or someone else has changed your Vista settings, you won’t see a speaker icon next to the Maximize event, meaning that the event has no assigned sound. When you click to maximize a window, Vista doesn’t play a sound.
Open the Sounds drop-down list box to see a list of sounds that you can add to the event. Select Chimes (it might display as chimes.wav). A speaker icon will appear next to the Maximize event. Click the Test button to hear the chimes sound. The chimes will now sound when you maximize a window. If you want to change an event’s sound, highlight the event and double-click the sound to review it or select a different sound that you want to replace the original sound with.
Add more sounds to additional Windows events if you want to. Change the sounds that are already there. When your sounds are the way you like them, you can save your custom sound settings by clicking the Save As button and entering a name for your sound scheme. (A sound scheme is a customized set of Windows Vista sounds saved in a file.) You can save as many sound schemes as you like. To apply a sound scheme, open the Sound dialog box and select a saved scheme from the Sound Scheme drop-down list box to apply that set of sounds.
Your sound scheme stays with your user account. So, if you share a computer with another user, you can each have your own sound scheme and the sounds you change won’t interfere with the other user’s sound schemes.
6. Close the Sound dialog box and test the new sounds. For example, open a program or Explorer window, minimize the window, and then maximize the window to hear the chimes play.
It’s important to know that Windows Vista controls the sounds, not the individual applications listed in the Sound dialog box’s Programs list. The idea of the Sounds list is for programs to list themselves in the Sound dialog box when you install them. The Sound dialog box gives you the ability, therefore, to control the sounds of all the common events found in all your programs.
The problem is that most software does not install itself as an option in your Sound dialog box. Not even the majority of Windows Vista’s own programs appear there, so your ability to control the sounds your programs make is more limited than it otherwise would be.
Record Your Own System Sounds
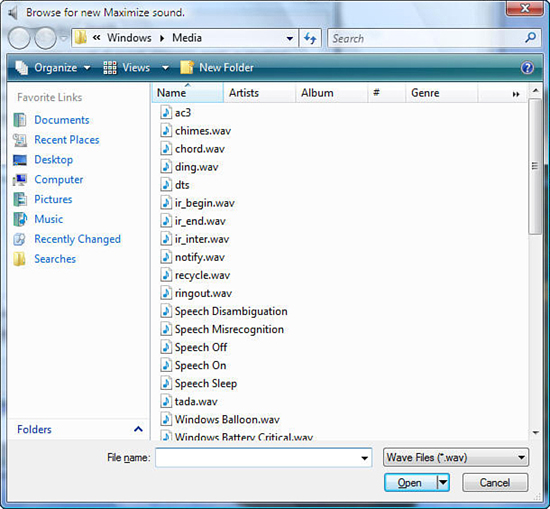
If you don’t like the sounds Windows Vista supplies, record your own. You can assign any wave file (with the .wav filename extension) to a listed event. Chapter 18, “Recording Simple Audio,” explains how to use Vista’s Sound Recorder program to make your own recordings. After you save the recordings to your disk, you can assign them to Windows events.
When you open the Sound dialog box and click the Browse button, Vista displays the Browse for New Sound dialog box shown in Figure 33.16. The default folder for your system sounds is the Windows/Media folder, but you can click other disk locations you have access to and locate other sound files you’ve saved to your disk drive.
Figure 33.16. You can assign any .wav file on your disk to system events.
Work with Windows Themes
Throughout this book, and especially in this chapter, you’ve learned how to customize several Windows Vista settings so that Vista looks, sounds, and behaves the way that you prefer. Not every user wants or requires the same customized settings. The fact that Vista allows such a wide assortment of custom settings allows each user to personalize his or her Vista installation.
When you customize your sounds, colors, and screen display settings, you are customizing the theme of your Windows Vista installation. When you get Windows customized the way you prefer it, it’s a good idea to save your custom settings as a theme that you name. You can store several themes and use whichever one you prefer. For example, when traveling, you might opt to use a theme that doesn’t include many Windows event sounds but does include a higher-contrast display mode so that you can read your laptop’s screen in various outdoor lighting better. When you return home from a trip, you might change your laptop’s theme to one balanced with sounds and a lower-contrast screen.
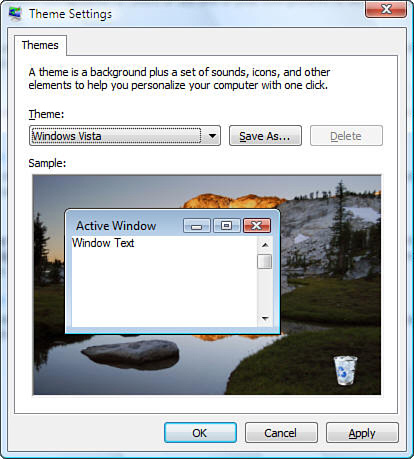
To save your current configuration settings in a named theme, open your Control Panel’s Appearance and Personalization group, click to open the Personalization window, and select Theme to open the Theme Settings window shown in Figure 33.17. Click the Save As button to open a Save As dialog box, give your theme a name, and click Save. Vista adds your theme to the drop-down list of themes in the Theme Settings dialog box, and you can select that theme or a different one when you’re ready to use any one of them.
Figure 33.17. As you customize Windows, save your settings as a new theme that you can return or change to when you want your Vista’s customized settings to differ.
By the Way
Vista even allows you to forgo Vista and return to the older Windows XP themed environment! If you select Windows Classic from the Theme drop-down list and click the Apply button, your windows and colors will return to a more Windows XP–like appearance. You can always change back to your Windows Vista theme by opening the dialog box again and selecting Windows Vista or one of your saved themes.
View All Your System Settings
It’s difficult to see all your Vista settings in one place. You know to use your Control Panel to access most of them, but they are scattered all over it. You must look at your display settings to see your monitor’s current settings and then move to the Printers area to see the printers installed on your computer.
Windows Vista offers a tool, named System Information, with which you can more easily view all your system’s settings. Open your Start menu, select All Programs, Accessories, System Tools, and then select the System Information program. The initial System Information program, shown in Figure 33.18, is helpful in that it shows your exact operating system version. Vista comes in several flavors, or versions, such as Windows Vista Ultimate and Windows Vista Business, and each one has been released and updated, so one Windows Vista Business installation might have a later version number than another.
Figure 33.18. The System Information program is one place you can view nearly every customizable setting in Windows Vista.
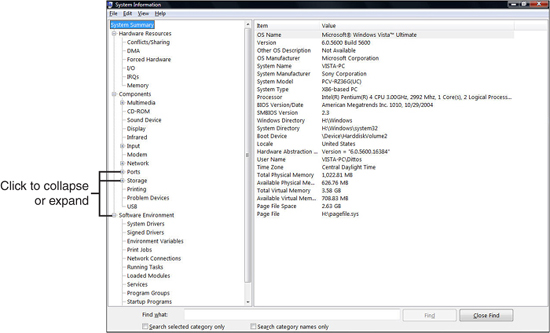
Clicking the plus sign next to Hardware Resources, Components, or Software Environment opens those sections so that you can quickly view your system settings. Click Display, for example, to see what resolution your screen is currently using. Click Printing to see a list of all your installed printers.
Although you cannot directly change any system setting inside the System Information program, you can view your settings from one location instead of having to hunt through several different Control Panel groups to locate a setting you want to know about.
Did you Know?
Select File, Print and print your system information settings occasionally. If you or someone else happens to mess up your monitor or other settings, the printout serves to tell you how your system should be set up.
Chapter Wrap-Up
This chapter discussed several configuration options and settings that you might want to modify. In a way, this chapter exists to inform you of the lesser-known system settings that might come in handy some day. Even if you don’t care about your system sounds, for example, it’s good to know that you can customize them in the future if the need arises.
When you get your computer set the way you like it, you can store your configuration settings in a theme file that you name and can later restore, if necessary. Saving multiple themes gives you the ability to change your Windows look and behavior when you want to change how—or where—you use your computer.
In the next chapter, you’ll learn about some unique settings that can actually save you money as you use Windows Vista. Vista offers several advanced power-saving features that are especially useful if you use a battery-powered laptop or tablet PC.