
Chapter 31. Restoring Your Windows System to a Previous State
In This Chapter:
- Learn the importance of a system restore point
- Understand what system restore does and does not back up
- See how system restore runs automatically
- Create manual restore points when you need them
- Reverse a restore point you want to undo
- Restore your system files
Computers are complex machines. The software you run on computers, however, is far more complex than the hardware. Windows Vista is the most comprehensive operating system ever written, with more code under its hood than any operating system to date. Given what’s there, it’s amazing that it works at all! How well Vista does work is a tribute to those who developed it.
Due to Vista’s complexity, it doesn’t take much to mess up the operating system. One lone bit (a bit is just one-eighth the size of a character in memory) in the wrong place and Vista will behave erratically at best, and crash and refuse to run in the worst of cases.
When you install a program that isn’t fully debugged, and some major software programs are released with bugs, that program can harm Vista if even one out of its billions of bits goes awry. Vista is designed to keep this from happening as much as possible, but ways still exist for system problems to occur. Saying that Vista will improve when it’s randomly changed by one bit is as absurd as saying that the human body gets better and gains new features through random mutation. Vista doesn’t gain a new feature when a bug changes one of your system files—quite the opposite. Vista gets very cranky indeed when that takes place.
Fortunately, there is a way that you can turn back the clock and put Vista right back where it was before the problem appeared on your computer. This chapter shows you how to create system restore points to protect against such problems.
Why You Need System Restore
Sometimes Vista just stops working well. Perhaps your computer begins to run very slowly. Perhaps Vista stops responding completely. If your computer was recently working well and now it does not, you can put it right back to the way it was with the System Restore program that comes with Vista.
One of the times that your system is at risk occurs when you install a new program or a new hardware device. If you immediately see a system problem right after you install a program, obviously one of the wisest things you can do is uninstall that program or device. If you do that and Vista works well, you’re okay, and you can and should contact the program’s support department to learn what the problem might be.
A hardware device, such as a graphics card that you insert into your computer, can cause system conflicts. It’s not the hardware that actually causes the problem; it is the software, the drivers responsible for letting Vista know how to communicate with that device. When you install new hardware, you should check out your system thoroughly. Make sure that the new hardware works as expected. After you do that, before installing any additional hardware or programs, use your computer for a few hours and run the programs you routinely run to make sure that the system is okay with the new hardware.
If a problem arises, look at the hardware’s website for possible clues into the problem. Make sure that you download the latest drivers for the program. If everything seems to be correctly installed but Vista still acts up, you probably should remove the hardware and uninstall the drivers that came with it until you can contact the hardware vendor’s customer support and get further instructions.
Sometimes you can remove the hardware and the driver and Vista will still act up. As long as you used the System Restore program to create a restore point just before installing the hardware, you can be right back where you were before the problems began. That’s nice to know!
By the Way
You must have administrative privileges before you can create a restore point or restore one. Restoring your computer back to a restore point can affect programs installed after the restore point. A restore point saves the system, but not any programs installed. You might have to reinstall a program after restoring a restore point, so administrative privileges are required.
Did you Know?
System Restore does not save or restore any of your data. This is good. Your data remains intact on the disk so that whatever data you saved after the restore point will still be there when you send your system back to a previous restore point. The system, therefore, goes back to an older, better-working state, but your data does not go back. This eliminates the need for you to reconstruct all your data after you restore your system. Make sure that you back up regularly, however, because doing so is the only way to ensure that your data is safe. Chapter 35, “Protecting Your Data and Programs,” explains how to use Windows Backup to make copies of your data so that you can restore your data if the need arises...and the need will arrive some day.
What System Restore Actually Does
Think of System Restore as a recording of your computer’s system files. When you use System Restore to create a restore point, System Restore takes a snapshot of your system files at that point in time. When you run System Restore, you can name each restore point that you create. Later you will be able to locate the system restore point you need from the name you give it.
For best results, get in the habit of creating a lot of system restore points, especially when you get a new computer and begin loading it up with programs and changing its hardware. Before you install a program or a new device such as a graphics adapter, create a restore point. Creating restore points takes only about a minute in most cases and it’s time well invested.
The restore point captures your system files so that if one or more of the files gets damaged you can restore a restore point that you created before the problem surfaced. Although it’s not a computer backup, it is a computer system file backup. System restore will back up critical system files and your registry.
By the Way
Your registry is a large database of system settings that Windows Vista monitors, updates, and reads to keep track of hardware and software settings throughout your computer. The registry tells Windows exactly how you want your desktop to look. The registry tells Windows what hardware and device drivers are installed on your computer. The registry contains many of your installed program settings so that when you return to a program, you don’t have to reset all your preferences each time.
System Restore Protects You from Itself
When you restore your system to a previous restore point, Vista first creates a new restore point for you automatically. Therefore, if you restore your system back to a point in time when you think things will work better—and the opposite happens—just select System Restore’s Undo System Restore link to restore back to the restore point that Vista created just before you performed the restore and you’ll be back to where you started.
Of course, your original problem will still be with you, but you won’t have the problem that the restore added. This can occur if you accidentally restore a newer restore point than one you meant to restore. By allowing you to undo a restore, in effect, the System Restore program makes a valiant effort to keep you running as smoothly as possible at all times.
Vista Creates Restore Points Automatically
When you install a new program, install a new hardware device, or update your hardware drivers, Vista creates a restore point for you. Given this information, you might wonder why it’s incumbent on you to create restore points yourself. Problems can occur because some programs are not well behaved and they don’t always go through the proper Vista channels to install themselves on your computer.
If Vista doesn’t recognize the fact that a new program or driver is being installed, Vista cannot be expected to create a restore point. Knowing this means that you’ll spend a minute or so creating a restore point before you make any change to your hardware or software. This extra safety measure pays ample dividends the one time you might need the restore point you created that wouldn’t have been created otherwise.
Did you Know?
In addition to monitoring system events such as hardware installs, and creating restore points then, Vista creates a restore point for you every day whether or not you change your system. This gives you a worst-case system restore scenario of going back at most a day to get your system running properly again.
Although multiple restore points exist on your computer and more are placed there as you and Vista create them, it’s best to select a restore point that is as recent as possible without going back too far. The best restore point to restore is the one that either you or Vista created immediately before the problem began.
Watch Out!
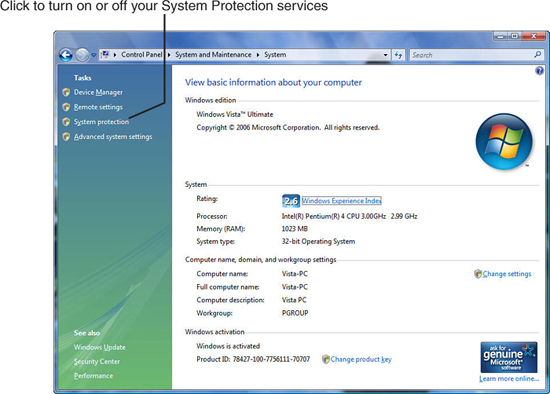
Restore points don’t remain on your computer forever. In general, the System Restore program uses about 15% of your hard disk space and once that space gets close to capacity, System Restore removes older restore points when new ones are created. You can erase all restore points on your computer by turning off System Protection in your Control Panel’s System and Maintenance group’s System option. The System Protection link is at the right of the window as Figure 31.1 shows.
Figure 31.1. The System Protection link opens the System Properties dialog box that enables you to turn on or off System Protection.
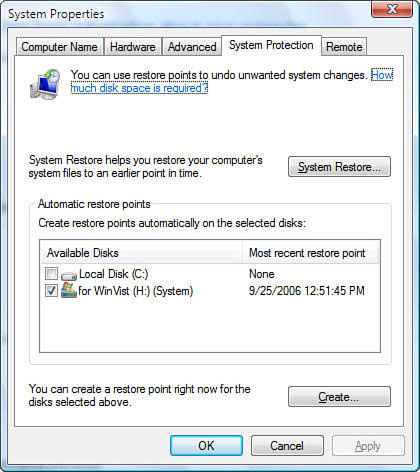
When you click the System Protection link, Figure 31.2’s System Properties dialog box appears. Click to check or uncheck the disk drives you want to create restore points for. In general, you keep your system disk’s restore point creation turned on by leaving that drive’s check box checked. If you uncheck the drive and close the dialog box by clicking OK, all your restore points will be erased. You then can turn System Protection back on by returning to the System Properties dialog box and checking your Vista’s system disk drive again.
Figure 31.2. Vista creates restore points for those drives you check; you’ll generally just check your Vista disk drive.
Creating Manual Restore Points
As you now know from this chapter’s earlier sections, Vista creates restore points but you need to know how to create them, too. To create a restore point, open your Windows Start menu, select All Programs, Accessories, System Tools, and select the program named System Restore. After confirming your Administrator user privileges, the System Restore screen shown in Figure 31.3 appears.
Figure 31.3. You’ll create and restore system restore points from the System Restore program.
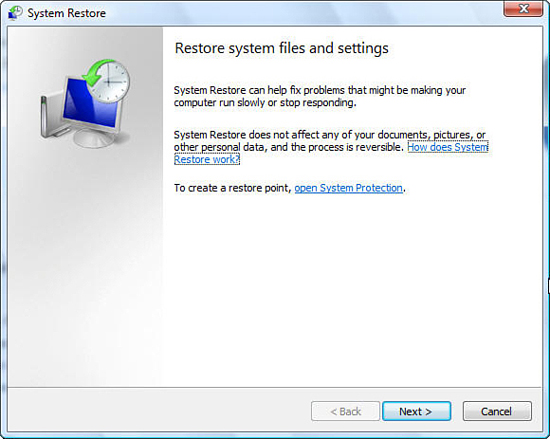
The System Restore program is designed to do just that: restore your system to a previous restore point that you or Vista created. To create a restore point, click the Open System Protection link on your System Restore program window. The same System Protection window opens that you saw in Figure 31.2 where you could turn on or off the restoration feature.
Make sure that your system disk is checked, and click the Create button to begin the creation process. Vista displays the Create a Restore Point window where you type a description for the restore point. It helps to link the description to the event you’re about to perform. For example, you might create a restore point just before updating your graphics card drivers, so you might name that restore point Pre-Graphics Driver Update as done in Figure 31.4.
Figure 31.4. Give your restore point a good name so that you’ll be able to link it to an event later.
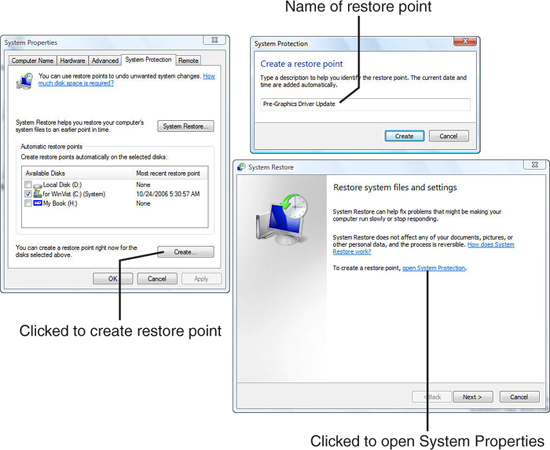
Click the Create button to create your newly named restore point. Vista saves your files and the process usually takes a minute or less. As Vista saves the restore point, a status bar lets you know that the restore point is in progress. Vista displays a message box stating that the restore point was created when the process finishes.
Did you Know?
Another reason you should create your own restore points before installing a program, changing hardware in any way, or updating a driver, is that you can name the restore points that you create, as you saw in this section. The names that Vista gives its own restore points aren’t always clear, and you might or might not know which one was created just before you installed a new graphics driver yesterday that you noticed is giving you problems today. When you create a restore point and give it a name that you’ll remember, such as Before installing new graphics driver, the next day you can look at a list of all the restore points and know exactly which one was created before you updated that specific driver.
Restoring a Saved Restore Point
To restore a saved restore point, run the System Restore program again. Open your Windows Start menu, select Accessories, System Tools, and select the program named System Restore. After confirming your Administrator user privileges, the System Restore screen appears.
Vista will suggest a restore point for you. Generally, this will be the most recent restore point that Vista created. The restore point’s date and time will always appear on the restore point and Vista is good at telling you why the restore point was made. The restore point might have a name such as Install: Device Driver Package. If you want to restore back to this point, click Next to begin the restoration.
If, instead, you’ve created a more recent restore point, click the Choose a Different Restore Point option and click Next. The System Restore program will display a list of restore points from the most recent back through several previous restore points. Figure 31.5 shows such a list.
Figure 31.5. Several restore points should be available for you to choose from.
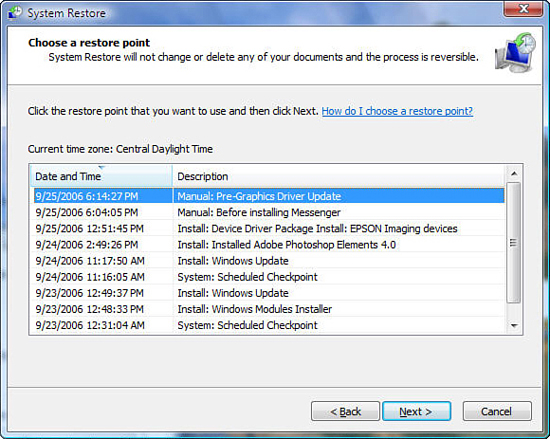
Click to select the restore point you want to go back to and click Next. Vista confirms that you really want to go back to that restore point. Click Back if you accidentally chose the wrong restore point so that you can choose another. Click Finish if you’re ready for Vista to restore back to that point.
Watch Out!
It’s worth noting that system restoration is an important process that you should never quit while it’s still running. You cannot undo a system restore until it’s fully finished restoring, and trying to stop a system restore in the middle of a restore might cause system problems. The System Restore program will warn you about all this—heed the warning. Click yes to the warning message box when you’re truly ready for the restore to begin.
When the restoration begins, a status bar will appear in a small message box window to tell you the initial progress being made. Once started, Windows forsakes its Vista-never-needs-reboots promise and shuts your system down to a system window for the restore to take place. Fortunately, Vista will ask you to save any unsaved work in any applications you might still have open before rebooting.
By the Way
System restoration takes far longer than the creation of a restore point. Sometimes a system restore can take 10 or more minutes. Often the process takes about 3 minutes. The speed of your computer and the number of system files on it determines the time required.
When Vista starts back up, your system files will be in the same place they were at the time of the restore point’s creation. Vista will display a message in the center of your screen telling you that the restore point is in effect. You should be restored to that point and if your computer was acting up before the restore, things should work as expected now.
Did you Know?
To undo a restore point, you can immediately return to the System Restore program and click the Undo System Restore option that will already be selected when you see the System Restore screen. Keeping this selection and clicking Next reverses the latest restore.
Chapter Wrap-Up
You now know to save restore points routinely to help you maintain a fully functioning computer as much of the time as possible. Before changing anything drastic on your computer, you should create a restore point. Even before installing a program that should never affect your system files, such as a game, you should consider creating a restore point. (Actually, you should always create a restore point before installing any game.) You’ll never regret having too many restore points. They take hardly any time to create and they can put you back in good working order quickly when you need them.
A major system problem, as might occur if you cannot reboot to Windows, is certainly more than System Restore can handle. For those cases, you might need to restore a backup image of your disk drive if you’ve created one or perhaps reinstall Windows and all your programs before restoring your data from a backup. Either way, a major problem that requires such a massive restoration will be time-consuming and isn’t any fun. System Restore cannot cope with such a problem, but it was not designed to do so. System Restore is there to revert your system back to a point in time when things were working great that are cropping up with problems today.
Now that you’ve learned how to keep Windows Vista streamlined and running smoothly, it’s time to give your disk drive a checkup. The next chapter explains how to use Vista’s disk optimizing tools to clean up your disk drive, maintain its speed, and maximize your storage space.