
Chapter 19. Making Movies with Windows Movie Maker
In This Chapter:
- Understand Movie Maker’s past and present
- Plan your videos to produce great movies
- Understand Movie Maker’s busy screen
- Get video into your computer
- Work with video clips
- Produce your movie
- Add special effects, movie titles, and credits
Get your director’s chair ready because you’re about to enter the world of video editing. Unlike the cut-and-splice film days, editing movies digitally requires no special chemicals—only a good program that can take movie clips, piece them together, add special effects when needed, append titles and credits, and enable you to synchronize the sound with the action.
Windows Vista includes Movie Maker, a program that does all that and more. Technically, Vista’s Movie Maker is version 3 and is a nice upgrade from Movie Maker 2. But Movie Maker users drop the 3 when referring to Vista’s program. Movie Maker has quietly worked in the background for video-editing buffs without a lot of fanfare, as you’ll see in this chapter’s first section.
Movie Maker often gets lost in the shuffle of all-in-one movie-production programs. That’s a shame. Movie Maker is a fair contender in the video-editing arena of programs and unless you need extremely advanced editing features, Movie Maker will fill just about any editing need.
Movie Maker’s Past and Present
When Microsoft first introduced Movie Maker to Windows XP, movie-editing users were unimpressed. They had good reason to be. Movie Maker was originally far too simplistic and far too limited in what it could do. You could edit simple videos, but you were limited in how you could save those videos. Movie Maker’s first version didn’t support the writing of movies to DVD, its special effects and scene transitions were weak, and the program wasn’t intuitive.
Microsoft quickly updated Movie Maker. Windows XP updates gave the new version to existing XP users. Movie Maker 2 was stellar given its free-with-Windows price tag, but Microsoft never really touted Movie Maker 2. Consequently, potential users overlooked a nice video-editing program. Many Windows XP owners ignored Movie Maker 2 and purchased video-editing programs. Most of those video-editing programs were vastly superior to Movie Maker 2, but in many cases, users needed only the tools that Movie Maker 2 already provided.
By the Way
In spite of its vast improvements over the first version, Movie Maker 2 still didn’t support saving movies directly to DVD. This missing feature was enough for many to try something else and never learn Movie Maker 2. By 2001 or so, when Microsoft released Movie Maker 2, writing videos to DVD was a reasonable feature to expect. That missing feature alone was enough to convince video-editing buffs to go with other programs and understandably so.
Finally, with Vista, Microsoft has brought Movie Maker’s third version into the present by supplying DVD-creation tools and a greater assortment of video-editing capabilities. If you need to edit video files or to produce videos from your own PC, you’ll find that Movie Maker might be all you need; if not, you can do a lot of work in Movie Maker without a lot of in-depth training and then move to a more advanced video-editing program, such as Adobe Premiere Elements.
Did you Know?
Please note that it would take a complete book to cover all of Movie Maker’s features in depth. This chapter can only skim the surface and give you an overview of what Movie Maker does, and offer some insight in how you’ll be able to use Movie Maker. If this chapter whets your movie-making appetite enough, you’ll want to get a complete book on Movie Maker. One of the best books on Movie Maker ever written (if I do say so myself) is Digital Video with Windows In a Snap, by Greg Perry, Sams Publishing, ISBN 0672325691. This text is a step-by-step, task-oriented training course for Movie Maker and is unique in how it approaches the tasks you’ll want to perform when making movies with your PC.
Planning for a Great Video
The right hardware goes a long way in making a great video, but a little planning never hurts either. You can do a lot to boost the quality of your movie before you even pick up your video camera. Obviously, you can’t plan those spontaneous videos that you find you need to take, but before you go out to make a video, you might find some of these tips helpful.
Keep the Background in the Background
One thing that makes a video sluggish is a low frame rate. As you know, lots of pictures “pasted” together make up a video. When the pictures are very similar from one frame to another, the computer has to do very little work to refresh the screen and move to the next frame, thus speeding up the frame rate. If, on the other hand, you do a lot of panning (moving from one side to the other) across a wide area or shoot with a “busy” or moving background, video performance is bound to suffer.
When possible, choose solid or static backgrounds. If that isn’t possible, try focusing the camera on your primary subject by bringing him or her closer to the lens or using a telephoto lens to zoom in on your subject. This reduces the depth of field, making the background fuzzy and less distracting.
Light Up Your Life
It goes without saying that your video subject should reside among adequate lighting conditions. What kind of lighting is best? Soft, diffuse, and—most importantly—consistent lighting gives the best results. Harsh lighting such as direct sunlight might cause shadows or silhouettes to appear instead of your subject.
It might be worth taking some sample shots before you actually begin filming. Take a few videos, return to your computer, and run them through Movie Maker. This isn’t easy or possible when you’re on vacation or shooting your kids or pets doing something unexpectedly, but when you have time to plan your video, a preproduction test works wonders to ensure that the final filming goes smoother.
After you do some preproduction testing a few times, you’ll have a better idea of how your camera works and how lighting and ambient conditions affect the videos you shoot. You will gain practice and be able to adjust your camera and change lighting settings more accurately when you do run across those spontaneous filming sessions.
The Clothes Make the Video
Believe it or not, the clothes that your video subject wears can dramatically affect the quality of your video. Bright colors can bleed onto the subject’s face and other surroundings, and stripes can cause distracting moiré patterns (video artifacts that make the lines look like they are crawling or moving onscreen).
Presenting Windows Movie Maker
Before you begin working with Movie Maker, it’s a good idea to know your way around its workspace. Figure 19.1 illustrates the parts of the Movie Maker screen.
Figure 19.1. Learning your way around Movie Maker is the first step toward understanding how Movie Maker works.

Here is a bit more detail about each element on your screen:
- Menu bar/toolbars—These elements perform similar functions to their counterparts in other Windows applications. With them you can open and save files, change views, and gain single-click access to unique Movie Maker tasks. You can also move, show, and hide Movie Maker toolbars as with other toolbars you have worked with previously.
- Tasks/Collections area—In the left pane, you will see a list of available video collections and files or you will see a list of tasks. What you see depends on which button you click: Tasks or Collections. (You can show the Tasks pane and then use the Collections drop-down button to display your video collections, transition effects, and special effects when you want to see a list but not keep it on the screen all the time.) In the right pane, you will see shortcuts to clips contained within the selected file or movie in your collection. After you load a video into Movie Maker’s editing area, you can divide that video into separate clips whenever the entire makeup of the frame changes suddenly.
- Monitor—Drag a clip into the monitor to view it, or play a whole project by selecting Play, Play Storyboard. Use the buttons underneath to control video play much like you did in Media Player. The seek bar above the buttons lets you know how much of the clip or movie has been viewed or has yet to be viewed.
- Workspace—This is the strip of workspace near the bottom of the window. It is where you drag all your clips to make a movie. You can view your project in two ways: by storyboard or by timeline. Figure 19.1 shows the Timeline view.
By the Way
If you’ve never used a video-editing program before, Movie Maker’s screen might seem a little busy at first. Take your time to look at all the elements and you’ll begin to get an idea of what is going on.
The clips in the center workspace are videos and still images that you drag, copy, or insert into the current project. You can put them together or use only part of them in your final video. Your final video will appear at the bottom of your screen in a timeline or storyboard display. Figure 19.2 shows a storyboard display, a simpler video project window than with the timeline but also not as detailed when you want to know the timing of certain parts of your video.
Figure 19.2. The storyboard view gives you a higher-level look at the video you’re putting together in Movie Maker.

You can select a single video clip to play in the Monitor. In addition, you can play the video you’re piecing and editing together in the Monitor. You’ll rearrange most things by dragging them. For example, if the fourth video clip on your storyboard should actually appear at the end of your movie, just drag the clip from that second position to the end and drop it there.
By the Way
The order of clips in the large, center workspace has no bearing on the movie’s final order. You’ll put clips in the center workspace so that you have them there to edit and use in your final movie that always appears on the storyboard or timeline.
Obtaining Video for Your Movie
Before Movie Maker can work with your video clips, you must be able to get your video clips to your computer. The video could be on a videocassette, in your camcorder, or on your digital camera with video clip capabilities. Regardless, you will have to do the following to make the movie (or movies) and their associated clips available for use in Movie Maker:
- With your video device attached to your PC, using a Firewire or USB 2.0 cable, copy the files to your hard drive. Often, your computer sees your video camera as a disk drive, so you can use Windows Explorer to move the files.
If your computer has trouble seeing the video, you’ll have to resort to the software that came with your camera. Your mission here is simply to get the content onto your PC’s hard drive. Older cameras use various means to transfer video to a hard disk.
- Next, you will have to import the files into Movie Maker. With Movie Maker up and running (click your Windows Start button; then click Windows Movie Maker), click the Import Media button on Movie Maker’s toolbar. Movie Maker displays the Import Media Items dialog box shown in Figure 19.3.
Figure 19.3. Movie Maker will import your video clips and still pictures for your movie.

By the Way
Movie Maker can import both video and still images (such as those you manage in Photo Gallery). Pictures work well in videos for backgrounds for titles and credits. Movie Maker imports from your Sample Videos folder located within your PublicPublic Videos folder by default, but you can import from any disk location to which you have access.
Did you Know?
Select Tools, Options to display the Options dialog box, and then click the Advanced tab. You can adjust how long Movie Maker uses for each picture’s duration. The default value is 5 seconds using a 1.25-second transition to the next picture or video clip. If all you did was import pictures into Movie Maker, Movie Maker could create a slideshow-like movie to which you could easily add narration or an audio clip such as background music. You have more control over a Movie Maker’s slideshow movie than Photo Gallery’s slideshow, but Movie Maker is slightly more difficult to use than Photo Gallery if all you want is a slideshow of still images.
- Click your way to the file you want to import and then double-click its name when you find it. Movie Maker takes a few moments to scan the file and create a clip for the video in the center workspace.
- You can view any imported clips by clicking the clip’s picture in Movie Maker’s center workspace. Images representing the resulting clips appear in the right Collections Area pane. Film edges on either side of the clip’s picture designate the video clip, whereas still images that you import don’t have the film edges as you can see in Figure 19.4.
Figure 19.4. You can distinguish between video clips and picture clips in the workspace area by the clip image’s side borders.

Repeat these steps until all the video images you want to use are viewable in the Collections area.
Pasting Clips into a Movie
You can view the movie files as they exist on your hard drive, but you could have a whole lot of fun pasting clips together to make a real movie.
To get started, click View, Storyboard on the menu bar. Remember that the storyboard is where you piece together the actual movie. The storyboard resembles frozen points in your movie where each clip you place eventually becomes an image in the film. This is the best way to see which clips are where in the movie you are piecing together.
To move a clip into the project, click the clip’s picture and drag it to the desired position on the storyboard. Don’t forget: You may use a clip more than once in the same movie if you want to.
Trimming Clips
You can shorten a clip by using Movie Maker’s Timeline view. This is a great way to cut unwanted parts out of your clips, and does not modify the source files in any way. To trim your clips, follow these steps:
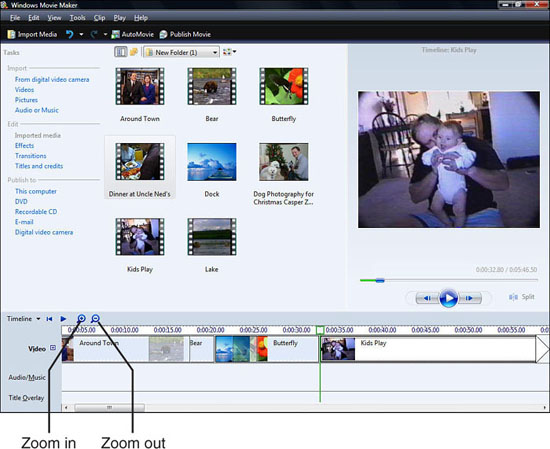
- First, click View, Timeline to change the workspace view from a Storyboard to a Timeline view. Ctrl+T is the shortcut key. As Figure 19.5’s timeline shows, each clip varies in length relative to those clips around it, and the width shows you visually how long each clip is to one another. The timeline shows you the exact length of each clip.
Did you Know?
Click the Zoom In and Zoom Out buttons across the top of your timeline to zoom into your timeline for more detail and to see a more exact timeline in minutes and seconds when you need more accuracy than Movie Maker first provides.
By the Way
Keep in mind that this is only a bird’s-eye-view chapter, walking you quickly through a simple movie-editing process. You are seeing how simple Movie Maker makes video editing, but you’re seeing it at the expense of delving very deeply into all that Movie Maker can do for you.
Figure 19.5. Each clip’s width shows its relative length in your movie.
- Next, click the clip you want to shorten. You will see the clip’s image outlined in blue, its duration on the project timeline shaded, and two gray trim handles (black arrows pointing in toward the clip picture’s center) at either end of the clip’s timeline.
- To begin trimming, run your mouse over one of the trim handles until it becomes an east/west double-headed arrow. (Obviously, you will click the left handle to trim from the front of the clip and the right handle to trim from the end of the clip.) This ensures that you are in the right position to grab the trim handle. To make the trim, click and drag the handle in the desired direction and then release it in place. You can use the elapsed time as a guide or keep an eye on the Monitor that displays the frames you are dealing with as you drag the trim handle.
Did you Know?
When you click the Monitor’s Play button, your selected clip plays. As you trim a clip, you might want to play back the clip to see the results of your trimming process.
Repeat as necessary to get all your clips to the desired length you want them to play.
Rearranging the Clips
As you work with the project, you might discover that you want to move a clip from one spot to another. That is what makes working with a computer so great: You can move pieces of your video around with ease.
To relocate a clip, you first need to enter Storyboard view by clicking View, Storyboard. Next, click the image of the clip you want to move and drag it across the filmstrip. See the dark line that moves as you drag the clip? It indicates where the clip will be placed when you release the mouse button.
Transitioning Between Clips
Real movies can change scenes in various ways other than a straight cut from one scene to the other. You can too! The video and picture clips on your storyboard (or timeline) often represent scene changes. A transition sometimes makes the passing of one scene to another less instant and conveys a sense of change to prepare your audience for the new scene.
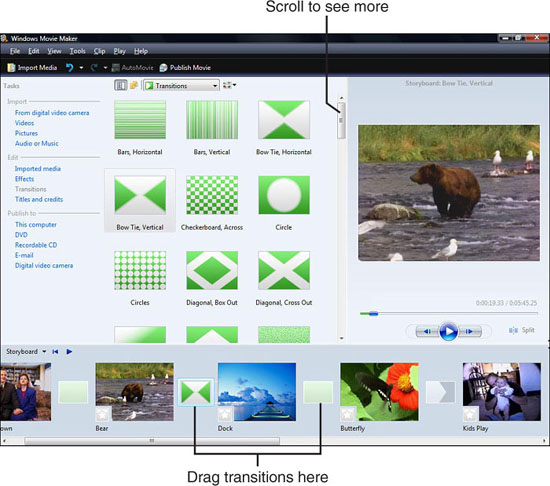
When you add one or more transitions to your movie, they appear between your clips on the storyboard. Click the Tasks Transitions entry to display all of Movie Maker’s scene transition formats. There are a lot of them. Figure 19.6 shows only a few and you can scroll down the list to see far more.
Figure 19.6. Movie Maker provides numerous transitions from which you can select.
Watch Out!
The more numerous, varied, and fancy your transitions are, the more they distract viewers from your movie. Your movie’s message is far more important than the transitions you add. Even if it’s a home movie of various family birthday parties through the years, transitions should accent your scene changes and not detract from them. Save dramatic transitions, such as the checkerboard transitions, for rare use, such as cutting away from a funny clip and don’t overuse them. Your audience will like your video more, and when you use a transition or special effect, it will mean more and be a surprise to your audience instead of a distraction.
Did you Know?
You can preview a transition just as you can see a preview of a video clip in your Monitor window. Double-click any transition and Movie Maker shows two pictures transitioning from one another in the Monitor window.
Transitions aren’t just for video clips. You can transition from one picture to another, or to or from a video and picture. To add a transition to your movie, drag the chosen transition to the area between whatever two clips you want to transition in your storyboard. The transition’s icon lets you know the transition will take place between those clips. You can click to select the storyboard’s transition and then click the Monitor’s Play button to see the transition from one scene to another.
Adding Special Effects
You can add special effects to your video clips. Most of the special effects seem silly when applied to video clips, especially when you add several to the same short movie. The special effects seem to work nicely, however, when you create slideshows with Movie Maker. A special effect can slowly reveal a picture or perhaps spiral into a picture. As with transitions, you’ll want to reserve special effects for special moments, but a well-placed special effect can be nice at times.
Click the Tasks Effects entry to display all of Movie Maker’s special effects. There are many of them. Figure 19.7 shows only a few and you can scroll down the list to see far more.
Figure 19.7. Add special effects to your clips to modify the way they begin.
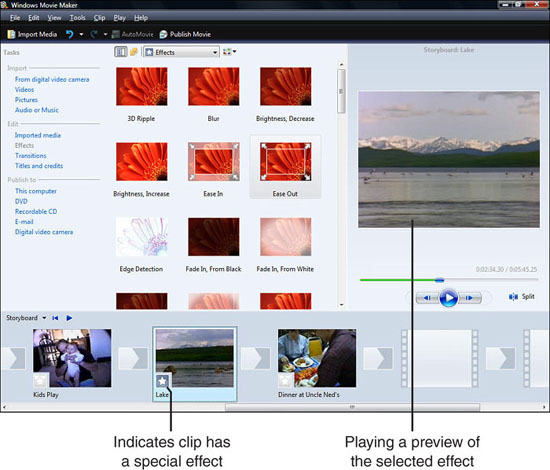
As with transitions, you can click an effect to select it and then click the Monitor’s Play button to see what effect that special effect produces. When you locate a special effect you want to use at the beginning of a scene, drag that special effect to the lower-left corner of a storyboard clip where a star appears. The star, when not grayed out, indicates that the clip will begin with a special effect. Figure 19.7 shows a preview of the clip playing in the Monitor. The clip has the Pixelate effect added, so the picture begins displaying in large, chunky blocks that gain greater and greater resolution until the full picture appears.
Adding Titles and Credits
Although this book can’t go into a lot of detail about adding titles and credits (because the primary goal is to cover Windows Vista and not teach every detail of Movie Maker), you should understand that adding titles and credits to your movie is very simple indeed.
By the Way
Never be afraid to experiment with Movie Maker. If you’re unsure whether you want to add credits to a video, go ahead and add a panel of credits and watch the results in your Monitor. The Undo command reverses any changes you make that you don’t like, including removing a complete screen of opening credits. The Undo command, available from the Edit menu (or using the Ctrl+Z shortcut key), undoes special effects, transitions, clip changes, and just about anything else you change your mind about.
All you need to do is click your Tasks list’s Titles and Credits link. To Movie Maker, a title appears at the beginning of a movie, or perhaps before certain clips. A credit appears at the end of the movie. Of course, the content is what actually distinguishes the two. You can put your movie titles at the beginning of your movie and use the title sequence for a few credits as well.
After selecting the Titles and Credits link, Movie Maker displays the following list of options:
- Title at the Beginning—Puts your titles at the beginning of your movie before the first clip.
- Title Before the Selected Clip—Inserts your titles before a clip you’ve selected.
- Title Overlap on the Selected Clip—Inserts your titles on top of a clip you’ve selected. You can use a clip as the background to your titles this way.
- Credits at the End—Inserts credits at the end of your movie.
As you type the text for your title or credit, Movie Maker displays a preview of the title or credit in the Monitor window, as Figure 19.8 shows. The titles normally fade into view but if you click the Change the Title Animation Link, you can select a different way the titles appear. In addition, you can change the font and text color used by selecting the Change the Text Font and Color link.
Figure 19.8. Movie Maker previews your titles or credits in the Monitor Windows.

When you finish adding a title, click the Add Title link and your title will appear at the bottom of your Storyboard or Timeline view. As with any item in your storyboard, you can add a transition between the title and the next clip or add a special effect to the title itself.
When you add titles over an existing clip, Movie Maker requires that your movie appear in the Timeline view and not the Storyboard view. This is because overlaid titles are an element of your movie that you can move to a different point in your movie and the timeline enables you to move them accurately.
Figure 19.9 shows such an overlay title. The figure also gives you an indication of the true power of Movie Maker’s Timeline view.
Figure 19.9. Use the Timeline view for overlaid titles and for adjusting the start points and end points of various movie elements.

About the Timeline
The Timeline view shows you the precise point in time the following five elements appear in your movie:
- Video—The video and picture clips you’ve added to your movie. The width of each clip shows the relative time that clip consumes in your movie, and the timeline across the top of the clips shows the exact start and end times of each clip.
- Transition—Shows where one clip transitions to another. By dragging the left edge of the transition on the timeline, you can extend the length of that transition.
- Audio—Indicates where audio begins and ends throughout your movie. If no audio entry shows for a part of your movie, the movie is silent at that point. The audio has the same name as the recorded audio file, or if the video includes audio, the audio has the same name or date as the video.
- Audio/Music—You can overlay a second audio track onto your movie. The video’s soundtrack, such as voice, might be in one audio track and you can add background music to the second audio track labeled Audio/Music. You can drag audio tracks left or right to change their starting times.
- Title Overlay—Shows where each overlaid title or credit begins and ends. You can drag an overlaid title or drag its right edge to change its duration in your movie.
Did you Know?
Select Edit, Clear Timeline to erase your timeline and start building your movie again. Any clips open in your workspace will remain there so that you can again drag them to the timeline or storyboard.
Saving Your Production
The two kinds of saves you have to perform in Movie Maker are Save Project and Publish Movie.
Saving Your Project
Saving a project means that the files you have chosen to work with for the current project will stay intact, as will the edits you have made to them (trims, fades, and so on). When you click File, Save Project, you will have the opportunity to save these elements so that you can go back and work with them at any point. Figure 19.10 shows the Save Project dialog box.
Figure 19.10. Saving a project saves your Movie Maker workspace, but does not generate a standalone movie file.

Publishing Your Movie
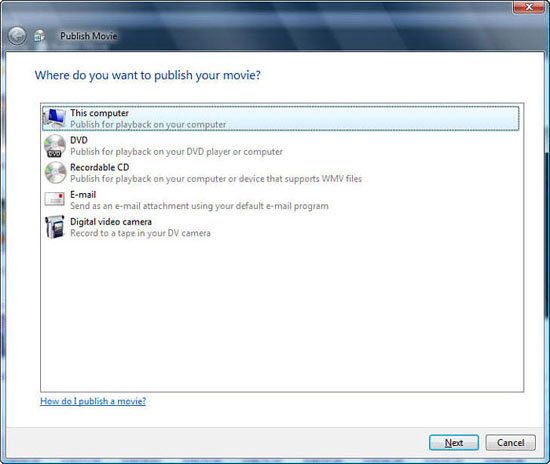
When you publish a movie, Movie Maker splices all your work together to create a final video file. Click Movie Maker’s Publish Movie toolbar button to display the Publish Movie dialog box shown in Figure 19.11. As you can see, the Publish Movie dialog box gives you several options because different Movie Maker users produce videos for different purposes. The way you plan to use your movie determines how Movie Maker should generate the movie.
Figure 19.11. You must give Movie Maker an indication of how you will use your movie so that Movie Maker generates the proper video file.
Did you Know?
If your Tasks pane is open, you don’t have to click the Publish Movie button to display the Publish Movie dialog box and select a publish option. You can go directly to any of the publishing options, such as Publish to DVD, by clicking the appropriate link in your Tasks pane.
Movie Maker publishes your movie in the Windows Media file format (with the .wma extension) or the Audio-Video Interleaved format (with the .avi extension). The choice you make depends on how you will play the movie. Computers without Windows Media Player won’t be able to play .wma files, so if you plan to share your video with others who don’t use Windows but use a Mac, you might have to publish your video as an .avi file.
The Publish Movie dialog box offers the following choices:
- This Computer—When publishing your movie to play back on your own computer, Movie Maker asks for a filename and a location to which it should publish the file. You then must select a quality setting and optional file format. Generally, if you accept the default option labeled Best Quality for Playback on My Computer, Movie Maker will publish your movie in the highest playback quality possible. Depending on the size of your file, you might have to select a different format if you don’t have enough disk space for the movie. As Figure 19.12 shows, the Publish Movie dialog box shows your movie’s estimated file size along with your free disk space. These measurements change if you select different quality settings.
Figure 19.12. Movie Maker publishes your movie in a high quality format as long as you have enough disk space to hold the movie.

- DVD—When you want to publish your movie to a DVD, Movie Maker transfers your movie to Windows DVD Maker to create the DVD. You must have a blank DVD in your writeable DVD drive. Chapter 17, “Modifying and Sharing Photos,” includes the “Creating a Video DVD” section that explains how to use Windows DVD Maker. After Movie Maker starts Windows DVD Maker, you can follow the instructions from the section in Chapter 17 to generate your movie.
- Recordable CD—If you send your movie to a recordable CD, most PCs will be able to play your movie but not all DVD players will be able to. You must make sure that the intended player can play
.wmvor.avifiles as you’ll select one of those formats. Your video should fit on a recordable CD unless it’s extremely long and you don’t choose a lower-quality format when saving it to the CD. If you want to maintain quality but still place your movie on a CD, perhaps to send to family members who have only CD drives and no DVD drives in their PCs or laptops, you might have to return to Movie Maker’s editing screen and divide your movie into two or more separate movies. By the way, Movie Maker does not write in the somewhat standard VideoCD or SuperVCD format. - E-mail—Movie Maker can prepare your video and attach it to an email message that you send to others. Obviously, size is an issue here but Movie Maker compresses your video some before attaching it to a new email message. When you attach the movie to the email, look at the size of the movie in the Attach field. Figure 19.13 shows that the attachment includes both the filename and the movie’s size. If the movie file is too large for the recipient’s email system (and you should always ask first), you’ll have to break up the movie into multiple parts and send the resulting videos separately. A better option would probably be to save the movie to a CD or DVD and mail the disc to the recipient.
Figure 19.13. Check the Attach field’s file size before sending your movie as an email attachment to ensure that the movie doesn’t clog your recipient’s inbox.

- Digital Video Camera—If you want to send your movie to tape (or to a digital video camera’s memory), select the Digital Video Camera option. Turn on your camera and connect it to your computer; often this is done using a FireWire connection. Click Next on the Publish Movie dialog box. Movie Maker displays multiple camera options if you have more than one camera connected. Most digital picture cameras have a video-recording mode, so if you have both your digital camera and your video camera attached, you’ll have to choose the one you want to write to. When Movie Maker displays the Cue Your Tape dialog box, move to the position on the tape where you want to record the movie and click Next. Set your camera to record and click Yes on the Windows Movie Maker dialog box to begin the recording.
Did you Know?
You can preview the movie as it goes to your video camera’s tape or memory by watching the video camera’s viewfinder.
Making Movies Automatically
Movie Maker contains an AutoMovie feature that almost does all your work! AutoMovie takes your video and picture clips, analyzes any sound you’ve selected, and combines them into a movie based on some high-level preferences you select.
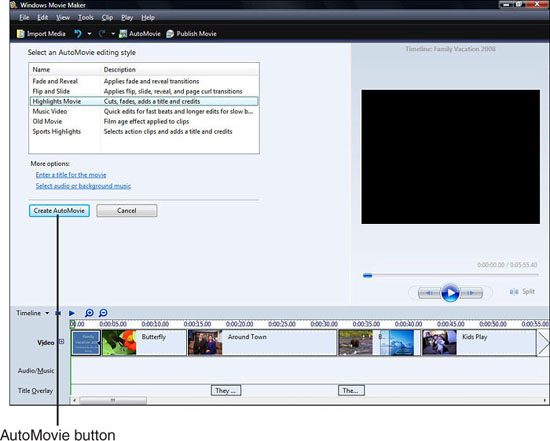
When you click the AutoMovie button, the AutoMovie editing style window appears as shown in Figure 19.14. As you can see, several movie styles are available, from an old-time movie that plays as though it’s showing on old, used, video tape to an emphasis on action sequences using the Sports Highlights style and a Flip and Slide style that works well for slideshows.
Figure 19.14. Movie Maker can analyze your video and sound and create a movie for you.
When you want to create a movie fast, the AutoMovie button is your answer. Here are the general steps in creating an automatic movie:
- Locate all the clips and pictures you want to appear in your movie and copy them to Movie Maker’s center workspace area.
- Edit the clips, as needed, to shorten them if some contain extraneous material that you don’t want to appear in the movie.
- Press and hold Ctrl and click every clip you want Movie Maker to include in the final movie. Don’t drag any to the storyboard or timeline because doing so defeats the purpose of automatic movie generation.
- Click the AutoMovie button.
- Select an AutoMovie style.
- Click the Enter a Title for the Movie link. Add the title.
- Click the Select Audio or Background Music link. Click the Browse button and locate one or more audio files you want to put in the movie. Adjust the audio volume level by dragging the volume slider left or right. This adjusts the relative level of audio included with your video clips and audio that you add as background music.
- Click the Create AutoMovie button and Movie Maker generates your movie. The storyboard and timeline will hold the resulting movie and you’re free to adjust whatever elements there you want to change. You can add or remove special effects, titles, and transitions just as you can when you build your own movie in the Storyboard or Timeline window pane.
- After you preview and finish editing your movie, click the Publish button to save the movie to a disk, DVD, CD, or to send it as an email attachment.
Watch Out!
The Undo command cannot undo an automatic movie. If you select an automatic movie style and you don’t like the results, you’ll have to generate a new movie and select a different style.
Specifying Movie Properties
You can set any of your movie’s properties from within Movie Maker. Therefore, you can assign a title, author, copyright message, rating, and comments for your movie. These movie properties travel with the movie and you can view or change them from Media Player.
By the Way
The rating you assign is an audience rating, such as G or PG, and not a rating based on the five-star rating system you’ve seen in previous chapters. From Media Gallery, you can assign a star rating to your video file.
Before publishing your movie, select File, Project Properties to display Figure 19.15’s Project Properties dialog box. There you can enter the properties for your movie.
Figure 19.15. Specify the properties to save with your movie when you publish it.

Add Narration to Your Movie
If you create training videos, or want to talk over a movie you produce, Movie Maker supports a narration feature. Using it, you can plug a microphone into your computer’s microphone-in jack and start narrating. Just select Tools, Narrate Timeline, and the Narrate Timeline screen in Figure 19.16 appears. If the Storyboard view was showing previously, Movie Maker changes to the Timeline view.
Figure 19.16. Talk over your movie, or parts of your movie, if you want to add narration.

When you click the Start Narration button, Movie Maker turns on your microphone, starts recording what you say, and plays the movie in your Monitor window. If the movie already has a soundtrack, as is often the case with video clips shot with audio, you will talk over the sound. Movie Maker takes care of timing the narration so that your voice always covers the same timeframe in the video. When you mention something in the video, your narration will accurately stay on track during your movie’s playback.
When you finish adding the narration, Movie Maker saves the narration in its own file using the Windows Media Audio format and prompts you for a filename in the Save Windows Media File dialog box. As with most audio, you can rate the recording with the five-star rating, specify an artist, album title, and year. Of course those items aren’t critical for a movie narration, but you should probably change the Album Title property to describe what you’re narrating. Subsequently, when viewing a list of audio files you’ll know the purpose of the recording.
By the Way
Your narration track appears in your timeline’s Audio/Music track, where you can adjust the narration or move it to a different part of the video. Keep in mind that if you move narration, you change the narration’s original synchronization with the movie.
Chapter Wrap-Up
You now have a video-editing tool that’s surprisingly powerful for a program Microsoft tosses in free with Windows Vista!
Although you can purchase more powerful programs, Windows Movie Maker is a great place to begin your video-editing hobby or career. More powerful programs might include additional audio and video tracks on the timeline, provide more control over titles and credits, and perhaps support more output formats, but the general way you edit videos doesn’t change from program to program. That is why Movie Maker is a good place to begin; its interface is simple and you can quickly grasp the concepts required for editing movies in its simple interface.
In the next chapter, you’ll move away from the multimedia applications that recent chapters have covered. Windows Vista introduces a new program, Windows Calendar, which you can use to keep track of appointments and reminders.