
Chapter 30. Faxing and Scanning
In This Chapter:
- Get a bird’s-eye view of Vista’s fax capabilities
- Fax from within any application you run
- Install your fax properly
- Use the new Windows Fax and Scan program
- Scan any document into digital form
- Send a quick text fax
Fax machines are a thing of the past. They went the way of eight-track tapes and vinyl records. Some people still need them if they fax physical documents such as legal documents that exist in only one copy with original signatures, but in many ways even that is outdated. If you have a computer and a scanner, you don’t need a fax machine in most cases.
With a computer, if you want to fax a document, you scan it into your computer and fax the scanned image to the receiving fax machine or to a computer that’s set up to receive faxes. Sure, scanning the document seems like an extra step, but when you fax, the fax machine is scanning the documents so scanning and sending with your computer isn’t much more time-consuming than using a standalone fax machine. Plus you have the added advantage of having a stored, digital file that you can reference later without digging through file cabinets to find it.
Even better, with your computer, you can fax documents and files that don’t exist in paper form. Instead of printing and then faxing, as you used to have to do when the world only had fax machines and not computers that faxed, you can fax straight from Word, Quicken, Photoshop, or any program that you print from. Instead of sending your data to your printer, select your computer’s fax service when printing and off the fax goes.
A Faxing Overview
To fax from your computer, you need one of two things:
- A fax modem—All phone modems manufactured after the mid-1990s connect to the Internet and they include fax capabilities.
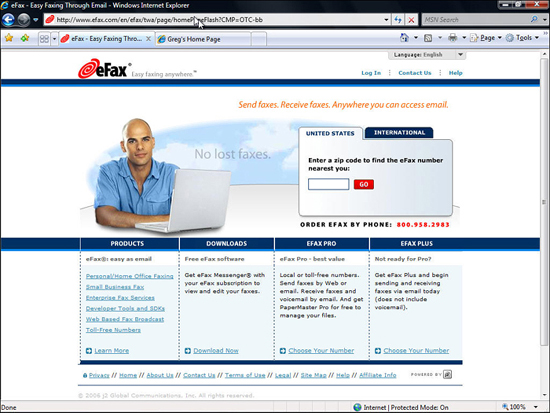
- A fax service—Online services exist that will accept your digital documents and fax them to recipients. www.eFax.com is one of many that offer this service for a small, monthly fee (see Figure 30.1). The service faxes your files to the recipients you specify, and it provides your own phone number that you give to others who want to fax documents to you. Such services often have local numbers and 800 numbers available. When someone sends you a fax from a fax machine to that number, the online service digitizes the fax and sends it to you as an email attachment. Such services are invaluable for anyone who sends and receives numerous faxes as people in the real estate and legal professions often do. For most users in today’s email-intensive world where most items are sent back and forth as email attachments, a fax service is overkill and a fax modem suits them just fine for those once-a-year faxes they send or receive.
Figure 30.1. Online fax services, such as eFax.com, make sending and receiving faxes almost effortless for a monthly fee.
The rest of this chapter discusses the first option, faxing from your own Vista-based computer. Almost everybody has a modem installed, so almost everybody has a fax machine inside their PC.
Watch Out!
Don’t forget the phone line! You need not only a fax modem, but also a phone line that you can connect to your modem. Many homes and small businesses now use wireless phone sets that all communicate with a base unit located elsewhere. Such a phone system eliminates the need for putting phone lines in every room that needs a phone. With a fax modem, the need for the phone line returns, however, so you have to run a phone line to your computer’s location to send and receive faxes from your computer.
If you don’t want to run a phone line to your computer’s location or you cannot because of physical considerations in the structure of your home or office, it doesn’t necessarily mean you’ll be without fax capabilities. You can now get a transmitter that sends a phone signal from a device plugged into your phone line’s wall jack that transmits the phone’s signal to a distant receiver that you put next to your computer. You run a phone line from your modem’s phone jack to the receiver. Your modem will think it’s plugged in directly to a phone jack when in reality it’s plugged into a transmitter that sends and receives the modem’s signals to the actual phone jack in another room. You can find these phone line transmitters in the phone accessories location of just about any large discount store or electronics retailer.
If You Can Print, You Can Fax
Vista is set up to install a virtual fax device automatically. As long as you have a modem plugged into a phone line (or into a wireless phone line transmitter) you can fax from Vista. To send a fax, follow these steps:
- Start the application you want to fax from, such as Photoshop, Quicken, or Word.
- Load the document you want to fax.
- Open your program’s Print dialog box. This is usually done from the File, Print menu selection or from Office 2007’s Office button click followed by clicking Print. You can fax anything you can print. Therefore, if you want to send only certain pages or a selected area of text in the fax, you first select that area or designate the pages you want to send in the Print dialog box.
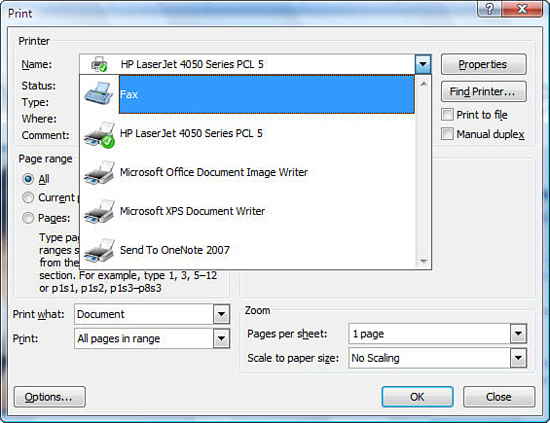
- Click to open the Name list and select Fax as shown in Figure 30.2. (If you selected Fax as your default printer, you won’t need to select it.)
Figure 30.2. To send a fax when you print from any application, select your computer fax.
- Click OK. Instead of printing or sending the fax, the fax program needs extra information such as the phone number to the recipient’s fax machine. The first time you fax, Vista will ask whether you want to use a fax modem or connect to a fax server on your network, as might be the case if you work in a networked, business environment. Select the option you want to use.
If you select a fax modem, you’ll give it a name on the Choose a Modem Name dialog box that appears next. Subsequently, you’ll select this name when you want to print to the fax. Vista then displays the Choose How to Receive Faxes dialog that enables you to receive faxes or just send one for now, as shown in Figure 30.3. (If you select Notify Me, Vista pops up a dialog box if your phone rings to ask whether you want the fax modem to answer and receive a fax. For most users, this gets annoying quickly.)
Figure 30.3. You can set your fax modem to answer calls after the fifth ring or set your modem to send a fax and not set other options.
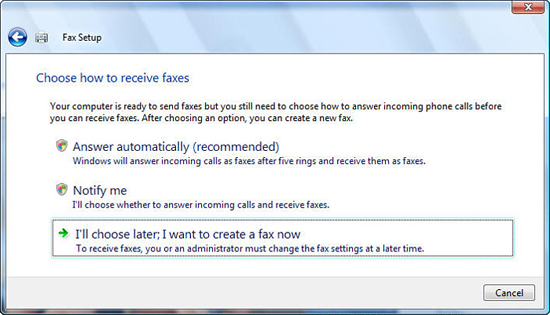
- Because you probably just want to send a fax and not ask your modem to answer calls that subsequently arrive at your location, click to select the I’ll Choose Later; I Want to Create a Fax Now option.
- The New Fax dialog box shown in Figure 30.4 appears and you’re finally ready to enter the recipient’s fax information. Click to open the Cover Page drop-down list to select a cover page from the list if you want a cover page to arrive at the beginning of your fax. Type a name next to the To text box. (If you have Outlook installed, you can click the To button and select a recipient from your contacts.) The contact you select must have a fax number listed, so in Outlook one of the fax numbers must be entered. If both the Business Fax and the Home Fax entries for that user are filled, Vista will ask which one you want to use. If you don’t use Outlook, you can select File, New Entry from the Select Fax Recipient dialog box and create a new name and fax number entry that you can reuse later if you ever need to.
Make sure that Dialing Rule is set to My Location if you’re calling from your typical location, such as your home or office. This uses your area code to determine whether the call is local or long distance.
Complete the Subject text box and Cover Page Notes text box if you elect to use a cover page. Don’t worry about the strange filename in the Attach field. Vista renames the document you’re printing when it converts the document to the required faxing format.
Next, complete the area at the bottom of the dialog box. There resides a mini-word processor with formatting tools to format a message for the recipient. This message gets sent on an initial page whether or not there is a cover page, so the cover page is often redundant when you fill in this sheet. Whether you fill it in is up to you.
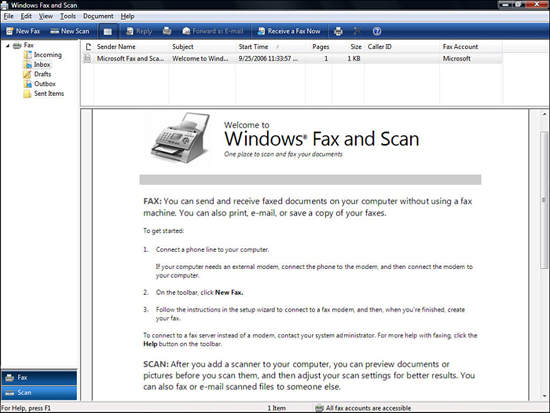
Figure 30.4. Windows Fax and Scan is a Vista application that forms your complete fax management center.

- Click Send to start the fax. Your computer dials the fax number and transmits the fax while showing a status screen as the fax progresses.
If you need to fax a printed document, instead of sending a fax from a digital document already on your computer, you need only scan the document first. After you scan any document into your computer, that document exists as a digital image on your disk drive. Whether it has graphics or only text doesn’t matter. You can fax the document once it’s there. The rest of this chapter discusses scanning.
By the Way
You can usually fax right from your scanning software just as you can fax from any other program.
Using Windows Fax and Scan
Vista includes the Windows Fax and Scan program, a program not offered in earlier Windows versions. With Fax and Scan, you can send and receive faxes. Of course, you can do that from any Windows program, as the previous section explained, but the Fax and Scan program is a complete fax management center that keeps track of your sent and received faxes, allows you to manage your contacts, and more.
Before you can fax, you must install your scanner. For USB-based scanners, installing the scanner usually requires only that you plug your scanner into your Vista computer. Vista often recognizes the scanner and installs it automatically so that when you start to scan, the scanner is there and ready to scan. Before faxing a printed document, you have to scan the document. Follow these steps to scan the document before faxing it:
- Open your Windows Start menu and select Windows Fax and Scan from the All Programs option. The Fax and Scan screen opens. If you’ve scanned and faxed in the past, the window will display those activities. If this is the first time you’ve used the program, Fax and Scan displays an introductory window as shown in Figure 30.5.
Figure 30.5. Windows Fax and Scan welcomes you with initial fax connection instructions the first time you start the program.
- Click the New Scan button to display the New Scan dialog box. Adjust the controls on the New Scan dialog box to suit your needs. For example, if you’re scanning a color photograph and want to obtain the highest quality possible, you might change the resolution to a higher one than the default (which is usually 300 dpi, or dots per inch).
- Click the Preview button to see what the scanned image will look like. After the preview appears, drag the sizing handles around the picture to crop the picture so that only the part of the scan you want to keep remains with the scan. (To crop means to remove all but that you want to keep; cropping is common when working with digital images.)
After you crop down your image, your New Scan dialog box will look something like the one in Figure 30.6. Depending on your scanner’s capabilities, you will see a dialog box with more or fewer options than the one shown in Figure 30.6 for the Epson Perfection 4490 scanner.
Figure 30.6. After you crop the image, click Scan to finalize the scan at the selected full resolution.
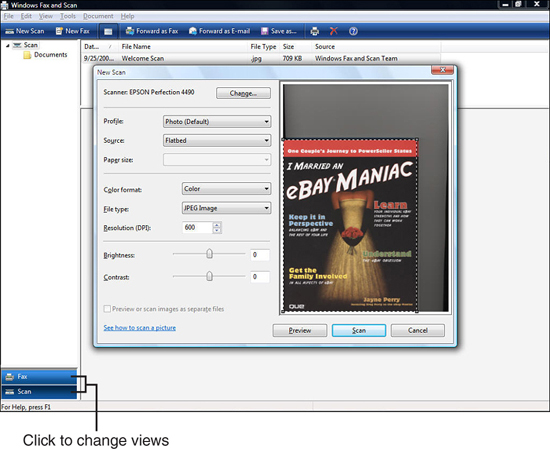
- Click the Scan button to finalize your scan. The Fax and Scan program will re-scan the image at the resolution you selected, but will not scan the area you cropped off. When the scan completes, the image appears on your screen and a new entry appears in the scanned images list above the image.
By the Way
The Fax and Scan program has two primary views: fax and scan. Click the Fax button or the Scan button in the lower-left corner of the Fax and Scan program window to change views. The Fax view lists all your faxes and the Scan view lists all your scanned images.
When you have scanned the image, you can fax it to someone. The image remains cataloged in the Windows Fax and Scan program in case you ever need to work with the image again or fax it to someone else. If this was a one-time scan and fax, you can right-click the scanned image’s Scan View entry and delete the scanned image after you fax it to someone else.
Did you Know?
If you right-click any scanned image and select View, Vista opens the scanned image in the Windows Photo Gallery. You can use the editing tools you learned about in Chapter 17, “Modifying and Sharing Photos,” to change the image before faxing it.
Faxing the image you just scanned will be extremely simple for you now that you’ve read the earlier sections of this chapter. Windows uses the Fax and Scan’s fax routine for all faxing that you do from within Vista. Therefore, when you select Fax and the printer to fax a document on your computer, Windows starts Fax and Scan’s faxing routine.
If you right-click your scanned image—or any image you’ve scanned that is listed in the Fax view’s fax list—then select Send To Fax, the Fax and Scan program opens the same New Fax dialog box you learned about in the previous section (refer to Figure 30.4). Complete the New Fax dialog box’s To, Subject, and Comments fields, and click Send to send the fax.
Did you Know?
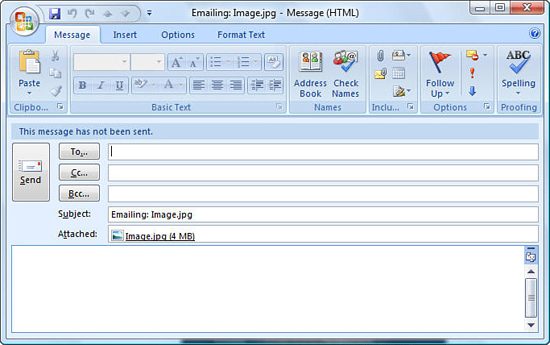
Instead of selecting Fax, if you select Mail Recipient from the Send To menu, Vista opens an email message, attaches the scanned image to the email, and lets you fill in the recipient’s email address, the Subject line, and the email body so that you can send the scanned image as an email attachment. Figure 30.7 shows the email message window that opens if you have Outlook 2007 installed on your system. Fax and Scan uses Outlook if it’s installed, or Windows Mail, or your own email program to send the email, depending on the default program setting in the Control Panel’s Programs group’s Default Programs option. (Chapter 25, “Setting Up Windows Program Defaults,” explains how to designate a default email program.)
Figure 30.7. Once you scan an image or document, you can easily send that scanned item as an email attachment.
Send a Quick Text Fax
If you need to send a quick fax that doesn’t require images or well-formatted text, you can use the Fax and Scan program to send a fax quickly from scratch. To send a quick fax to one of your fax recipients, click the Fax view, click the toolbar’s New Fax button to open the New Fax dialog box, complete the To and Subject fields, optionally select a cover page, and type your message in the body of the New Fax dialog box.
You won’t send any attached files. The message you type will be the fax. The Windows Fax and Scan program sends your fax the moment you click the Send button.
Did you Know?
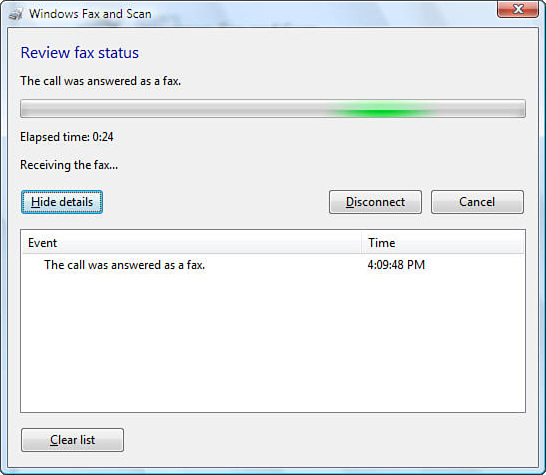
If you rarely receive faxes but are expecting a fax to be sent to you, when your phone rings open the Windows Fax and Scan program and click the Receive a Fax Now button. The Receive Fax Status window shown in Figure 30.8 opens and the Fax and Scan program receives the fax. After receiving the fax, the window closes and the new fax appears in your Fax view’s Inbox list. Double-click the fax entry in your Inbox to view and, optionally, print the fax.
Figure 30.8. You can receive a fax even if you rarely get them and you don’t normally want Vista to answer the phone.
Chapter Wrap-Up
You’re coming along well with your Windows Vista education! You saw in this chapter that Vista’s fax and scanning capabilities work to give you just about all the fax and scanning capabilities you’ll ever need. From faxing a document within any program to using the Windows Fax and Scan program to manage your faxes and scanned images, there are plenty of tools to give you the power you need without getting in your way when you don’t need them.
The next chapter explains how you can create system restore points. Such restore points enable you to return your Windows Vista system to a better state if something happens to make Vista work improperly. The restore points will not help in times of major disasters where you cannot boot your computer as can be the case with disk failures—that’s the job of your backup and restore programs—but system restore can put your Vista system back in shape, often within seconds, if damage occurs.