
Chapter 32. Improving Disk Performance and Storage
In This Chapter:
- Understand how disk fragmentation can adversely affect performance
- Detect fragmentation problems
- Let your disk run efficiently by letting Disk Defragmenter clean up potential disk problems
- Use Disk Cleanup to keep your disk drives free of clutter
Everybody seems to need more disk space eventually no matter how much they already have. Some get external drives that hold as much as a terabyte or more of information (that’s one thousand gigabytes, or approximately 1,000,000,000,000 characters of data!). They get this storage for their music files only to begin storing video files as well that quickly eat up the massive excess space they thought they would have for years.
This chapter shows you how to get more disk space and use your disk more efficiently with two of the more useful Windows Vista disk-related system utilities: Disk Defragmenter and Disk Cleanup.
As you use your computer over time, your disk becomes cluttered, not only with extra programs and Windows Vista components that you don’t need, but also with file fragments, small pieces of files that slow down the overall operation of your computer. You’ll be able to eliminate those fragments and combine them into a more efficient disk that Vista can access quicker.
Fill in the Holes
Disk Defragmenter is a Vista program that reorganizes data on your disks to make retrieving it more efficient. As you add and delete files, the deleted space leaves free holes around the disk. Vista eventually fills those holes with other data as you add files and programs to your system. However, the more erasing and rewriting that occurs, the more the data for programs and even individual files can end up scattered in multiple locations on a disk. Over time, your disk response time will slow down as you add or delete files to and from your disk.
To put it another way, in a perfect world, large files are always stored as one continuous file. That occurs only if there is enough space to do so and only if you never change that file and other files physically located close by on the disk. Windows tries its best to reuse fragment space left over from a deleted file, but chances are great that a file you create won’t exactly fit in a fragment left behind by a previous file’s deletion. Windows stores as much of the file as it can in a free fragment and puts the rest in other fragments. Over time, the number of these file fragments can grow considerably and slow down your PC when you access a fragmented file.
By the Way
It’s important to remember that if a file is badly fragmented, it’s stored in several chunks, the file fragments, over different parts of your disk drive. For you, Vista acts as though the file is still one continuous single file, but every time you do anything with that file Vista must collect all the fragments, which slows things down. You don’t know Vista is doing this except that your disk drive’s access gets slower, especially for large, badly fragmented files such as big databases.
Disk access slows down on a fragmented disk drive because Windows must jump to each file fragment when retrieving a file. If you run Disk Defragmenter often enough (once or twice a month for the average user ought to be enough), Windows keeps the fragments to a minimum and, thus, increases your disk access speed. Disk Defragmenter not only closes empty disk gaps but also rearranges your disk drive so that often-used programs run faster.
Did you Know?
Although the Windows Task Scheduler has its own schedule for running Disk Defragmenter, you can also manually start Disk Defragmenter and then do other things with your computer. You might notice a slowdown as Disk Defragmenter runs in its program window, defragmenting your disk drive, but you can still do other work in other programs. Generally, it’s best not to work on your computer while Disk Defragmenter runs, but you can.
Correcting Disk Fragmentation
To use Disk Defragmenter to consolidate your disk drive’s fragmented file portions, follow these steps:
- Open the Start menu and select All Programs, Accessories, System Tools, Disk Defragmenter. Windows confirms that you want to run the program and that you have Administrator user account privileges to do so before opening the Disk Defragmenter’s start window as shown in Figure 32.1.
Figure 32.1. You can schedule Disk Defragmenter to run on a schedule or you can defragment your disks now.

As Chapter 21, “Scheduling Tasks to Run Later,” explained, Disk Defragmenter can run at a preset time, such as when you normally are away from your computer. This is good because Disk Defragmenter can take a few hours if your disk drive is large or badly fragmented.
Click to uncheck the Run On a Schedule option if you don’t want Disk Defragmenter to run on a schedule. If you do this, make sure that you run Disk Defragmenter manually every so often to keep your disk drive running smoothly in a defragged state.
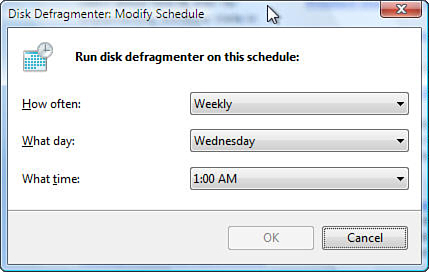
- If you want to change the schedule on which Disk Defragmenter runs, click the Modify Schedule button to display Figure 32.2’s Disk Defragmenter Modify Schedule dialog box and select the recurring schedule you want to use for the scheduled defragmentation. A weekly scheduled defragmentation will really pay off in disk performance for you over the years as you add, change, and delete files from your disk drive as you use your computer. Click OK to accept the schedule and close the scheduling dialog box.
Figure 32.2. Modify the recurring schedule you want to use to defragment your disks.
- Even if you keep your Disk Defragmenter program on a schedule, you can run Disk Defragmenter manually whenever you want. To do so, click the Defragment Now button to begin your disk defragmentation.
Vista begins defragmenting your disk drive. The process can take from a few minutes if you’ve defragged recently to a few hours, depending on the condition of your drive. If you want to cancel the disk defragmentation, click the Cancel Defragmentation button and, after a brief pause, the program will stop. Depending on how long it ran before you stopped the program, a portion of your drives will be defragmented although not fully because you cancelled the operation early.
By the Way
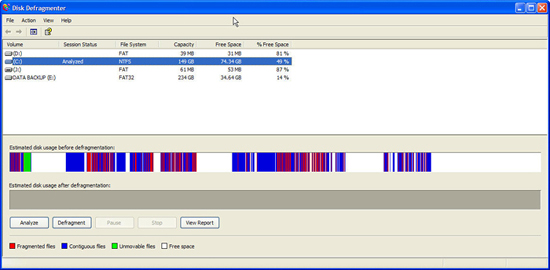
Users of previous Windows operating systems might be surprised that Vista’s Disk Defragmenter doesn’t display the usual map of the defragged disk drive the way that Windows XP and earlier Windows did. A map such as the one shown in Figure 32.3 was helpful in learning how badly fragmented a disk was. In previous versions, you could request such a visual report without actually starting the defragmentation process. If you saw that you disk wasn’t badly defragmented, you could skip the disk defragmentation to save time. Vista doesn’t do that; the Disk Defragmenter interface is rather bare of options. When you or Task Scheduler runs Disk Defragmenter, the program begins and defragments all your hard disks active on your Windows Vista system.
Figure 32.3. Older Windows versions enabled you to see how badly fragmented your disk was before starting the defragmentation process.
Disk Defragmenter’s Biggest Danger: A Power Failure
Never turn off your computer when you’re running Disk Defragmenter. Actually, you should never turn off your computer no matter what you’re doing except in two instances: your computer has frozen and you cannot get it to do anything, including a reboot using the Ctrl+Alt+Del key combination. Or you logged off or shut the system down using the Start menu’s Shut Down button and your computer didn’t power off on its own after enough time has passed for it to do so (due to a device conflict that can sometimes occur and keeps computers from fully responding to a shut down command).
Turning off your system at other times could cause you to lose data, but turning off your system when running Disk Defragmenter can completely damage the system files on your computer and keep your computer from starting properly the next time you turn on your machine. You probably don’t have any intention of turning off your computer during Disk Defragmenter’s execution. Nevertheless, you should understand what can happen and know that a power-down is possible even if you never intended to power off you computer.
If you run Disk Defragmenter, or if Task Scheduler runs it, and the power goes off at your home or office where the computer is running, the power failure can very easily cause Disk Defragmenter to leave your files left in a critical half-written state. Your computer could have severe issues and might not even boot the next time you turn on the computer.
This does not imply that you shouldn’t run Disk Defragmenter due to the possibility of a power failure. Instead, this should encourage you to obtain an uninterruptible power supply, also called a UPS. You plug your computer and monitor into the UPS and then plug the UPS into a power outlet. A UPS contains a powerful battery that continuously charges from the power outlet while it also powers your computer. If the power goes out, the battery keeps your system running without a glitch long enough for you to cancel the Disk Defragmenter and shut down your computer properly.
Of course, you might not be there when the power goes out. Many of the mid-range and better UPS models sold in the last few years usually include a USB connection that, when the power fails, begins shutting down your Windows system properly so as to not cause the disaster of a disk problem that would otherwise occur if the power went out and Disk Defragmenter were still running.
By the Way
Unlike previous Windows versions’ defragmenter program, you cannot specify which disk drives Disk Defragmenter defragments. Instead, Disk Defragmenter defragments all your disk drives.
Cleaning Up Your Disk
Disk Cleanup is a utility program that comes with Windows Vista that enables you to free your disk drives of clutter and make more space available. Over time, your disk drives fill with temporary files and other information that you don’t have to retain. Disk Cleanup can keep your free space at a maximum.
Did you Know?
When combined with a regular use of Disk Defragmenter, Disk Cleanup ensures that your disk drives will perform at their optimal level and that you’ll always have as much disk space as possible for your data.
If you read the chapters prior to this one, you’re already familiar with Disk Cleanup because Chapter 21 used Disk Cleanup as its sample program to show you how to schedule automatic program execution.
The following steps walk you through the process of using Disk Cleanup to remove clutter from your drive. Although you will probably use Task Scheduler to set up Disk Cleanup to run automatically, it helps to run through the Disk Cleanup process at least once to learn what kinds of files Disk Cleanup handles.
- Display the Start menu and select All Programs, Accessories, System Tools, Disk Cleanup. Windows displays the Disk Cleanup Options window, shown in Figure 32.4, from which you can specify whether Disk Cleanup is to clean up only your user account’s files or the files from all users on the computer.
Figure 32.4. Disk Cleanup keeps the clutter from your files or from all users’ files.

Watch Out!
If you elect to clean up files for all users, Disk Cleanup requires that you run the program from an Administrator user account, or be able to enter the password from your Administrator user account.
- Select the option you want to use. If you choose Files from All Users on This Computer, Disk Cleanup asks for a confirmation before continuing, showing that you’re aware that only Administrator user privileges can clean up the files across user accounts.
- Open the Drive Selection window’s drop-down list and click the disk drive you want to clean. All hard disks, internal and external, are available from the list.
Watch Out!
You cannot clean up disk drives on computers networked to yours. Disk Cleanup must be run from those computers.
- After selecting the disk drive you want to clean up, Disk Cleanup shows how much space will be freed in various areas such as Temporary Internet Files and your Recycle Bin. Click to check or uncheck any option you don’t want to erase and click OK in this window shown in Figure 32.5.
Figure 32.5. Determine the kinds of files you want to clean.

- Often, your Recycle Bin holds files that you no longer want. Disk Cleanup offers to delete all the files from your Recycle Bin. First, you can click the View Files button to open your Recycle Bin window and review everything there.
- If you want to delete the files from your Recycle Bin, click the check mark next to the Disk Cleanup’s Recycle Bin option.
- Windows Vista includes an indexing feature that operates when you search for data. In addition, other files (such as installation log files, cached Internet files, and power-related hibernation files) build up over time and you do not need to keep them. Click to check each of the file categories you want Disk Cleanup to remove.
Did you Know?
Click to select each type of file set on the Disk Cleanup dialog box to read a description about those files. For example, if you click the Hibernation File Cleaner entry, Vista displays several sentences that describe how the hibernation-related files get onto your computer.
- Click the OK button and Vista issues a final confirmation that you want to permanently delete the selected files with Figure 32.6’s message box.
Figure 32.6. Disk Cleanup is about to clean up several areas of your disk drive.

- Click the Delete Files button to begin the cleanup. Disk Cleanup permanently removes the files you selected. Disk Cleanup displays a status box that shows you the progress. Depending on how cluttered your disk is, Disk Cleanup can take from a few seconds to several minutes to complete.
Did you Know?
If you’re extremely low on disk space, Windows Vista and your applications will begin operating at a sluggish rate. Programs require ample disk space to store temporary files and Windows Vista requires ample disk space to function. Although you should run Disk Cleanup regularly, if you are low on space, your sluggish computer will let you know. Given the relatively low cost of an additional disk drive today, if you find yourself needing to run Disk Cleanup more and more often, consider purchasing a second disk drive. You’ll gain a tremendous amount of storage and your computing experience will be much better.
Users of previous Windows versions might be surprised that Vista’s Disk Cleanup program eliminated some of the options that Windows XP and earlier operating systems provided. Most of these options related to operating system components and programs, as Figure 32.7 shows.
Figure 32.7. Disk Cleanup used to provide system- and program-level cleanup options.
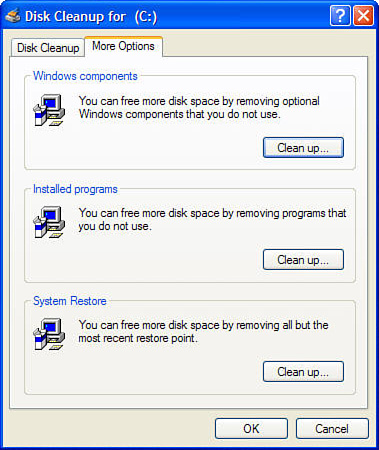
As with Disk Defragmenter, Microsoft decided to slim down Disk Cleanup and make it more of a temporary file-related cleaning program and removed the system-level and program-level modification options. It’s probably best because system changes are best left to more focused tools that you find in your Control Panel, and program-related removals are best done from the Programs group, which is also located in the Control Panel.
Chapter Wrap-Up
This chapter described the two primary Windows Vista disk utilities: Disk Defragmenter and Disk Cleanup. Both utilities work to make your disk drives operate faster and with more disk space. If your disk begins to slow down, run Windows Vista’s Disk Defragmenter to eliminate the empty holes in your drive so that your disk access runs at top performance. If you find yourself needing more free disk space than you currently have, run Disk Cleanup to see whether you can remove some unwanted clutter.
In the next chapter, you’ll learn how to configure Vista and fine-tune the operating environment further to be more efficient and to work the way you want Vista to work. Now that you know how to keep your disk drives tuned up, in the next chapter you’ll learn how to keep Vista running like a well-oiled machine.