
Chapter 42. Vista’s Ten Best Tips That Save You Time and Grief
The format of this chapter is a little different from the chapters that came before. Instead of the more traditional sections, you’ll find exactly ten sections here and in each is a tip. The tip might be short or long but no matter its length, each tip aims to give you an insightful way to use Vista and your computer together for a better and more pleasant experience.
You worked hard to master Windows Vista. You’ve now mastered the basics and more, so now you’re ready to move up to the level of official Windows Vista Guru. This chapter teaches several practical tips that you are ready for now that you understand the ins and outs of Vista.
By the Way
There are so many things you can do with Vista that it’s impossible to rank tips in order of coolness! There’s no order of importance in these tips. Just read them, use them, and save enough time and frustration with them that you have more time to watch videos with Windows Media Player.
Eliminate User Account Control Message Boxes
Okay, security is just wonderful until you don’t need it—then it gets in your way. After you install your antivirus program, your spyware protection, and turn on a firewall, you have gone above and beyond what many people do and protected yourself against the nasties that want to rob your computer’s data and files.
When you’ve done all that, it seems that Vista still asks you to confirm your Administrator user account privileges every time you try to do anything reasonable like create a restore point. The User Account Control (UAC) message pops up and gets in your way. It’s almost as though Vista forgot that the very first thing you did when you sat down at the keyboard was log in as an Administrator.
Vista didn’t forget. As explained in Chapter 27, “Managing Your Windows Security,” the UAC is there on both Administrator user and Standard user accounts to remind you that what you’re about to do has some potential to harm the system or other users. As long as you confirm your administrative privileges, you’re on your way. You can even perform administrative-level tasks when logged in as a standard user as long as you know the password of one or more administrative user accounts on your computer. But still, the messages get frustrating.
You can turn the annoying messages off. You probably shouldn’t, but let’s face it: Many other users who know how to do it probably will.
One thing you can do is create a new Administrator user account, perhaps called Freedom, and turn off the UAC in that one account. Then you use your other account for computing when you want to be more careful and when you’re less likely to need one of the administrative-level programs.
To turn off the UAC, follow these steps:
- Log in to an Administrator user account.
- Open your Control Panel’s User Accounts and Family Safety group.
- Click User Accounts to modify the account.
- Click the Turn On or Off User Account Control (UAC) On or Off link. After one final UAC message box confirmation (good riddance!), you can click to uncheck the Use User Account Control option on the window that appears (shown in Figure 42.1), click OK and reboot, and you won’t be hassled by those pesky messages again.
Figure 42.1. Say goodbye to UAC messages.

- To turn UAC back on if you miss the messages, repeat the process.
Rearrange Your Start Menu
If you don’t like the location of a menu item on one of your Start menus, drag that item to another location. When you’ve opened one of the Start submenus, such as the All Programs, Accessories submenu, you can click and drag any item to another menu. To drag a menu item such as the Command Prompt from the Accessories menu to the System menu, display the menu and locate Command Prompt. Drag it to the System Tools menu folder; after a brief pause (while you continue holding the drag) System Tools opens, and you can release the Command Prompt selection inside the System menu where it will remain.
When you make such a move, Vista warns you with Figure 42.2’s message window that this move affects all users of the system, but that’s fine. Just remember that other users might be confused if they expect to find the menu item on the Start menu’s top level, for example, and it’s not there because you moved the item further down into the menu structure.
Figure 42.2. Some menu restructuring moves menu items from locations other users have become familiar with, so confirm that you want to do this.

Make Yourself More Comfortable
What’s the most important component in your PC system? It’s not your system unit, your CPU, the speed with which Vista performs, your hard disk, or your printer. Your most important component is the very chair you sit in. Smart computer users spend almost as much money on their chair as they do on their operating systems.
If you spend an hour or more a day at your PC, run, don’t walk, to your local office furniture store and check out their desk chair selection. If you’ve never paid much attention, you’ll be shocked at how many kinds of chairs that you find. Your back, arms, shoulders, and wrists (not to mention the body part on which you sit), deserve far better than the average chair most people place in front of their computers. You’ll be more productive, work more accurately, and you’ll feel better.
Did you Know?
The better desk chairs provide separate controls for the arm rests, back and lumbar support, and height. Make sure that you can adjust these components easily while sitting in the chair. Look for a chair on wheels that rolls easily so that you can move between your PC and other work areas.
Stop a Copy or Move
This one is so easy to do, yet it’s often forgotten. It’s been around since early versions of Windows, but if you’ve never heard of it you’ll be grateful to learn about it.
Sometimes you begin a copy or move operation with your mouse by dragging something from one location to another, and you realize that you want to cancel the copy or move. What do you do when you’ve got the items dragged over a folder where you first thought you wanted them? If you release the files, they are put in the folder whether or not you want them there. If you move your mouse pointer back to the original location where you dragged from, Vista creates a copy of the files in that same folder.
All you do to end a drag or copy operation that you’ve begun is press Esc. Vista cancels the current copy or move in progress and all your files and folders are in the same state they were in before you began.
Instantly Speed Up Any Computer with ReadyBoost
Truly one of the most amazing tips to help just about any Vista user whose computer is sluggish uses a simple ubiquitous USB flash drive.
One of the ways you can improve the speed of an older computer is to add memory to the machine. That means locating and purchasing the correct memory chips, opening the system unit, and installing the new memory. The process isn’t always as straightforward as it should be and you risk damaging something when you insert the memory because such electronics are extremely fragile.
Instead of buying memory, just buy a USB flash drive. Better yet, wait for a post-Christmas sale and you can often find them free after rebate. With such a drive, and the more memory it has the better (at least 512MB is a great place to begin), plug the flash drive into a spare USB port. Use one on the back of your computer because this isn’t something you’ll be removing once you see what happens.
When you plug a USB flash drive into a Vista machine, Vista displays the expected AutoPlay dialog box shown in Figure 42.3. (Your AutoPlay options might differ slightly.)
Figure 42.3. A simple and cheap USB flash drive instantly speeds up almost any Vista computer.
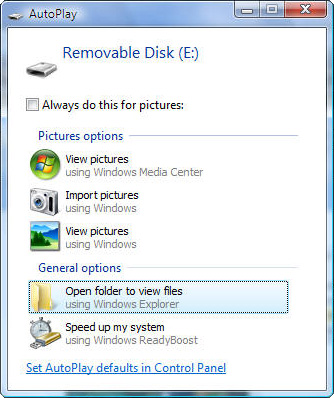
Select the option labeled Speed Up My System to activate Vista’s ReadyBoost feature. Vista begins using your flash drive as extra memory, eliminating the need for you to buy, add, and go to the trouble of installing memory chips.
By the Way
If your computer has already more than a gigabyte or more of memory, it probably has enough memory and a flash drive won’t make as big a speed improvement as it will on Vista machines running 512MB.
Type an Application’s Name to Run It
Many of us appreciate Vista’s one-column menu over the cascading Start menu that XP gave us. The one-column menu stays in place, allows everybody to see the rest of the screen, and seems to be more manageable in general. Nevertheless, the improvements to the Start menu don’t help when you need to locate a program buried deep in the menu structure.
Programs you commonly run, such as Word, probably appear on your Start menu’s Recent Items list (see Figure 42.4). Those programs are simple to find because they’re right there when you click Start or press your Windows key on your keyboard.
Figure 42.4. Your recently run items are only a click away.
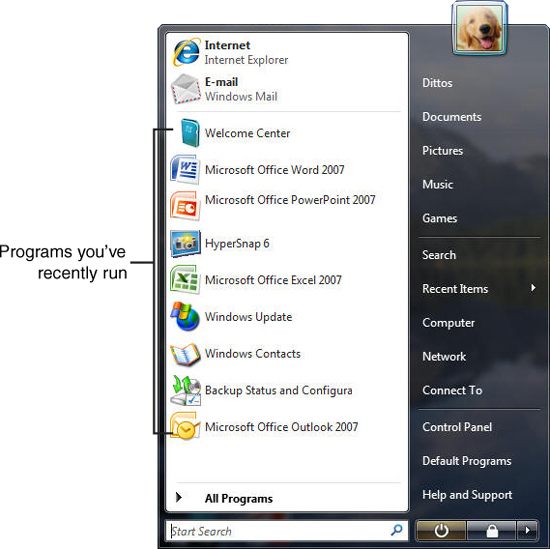
To run programs that aren’t on your recent items list without having to click menu folder after menu folder to locate them, just type a keyword from the program’s name. For example, to run the Chess Titans program, you could find it on Vista’s Start menu structure or you can display your Start menu, type chess, and press Enter. When you type, your letters appear in your Start menu’s Search box and when you press Enter, Vista looks for the closest match. Unless you have more than one chess program on your computer, the Chess Titans game will start.
Save Paper
When printing a draft of anything, you can save paper, ink, energy, and time. Most printers support this feature so get in the habit of printing multiple pages of output on a single page.
Select File, Print from any Vista application and when the Print dialog box appears, click the Properties button. On one of the tabbed pages (usually called Finishing or Layout) you should see an option labeled Pages per Sheet. Click to display a drop-down list of options. Figure 42.5 shows such a list.
Figure 42.5. Print more than one page of output on a single sheet of paper to save paper, energy, ink, and time.

When you click OK and print the document, you will see four (if you selected 4 Pages Per Sheet) pages of output printed on one page of output. The pages are exact reproductions of their full-page equivalents. Sometimes the text can be small and you might have to print only two pages per page to keep everything readable, but some people are able to print up to eight pages per sheet and still comfortably read the output.
By the Way
The document you print has as much to do with how readable the multiple printed pages will be as your eyesight does. Some eBooks, for example, have very little text and lots of whitespace on each page relative to a regular book, and printing eight pages per sheet of such an eBook is more readable than you might expect.
Print to a Hotel Fax
When you write something with your laptop while you’re on the road, you probably don’t have your printer with you. Although you can back up your files to a flash drive or send yourself an email to a web-based email account with the files attached, you might feel better if you print the document. You’ll then have the printed hardcopy (a term used for a printed document) in case something happens to your laptop and you can later edit the printed hardcopy at your convenience.
If you don’t want to lug a printer on your trip, open Vista’s Windows Fax and Scan program (open your Start menu, and type fax, and press Enter to use a tip from earlier in this chapter), and fax your document to the hotel fax machine. You will, in a few seconds, have a printout of your document.
Laptop Security
If you use a laptop, you can help get your laptop back if you lose it. Right now, before you forget, tape your business card to the bottom of your laptop. If you leave the laptop in an airport or hotel, the finder of your PC will be able to contact you to return the laptop. Sure, if a thief steals your laptop, he will know whom to thank, but many people are honest and it’s worth the cost of a business card to try.
Don’t wait; tape your card there right now.
Did you Know?
As a bonus tip, you can also use the Vista Paint program to create a background image for your Vista-based laptop. Use whatever image you want, but click the Text tool and type If found, call (111) 222-3333 or send an email to me at MyName@ISP.com. Anyone who finds your laptop will then easily be able to contact you.
Chapter 10, “Exploring the Windows Vista Accessories,” explains how to start and use Vista’s Paint program.
Spend Some Time in Windows Explorer
In Chapter 8, “Mastering Vista’s Explorer Windows,” you learned how Vista improved on the more stodgy Windows Explorer features that came before. Many windows in Vista now take on Explorer-like features, including the Control Panel, Computer Explorer window, Network Explorer, and more. New features such as live thumbnail previews (assuming that you have Aero) and zoom controls are common throughout most of the Explorer windows and the Search box is always present.
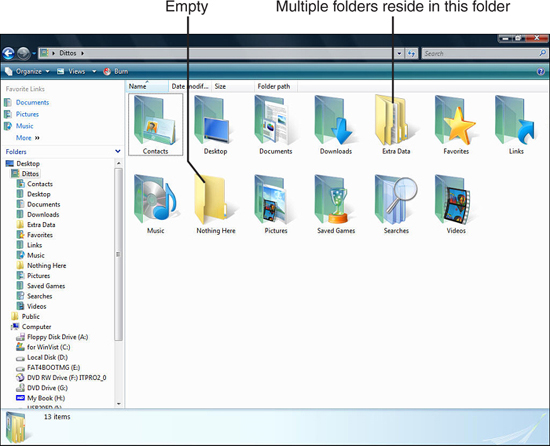
Pay attention to the icons when viewing an Explorer window and you’ll glean a lot of information about the contents of your files and folders before you open them. For example, Figure 42.6 shows several folders inside a user’s account and although you can look at the names of the folders, the icons used for each one gives a quicker representation of what the folder contains (videos, music, pictures, documents, and you can even see which folders are currently empty).
Figure 42.6. Quickly scan your Explorer window’s icons to learn what’s there.
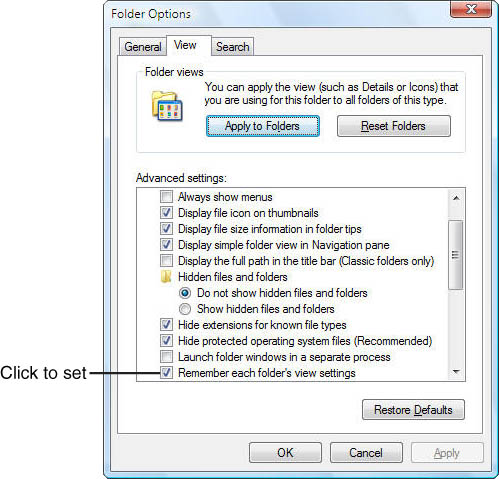
If you find yourself changing a folder’s view by clicking its View button, the next time you change the folder’s view you can make Vista retain that view in the future. Click to open the Organize drop-down list and select Folder and Search Options to open the Folder Options dialog box. Click the View tab and scroll to the option labeled Remember Each Folder’s View Settings. Click to select the option (see Figure 42.7) and every time you subsequently close an Explorer window, Vista remembers the view you set and puts you back into that same view.
Figure 42.7. Vista retains your folder’s view for the next time you visit that folder.
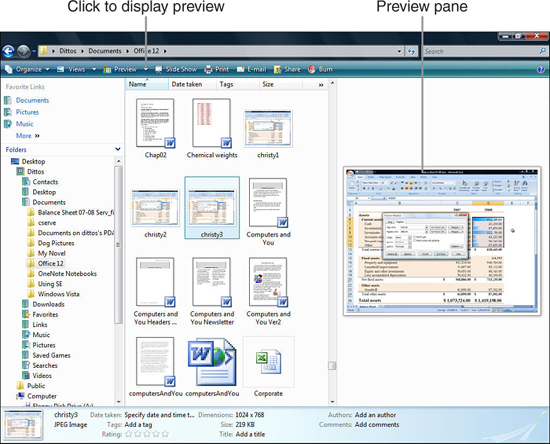
If the live icons don’t provide enough detail for you when you search through your files and folders, you can request a preview pane and Vista displays an instant preview of your document that you can scroll through. This means you don’t have to open the application that produced that document to read its contents.
By the Way
Vista isn’t always able to preview a file’s contents depending on how universal the application is. For example, you can preview PowerPoint, Excel, and Word documents, but you cannot get a preview of data files from a program such as InfoSelect that is less known and not one whose data files are available as a preview to Vista’s Explorer windows.
Figure 42.8 shows a preview of a document. The Explorer window tells a lot about the file just by glancing at it: The document is a Word document, which you know from the small flying-W icon in the thumbnail. The thumbnail gives a preview of the document’s contents, and by clicking the Organize drop-down list and selecting Layout, Preview Pane, a readable preview of the document appears to the right of the file list.
Figure 42.8. Not only can you use live thumbnail images to see what’s in a file, but Explorer’s preview pane shows actual, readable content that you can scroll through.
Did you Know?
As a bonus Windows Explorer tip, remember that a slideshow is only a click away whenever you view pictures. When viewing a list of digital graphic images in a Windows Explorer window, click the toolbar’s Slide Show button. Vista instantly changes to a full-screen, changing montage moving from image to image. Right-click the slideshow to change its speed and slide order. Press Esc to end the slideshow and return to your Explorer window.
Chapter Wrap-Up
So, are you maximizing your Vista-powered computer?
This chapter showed you ways to do just that. These were just a sampling of tips that even the pros often forget about. Make Vista work smarter so that you can, too.
In the next chapter, you’ll learn additional tips as well as some traps to avoid related to working online.