
Chapter 23. Speaking to Your Computer
In This Chapter:
- Understand the problems inherent in speech recognition
- Set up your computer’s microphone properly
- Train your computer to understand what you say
- Take Vista’s speech recognition tutorial
- Master speech recognition commands so that you can control your computer
- Dictate text into your documents
Why mess with a keyboard and mouse when Vista understands what you say?
The day is finally here, long-promised in science-fiction stories from long ago. Computers understand people. Speak into your computer’s microphone, and you can control your computer and dictate words into your word processor. Speech recognition used to be error-prone at best. Although some improvement is still called for, a Vista-based computer is extremely capable of understanding what you say with a high degree of accuracy.
Vista integrates speech recognition technology into its full line of features. You’ll need a microphone. You’ll need to spend a few moments training Vista which, in effect, enables Vista to pick up on your specific voice characteristics. You’ll then be able to command your computer with your microphone.
Preparing for Speech Recognition
Think of all the languages that people speak. Each language brings a different set of grammar and pronunciation rules. Within one language, people sound much different; women sound different from men. People from the east coast sound different from those on the west coast. People in the same family sound different from each other. Vista has quite a chore ahead of it if it’s going to understand and respond to what you say.
Until recently, computers really were not powerful enough to interpret spoken words with a high degree of accuracy. You’ll find that today’s speech recognition systems are extremely capable and highly accurate, but 100% accuracy is still a few years—and perhaps a lot of years—in the future. Having said that, today’s technology is certainly accurate enough to be useful. One way that you can gain more speech recognition accuracy with Windows Vista is to train Vista to recognize your voice characteristics.
Without a microphone, Vista cannot hear you. You can find many computer microphones at your local computer store and online. If you plan to do much with speech recognition, a headset is the best way to go. With a headset, you don’t need a microphone stand and can adjust the microphone to where it works best, and keep it at that location relative to your mouth while you speak. Another advantage to headset microphones is that they don’t pick up other noises from the room as readily as desktop microphones.
By the Way
You’ll find microphones that plug into your computer sound card’s input jack as well as USB and Bluetooth microphones. Currently, it seems as though USB-based microphones are the most universal and easiest to install. So, if you have a choice, use a USB-based microphone for your Vista speech recognition.
Did you Know?
The accuracy of Vista’s speech recognition is tied to the quality of microphone that you get for your computer. Generally, if a microphone came bundled with your computer, it’s not a high quality microphone and you might encounter more problems than you would if you upgraded to a higher-quality microphone. As with many things, you generally get what you pay for. When looking for a computer-based microphone, don’t get one of the cheaper models. Buying a computer microphone that falls in the middle or higher end of the price scale is worth the added cost if you plan to do much with speech recognition.
Setting Up Your Microphone
If you get a USB-based microphone, the microphone often comes with installation instructions and a CD-ROM. Vista will probably recognize the microphone the moment you plug it into an empty USB slot, but follow the instructions that come with your microphone just to be sure that you get the microphone installed correctly. If your microphone has a silver, 1/8” plug that plugs into your sound card’s input jack, the microphone might not include an installation CD-ROM because your computer should be able to monitor the microphone the moment you plug it in.
After you install the physical microphone, you must set up the microphone in Vista. Open your Control Panel and select the Ease of Access group. Open the Speech Recognition Options to display your Control Panel’s Speech Recognition window, as shown in Figure 23.1.
Figure 23.1. The Control Panel’s Speech Recognition window supports Vista’s speech recognition capabilities.
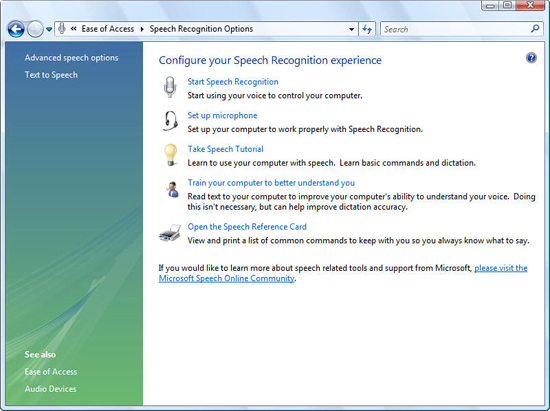
It is from the Speech Recognition window where you will work most with speech recognition, especially when you first begin to train your computer to understand your voice better.
The first thing you should do is set up your microphone by selecting the Set-Up Microphone option. Although you’ve already installed your microphone hardware, Vista needs you to tell it some specific details about your microphone because Vista adjusts its sound settings differently for different types of microphones.
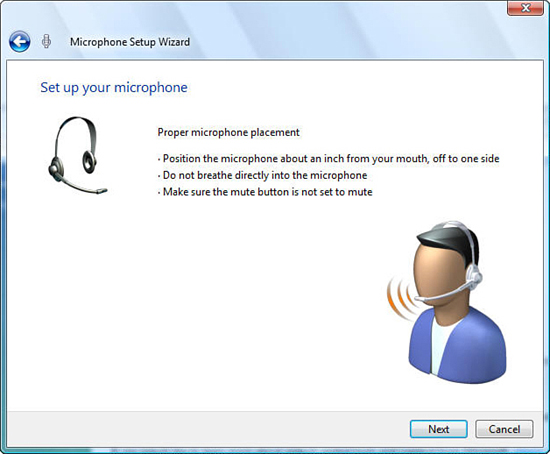
When you select the Set Up Microphone option, Vista starts the Microphone Setup Wizard. You’ll first be asked to select the type of microphone that you connected to your computer from these options: Headset Microphone, Desktop Microphone, or Other (such as handheld microphones and array microphones). Select your microphone type and click Next.
If you selected the Headset Microphone option, the Microphone Setup Wizard displays the information window shown in Figure 23.2. The window includes instructions for proper headset microphone placement and usage. (The best position for a headset microphone is about one inch away from your mouth.)
Figure 23.2. The Microphone Setup Wizard offers instructions for your microphone’s placement and usage.
Click Next to move to the next microphone setup screen. There you’ll see a sentence that you are to read. If your microphone is set up properly, most of your speech will remain inside the green zone and sometimes move into the red zone as you talk. If the bar does not move while you speak, you should check to ensure that your microphone is plugged in fully and installed using the software that came with your microphone, if any did. If the bar is pegged at the right of the red zone while you speak, your microphone volume is set too high. This can occur if you use an amplified microphone that is not designed for computers, or an array-based microphone, or a microphone plugged into amplified equipment whose volume levels should be set much lower.
Watch Out!
If your microphone has a mute button, make sure that the button is not set to mute. Also, make sure the microphone’s Mute option isn’t selected on the Control Panel’s Sound options’ Volume Control. No matter how properly installed your microphone is, the mute button will keep it silent when you speak.
After you say the sentence and click Next, Vista lets you know whether the recording level was fine, or if you need to adjust the microphone further and try again. When you get the volume in the range that Vista prefers, click the Finish button to complete your microphone’s setup. Unless you change microphones or adjust any amplification equipment that your microphone is plugged in to, you won’t need to set up your microphone again.
Train Your Computer to Understand Your Voice
You must now go through a short training session with Vista. Open the Control Panel’s Speech Recognition window and select the Train Your Computer to Better Understand You option. There you will be led through a series of screens with text that you read into your computer’s microphone. After you finish reading a sentence, Vista prompts you with another sentence.
Before clicking Next to start the training, get ready to read a series of sentences that Vista gives you one at a time. Try not to speak in any way differently from the way you’d speak to a friend next to you. Try not to drawl or use sloppy pronunciation, but don’t be overly exact either or else you will come across differently from the times later when you dictate into your computer. Vista recommends that you mimic the voice pattern of a newscaster, meaning that you speak clearly but naturally.
Watch Out!
Depending on the sentence and how you speak it, your computer might not understand every sentence you read. Don’t worry about it; a few errors are common.
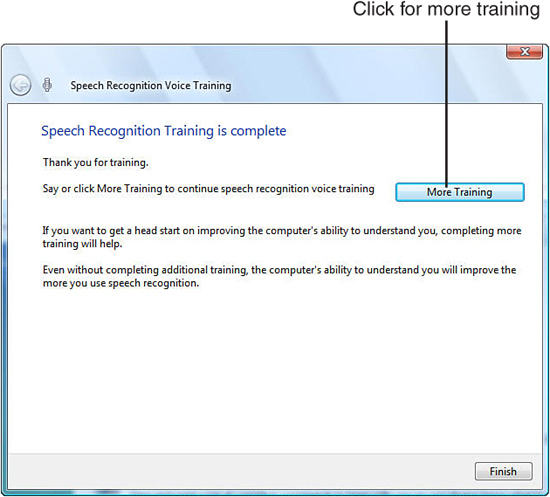
When you finish training, Vista displays the concluding Speech Recognition Voice Training window as the one shown in Figure 23.3. You can click More Training to train further or Finish to accept the training you’ve performed.
Figure 23.3. The more training you do, the better Vista will be at recognizing what you say.
Did you Know?
The more you train Vista to recognize your voice, the more accurate the speech recognition will be. If you have time now, this is a great time to train some more by clicking the More Training option.
Train Yourself for Speech Recognition
Now that you’ve trained your computer, it’s time to train yourself to give voice commands and dictation. You need to take Vista’s speech tutorial. The tutorial is a series of lessons that explain how to use Vista’s speech recognition services. The lesson is invaluable at this time and you might find it useful to return to the lessons later for a refresher course.
The primary information you’ll gain from the speech recognition tutorials includes correcting mistakes that you or Vista make during your dictation and voice command work. For example, if while dictating into your word processor you said recording, but Vista thought you said recoding, Vista would place recoding in the document at the cursor’s position. To correct the mistake, you could use your mouse to select the word and type it, but correcting with your voice is much faster and easier. Just say, Correct recoding. Vista highlights the word recoding and offers a series of possible corrections from which you can select.
Did you Know?
Every time you correct a mistake using speech recognition, Vista analyzes your correction and modifies its speech recognition pattern to avoid making the same mistake again. Therefore, every time you correct Vista’s speech recognition using your voice, you make the speech recognition more accurate in the future.
Although this chapter could list all the ways to correct and handle voice input, the tutorial is the preferred way to learn because it uses Vista’s speech recognition technology to train you and allows you to interact using your microphone. In addition, you further train Vista to recognize your voice patterns properly.
Watch Out!
The speech tutorial uses your speakers for some sound during the lessons. Make sure that your speakers are turned on before you start the speech tutorial.
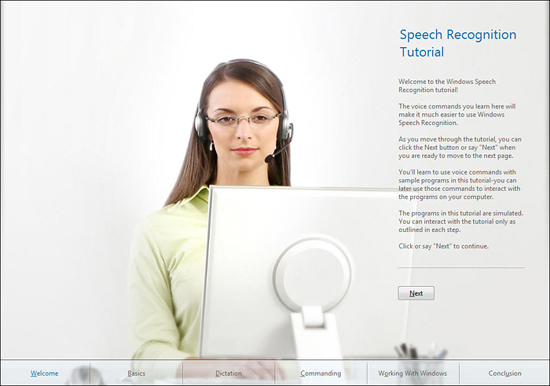
To start the tutorial, set aside about a half hour. The speech tutorial is meant to be run through in a single sitting. Open your Control Panel’s Speech Recognition window and select the Take Speech Tutorial option. The speech tutorial lessons begins with the opening window shown in Figure 23.4. Click Next—or say Next—to start the tutorial.
Figure 23.4. A 30-minute set of speech recognition tutorials is all you need to become a master at Vista’s voice input system.
Here is a summary of some of the speech tutorial’s primary lessons:
- When you use speech recognition, a small window appears with a microphone button and meter that shows your speech status. Saying Start listening tells Vista to begin recognizing your voice, and saying Stop listening tells Vista to ignore whatever sounds come from your microphone until you say Start listening again. The microphone button also includes a meter that moves as you speak and color-coded feedback, such as orange, which means the computer didn’t understand you and you need to repeat the previous command you gave.
- Say Show speech options when you want to see the speech recognition’s context menu, a menu of speech-related commands.
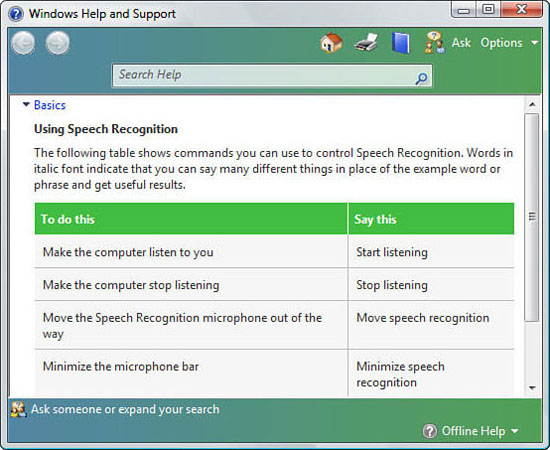
- Asking Vista What can I say? (as long as you’ve first said Start listening so that Vista monitors your microphone and is awaiting your voice command), displays the basic speech-related commands that summarizes high-level speech recognition actions, as shown in Figure 23.5.
Figure 23.5. Ask Vista for help by saying What can I say? into your microphone during dictation or when giving voice commands.
- Vista’s speech recognition’s dictation system will not punctuate for you. If your text requires a comma, you’ll have to say comma to put a comma in the text as you dictate. Vista’s speech recognition system is good at capitalizing words at the beginning of a sentence.
By the Way
Vista automatically separates words with a space between them as necessary.
- Saying Delete that deletes the last sentence or phrase you spoke. Saying Undo undoes the previous deletion, but saying Undo also might delete a phrase or sentence you last spoke if you dictated the text right before saying Undo. In other words, Undo either reverses your most recent command or your most recent text, depending on what you did just before saying Undo.
- To select text that you’ve dictated, you can say Select apple through pear if you want to select all text between and including those two words. You can then say Delete that to delete all the selected text.
- To remove a selection from text, say Clear selection.
- When a list of corrections doesn’t show the correct word in a list of possibilities, as might be the case for proper nouns, you can spell the correct word by saying I’ll spell it myself followed by Capital B o b b y OK to use the name Bobby for the correction.
- Saying New line and New paragraph simulates pressing Enter once or twice.
- Say Press and then say the name of any key on your keyboard (such as Backspace) to simulate that keypress.
- Say Start to open Vista’s Start menu.
- Usually you can say whatever is on your screen when controlling programs. For example, if you’re viewing a web page that has an About link, just say About to simulate the mouse click over that About link and the web page changes to the About page. If multiple items appear on your screen with the same word, such as multiple Edit buttons, when you say Edit, Vista places a different number over each Edit button and then you say the number that matches the button you want to select. Say double-click before saying a screen name that you want to open that would normally require a double-click of your mouse. Therefore, saying Double-click Recycle Bin opens your Recycle Bin when viewing your Vista desktop.
- For dialog boxes and forms that have text boxes, say Go to name to place the text cursor in the name field where you can say or spell a name.
- Speech Recognition will typically guess correctly at the context of your meaning so if you’re text cursor is at the end of a Word document and you begin speaking, Speech Recognition assumes you are dictating. If you say File by itself, Speech Recognition assumes you want to select from the File menu and opens the menu. If, instead, you say File it away then Speech Recognition assumes you wanted to dictate the word File and not open the File menu. If Speech Recognition ever gets confused and keeps selecting a menu or command instead of dictating what you want to say, you can say press capital F press i press l press e to get the word File in your document.
- Say Switch to Word (for example) if you have multiple program windows open and want to switch to one of them, such as Word.
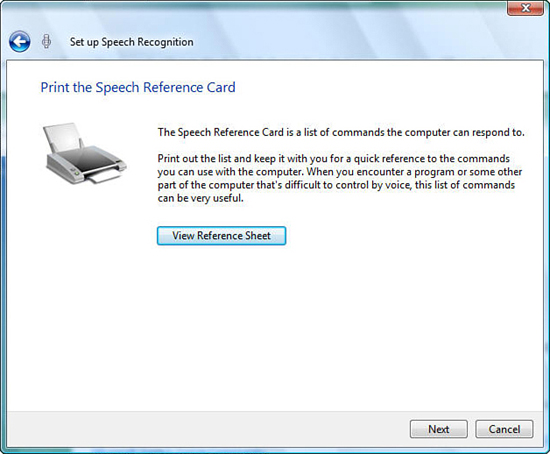
After you finish the tutorial, you’re ready to use Vista’s speech recognition system. Open your Control Panel and select the Start Speech Recognition option. Vista’s speech recognition begins and Vista requests that you set up your microphone if you haven’t done so already. In addition, speech recognition offers a speech recognition reference sheet in Figure 23.6’s window, which produces a Help window of common speech commands that you can print and keep handy as you begin getting comfortable with speech recognition. Within the Speech Recognition window, click Open the Speech Reference Card and then click Common Speech Recognition commands.
Figure 23.6. View and print Vista’s handy speech recognition reference sheet.
Chapter Wrap-Up
If you followed along with this chapter, you might have been amazed to see how simple speech recognition can be. Although not 100% accurate, Vista’s speech recognition engine is simple to use after you set it up and is relatively accurate. To gain more accuracy, you’ll want to get a good computer microphone and you’ll want to train Vista to understand your voice through the Control Panel’s speech-training program.
You used the Control Panel early in this chapter and you accessed programs from the Control Panel in previous chapters as well. There is so much to Windows Vista that it’s difficult to learn everything sequentially. In other words, if an earlier chapter had focused exclusively on the Control Panel—as the next one does—you might not have had enough background to understand the importance of some of the Control Panel’s entries.
Now that you’re becoming a Windows Vista Master, you’re ready to focus more on your Control Panel and learn about what it can do for you. Depending on how you use your computer, you might have a lot or only a little need for the Control Panel. Through the years, Microsoft has made the Control Panel easier to understand and use with each release of Windows. By getting an overview of how the Control Panel operates, you’ll be better informed of its benefits and you’ll better understand when you can use the Control Panel to get something done.