
Chapter 35. Protecting Your Data and Programs
In This Chapter:
- Learn advanced backup strategies to guard your computer’s files
- Master Vista’s Backup program
- Make both full and incremental backups so that disaster recovery goes smoothly
- Understand the pros and cons of using external devices and off-site backups
- Backup with emails and USB flash drives
- Scheduling automated backups
Disaster recovery is an important term in the world of computing and has been for about 35 years, ever since the concept of Information Systems or MIS (for Management Information Systems) came into vogue in the corporate world. The idea now applies to individual computer users as well as for huge corporate networked computer systems.
It’s almost cliché to mention the adage, “It’s not if your files will get destroyed but when.” A corollary to that is, “It’s not if a disk crash will occur but when.” Problems happen to the best of computer systems. Disk drives are mechanical and they cannot last forever. Their specifications are so exacting that the tiniest bump can put them off track (although they are designed to be rugged) and an invasion by the smallest dust particle will wreak havoc on the drive’s platter.
You must plan for your own disaster recovery now. A single computer system often runs thousands of dollars worth of software. You can always buy a new computer; getting your data and programs back the way you like them is the challenge if something goes wrong.
Nothing should go wrong with computers, though, right? As the computer HAL made clear in the movie 2001: A Space Odyssey, “Nothing can possibly go wrong...go wrong...go wrong..."
It’s Not Always the Fault of Your Hardware
Disaster occurs to computer files in many ways. A disaster doesn’t always come to you in the form of a hardware failure such as a disk crash. No matter how much design went into Vista to protect you and your system files, a glitch such as trashing an operating system file can occur. The glitch might be intended, due to spyware, or unintended, as from a bug in a program you install and run. The nastiest bugs are the ones that occur later and not immediately, long after you install the offending program, which makes tracking down the problem rather difficult.
Most of the time, software causes more problems than hardware. You go into your office and turn on your computer or start-up from a sleep state, only to find that your system won’t boot and you cannot access your hard disk.
The very best thing to do immediately after you realize your computer files are gone is to restore the computer backup that you made seconds before the problem occurred. The reality is you can count the number of people in history able to do exactly that on one hand. For the rest of us, it’s time to get serious about backing up your files.
You might not be able to restore a backed-up system to the full and reliable state it was in seconds before the problem, but a standard backup plan can go a long way toward protecting you and getting your computer back in action soon. Backing up isn’t difficult or time-consuming. If you follow the advice in this chapter, you can set your backup plan into motion and not worry about it much after that.
By the Way
Making a backup is like getting fire insurance. Nobody wants to do it. Everybody hopes doing so is a waste of time. It’s better to have a backup and not need it than to need it and not have it.
Windows Vista Backup
Ever since Windows 95, the backup program Microsoft supplied with Windows has been woefully inadequate and seemed almost like an afterthought. The all-important backup program was not intuitive, hardly updated as hardware advanced, and didn’t even install automatically with some Windows installations such as Windows Me.
Windows Vista offers a new backup program. Figure 35.1 shows the opening screen that appears when you select Backup Status and Configuration from your System Tools folder on your Start menu. The backup program is an improvement from the Windows backup program that came before and might be all you ever need. Vista’s backup program is not a comprehensive program and you can purchase far more complete backup programs, but Vista’s isn’t too bad. Along with every backup program, you also need a reliable way to restore your backed-up files if a disaster occurs. Vista’s restore procedure is good, too, especially if you use one of the higher-end Vista versions that includes an advanced backup mode called Complete PC Backup, which saves complete mirror images of your disk drives.
Figure 35.1. Windows Vista’s backup and restore program is one that you can rely on.

By the Way
Vista’s backup program backs up selected files such as your data files or your entire computer. You’ll want to back up different things at different times, and you’ll learn the advantages and disadvantages of each backup style later in this chapter.
Your Backup Frequency
You can never back up too often. Monthly is almost never often enough, weekly is far better, and daily backups are vital if you want to maintain a computer system that has good redundancy and that you can put back the way it was before a failure and lose no more than a day’s work.
In addition to scheduling a nightly backup, you can do some other things to back up your current work files during the day so that you potentially lose far less than one day’s work. If, for example, you create and manage financial spreadsheets, you should save each spreadsheet you work on several times throughout your work session. Get in the habit of selecting File, Save every few minutes (often Ctrl+S is the shortcut key to save your files and on a toolbar there is often a Save icon you can click if you find that to be easier). I can attest that this becomes second nature after a few days, and you’ll find yourself unconsciously selecting File, Save to save your most recent changes every few minutes and always before you get up from your desk.
Of course, saving your work often—whether manually or through an automatic save feature—typically saves your work to the same disk drive. Generally, you’ll use a primary disk drive for most of your work and to which you’ll save your data. Typically, that drive holds your user account’s Documents and other folders and files. Performing a save often to that disk makes sure that a fresh version of your work is on disk and not just in memory if something bad occurs, such as a power outage.
Watch Out!
Run, don’t walk, to your nearest computer store or electronics website and get an uninterruptible power supply (UPS). Don’t skimp and get a low-end UPS; you need one rated at least 1000VA/500W. Such a system gives you a few minutes to save your work and properly power down your computer down before the backup battery drains out of the UPS and you lose power completely. Don’t keep your printer plugged into the UPS or it will drain too much power if the current goes out. Keep your computer, your Internet DSL/cable/telephone modem, and at least one display plugged into the UPS so that you have full control to save your work if the power goes out.
Even with your UPS in place, don’t even think about eliminating the periodic save-to-disk routine. You’ll still want to save your work every few minutes if you can get into that file-saving habit (and you can). A UPS doesn’t do much good if someone walks by and accidentally trips over a cord that pulls your computer power cord from your system unit. Even your own foot could do this while you sit there working. Don’t risk your data; save often.
Incremental and Full Backups
Several kinds of backups are possible. Most backups fall into one of these five categories:
- A full backup—A backup of all your files, including your data, programs, and system files.
- An image backup—A bit-by-bit mirror image of your disk drive. The backup program might compress the image backup, so storing the backup does not consume as much disk space as storing as the actual, original source disk. An image backup takes the longest of all the backups to make, but provides the easiest way to get your computer back to working order if you must restore your entire disk drive.
- An incremental backup—A backup of all files that have changed since the most recent full backup or image backup. An incremental backup is far less time-consuming than a full or image backup. If you ever have to restore your computer, you have to restore the full backup first, and then restore each incremental backup in the order you made them to get your system back to its most recent, stable state. The more often you make a full backup, the fewer incremental backups you have to restore when you need to recover your computer.
- A data backup—A backup of your data. The easiest way to do this in Vista is to back up your user account’s folders and files. Your data is far more difficult to restore from scratch than your programs. Your data includes your documents, pictures, music, and video files as well as emails, Windows Vista, and program settings. The drawback to making only data backups is that if you lose your hard disk, you have to restore Windows Vista, and install all your programs before you can work with your data again.
Watch Out!
Reinstalling all your programs is often difficult because the sources for new programs are so varied. You buy some programs and have the CDs and DVDs they came on. Some programs you might get from friends. Some programs you might download and install from the Internet. Many programs that you originally installed from CDs or DVDs you have since updated and upgraded online. You have to install them again from their installation discs and perform all the updates and upgrades again before those programs will work reliably with the data file backup files you restore.
- An individual file backup—A backup copy of one or more files you want to protect by saving them to your disk drive, separate from their original location or on a different disk drive. As the next section explains, an individual file backup isn’t a true backup, but one where you save current data as you work with that data so that you protect today’s work.
A full backup of all your programs, system programs, and data actually doesn’t do you a lot of good these days if it’s not an image backup of your disk drive. Computer systems have several hidden files and folders and partitioned disk areas that make a complete file backup difficult to create. After you create it, restoring such a backup isn’t always possible.
Image backups make far more sense than file backups in most cases because image backups include an exact image of your disk’s files and settings. If your disk drive gets wiped out, you can restore the drive to the exact point in time that you backed up the disk image. If your disk drive gets damaged, you need only get an identical drive and put it in your computer, giving you a place to restore the image backup so that you’ll be running smoothly once again.
By the Way
The greatest thing about Vista’s backup program is that its full backup routine is an image backup of your computer disk drive so that in a worst-case scenario you can completely restore your hard disk. The former Windows backup program could create a full backup of your data, program, and system files, but it was not an image backup and it was difficult to restore.
Vista’s full disk image backup, called a Complete PC backup, is not available for Windows Home Basic or Vista Home Premium editions. This is a shame. If you run either of those Vista installations, you should get a backup program that does create an image backup, such as Norton Ghost. The steps necessary to run an image backup for a program such as Norton Ghost differ from Vista’s Complete PC backup, but the overall process is similar and you can read the “Making a Complete Image Backup,” section later in this chapter to get a feel for the steps you’ll take with a third-party program such as Ghost. (The Complete PC backup procedure alone might be enough reason to upgrade your Windows to a higher version.)
Where You Back Up to Makes a Difference
After you get in the habit of saving your files often as you work with them, and when you have your UPS in place so that the power doesn’t go out on you before you’ve had a chance to save your current work, you’ve only just begun to protect your files from the grave harm that is possible.
Saving your work to your disk while working during the day saves your work to one disk—a single disk—and that disk can go bad. The periodic saving technique works to protect you only if something happens to your computer’s power. It does nothing to protect you if something happens to your computer’s disk drive.
Using a Second Internal Drive
A relatively simple way to save your data in a second location, other than your primary work disk, is to install a second internal disk drive in your computer. You could change to that other disk drive every few times that you select File, Save. That procedure puts a recent copy of your important work in two places. If one disk drive crashes, the other will usually be okay.
There are no guarantees in life or in computing, and sometimes a problem brings down a computer system and all disks and files in that computer. Bad viruses can do this. Periodically saving your work throughout the day to a second, internal drive, however, helps to save your data and keep it fresh if the first disk drive goes bad. Internal disk drives are inexpensive these days, and after installing one in your computer’s system unit, it’s extremely simple and fast to save files there. Just change the drive letter and save your file. The ease of making that second copy throughout the day, combined with the extra protection of saving to a second drive, helps protect your data more than if you use only a single disk drive.
Using a USB Flash Drive
Some people are fanatical about backing up. Every hour or so, they insert a USB flash drive, save their day’s work to the flash drive, remove the drive, and continue. These fanatics are never called fanatics when something happens to their computer, however, because their data is safe and they’re back working on it within a few minutes of getting another computer to use. Although such a flash drive backup procedure might seem like a lot of work, inserting and removing a flash drive is quick and easy and might mean a lot to you someday if you ever need the files on that flash drive. Consider using this method to save your day’s work at least before you leave for lunch and at the end of your work day.
Send Emails to Yourself
One of the simplest ways to back up a file quickly (as long as you have a high-speed Internet connection) is to send the file to a web-based email account. Google’s Gmail and Microsoft’s Hotmail accounts work well for this and when you travel it’s one of the simplest ways to protect your data.
After you’ve worked on a file for a while, just open a Windows Explorer window, right-click the file, and select the Send To option. You can first select multiple files, as Figure 35.2 shows, before selecting the Send To option. Click Mail Recipient and Vista opens an email message window. Type your web-based email address in the To field, type a subject that describes the files you’re sending there, and click Send. After they go, you have a fresh copy of your files on a highly reliable web-based email account that you can access to get your files back if something happens to your computer’s disk drive before you’ve had a chance to make a full backup.
Figure 35.2. Send files to a web-based email account when you want a reliable backup.

By the Way
Emailing files to yourself works well as long as you don’t have your computer’s email system set to download email from that web-based email account. For example, if you send a file as an email attachment to your Gmail account and all that Gmail account’s email downloads to your laptop or desktop the moment you open your email program, the files no longer reside on that web-based server and you’re back to having all your files on one disk drive. It’s simple to open a second web-based email account if you want one solely for backing up your files. You should routinely log in to your email account and delete the files that you no longer need or that are on a more complete backup DVD or external drive to keep the account cleared out.
Using an External Disk Drive
External drives are plentiful, only slightly more costly than internal disk drives, and they are easy to install. In most cases, you plug a new external drive into your computer’s USB or FireWire port, Vista recognizes the drive, adds the drive to your list of disk drives in all your Explorer and File Save windows, and the drive is ready for you.
Such an external disk drive works well for saving your work throughout the day because it adds yet another location in which to back up your current and fresh files. There’s nothing wrong with using an external disk drive for this purpose but, in reality, external disk drives are better for a slightly different use.
Watch Out!
External drives are far better than CDs and DVDs because they hold so much more data and you can write to them so much faster. Although you can back up onto CDs and, preferably if you must choose between them, DVDs, a typical hard disk drive might require 10 or more DVDs to hold an image backup set and such DVD-swapping makes backups far less likely to happen. You must be there to swap the DVDs as they fill up, so the process consumes your time, and you’re far less likely to back up regularly. By backing up to an external disk drive you plug in to your computer, your computer can perform any backup you specify at night when you’re away from your computer. You can create a weekly complete backup and a nightly incremental backup and Vista takes care of all the work. All you have to do is make sure that the drive is plugged in and large enough to hold the backups.
External disk drives provide perhaps the best location for your disk drive backups. Whether you routinely back up an incremental set of files or create a full system backup, an external disk drive makes a wise location for such backups. You can buy as many external disk drives as you like and rotate them. For example, this week you might make a full system backup and five daily incremental backups of your system, and then unplug the external drive and plug in a different one for next week. By rotating the external drives, you have a double backup set for twice the protection of a single backup.
Did you Know?
Here is the best tip you will ever read about backing up: Use an external disk drive for your backups, rotate a second external drive as the previous paragraph explained, and then take the drive not currently in use to an off-site location where your computer is not stored. In other words, take the backup drive not currently plugged in to work with you for the week and bring it home the next week so that you can trade it for the other drive, which you then take to work for the week. This helps to ensure that if a fire breaks out and burns up your computer, the second backup drive wouldn’t be sitting right there getting burned also. (Discussing backups does get serious; but remember what was said early in this chapter: Backups are like life insurance and it’s better to have them and not need them than the other way around.)
Using Windows Vista Backup
Assuming that you connected an external disk drive, or perhaps have a second internal drive you want to back up to for now, you’re ready to back up your computer. Keep in mind that backing up your entire system is the best place to begin. After you do that, you can create an incremental backup or perhaps just back up your data files for the next few rounds of backups until you again create a full backup image.
To start Vista’s backup program, open your Start menu, select All Programs, Accessories, System Tools, and then select Backup Status and Configuration to open Vista’s backup program (refer to Figure 35.1). Backup Status and Configuration isn’t necessarily the easiest name to remember so the rest of this chapter will call it simply Backup.
Making a Complete Image Backup
The first time you back up your computer, and as often as necessary after that, you should perform a complete PC backup. Vista recommends that you perform this type of backup at least monthly, but if you often modify your computer settings or install and uninstall programs and settings frequently, a weekly complete backup makes more sense.
Click the Complete PC Backup button. The window normally shows the time and date of the most recent successful complete backup and location to which it was stored. But if this is the first time for this computer, both the date and location entries show None.
Click the Create a Backup Now button and after an administrative privilege confirmation, Vista looks for available backup drives and asks where you want to create the complete backup image as Figure 35.3 shows.
Figure 35.3. Tell Vista where you want the backup image to be stored.
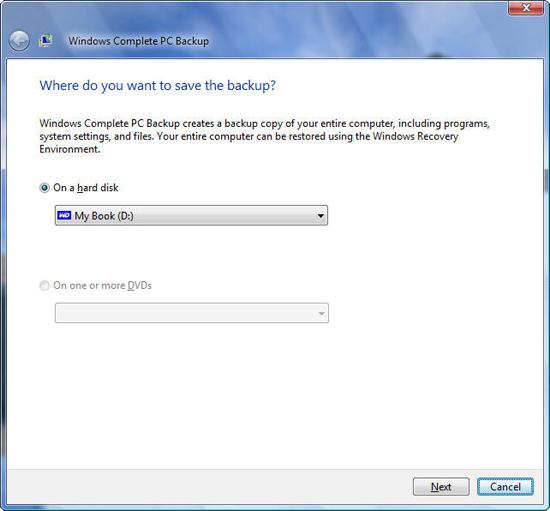
Click to open the drive-selection drop-down list to select a hard disk or click to select the On One or More DVDs option, depending on where you want to place the backup. If you have an external drive connected to your computer (the best choice for this kind of backup), use that drive for your backup.
Watch Out!
The external disk drive must be partitioned in the NTFS file system and not FAT or FAT32. NTFS stands for New Technology File System and offers more file storage and security than the older FAT-based disk standards did. If the backup program doesn’t display your external drive, its format might not be correct. Contact your external drive’s website’s customer support site to learn how to convert the drive to NTFS or whether it’s possible to do so. If not, you’ll have to get a different, more recent external drive for your complete backups.
By the Way
You cannot place a complete PC full-image backup onto a disk drive or disc that is one gigabyte or smaller. Therefore, you cannot place the backup onto a series of CD-ROMs. You can, however, use CD-ROMs for other kinds of backups you would do incrementally, such as your data and selected file backups.
Click Next to confirm your backup settings. Vista tells you which disc drives it will back up, as Figure 35.4 shows. In Figure 35.4, Vista’s system drive happens to be disc drive H: and not disc drive C: but as you can see, the Backup program doesn’t care. It backs up the entire system, saving both drives. If you ever had to restore such a system, Backup would restore everything to its current state.
Figure 35.4. Vista needs confirmation before making the system backup.
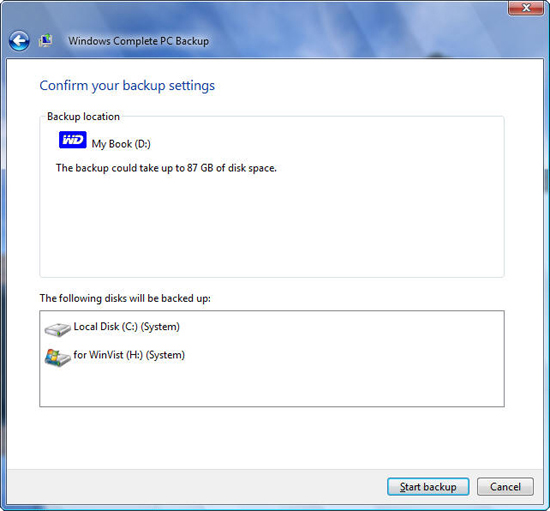
The Confirm Your Backup Settings window shows how much disk space the backup will consume. If your selected backup drive does not have enough free space, Vista tells you so that you can cancel the process, free some space or use a different drive, and start again. When everything is ready, click Start Backup and the process begins.
By the Way
During a Complete PC Backup, you can click the Stop Backup button to stop the process. If you stop the process in the middle of a complete backup, the Backup program erases any saved data. Windows cannot work with a partial system backup, so you have to start over when you’re ready to let the process finish.
Vista does allow you to work on your computer while saving the backup. If you do, however, any work you do is not included in the backup. You have to back up any changes to files, or new files you create, the next time you perform a backup.
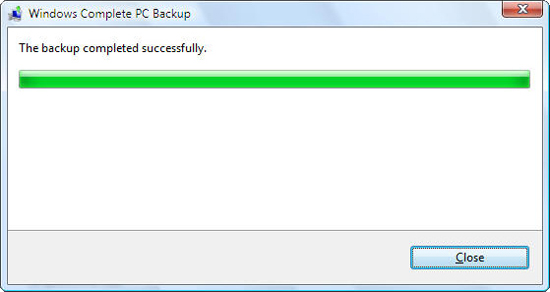
When you see the dialog box in Figure 35.5, you can rest easy knowing that your Complete PC backup image is safe on the external drive. With that backup, you can restore your entire computer back to its present state if something happens.
Figure 35.5. The Complete PC Backup finished and an image of your computer now resides on the external backup drive.
Restoring a Complete Image Backup
Suppose that you start getting system errors but you can still use Windows Vista. Perhaps settings are lost and certain programs stop working. As long as you can boot Windows Vista, restoring your entire system back to the original state it was in when you performed a Complete PC backup is rather simple.
The best news to learn is that you might not have to restore the Complete PC backup image. You might just need to restore your system files back to an earlier date using System Restore. Refer to Chapter 31, “Restoring Your Windows System to a Previous State,” for details.
Did you Know?
The sooner you spot system problems and the sooner you perform a System Restore, the more likely it is that System Restore can take care of the problem for you and you can get back to work.
If System Restore doesn’t seem to be fixing things, you probably have to resort to restoring your Complete PC backup image. First, save any data files you might have changed or created since the most recent Complete PC backup, if you still have access to your disk files.
Perhaps you’ll use Vista’s Backup program to save those individual files as the next section explains, or perhaps there aren’t too many files and you can copy them to a USB flash drive, CD, or DVD. As long as you can access the files, you should be able to save them in their newest, current state. If you have Internet access, send them to a web-based email account as explained earlier in this chapter for a reliable backup that you can retrieve after you restore the rest of your computer.
Obviously, if your system has major problems, you might not be able to back up even your most recent data. If not, be thankful you have created daily backups and know that you’ll lose one day’s work at most. You then must start the restore process.
The procedure you use to restore a Complete PC backup depends on how the manufacturer set up your computer and configured it to sell. If your computer came with a Windows Vista installation disc, or if you upgraded your computer to Vista using a Windows Vista installation disk, follow these steps to restore your system:
- Remove any CD or DVD from your computer’s disc drive, place your Windows installation disc there, and restart your computer. If you cannot display Vista’s Start menu to restart your machine, you might have to resort to turning off your computer and turning it back on again after letting it sit in a power-off state for a minute or so.
- If prompted to boot from the DVD drive, press any key to confirm that’s what you want to do. Some systems attempt to boot automatically from any disc that is there, so you might not have to do anything to get your computer to boot to the Windows Vista installation DVD.
The boot process will take a while longer than normal, but you will eventually see the Start button.
By the Way
If you cannot get your computer to boot to the installation disc but it keeps trying to boot normally from the hard disk, you need to contact your computer’s manufacturer’s customer support website or check your manual to learn how to enter the computer’s BIOS screen and request that the system boot from the disc drive. This usually requires pressing the keyboard’s F2 key when the computer first starts until you see the BIOS screen. If this doesn’t work, your only resort really is the manual or the customer support staff.
- Click the Start button, click the arrow to the right of the Start menu right pane’s Lock button, and select Restart.
- Vista prompts you for your language settings. Select a language and click the Next button.
- Select Repair Your Computer and click Next.
- Finally, open the System Recovery Options menu and select the Windows Complete PC Restore option. Vista prompts you for a confirmation and perhaps asks that you select from the drive and then the restoration will begin. The Complete PC restore process takes longer than it took to create the full backup image, so have patience while Vista performs the restore. After the restore finishes, your reward is a fully working computer again.
By the Way
Vista is robust and advanced enough to be able to recognize your USB-based disk drive during this recovery process even if it cannot recognize other devices, such as your printer. If you use a FireWire drive, especially one made before 2004, Vista might not be able to recognize it during the recovery process. Many external drives are both USB- and FireWire-enabled, so locate the drive’s USB cable and connect it to see whether Vista recognizes the drive during this restore process. If not, you might have to get a newer USB drive, install it temporarily on another computer, temporarily install your FireWire drive on that computer, and copy the WindowsImageBackup folder to the new drive, which Vista should recognize for the restoration.
If your computer did not come with a Windows Vista installation disc but had Windows Vista preinstalled, follow these steps to restore your system:
- Remove any CD or DVD from your computer’s disc drive, and restart your computer. If you cannot display Vista’s Start menu to restart your machine, you might have to turn off your computer and turn it back on again after letting it sit in a power-off state for a minute or so.
- Turn your computer on and press F8 repeatedly, waiting about a second between F8 key presses. If asked to select an operating system, as would be the case if you have Vista and another operating system installed, use your arrow keys to highlight Vista and press F8. (If you see your Windows logo screen you didn’t start pressing F8 soon enough and you need to reboot and try again.)
- Vista will start in safe mode, an environment where Vista loads only enough drivers and system routines to give you control of your computer using the mouse, screen, keyboard, and your internal and external drives. You’ll soon see the Advanced Boot Options menu. Select Repair Your Computer and press Enter.
- Vista then prompts you for a keyboard layout. Select a layout and click Next.
- If asked, select your username, enter your password, and click OK.
- Open the System Recovery Options menu that appears and select Windows Complete PC Restore. Vista prompts you for a confirmation, perhaps asks that you select the drive, and then begins the restoration. The Complete PC restore process takes longer than it took to create the full backup image, so have patience while Windows Vista performs the restore. After the restore finishes, you should have a fully working computer again.
After restoring your computer and verifying that it works as you expect, you need to restore any incremental backups you made since you created that Complete PC backup. You should either restore an incremental backup you created (as explained in the next two sections of this chapter) or retrieve the files from a USB flash drive, CD, DVD, or web-based email. Your system should be back to where it was before the problems began.
Backing Up Selected Data Files and Folders
If you don’t need a Complete PC backup image because you recently made one, you can back up selected files and folders using an incremental approach. The only kinds of files that you cannot back up, even if you use an Administrator user account, are these:
- Encrypting File System (EFS) files
- Windows system files
- Program files
- Files formatted with the older FAT or FAT32 file system
- Web-based email not downloaded to your computer
- Recycle Bin files
- Temporary files
- User Profile settings
Obviously this list poses quite a few limitations. You can’t back up program files, so if you have a disk problem, you have to reinstall the programs from their original program discs or from their download site. But as long as you regularly create a Complete PC full image backup, as the previous two sections described, you won’t have a need to back up your programs because they reside in your complete backup image.
Perhaps the biggest limitation—and, again, it’s fixed as long as you have a complete backup—is that you cannot save your user profile settings. The backup is not intended to back up anything other than your data. Keep in mind, your data covers a lot of territory, including
- Program data such as Outlook contacts and emails, Word documents, and Quicken-based financial information
- Music stored in MP3 and other music file formats
- Digital videos
- Digital pictures
Remember that as long as you make complete backups regularly and back up your data regularly (such as daily), you can restore everything with ease.
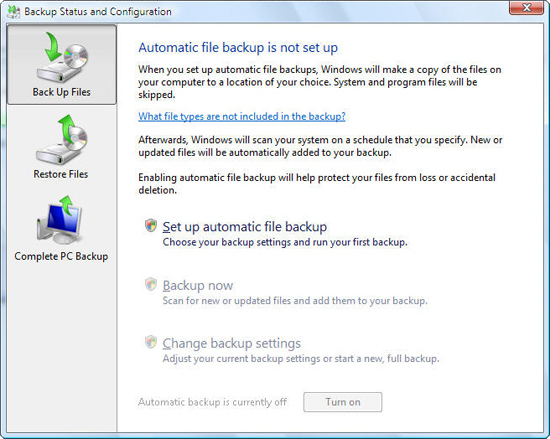
To some Vista users’ dismay, Vista is strict about backups. In fact, before Vista lets you make a backup of your files, it requires that you set up a regular backup schedule. When you first click the Back Up Files button on the Windows Backup program, Vista lets you know that you don’t yet have an automatic file backup set up, as Figure 35.6 shows.
Figure 35.6. Vista wants you to schedule automatic backups before it allows you to run a manual backup.
The first thing to do is the best thing: Click the Set Up Automatic File Backup option, confirm your administrative privileges, and set up your regular file backup schedule. Vista will ask where you want to store your scheduled backup. You choose from an external disk drive or a network disk drive attached to any network you’re using at the time. You then must select the disk drives you want to back up. Vista always selects the system disk you’re using and you can optionally keep any additional disks on your computer. Click Next after you select the drives you want to back up.
Vista now presents you with Figure 35.7’s File Types window where you select which kinds of files you want to include in the scheduled backup. Typically you’ll want to back up everything except some files, such as TV shows that you might have saved from the Vista Media Center software (refer to Chapter 14, “Going Multimedia with Vista”). Remember that TV shows and other video can generate extremely large files, and you might not want to back those up because your backup disk will fill quickly after only a few backups if you save that kind of data.
Figure 35.7. Select the kind of data you want to back up regularly.

By the Way
Another way of looking at large digital video files like television programs, however, is that their nature (a show that you always want to see and that plays once every week) and their huge size make them difficult to capture again. You must wait for the rerun season to begin if you lose the show that you saved to watch before you’re able to watch it. You should back up such a file despite its size, and the best thing to do is to make sure that you have plenty of space on your backup drive. This might require purchasing a larger, external drive than you currently have.
After making sure that you selected the files want to include, click Next to move to the scheduling window shown in Figure 35.8. There you set the time you want Vista to use to make your routine data backups. The very first time you back up your data files, Vista backs up all of them. In subsequent backups, Vista backs up only files that are new or have changed since the most recent data file backup, meaning that Vista performs an incremental backup of your data after the first complete backup.
Figure 35.8. Pick a time for your data backups. They can be daily, weekly, or monthly.

Did you Know?
The best time to run a backup is when you’re not using your computer. That way, Vista can back up your data and save any changes you made before you left your computer for the day (or perhaps for lunch). The backup can begin during times you do want to use your computer, but changes you make to your data files during the backup will not be saved until the next scheduled backup. The only things you must make sure of when scheduling a backup are that your computer is powered on at that time (you don’t have to be logged on) and your backup drive, such as an external USB drive, is connected to your computer.
After you schedule and perform your first backup, you can create a manual backup anytime you want. Suppose that you worked a lot on your computer today before lunch, and copied other files to your computer from co-workers or family members who want you to work on their files for some reason, and you want to make a backup to protect everything even though one isn’t scheduled until 3:00 a.m.
In that case, just start Vista’s Backup program and select Back Up Now. Vista allows you to create a manual backup of your data files because you’ve already scheduled automatic backups and already performed your first backup. Simply click the Back Up Now option and make the backup.
By the Way
Unlike a Complete PC backup, you can cancel a data file backup, and the files that have been written will be backed up and you can retrieve them later. Although a partial backup is never as good as a full one, if something happens in the middle of such a backup, such as the power going out in the middle of the night, you still have some files saved on the backup drive.
After you schedule a backup and perform your first one, you can turn off the scheduled backup if you want. Obviously, doing so puts your data at risk, but there might be times when you want to do so. For example, perhaps you back up nightly but want to go out of town for three days and don’t want to leave your external backup disk drive attached for that time; you would rather leave the backup disk at your office, off-site, just in case something happened at home. You might leave your computer on while you’re away for others to use, but the backup drive won’t be there and available when the scheduled backup is to take place each night.
To turn off a scheduled backup, start the Windows Backup program and click the Turn Off button at the bottom of the window. When you return, you can click the button now labeled Turn On and put the external drive back where the scheduled backups expect to find it.
By the Way
When your scheduled backup is turned off, you can still manually back up your files. Click the Back Up Now button and Vista begins the backup. Because you’ve already made a full backup, Vista backs up only those files that have changed since your last backup. Such an incremental backup goes very quickly in comparison to a full data backup.
Restoring a Data Backup
Unlike a Complete PC backup, you can select certain files and folders to restore from a data backup whether that backup was created manually or from a scheduled backup process. You can also restore the entire set of data files if you want to do so, and that might be your preference if you just had to restore your entire PC using an image backup.
To restore all your files from a backup, click the Restore Files button. Vista asks whether you want to restore files from the latest backup you made or from an earlier backup, as might be the case if you deleted a file before making your most recent backup but decided you want that file again. The Backup program asks what files and folders you want to restore, and you select either individual files and folders or select all available and restore everything.
By the Way
By clicking the Advanced Restore option, shown in Figure 35.9, you can restore files that you backed up from another computer. This might be handy if you have a new laptop on which you want to place all your desktop’s data files and folders.
Figure 35.9. Select the Restore Files option when you need to grab files from a backup disk and when you need to restore a complete disk image.

Chapter Wrap-Up
This chapter described Windows Vista’s Backup program, technically called the Backup Status and Configuration program. Take it on yourself to be responsible for your applications and data. Computers often work reliably for years, but you’re still a possible victim of a disk drive failure at any unexpected moment. A copy of your files means the difference between returning to your regular routine quickly or spending hours, days, and weeks trying to restore your system to its original state.
Your disk drives are mechanical and will break down over time. Don’t wait to make your first backup or you’ll regret it the first time your disk has a problem.
The next chapter begins the final part of this book. The material moves away from your own computer and shows you how to connect to other computers, both on a network and the Internet. Vista’s networking and Internet tools are extremely advanced, and yet Microsoft put a lot of effort into shielding the average user from the technical details. As you’ll learn in the next chapter, the nicest thing about networking under Vista is that, most of the time, it just works.