
Chapter 36. Combining Vista, Networks, and the Internet
In This Chapter:
- Learn how Vista simplifies networking
- Determine which networking hardware works best for you
- View a graphical representation of your own network
- Use Vista’s Network Discovery tool to locate computers and printers available to you on your network
- Connect to XP computers on your network
- Set up file and printer sharing
- Use Public folders to make sharing information easy
- Password-protect your files and printers
In the past, a Windows book typically included a chapter about networks. Then there would be a chapter or two about the Internet. This book’s outline initially included separate chapters about using a network with Vista and accessing the Internet with Vista; those chapters combined to form this single chapter.
Things change. Why should accessing files on the Internet (including web pages, which are nothing more than files stored on a collection of remote computers) be much different from accessing files on a network that happens to be located in your building?
The fact is that connecting to a network and connecting to the Internet used to require you to jump through hoops to make the connections work. Fortunately, that isn’t typically the case anymore. Several things occurred to make accessing networked files and the Internet much easier: Much of the networking and Internet-based technology standardized and converged, and Vista got very smart and does most of or all the hard stuff for you.
Average users simply know that the Internet just works and the files on that networked computer appear when you need them. Well, that’s the goal. Vista is able to achieve that goal for most people.
Networking Is Not as Technical as Before
By its very nature, networking is a technical subject. Anytime you must connect hardware to software and make that hardware and software talk to other computers that might not even be running the same operating system you do, the connection is going to have some challenges.
These challenges were faced and generally overcome in the past two or three decades that computer networking has become so ubiquitous. When networking first appeared on the desktop computer scene in the early 1980s, several networking technologies competed to become the world’s standard networking technology. Backed by IBM, token ring networking came on the strongest, and ethernet and ARCnet were among other technologies that competed to have the biggest installed base of users.
It was obvious that one technology had to emerge to become the leader because the competing networks didn’t communicate with each other very well, and users wanted a seamless method to send and receive data between their computer and others’ computers. Unexpectedly, the ethernet networking technology began to grab market share from token ring and other varieties. One reason was simply that the cable used for ethernet was easier to manage than the coaxial cable required for token ring and some of the other network types. Looking like a slightly thicker telephone cable that plugged into network cards as easily as familiar phone lines plugged into phone jacks, it might have been nothing more than the familiarity of the cable and plug that turned the corner for ethernet.
In addition, the fact that a new and emerging technology called the Internet came on the scene in the 1990s and used the same kinds of networking protocols (communication standards) as ethernet. That certainly helped seal ethernet’s place in our world today. Because the Internet uses protocols similar to ethernet networks it makes both technologies so easy for Windows Vista to access and manage.
Standards are now in place and Vista is well-configured to take advantage of them. The bottom line for you is simple: It’s easy to access the Internet and other networked computers and printers using Vista. Windows XP leaped forward with making both technologies available to you, but Vista goes further and lessens the technical nature even more. In the rest of this chapter, you won’t spend long, tedious sections learning about TCP/IP protocols because you don’t have to. The Internet and networks just work (most of the time) under Vista. Here, you’ll learn some of the things you can do with a networked Internet-based computer running Vista.
Did you Know?
Microsoft completely rewrote the internal networking system instead of reusing and updating XP’s. The code is better and runs faster. Maximum PC magazine published its results of testing large downloads on a Vista computer and an identical computer running XP. The testing showed a speed improvement of 15%, resulting in far faster downloads on the Vista machine (page 31, Maximum PC magazine, June 2006).
Networking Your Environment
Many homes and offices have more than one PC. Perhaps you use a laptop on the road and a desktop at work. Perhaps you replaced an older PC with a more modern one and relegated the older PC to the kids’ room. The victims of today’s low-priced, high-powered PCs are yesterday’s PCs. Older PCs are too expensive to throw out, they aren’t powerful enough to use as a serious business or entertainment tool, and if you used them in a business you’ve depreciated their cost so that you cannot donate them for a tax break.
You can now begin to use that second, slower PC elsewhere in your home or office. Such PCs used to be discarded, but new advances in simple networking technology enable the home and small office user to take advantage of every computer. Although the slower machine might not be your primary computer, you can use it to access the other PC’s files when you are in another room, putting the slower machine back into operation again.
Did you Know?
The primary reason you would network PCs is to share a single printer, files, and usually an Internet connection. You can connect your home office PC to a laser printer and your bedroom PC can, through the network, print documents to the laser upstairs. Of course, the printer must be turned on for the documents to print, but if it’s not, Windows Vista holds the output in its print queue until you can get there to turn on the printer. For fun, multiplayer games played over a network can be fun for several family members at once (and for co-workers who, of course, play only on their lunch breaks...).
Watch Out!
Although the printer does not have to be on, your printer’s PC must be connected and turned on to accept print commands from the network. Therefore, the machine that you use for a shared printer must be powered on or the network’s PCs can’t print to that printer. Unlike larger, more powerful, more expensive networks, you don’t have to designate a machine as a network server machine. A server isn’t a computer that anyone can sit down and use. In the home-based networking system used most often, every PC on the network, including those sharing files and printers, can also be used as regular PCs on the network. The networks described here are peer-to-peer networks, meaning that every machine is a usable machine and one does not have to be designated as a reserved server for files and the printer.
Networking Hardware
A network used to require cabling between two or more computers. Many networks in use today still use cabling, but there are wireless options that eliminate the requirement to run cables. Right now, you can network PCs together using one or both of these two methods:
- Traditional wiring—Wired networks are generally ethernet-based, simple to install, and require a router with a switch (or hub) to which all network cables run to manage the traffic across the network. A router takes an Internet signal and enables it to be shared between users. Many of today’s routers are wireless, sending out both wired and wireless connections to the Internet (see Figure 36.1). Routers often include switches in them so you can plug multiple devices into your router without needing to purchase a separate switch. You would only need to buy a switch with several additional network ports if you want to connect more devices to your network than your router’s connections allow. The wiring between computers, such as 100Base-TX wiring (Ethernet), is similar to telephone cable, is flexible, and is easy to run through walls and under carpet.
Figure 36.1. A router sends the Internet signal wirelessly to Wi-Fi PCs and through a hub or switch that routes Internet and network information between the computers connected to the network.

- Wi-Fi (wireless) transmission—One or more computers includes a wireless networking card that transmits and receives network signals. Wi-Fi networks are traditionally slower than wired ethernet but provide the obvious advantage of being wireless, although new advances are improving Wi-Fi’s speed and range. Wi-Fi is also known by the naming standards of its various technologies, such as 802.11b (slowest and the first widely adopted wireless standard), as well as 802.11n, 802.11a, and 802.11g (all of which are faster than 802.11b). 802.11g is currently the most popular standard but the 802.11n will likely take over during Vista’s lifetime, as more users adopt it.
When you install a network, each networked PC that will connect to the wired network requires a network interface card (NIC) that you can insert into one of the empty PC slots. Most PCs and laptops sold after 2002 already have built-in networking cards and connectors. You run the network cable from card-to-router (or external switch or hub if you use one) until all wired PCs are connected to the network.
Wireless network and Internet connections require a wireless card. Most laptops sold today have them already, but if yours does not, you can purchase one inexpensively. You can insert a wireless card in a desktop computer as well, although the increased speed of a wired network connection along with the fact that you rarely move a desktop computer from one place to another means that most people run a network cable from their desktops to the hub they use.
This discussion of networking hardware is important for you to understand, but it’s almost unnecessary with modern computers. A computer running any Vista Home Premium version requires an Internet connection, and most computers that can run Vista are recent enough to include the necessary networking connections. Your job is to make sure that you get a router and possibly a hub so that you can share your Internet connection among the computers on your network.
Windows Vista Helps You Network
Fifteen years ago, managing a network of any size required a network administrator, a person who was responsible for maintaining the network connections, adding users to the network, and setting up security, giving access to certain files and printers. Networks were extremely cumbersome to maintain. Although larger network systems still require extensive training and procedures to operate, the home-based PC boom turned the smaller segment of the networking market into a consumer-oriented technology segment.
One of the reasons home-based networks don’t require much know-how to operate is because of the ethernet standard described in this chapter’s opening section. The other reason that networking is virtually painless is due to Windows itself. Beginning with Windows 3.11 (called Windows for Workgroups), peer-to-peer networking became a reality instead of a difficult-to-deliver promise. More importantly, Windows 3.11 (which continued throughout all the versions until Windows XP appeared) gave the industry a standard on which to build network hardware and write network software.
Vista ups the ante as usual.
The majority of users with broadband Internet service—available over DSL or a cable modem—will find that they have to do absolutely nothing to let Vista know about the Internet connection. Long gone are the days when users had to tweak their system settings or play around with modem DIP switches to get a solid connection. Given Vista’s support for more devices than any other operating system to come before it, if you use a dial-up modem (especially if it’s a newer model that plugs into a USB port), Vista will probably recognize your modem when you install Vista and you’ll be dialing (and faxing) with the modem, connecting to your local Internet provider, without trouble. If you have trouble connecting, it’s probably because of a software problem that your Internet provider can fix after you tell the customer service representative that you’re trying to connect on a Vista-based computer.
Windows Vista provides you with full control over your computer’s networking connections in the Network and Sharing Center, shown in Figure 36.2. You can display your Network and Sharing Center by opening your Control Panel’s Network and Internet group and selecting the Network and Sharing Center option.
Figure 36.2. Just about anything you want to do with your network is available in Vista’s Network and Sharing Center.

The vast majority of anything you might ever need to do with your computer’s network connection is available from the Network and Sharing Center. The rest of this chapter describes many of the features of your Network and Sharing Center and explores ways you can use it to your advantage.
Your Graphical Network Connection
The very top of your Network and Sharing Center window shows your computer’s network and Internet modem connection. Depending on your setup, you might see a different picture from that at the top of Figure 36.2. For example, if you don’t use a router, you probably have your Internet connection coming directly into your computer. You then share that connection over your network, so the globe representing the Internet might be shown connecting to your PC as well as the Network icon in your Network and Sharing Center.
Did you Know?
Your Network and Sharing Center will display a more detailed graphic representation of your entire network if you click the View Full Map link. Figure 36.3 shows a simple network shown in the full map view. Two computers are wired to a switch (which is a network hub), and the switch is connected to a gateway (which is typically an Internet router or modem). If your router includes a switch then your diagram won’t show the switch separately.
Figure 36.3. View a full detailed map of your network connections.

This graphical representation of your network can become huge, depending on how many connections your network has available. In addition, you might see only Vista computers on your network graphic even if you can access shared Windows XP computers connected to your network.
Did you Know?
Press F5 to refresh the network graphic if you add or remove network devices and want to confirm that Vista recognizes them.
Turning On Network Discovery
If your network doesn’t see one of your Vista computers, you need to turn on network discovery, an internal system program that makes your computer available to others on your network. In Figure 36.2, the network discovery feature is turned on, as indicated by the first entry in the Sharing and Discovery section.
If a computer on your network does not have network discovery turned on, click the arrow to expand that computer’s Network Discovery group (the arrow to the right of each entry in the Network and Sharing Center) and click to select the Turn On Network Discovery option as shown in Figure 36.4.
Figure 36.4. Turn on network sharing when you want others on the network to see your computer.

Watch Out!
You might want to turn off network discovery on your laptop when you use it away from home. With network discovery off, your laptop can still access an Internet signal wirelessly but other computers on the network won’t be able to see your computer.
After you turn on network sharing, the other computers on your network should be able to see your computer after a few seconds.
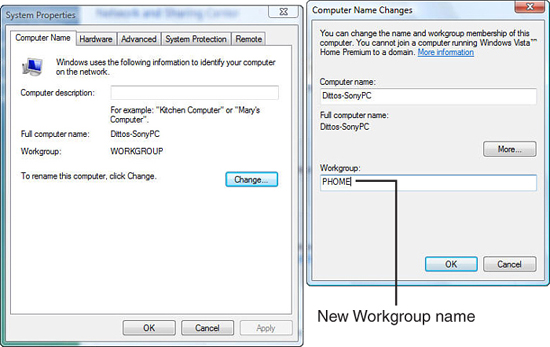
While you have your Network Discovery option open, check to see what workgroup your Vista computer is a member of. Workgroups are not the primary means of network access in Vista, but they were in versions of Windows through Windows XP. Because you might share a network connection with XP-based computers in your home or office, you might have to change the workgroup assignment of your Vista computer so that those XP computers can see your computer and share files and printers with it.
In Figure 36.4, the workgroup name is WORKGROUP, the default workgroup name. It’s recommended that you change to a different workgroup name for security reasons just because changing from the common WORKGROUP name gives a hacker one more barrier of entry. To change that to the workgroup used by whatever XP-based computers you want to network to, click the Change Settings link to the right of the existing workgroup name, confirm your administrative privileges, and enter a new workgroup name. Click the Change button in the System Properties dialog box that opens, type a new workgroup name in the Workgroup text box (as shown in Figure 36.5), and close the dialog boxes. You must reboot your computer to apply the new workgroup name fully. After your computer restarts, your Vista machine will be a member of the same workgroup as your XP computers and they should be able to share files and printers.
Figure 36.5. Set your Vista computer’s workgroup name to the same name as your XP computers to share files and printers with those computers.
Did you Know?
To locate the name of a Windows XP’s workgroup, right-click My Computer and select Properties to display the System Properties dialog box. Click the Computer Name tab. The workgroup name appears to the right of Workgroup in the center of the dialog box.
Watch Out!
Vista’s Network and Sharing Center won’t always show an XP computer in the graphical network connection even if both it and your computer are members of the same workgroup. A workgroup enables the XP computer to see your computer, but the Network and Sharing Center is designed for Vista computers on your network. If XP computers are members of your Vista computer’s workgroup, you can see them from an Explorer window (such as the one in Figure 36.6) when you click the Network folder to see all the computers and other networked devices with which you can share files and printers.
Figure 36.6. Although the icons are the same as the Vista PCs, the computers named JAYNEHP-PC and OFFICEDELL are not Vista-based computers. Because they’re members of the same workgroup as the two Vista machines in the list, all four computers can share files and printers. The XP machines, however, don’t appear in the Network and Sharing Center.

Did you Know?
If a networked Vista computer doesn’t show in your Network and Sharing Center map, or if an XP-based computer isn’t shareable even if that XP machine shares the same workgroup name as your Vista computer, the computer that doesn’t show up might have a firewall setting that blocks network access. Firewalls block and unblock local networks differently, so you have to check that computer’s firewall settings and online help to learn how to unblock local area network access. In general, Vista’s firewall allows local network connections through as long as you’ve turned on the Network Discovery option.
Allow for File and Printer Sharing
You must allow file and printer sharing on any computer whose files or printers you want to share. To share your files, click to expand the File Sharing section of your Network and Sharing Center and click to select the option labeled Turn On File Sharing. Click Apply and Vista shares your computer’s files as soon as you confirm your administrative privileges. Reverse this procedure if you want to turn off file sharing, as you might do if you’re working in a public wireless area such as a coffee shop that offers Wi-Fi connections.
In a like manner, you can click to expand the Printer Sharing section of your Network and Sharing Center and click to select the Turn On Printer Sharing option. Click Apply and Vista shares any printer attached to your computer after you confirm your administrative privileges. Reverse this procedure if you want to stop sharing that computer’s printer.
Watch Out!
If you have password protection turned on, as described in the “Password-Protecting Your Files and Printers” section later in this chapter, users on your network will be required to type a password anytime they request access to a file or printer on your computer.
Working with Public Folders
A Public folder is one meant for sharing with others. You copy and move items to your Public folder when you want to make those items available to others.
Watch Out!
Only one Public folder exists on a Vista computer, no matter how many user accounts are set up to use that computer. Given the nature of the Public folder and its intended use as a shared folder, there is no reason to keep access from others on your computer from that folder. If you don’t want to share a file, make sure that you never put that file in a Public folder. Every file in every Public folder is always available to everyone who has a user account on your computer. All network users might or might not have access to your Public folders depending on the file-sharing permissions discussed in the previous section.
The Public folder contains the following subfolders:
- Public Documents
- Public Downloads
- Public Music
- Public Pictures
- Public Videos
- Recorded TV
You can create additional subfolders in the Public folder as well. The Public folder appears in your Explorer window in the left navigation pane, as Figure 36.7 shows.
Figure 36.7. Your computer’s Public folder is always available in your Explorer window’s left navigation pane.

To control whether people on your network can access your computer’s Public folders, click to the Public folder’s Sharing Settings button to move to your Network and Sharing Center. Under the Public Folder Sharing option you have three choices depending on the level of Public folder access you want to grant:
- Turn On Sharing So Anyone with Network Access Can Open Files—Enables anyone with network access to your computer to access your Public folders and all contents within. Those users are limited to reading the files and folders (this includes copying from them), and cannot change or delete any contents of your Public folders.
- Turn On Sharing So Anyone with Network Access Can Open, Change, and Create Files—Enables anyone with network access to your computer to access your Public folders and all contents within. Those users may read the files and folders, delete files and folders, create new files and folders, and change the contents of the files and folders. In other words, they have the full access that users on your computer have to the Public folder stored there.
- Turn Off Sharing—Blocks access to your computer’s Public folders to all users on your network. All users with accounts on your computer still have full access when they log in to their account.
Password-Protecting Your Files and Printers
When you password-protect your computer, anyone on your network who attempts to gain access to your shared files or shared printers won’t be allowed access unless they have a user account on your computer. If they do, they must type the password when they want access or your computer will not allow file and printer sharing to take place.
To add the password requirement, click to expand the Password Protected Sharing section in your Network and Sharing Center. Click the Turn On Password Protected Sharing option and then click Apply. After Vista confirms your administrative privileges, only users who have a user account and password on your computer can access shared files and printers.
Sharing Media
The nice thing about networking Vista computers is the ease with which you can share media files among the machines. For example, if you network in a home environment, a user on another Vista computer in your home can start Media Player and access the music and videos on your machine. The access is limited to music, pictures, and videos, and the remote users only have read access. That is, the remote users cannot change them or delete the files unless they have full access to your files through the other file-sharing means described in the previous sections.
To turn on your computer’s media-sharing capability, open your Network and Sharing Center, click to expand your Media Sharing section, and click the Change button to turn on the Media Sharing option. Vista displays the Media Sharing dialog box shown in Figure 36.8. Click the Share My Media option to allow others to access your media files.
Figure 36.8. You can allow other Vista users on your network to access your pictures, music, and videos.

By the Way
The media files stream from your computer to your remote users’ computers. Streaming means that when someone begins to play a video from your computer, the entire video file doesn’t have to travel over the network before that user can begin watching the file; instead, once enough of the video travels to the user’s computer, the video begins to play while the rest of the video arrives.
Did you Know?
If anyone on your network uses an Xbox 360 or other digital media player, they can access your media as well. This enables you to send music and video throughout your home or office to other rooms that have an Xbox 360 or perhaps to your TV or home theater to which you’ve connected an Xbox 360.
After you verify that you want to turn on media sharing, Vista displays the Media Sharing dialog box (shown in Figure 36.9) that enables you to decide which Vista-based computers on your network can access your media files. In Figure 36.9, only one other computer is a Vista computer and it doesn’t currently have access to the computer’s media files because the option is turned off. To allow the computer named dittos-pc as well as other users with user accounts on the current computer to access the media files, you need to give those machines specific access.
Figure 36.9. Select the computers and users connected to your machine to which you want to offer media files and click Allow.

By the Way
It might seem as though you must turn on media sharing twice: once from your Network and Sharing Center (refer to Figure 36.8) and once more from the Media Sharing dialog box in Figure 36.9. Actually, when you initially turn on media sharing from the Network and Sharing Center you’re giving your computer permission to share files, but you haven’t specified exactly which computers and users on your networks will have access to the media. It’s only when you select one or more computers and users from the Media Sharing dialog box (see Figure 36.9) that media sharing is actually available to those users and computers. This way, you can limit which computers have access if your network includes multiple Vista computers.
Click each computer in the Media Sharing dialog box you want to give media access to and then click the Allow button. The yellow exclamation point on those users or that computer changes to a green check mark, indicating that computer now has access to your media.
Did you Know?
While still inside the Media Sharing dialog box, if you click to select a networked computer and then click the Customize button, Figure 36.10’s Media Sharing Customize window opens. Here you can specify more detailed options for this network computer’s sharing of your media files. For example, you can limit the content that the computer can play from your machine by parental rating or media type.
Figure 36.10. You can narrow the kinds of media another computer can access by putting limits based on media type, star ratings, or parental control ratings.

The networked computer now has only to open its Media Player program to access the shared content. In Windows Media Player, this means that the networked computer user clicks the arrow below the toolbar’s Library button, selects Media Sharing, clicks to select the Find Media That Others Are Sharing option, and clicks OK. The user now has access on that computer to all media given from the source machine. Check the left navigation pane in the networked computer’s Windows Media Player and the source computer’s name appears; you can click the name to see all its allowed media files.
Chapter Wrap-Up
This chapter took you on a brief history of networking so that you could gain a little background to the world of networking. Network technology has come a long way in speed increases and cost decreases. The true winners in the network advances are small office and home-based PC users. Networks used to be synonymous with expensive technology that was difficult to use, hard to install, and costly to maintain.
All that has changed, and Vista really goes above and beyond the call of duty by putting your file and printer sharing setup in the Network and Sharing Center. You can easily specify who has access to what on your computer and a graphical map always lets you know how your own computer connects to the network. Other computers and users can access your digital pictures, music, and video with ease after you allow media sharing.
It’s obvious that networks are now popular for two reasons: Users of multiple machines can share files and printers, and file integrity is maintained when only one disk keeps the data used by several PCs. Fortunately, Vista takes much of the mystery out of the software side of networking setup, management, and use.
In the next chapter, you’ll learn how to use your computer to explore the largest network in the world: the Internet. Although you’ve almost surely used the Internet before, and you might be a pro at it, Windows Vista brings some new features to the Internet user’s world that Windows XP didn’t offer.