
Chapter 10. Exploring the Windows Vista Accessories
In This Chapter:
- Familiarize yourself with Vista’s accessory programs
- Use Vista’s Calculator accessory program
- Write with Vista’s free word processor
- Create pretty pictures with Paint
Windows Vista comes with several application programs you can use right away without having to install anything else. The names of these programs indicate their purpose in most cases; for example, Calculator and Paint are self-explanatory.
This chapter introduces these programs to you. They reside on your Start menu’s Accessories folder. If you’ve used previous versions of Windows, some will surely be familiar but others are new to Vista, such as the Mobility Center.
Looking at the Accessories
Open your Start menu, select All Programs, and then select Accessories. Depending on your Vista’s installation, you might see a different list of programs from this book’s but many will overlap. Windows users often find themselves using these programs more than they first thought they would. The programs load quickly because they’re fairly small, unlike larger applications such as Adobe’s Photoshop, which is why many Vista users put some of the accessory programs on their Sidebar. The following list describes programs that Vista users commonly find on their Accessories menu.
- Calculator—Performs quick calculations; handy for arithmetic that doesn’t require a worksheet program. Calculator includes an option to change its display to a scientific calculator for more complex calculations such as statistical and trigonometric operations.
- Command Prompt—Sometimes known as the DOS prompt due to the pre-Windows, DOS-like window that the Command Prompt emulates. Figure 10.1 shows the Command Prompt window that appears when you select Command Prompt from the Accessories menu. To close the Command Prompt window type
exit.
Figure 10.1. Use the Command Prompt window when you want to work in a DOS-like environment.

Did you Know?
You can adjust the way the Command Prompt window behaves by right-clicking on its title bar and selecting Properties. (This isn’t obvious because there is no button or label or link to tell you about the right-click option.) On the Command Prompt Properties dialog box that appears, you can adjust the Command Prompt window’s size, colors, font used, and more.
- Connect to a Network Projector—Connects your computer to a networked projection system (as opposed to one directly connected to your computer). Such a network projector, whether wired or wireless, is becoming more common.
When you give a presentation at a hotel or board meeting, instead of connecting to a projector, you now can simply access the company’s network and your screen output will appear on the network’s projection system.
- Notepad—A text editor somewhat useful for writing web pages in HTML and scripting code and for writing programs. Vista’s Notepad is slightly primitive even compared to most of today’s low-level editors. The advantage of Notepad is that Notepad is always available and ready to use.
Watch Out!
Notepad isn’t intended to be used as a word processor. You won’t find the typical word wrap in Notepad (you can turn on word wrap, but it’s not on by default) and Notepad can edit only files stored in a textual format. If you want to do simple word processing, even if you just want to type some quick notes into a file, use WordPad or another word processing program.
- Paint—A simple but effective drawing program that you can use to create colorful pictures. If you’re a good artist, you can use one of your Paint creations (or one of your children’s, which will please them greatly, if you do) for your desktop’s background.
- Remote Desktop Connection—Allows you to connect to a remote computer, such as one at a different location from your physical address. You might wish to access your home computer’s files from work, for example, and a remote desktop connection will enable you to do that.
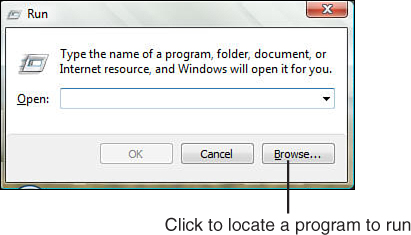
- Run—Enables you to run programs from an operating system level if you know the exact name of the program and where it’s located if its not a system program that Windows expects to be ran from the Run dialog box. When you select Run, the Run window shown in Figure 10.2 appears. Windows+R is the shortcut for the Run command.
Figure 10.2. You can execute commands by typing their name from inside Vista’s Run window.
Did you Know?
If you type the command
cmdin the Run window, Windows Vista opens a Command Prompt window on your desktop just as if you’d selected Command Prompt from the Accessories menu. Some Run commands execute quickly and then close their window before you’ve had a chance to see what the program did. When this happens, typecmdto open a Command Prompt window, which remains open after a command executes, allowing you to see (or scroll up, if necessary) the results it generated. - Snipping Tool—Starts a program that enables you to capture some or all of your screen as a graphic image.
- Sound Recorder—Enables you to record sound from your computer’s microphone jack and save it to a file. Unlike previous versions of Windows, the Sound Recorder provides no rudimentary editing on the sounds you record and save. Chapter 18, “Recording Simple Audio,” shows you how to use the Sound Recorder.
Watch Out!
For most versions of Windows Vista, Sound Recorder saves its recordings using the Windows Media Audio (WMA) file format. However, if you have a Business or Home version of Vista with an N designation (Windows Vista Business N, for example), your sound files are saved as Wave (WAV) files. The N versions of Windows are primarily intended for distribution outside the United States.
- Sync Center—Enables you to synchronize the files on other computers and devices connected to your computer such as PDAs (Personal Digital Assistants such as Palm Pilots and PocketPCs). In Chapter 39, “Synchronizing Your Computer with Other Devices,” you’ll learn how to use the Sync Center.
- Welcome Center—Displays Vista’s Welcome Center described in Chapter 2, “Exploring the Welcome Center.” If you click to uncheck the option labeled, Click to Run at Startup, the Welcome Center window will cease opening when you start Vista. This Accessories option turns it back on once again.
- Windows Explorer—Opens the Windows Explorer window in which you can manage files and folders. Chapter 8, “Mastering Vista’s Explorer Windows,” explains how to use Windows Explorer.
- Windows Sidebar—Produces the Sidebar that contains gadgets as the previous chapter explains.
- WordPad—A simple word processor with which you can create formatted, word-processed documents.
The rest of this chapter gives you an overview of most of these programs. Some, such as Windows Explorer, you’ll learn about in subsequent chapters.
Calculate Results
The Calculator program performs both simple mathematics and advanced scientific calculations. Throughout your working day, you use your computer constantly, perhaps writing letters, printing bills, and building presentations. As you work, you’ll often need to make a quick calculation and, if you’re anything like computer book authors, your handheld calculator ends up buried underneath a mountain of papers stacked a foot high on your desk. With the Windows Calculator program, however, a handy calculator is never farther away than a simple mouse click or three.
Did you Know?
Calculator actually contains two calculators: a standard calculator and a scientific calculator. Most people need only the standard calculator that provides all the common mathematical operations typically required for day-to-day affairs. The scientific calculator contains additional operations, such as statistical and trigonometric operations.
So, sell your desk calculator on eBay and start using Vista’s. The Calculator program even enables you to copy and paste the calculator results directly into your applications.
Follow these steps to practice using the standard calculator:
- Click Start, All Programs, Accessories, Calculator (see Figure 10.3). If you see a calculator window with many more buttons than is shown here, select View, Standard from the Calculator’s menu to work with the nonscientific calculator.
Watch Out!
You cannot resize the Calculator window. You can only minimize the Calculator program to a Taskbar button and move the window.
Figure 10.3. The Vista Calculator program goes beyond a pocket calculator.

- It doesn’t take a rocket scientist to use Calculator! Calculator performs standard addition, subtraction, multiplication, and division. The Calculator also includes memory clear, recall, store, and memory add capabilities.
By the Way
All the Calculator operations produce running totals, meaning that you can continuously apply operations such as addition to the running total in the calculator’s display.
Watch Out!
The Calculator program has keyboard-equivalent keys. Instead of clicking with your mouse to enter 2 + 2 for example, you can type 2 + 2 = (the equal sign requests the answer). Not all keys have obvious keyboard equivalents, however. For example, the C key does not clear the total (Esc does). Therefore, you might need to combine your mouse and keyboard to use the calculator effectively.
- Click the number 1, and then 2, and then 3 (or type the numbers with your keyboard, but make sure that your Num Lock key is turned on first). As you click, the numbers appear inside the display.
- Click the multiplication sign (the asterisk).
- Click 2.
- Click the equal sign, and Calculator displays the result of 246.
- Click C or press Esc to clear the display.
- The percent key produces a percentage only as a result of multiplication. Therefore, you can compute a percentage of a number by multiplying it by the percent figure. Suppose that you want to know how much 35% of 4000 is.
Type
4000and then press the asterisk for multiplication. Type35followed by the percent key (Shift+5 on your keyboard). The value1400appears. The result: 1400 is 35% of 4000. The word of in a math problem almost always indicates that you must multiple by a percentage. Calculating 35% of 4000 implies that you need to multiply 4000 by 35% (or .35). - When you want to negate a number in the display, click the +/- key. Suppose that you want to subtract the display’s current value, 1400, from 5000. Although you can first clear the display and perform the subtraction, it’s faster to turn the 1400 into a negative number by clicking the +/– key, press the plus sign, type
5000, and press the equal sign to produce 3600. - To store a value in memory, click MS (memory store). Whenever you want the memory value to appear in the display, click MR (memory recall). MC (memory clear) clears the memory and M+ adds the display to the total in memory. If you want to store a running total, click the M+ button every time you want to add the display’s value to the memory. The M disappears from the memory indicator box when you clear the memory.
By the Way
The Calculator program displays a letter M above the four memory keys when you store a value in the memory.
Did you Know?
When you want to switch your application to Calculator to perform a calculation and then enter the result of that calculation elsewhere (such as in your word processor’s document), select Edit, Copy (Ctrl+C) to copy the value to the Clipboard. When you switch back to the other Windows program, you will be able to paste the value into that program.
The program’s standard calculator performs all the operations most Windows users need most of the time. The interface is simple. The scientific calculator supports many more advanced mathematical operations. Despite its added power, the scientific calculator operates almost identically to the standard one. The standard keys and memory keys are identical in both versions.
To see the scientific calculator, select View, Scientific. Vista displays the scientific calculator shown in Figure 10.4. You’ll see that the scientific calculator offers more keys, operators, and indicators than the standard calculator, including trigonometric and statistical operations.
Figure 10.4. The scientific calculator provides advanced operations.

Write with Flair
Vista contains a word processor called WordPad, which appears on your Accessories menu. Although WordPad does not contain all the features of a major word processor, such as Microsoft Word, WordPad does contain many formatting features and can accept documents created in some other word processing programs.
By the Way
Notepad also appears in your Accessories menu group, but despite the similarity of its name to WordPad, Notepad is a scaled-down version of WordPad and offers very few of the capabilities that WordPad offers. The most important WordPad feature omitted from Notepad is its lack of rich text-formatting abilities as well as a word wrap feature that’s turned on by default. A text editor used for writing programs, which is one of Notepad’s reasons for being, doesn’t require a rich assortment of formatting tools and word wrapping could cause program problems if it automatically wrapped text from the end of one line to the start of the other.
WordPad edits, loads, and saves documents in all the following formats: text documents (TXT) and Rich Text Format (RTF) documents. As a result, when you open an RTF document that contains formatting such as underlining and boldfaced characters, WordPad retains those special formatting features in the document.
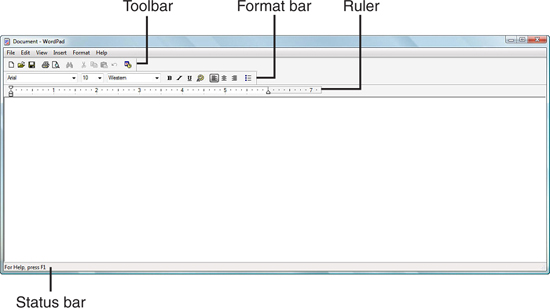
Figure 10.5 shows the WordPad program window. WordPad contains a toolbar that you can use to help you access common commands more easily. In addition, WordPad supports the use of a ruler and format bar that help you work with WordPad’s advanced editing features. When you type text into WordPad, you won’t have to worry about pressing Enter at the end of every line. WordPad wraps your text to the next line when you run out of room on the current line. Press Enter only when you get to the end of a paragraph or a short line such as a title that you don’t want combined with the subsequent line. (Pressing Enter two times in a row adds a blank line to your text.)
Figure 10.5. WordPad offers many word processing features.
To practice using WordPad, follow these steps:
- Start WordPad from the Accessories menu. You’ll see the WordPad screen shown in Figure 10.5.
By the Way
If your WordPad screen does not look exactly like the one in Figure 10.5, you can use the View menu to add a check mark to each line of the first four commands—Toolbar, Format Bar, Ruler, Status Bar—so that you can display each of these four optional tools.
- For this task, you’ll practice entering and formatting text. Type the following text:
A large line. - Select all three words by highlighting them with your mouse or keyboard. With your mouse, select by pointing to the first character and dragging the mouse to the last character. With your keyboard, you can select by moving the text cursor to the first letter and pressing Shift+Right Arrow until you select the entire line.
- Click the format bar button with the letter B. The text stays selected but something changes—the text becomes boldfaced. Press any arrow key to get rid of the highlighted text and see the boldfaced text.
- Select the three words once again. Click the second format bar button with the letter I. WordPad italicizes the text. Now click the third format bar button with the letter U. WordPad instantly underlines the selected text. Keep the text highlighted for the next step.
By default, WordPad selects a font (a typestyle) named Arial. You can see the font name directly below the format bar. The font’s size, in points (a point is 1/72 inch), appears to the right of the font name (the default font size is 10 points).
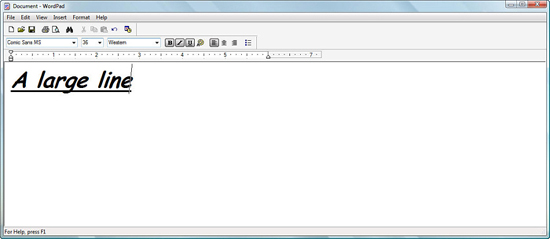
You can change both the font and the font size by clicking the drop-down lists in which each appears. When you select text, choose a font name and Word Pad changes the font to the new name’s style. After selecting the text, display the font name list by clicking the drop-down list box’s arrow and select a font name. If you have the Comic Sans MS, use that font; if not, select another that sounds interesting.
Open the point size drop-down list box and select 36 (you can type this number directly into the list box if you want to). As soon as you do, you can see the results of your boldfaced, underlined, italicized, large-sized text displayed using the font name you selected. Press the left or right arrow key to remove the selection. Figure 10.6 shows what your WordPad window should look like.
WordPad applied all the previous formatting on the three words because you selected those words before you changed the formatting. If you select only a single word or character, WordPad formats only that selected text and leaves all the other text alone.
Watch Out!
Although this example uses a lot of different formatting options, when you write you should avoid overformatting your titles and documents. If you make your text too fancy, it becomes cluttered, looks cheap, and your words lose their meaning amid the italics, underlines, and font styles. Use italics, boldfacing, and underlining only for emphasis when needed for select words and titles.
Figure 10.6. The text is formatted to your exact specifications.
- Press Enter. Click the B, I, and U format bar buttons once again. This resets the boldface, italics, and underline buttons so subsequent text you type doesn’t have those formatted properties. Return the font name to Times New Roman. Lower the font size to 20. Press Enter three times to add some blank lines after the title and then type the following:
Windows Vista is funand press the Spacebar. If you don’t like the font size, click the down arrow to the right of the font name list and select a different size. - Click the italics format bar button again. Subsequent text you type will be italicized. Continue typing this on the same line:
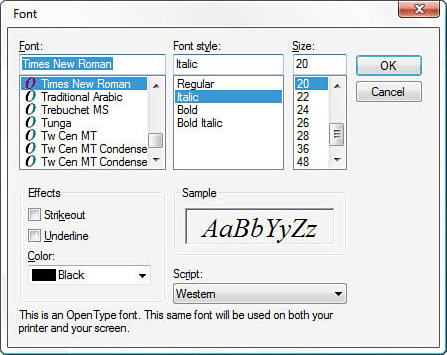
and I like to use WordPad. As you can see, you don’t have to select text to apply special formatting to text. Before you type text that you want to format, select the proper format command and then type the text. WordPad then formats the text, using the format styles you’ve selected, as you type that text. When you want to revert to the previous unformatted style (such as when you no longer want italics) change the style and keep typing.Figure 10.7. The Font dialog box provides all formatting specifications in a single place.
- Select File, Print Preview to see a thumbnail image of how your document will look if you were to print it. By looking at a preview before you print your document, you can tell whether the overall appearance is acceptable and if the margins and text styles look good. You can quit the preview and return to your editing session by pressing Esc.
- Close WordPad. You don’t need to save your work when WordPad prompts you to do so.
You now have a taste of the text-formatting capabilities available. In addition to the standard editing commands you saw in the previous walk-through, here are additional features that give WordPad enough power to handle almost all simple word processing chores:
- The ruler indicates where your text appears on the printed page when you print the document. Each number on the ruler represents an inch (or a centimeter if your WordPad is set up for a metric setting in the View, Options dialog box). As you type, you can watch your ruler to see where the text will appear when you print your document. If you select the Format, Paragraph command, WordPad displays the Paragraph dialog box in which you can set left and right indentions for individual paragraphs as well as tab stops.
Did you Know?
You can place tab stops quickly by clicking the ruler at the exact location of the tab stop you want.
- The toolbar’s Align Left, Center, and Align Right buttons left justifies, centers, and right justifies text so that you can align your text in columns as a newspaper does. The Center alignment format bar button is useful for centering titles at the top of documents.
- If you have a color printer, consider adding color to your text by clicking the toolbar’s color-selection tool after highlighting the text you want to apply a color to.
- The far-right format bar button adds bullets to lists you type. Before you start the list, click this Bullets button to format the list as a bulleted list.
Paint a Pretty Picture
Paint provides colorful drawing tools. Before you can use Paint effectively, you must learn to interact with Paint and you must understand Paint’s tools. The Paint screen contains five major areas, as Figure 10.8 shows. Table 10.2 describes each area.
Figure 10.8. The five major areas of the Paint screen enable you to create and edit your graphic images.

Table 10.2. Paint’s Five Areas Help You Draw
By the Way
Paint does not contain a toolbar with buttons, as do WordPad and many other Windows programs. Paint contains a toolbox that is the most important area of Paint. It is from this toolbox that you select and use drawing tools.
The two scrollbars on Paint’s drawing area enable you to scroll to other parts of your drawing. The drawing area is actually as large as a maximized window. If, however, Paint initially displayed the drawing area maximized, you wouldn’t be able to access the menu bar or the toolbox or read the status bar. (Paint was originally designed before the concept of floating toolbars was invented, and Microsoft didn’t add them in this version for Vista.) Therefore, Paint adds the scrollbars to its drawing area so that you can create drawings that will, when displayed, fill the entire screen.
The easiest way to learn Paint is not to see a list of commands but actually to draw something. The following steps walk you through Paint’s major features:
- Start Paint from your Accessories Start menu option.
- Maximize Paint’s program window to your full screen size. Paint is one of the few programs in which you’ll always want to work in a maximized window. By maximizing the program window, you gain the largest drawing area possible.
- If you don’t see the toolbox, the status bar, or the color box, open the View menu and click to view each of these important screen areas to ensure that you see all five shown as you follow along here.
- Figure 10.9 labels each of the toolbox tools. Each tool contains an icon that illustrates the tool’s purpose. The tools on the toolbox compose your collection of drawing, painting, and coloring tools. When you want to add or modify a picture, you have to pick the appropriate tool.
Figure 10.9. You’ll use the tools on Paint’s toolbox to draw and paint.

- Click the Pencil tool.
- Move your mouse pointer over the drawing area and the pointer changes to a pencil (the same icon that’s on the Pencil tool itself).
- Hold down your mouse button and move your mouse pointer, the pencil, all around your drawing area. Make all sorts of curves with your mouse. Notice that Paint keeps the pencil within the borders of your drawing area. Figure 10.10 shows what you can do if you really go crazy with the Pencil tool.
Figure 10.10. The Pencil tool enables you to doodle; no criticism of the artist will be tolerated!

- The default color for pencil drawings is black. Click a different color on the color bar, such as red or green, and draw some more. The new lines will appear in your selected color. Select additional colors and draw more lines to beautify the picture further.
Did you Know?
Every time you change a tool or color or draw a separate line, Paint saves the next group of changes to your drawing area. As with most Windows Vista programs, Paint supports an Edit, Undo feature (Ctrl+Z or Alt+Backspace are both shortcuts for the Undo command). You can undo up to three previous edit groups. Therefore, if you’ve just drawn three separate lines, you can remove each of those lines by performing the Undo command three times.
- Erase your drawing by selecting File, New. Don’t save your current drawing (unless you really want it, for some reason). Paint clears the drawing area so that you can begin again.
- Click the Line tool. Use the Line tool to draw straight lines.
A straight line is defined by two coordinates: the starting coordinate position and the end coordinate position. To draw a line, you must anchor the line’s starting position and extend the line to its ending position. Paint automatically draws a straight line from the starting position to the end position. You can draw lines using the Line tool in any direction.
Get used to reading the coordinate pair numbers in the status bar. The numbers tell you the number of drawing points from the left and top of your window. Move your mouse around the drawing area without clicking a button and watch the pair of numbers at the right of the status bar change.
- Select a different color and draw another line. Paint draws that line in the new color.
Did you Know?
Now that you’ve selected the Line tool, look at the area below the toolbox. You’ll see five lines with each line growing thicker than the one before. By clicking a thick line, the next line you draw with the Line tool appears on the drawing area in that new thickness. You can change the thickness using the line size list for any geometric shape.
- Click the thickest line in the line size list. Draw a couple of lines to see the thicker lines. If you change colors before drawing, the thicker lines appear in the new color.
- The rest of the geometric shapes are as easy to draw as the lines are. Select File, New to clear the drawing area. Don’t save any changes.
- Click the Line tool to change the line thickness size to the middle line thickness (the third thickness size). Always change the Line tool’s thickness before selecting one of the geometric drawing tools. The Line tool’s line size determines the line thickness for all geometric tools.
- Select the Rectangle tool. Rectangles, like lines, are determined by their starting anchor position and the rectangle’s opposite corner’s position. Begin drawing a rectangle at coordinates 190, 75. After anchoring the rectangle with the mouse button, drag your mouse until it rests at position 385, 270. The status line indicator will show 200,200 meaning that the rectangle is 200 by 200 drawing points. When you release your mouse button, you will have drawn a perfect square.
Did you Know?
Drawing a perfect square is not always easy because you have to pay close attention to the coordinates. Paint offers a better way to draw perfect squares than trying to draw them manually. Hold down the Shift key while dragging the mouse and the rectangle always appears as a square. Shift also draws perfect circles when you use the Ellipse tool.
The three rectangles below the toolbox don’t represent the line thickness of the rectangles. They determine how Paint draws rectangles. When you click the top rectangle (the default), all of the drawing area that appears beneath the next rectangle that you draw shows through. Therefore, if you draw a rectangle over other pictures, you see the other pictures coming through the inside of the new rectangle. If you click the second rectangle below the toolbox, the rectangle’s center overwrites any existing art. As a result, all rectangles you draw have a blank center no matter what art the rectangle overwrites. If you select the third rectangle, Paint does not draw a rectangular outline, but draws the interior of the rectangle in the same color you’ve set for the interior (the default interior color is white).
- Now that you understand the rectangle, you also understand other geometric tools. Click the Ellipse tool to draw ovals (remember that Shift enables you to draw perfect circles). Click the Rounded Rectangle tool to draw the rounded rectangles (or rounded squares if you press and hold Shift while dragging).
- Click the top rectangle selection (to draw see-through shapes) and click the Ellipse to draw circles. Click the rounded Rectangle tool and draw rounded rectangles. Fill your drawing area with all kinds of shapes to get the feel of the tools.
- A blank drawing area will help you learn how to use the Polygon and Curve tools so select File, New (don’t save) to clear your drawing area.
- Select the Polygon tool. The Polygon is a tool that draws an enclosed figure with as many sides as you want to give the figure. After you anchor the polygon with the mouse, drag the mouse left or right and click the mouse button. Drag the mouse once again to continue the polygon. Every time you want to change directions, click the mouse once again. When you finish, double-click the mouse and Paint completes the polygon for you by connecting your final line with the first point you drew.
- Clear your drawing area again. The Curve tool is one of the neatest but strangest tools in Paint’s toolbox. Click the Curve tool (after adjusting the line thickness and color if you wish to do so).
- Draw a straight line by dragging the mouse. After you release the line, click your mouse button somewhere just outside the line and drag the mouse around in circles. As you drag your mouse, Paint adjusts the curve to follow the mouse’s movements. When you see the curve that you want to keep, release your mouse button so that Paint can stabilize the curve.
- The Eraser/Color Erase tool erases whatever appears on your drawing area. The Erase/Color Eraser tool comes in four sizes—A small eraser that erases small areas up to a large eraser that erases larger areas at one time. When you select the Eraser/Color Eraser tool, you can also select an eraser thickness. (The color you choose has no bearing on the eraser’s use.) Select the Eraser/Color Eraser tool now and drag it over parts of your drawing to erase lines you’ve drawn.
- Exit Paint.
By the Way
Paint can read and save files in several popular graphic file formats including bitmap files with the .bmp filename extension, JPEG files that end in .jpg and .jpeg, Graphic Interchange Files (with the .gif extension), and TIFF files with .tif and .tiff file extensions. Certain image files are better for some things than others. For example, bitmap images work best for your desktop background images and JPEG images often work well for nonphotographic web images that you want to keep small so that they load quickly.
Because formats like JPEG compress data to achieve a smaller file size, they’re also prone to degrading overall image quality. It’s generally not a huge issue, but if you absolutely do not want to lose image quality due to file compression, save your image in an uncompressed format, such as TIFF.
Did you Know?
Paint doesn’t just put lines and colors on your drawings, it can also add text. The Text tool enables you to add text such as photo captions and titles, using any font available within your Windows Vista’s font collection. You can control how the text covers or exposes any art beneath the text. After clicking the Text tool, drag the text’s outline box (Paint text always resides inside this text box that appears when you first place text onto a drawing). When you release your mouse button, select the font and style, and type your text. When you click another tool, your text becomes part of the drawing area.
Chapter Wrap-Up
This chapter reviewed many of the programs that Vista provides in the Start menu’s Accessories folder. You learned how to use three of these programs—Calculator, WordPad, and Paint—in some depth. The accessory programs are designed to give you simple but quick access to common features that you’ll need as you use Windows. Although more powerful programs exist, the accessory programs come free with Windows Vista and even if you use additional programs such as Photoshop or Microsoft Word, you’ll still find times when the smaller accessory programs come in handy. Therefore, you should know something about how to maneuver in them and this chapter gave you enough background to do just that.
In the next chapter, you’ll learn about the games that Windows Vista supplies. Many of these you’ve no doubt seen before. That’s fine. Unlike recent versions of Windows, though, Vista updated some of these games to make them more graphically appealing and added a few new ones. In addition, if you play more advanced games available that aren’t included with Windows Vista, you should understand Vista’s new Games Explorer window, which allows you to organize all your games into one location in your Start menu, along with basic information about them, like a game’s publisher and ESRB rating.