
Chapter 7. Changing Windows Vista’s Look
In This Chapter:
- Change the look of your desktop
- Put icons where you want them
- See more on your monitor
- Change your desktop’s background image
- Set up a cool screensaver
- Change the sounds that Windows Vista makes
- Modify your mouse’s behavior to work the way you do
No two people are alike, so why should your Windows desktop look like everyone else’s? Whether you’re an animal lover and want your PC to reflect that, or you simply cannot stand the thought of staring at the same desktop background day in and day out, you’ll be happy to know that you can change all that and more.
In this chapter, you’ll learn ways to change your computer desktop’s appearance. Along the way, you’ll add more functionality to what you can do. Windows Vista is highly customizable and you can arrange Vista to sport an interface that not only reflects your aesthetic preferences but that also minimizes the time it takes you to do tasks.
Managing Your Desktop Icons
Although Vista’s initial desktop background is clutter-free with only a few icons, more icons will show up over time. In many cases, as you install new programs, new icons appear. If you bought your computer with Vista preinstalled, almost certainly there are several icons on your desktop that aren’t specific to Vista, but represent programs your computer’s manufacturer installed for you.
The icons represent programs and windows. When you activate an icon—which usually means double-clicking the icon with your mouse—the program represented by the icon launches or the window opens as would be the case for a folder of your pictures that you might have saved to the desktop as an icon.
By the Way
Any desktop icons that have small blue arrows pointing to them represent shortcuts to the actual programs and windows. Therefore, you can delete such a desktop icon without worrying that you’re deleting the actual program from your computer. All deleted icons go to your Recycle Bin, so they’re easy to restore if you change your mind. If you’re unfamiliar with the Recycle Bin you’ll learn about it in the next chapter, “Mastering Vista’s Explorer Windows."
Rearranging Your Desktop Icons
If you want to move a certain icon from one location to another on your desktop, simply click and drag it into position. Perhaps you want to group your icons so that the game-related icons all appear together and your work-related icons appear in another section of your desktop.
Watch Out!
If you move an icon and Vista snaps the icon to a different location or back to its original place, you have one of the automatic arrangement settings turned on. The next section, “Changing Your Icons’ Display,” explains what’s going on and how to avoid it.
For more global and general changes in your icon layout, right-click on a clean spot on your desktop (any part of your background picture that has no icons or text) and select Sort By from the pop-up menu (see Figure 7.1). This produces a menu of choices for arranging your desktop icons including by name, size, file extension, or date modified. Just click the desired option to arrange your desktop in the specified order.
Figure 7.1. Rearrange your desktop icons using this contextual menu.

By the Way
When you change your desktop icons, as well as all the other elements such as your background wallpaper throughout this chapter, keep in mind that the changes affect only your login account but not the accounts of other users who share your computer. Each user sets up his or her own appearance, icons, background, screensavers, and themes. That way, each user works within a personalized and unique desktop setting.
Changing Your Icons’ Display
When you right-click your Vista’s desktop wallpaper and select the top option, View, you’ll see how you can change the way Vista displays icons. Table 7.1 describes the options you see on the View menu.
Table 7.1. Your Desktop Icon View Settings


Figures 7.2 and 7.3 visually show you the difference between the Auto Arrange option and the Align to Grid option. Before Figure 7.2, the icons were dragged into similar purpose groups all over the desktop. Figure 7.2 shows what happened when the user selected the Align to Grid option. The icons are nicely aligned in rows and columns, but they generally stay in the same area where the user put them.
Figure 7.2. After Align to Grid, the previously scattered icons are grouped in a more visually appealing, row-and-column manner.

Figure 7.3. Auto Arrange moves all the desktop icons over to the left side of the desktop and begins forming columns.

Figure 7.3 shows the same desktop immediately after selecting the Auto Arrange option. The icons no longer have the freedom to be placed in groups around the desktop. Instead, they all align in columns against the left side of the desktop.
Did you Know?
If you prefer to have lots of icons on your desktop, organizing them in groups so they reside together depending on their function is helpful. For example, you might group all icons that represent your graphics programs in one area of your screen and group all your financial icons together in another area. If you then select Align to Grid (not Auto Arrange, which will move them all to the left side of your desktop), Vista straightens their layout by placing them in rows and columns but keeps them in the same general vicinity and in the groups you put them in.
Adding and Removing Desktop Icons
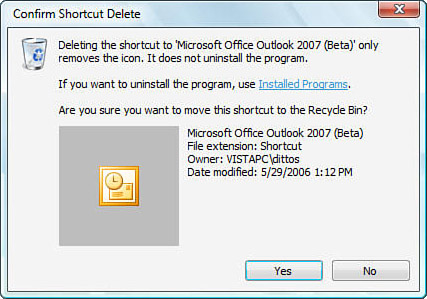
Deleting an icon is easy. Click to select the icon and press your Delete key. You can also right-click an icon and select Delete. Vista makes sure you really want to delete the icon with the verification shown in Figure 7.4. Click Yes and Vista erases the icon from your desktop and sends it to your Recycle Bin.
Figure 7.4. Vista makes sure you really want to delete the icon before proceeding.
Until you delete another icon, Vista adds an Undo Delete option to your desktop’s right-click menu so that you can restore the icon to its original position if you change your mind.
When you want to add new icons to your desktop, there are several approaches you can take. Usually, you’ll want to add a desktop icon for a program you frequently run. Instead of wading through the Start menu each time you want to run the program you can double-click the desktop icon. The simplest way to add a desktop icon from a program in your Start menu is to display your Start menu and locate the program there. Right-click the program and select the Send To option from the contextual menu. Choose Desktop and Vista creates a shortcut icon on your desktop for that program.
Did you Know?
You can right-click a Quick Launch toolbar button or any program in an Explorer window to send that item to a desktop as a shortcut icon. If you want to move an icon from your Quick Launch toolbar to your desktop, instead of putting a copy of the icon on your desktop, click and drag the Quick Launch toolbar icon to your desktop.
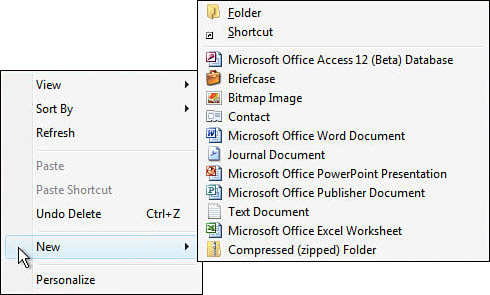
If you right-click over a blank area of your desktop (not over an icon) and select New, the menu shown in Figure 7.5 appears. From this menu, you can choose from a variety of items that you may represent with a desktop icon. For example, if you routinely use an Excel worksheet for home budgeting, you can create an icon that represents that home budget worksheet: First select Microsoft Office Excel Worksheet to create a shortcut to Excel and then right-click the icon that appears, select Properties, and locate the worksheet file you want to open from the icon. This is a little cumbersome, but works fine. Obviously, if you don’t have Excel installed, Vista won’t display Excel as one of your options on the New menu.
Figure 7.5. You can add desktop icons that represent many kinds of programs and files.
Personalizing Your Desktop
You can customize the way your desktop looks. People have different preferences. Some people like to see more information at the cost of small icons and text while others prefer to see less but make what they see larger. Some people don’t care what background image appears on their desktop while others like to change their desktop’s wallpaper regularly. As with most aspects of Vista, you can change the way your desktop looks.
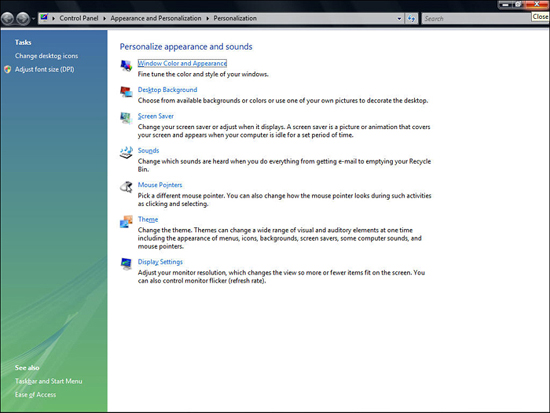
To customize your desktop, right-click your desktop and select Personalize from the contextual menu. The window shown in Figure 7.6 appears. From here, you can customize your desktop and Windows Vista settings in several ways. The following sections explore some of the personalization settings available to you.
Figure 7.6. Customize the look and behavior of your desktop with these Personalize options.
Change Your Display Settings to See More
The first option on the Personalize Appearance and Sounds window is the Display Settings option.
By the Way
Depending on your graphics adapter, you might see far more display settings than described here. For example, some adapters support high-resolution 3D graphics that require personalization to match your monitor. These settings will show as extra tabbed pages in your Display Settings window.
Most users modify settings in their Display Settings window when they want to adjust the resolution of their screen. Resolution refers to how many pixels (tiny dots that collectively construct an image) you can fit onto your screen at one time, both vertically and horizontally. In addition, if you use multiple monitors, Vista enables you to control the resolution of each monitor separately.
To adjust the resolution of a monitor, click the monitor you want to adjust (you don’t have to do this if you use only one) on the Display Settings window and drag the slider control labeled Resolution to the left or right. Decreasing the resolution magnifies objects on your screen, but you won’t be able to see as much at one time. You’ll find that you must scroll up and down and left and right when viewing web pages if your resolution is too low. If your resolution is higher (meaning you slid the Resolution slider more to the right), you’ll see more at one time but everything will be smaller. You’ll have to adjust your resolution to suit your own needs.
On modern systems, especially those capable of running Windows Vista, I recommend you don’t set your screen resolution lower than 1024×768, although 1280×1024 is often preferable for screens of 19" (diagonal) and larger. If you have an LCD panel, note that it was designed for a specific “native” screen resolution and will display its best image only when operating at that resolution.
Watch Out!
If you use a television for your primary display, your choice in screen resolutions is likely to be much more limited, particularly if it is not a high-definition TV.
After you adjust your resolution, you generally won’t have to do much more with the Display Settings window again.
Changing Your Vista Theme
Vista enables you to give your Windows a complete facelift, both in appearance and even sound by giving you themes to choose from. A theme is a collection of sounds and colors and icons that change the entire look of Windows at once. Your theme permeates all of Windows Vista, including dialog boxes you open in programs such as Microsoft Word.
To apply a new theme, follow these simple steps:
- Select Themes from your Personalize Appearance and Sounds window to open the Theme Settings dialog box shown in Figure 7.7.
Figure 7.7. Select a new theme for Vista.
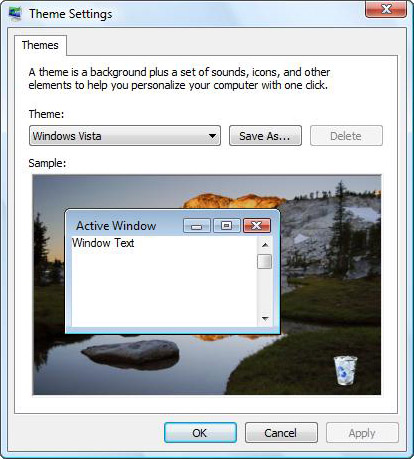
- Click the down arrow to display the list of themes. For example, if you select Windows Classic, all your desktop, icons, sounds, and dialog boxes will take on the more traditional 2D appearance of Windows XP. As you select from the various themes, Vista displays a window on a desktop under the Sample label to show you what your new theme will look like.
- Vista doesn’t change your current theme to your selected theme until you click Apply or OK. You can still change to another theme, if you prefer, before you click OK to close the dialog box.
The themes available to you will be either somewhat limited or vast depending on whether you had extra themes when you upgraded to Vista from XP, or perhaps you bought your computer preinstalled with Vista and your computer’s manufacturer added new themes to the small set of themes that come standard with Vista. Whether you have a lot or only a few, many more themes are available to you.
You can install a wide variety of themes containing unique and appealing sounds and animations. You can turn your PC into a virtual jungle complete with monkey noises, lion roars, and birds calling among other possibilities. Some desktop themes come with animated mouse pointers that change depending on where and how you move your mouse.
Although you might not have many themes at your disposal now, the Internet is usually just a click away. Microsoft offers a small number of themes at Microsoft.com, but other sites, such as www.themeworld.com, offer far more. There, and on similar theme sites, you’ll find themes based on TV shows, cars, music stars, cartoons, animals, and just about anything imaginable.
Watch Out!
Theme websites that provide themes for free or for small download charges often have their own installation instructions depending on what the theme has to offer. This is one time when you won’t want to bypass the instructions because you can mess up your current theme and still not properly install the new theme if you don’t follow the directions for specific themes.
Changing Your Desktop’s Color Scheme
There are times when you don’t want to change your entire set of Windows icons, dialog boxes, and sounds, but you might want to select a different color scheme.
Selecting Window Color and Appearance from your Personalize Appearance and Sounds window produces the Change Your Color Scheme dialog box shown in Figure 7.8.
Figure 7.8. You can change your Windows color scheme without changing the entire theme.

The color scheme you select changes the colors of the following elements from your Windows environment:
- Window borders, edges, corners, and interior parts
- Start menu
- Taskbar
Click to pick one of the sample color schemes at the top of the dialog box to change your Windows color scheme to one of the options.
By clicking to check or uncheck the option labeled Enable Transparent, you determine whether or not the Aero Glass transparency stays on your windows. If you choose to keep the transparency, the slider labeled Transparency determines how much of a see-through effect appears. If you want to create your own colors, click the Show Color Mixer option to get access to color, saturation, and brightness controls.
By the Way
Windows XP also allowed you to change your color scheme from the Appearance dialog box. If you’re familiar with XP’s way of supporting color changes and want to use XP’s more familiar dialog box, click the option labeled Open Classic Appearance Properties For More Color Options to adjust your Windows settings with the dialog box you know already.
Changing Your Desktop Background
You’re never stuck with the default picture Vista uses for your desktop’s background. The desktop background image was called wallpaper in previous Windows versions. You can change your desktop’s background image by following these steps:
- Select Desktop Background from the Personalize Appearance and Sounds window. The Choose a Desktop Background dialog box appears, as shown in Figure 7.9.
Figure 7.9. Select from several Vista desktop background options or use your own graphic image.
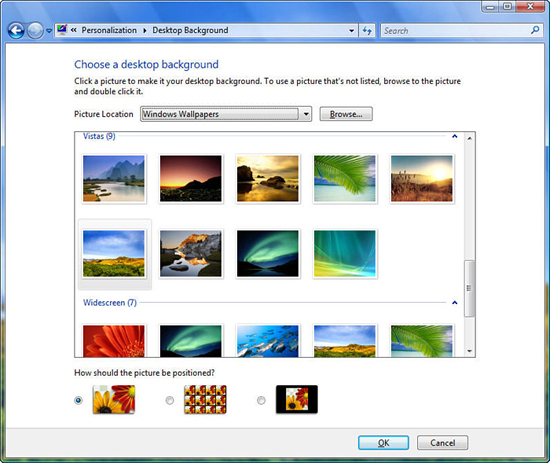
- With Windows Wallpaper selected for the Picture Location option, several Vista-supplied background images appear. You can select one and click Save to switch to that background desktop image.
- If you click the Picture Location down arrow and select Pictures or Public Pictures, a preview image of your pictures from your Pictures folder, or one from a system-wide pictures folder (if your computer has one) will appear. You can select one of those images to use as your desktop background.
- Some images, as will often be the case for your picture files, aren’t framed properly to fill the entire desktop. You can select how the image appears (stretched, normal size with a blank border, or tiled) from the options under the question, How Should the Picture Be Positioned?
- If you elect to place the image unsized in the center of your desktop without stretching or tiling it to the borders, you can choose the border image color you want to use by clicking the Change Background Color button that appears when you click to select this image option.
By the Way
If you upgraded to Vista from an earlier Windows version or if you bought a computer with Vista preinstalled, you might have several more wallpaper options available to you than those shown in Figure 7.9.
SOS—Save Our Screens!
Almost everyone has heard of screensavers. Computer stores and software distributors on the Internet sell several programs that display pictures of your favorite television characters, cartoons, and geometric and 3D designs. Microsoft designed Windows Vista to include several screensavers, so you don’t have to buy one unless you want more than you can find in Vista and online free of charge.
Windows contains several screensavers from which you can choose. Through the Screen Saver dialog box, you can set up a blank screensaver or one that moves text and graphics on the screen. You control the length of time the monitor is idle before the screensaver begins. The following steps explain how to initialize your screensaver:
- Select Screen Saver from your Personalize Appearance and Sound Effects window. The Screen Saver Settings dialog box shown in Figure 7.10 appears.
Figure 7.10. The Screen Saver dialog box controls your screensaver’s timing and selection.

- The drop-down list box—directly below the Screen Saver prompt—that you display when you click the down arrow contains a list of Windows-supplied screensavers. Click the box now to see what’s on your computer. When (None) is selected, no screensaver will be active on your system.
- If you select Blank, Windows Vista uses a blank screen for your screensaver. When the screensaver activates, your screen goes blank and a keypress returns the screen to its previous state (or prompts you to enter your password, if it’s configured to do so).
The remaining screensavers are generally more fun than a blank screensaver. If you want to see the other screensavers, click them in the list (such as the colorful Ribbons) and Vista displays a preview of each one on the little monitor inside the dialog box.
- The animated screensavers can move fairly quickly. To adjust their speed, click the Settings button. In some cases, you can also adjust the number of animated items that appear on the screensaver. Sometimes, a screensaver is so basic that there are no options available when you select it. Click OK when you’re done changing settings.
- The Preview button enables you to view the screensaver full-screen if you want a better preview than the small screen inside the dialog box provides. Click Preview to see the actual screensaver in action. Press any key or move your mouse to terminate the screensaver preview and return to the dialog box.
- The Wait prompt determines how many minutes your computer must remain idle for the screensaver to activate. By pressing Alt+W (the shortcut key combination for the Wait prompt), you can enter a new minute value or click the up-arrow and down-arrow keys to change to a new minute value.
- When you click the OK button at the bottom of the dialog box, Vista activates the screensaver. The screensaver remains active for all subsequent Windows sessions until you change it by using the Screen Saver Settings dialog box once again. (Other users are unaffected by the screensaver you select.)
The screensaver operates in the background and never shows itself, even on the taskbar, until your computer sits idle for the specified time value. If you keep your hands off the keyboard and mouse for the waiting time period, you’ll see the screensaver kick into action. Press any key (or move your mouse) to return to your desktop.
Did you Know?
Vista enables you to create your own screensaver. Save the digital images you want to use in your screensaver and select Photos from the screensaver list. Click the Settings button to select the path where your digital pictures are stored. Vista then uses your pictures, rotating them randomly, when your screensaver time limit expires.
Making Windows Sound Off
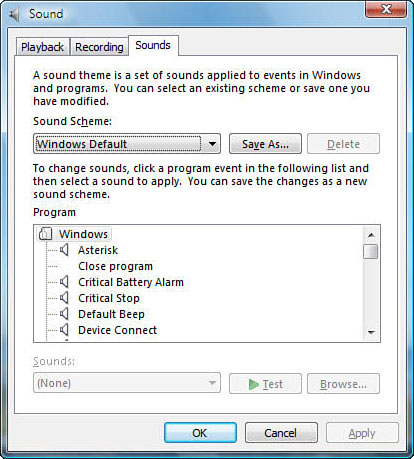
When you do something with Vista, such as shut down your system or click an option that causes an error message, Windows often produces a sound to give you audio feedback related to what you’re doing. Sometimes the sound is helpful. Sometimes not.
As with most other Windows features, you can control when and how Windows produces sounds. When you select the Sounds option from the Personalize Appearance and Sounds window, Vista opens the Sound dialog box shown in Figure 7.11.
Figure 7.11. You control what produces a sound and which sound is produced as you work with Windows Vista.
Did you Know?
If you want Windows to remain silent, click the down arrow to open the list box under the Sound Scheme label and select No sounds. Program-generated sounds such as music from Windows Media Player will still play, but notification and warning sounds from Windows Vista won’t.
The Program list contains a list of common Windows operations, such as opening a dialog box, receiving email, and logging off your user account. If a speaker icon appears to the left of one of these events, a sound will be heard when that event occurs. If an icon doesn’t exist next to an option, such as the Close Program event, Windows does not produce a sound when that even happens.
To add a sound to an event, select it and then brows to a folder with the sound you want played when you click the Browse button. The sound file that you select should be a wave file. You may need to right-click the file and select Properties to see if the file ends in the 3-letter .wav filename extension. To stop a sound from playing when an event happens, click to select the event and then select (None) from the list that opens under the Sounds label.
When you display a sound in the Sounds list, click Test to preview that sound. After you assign a sound, the sound isn’t actually attached to that Windows event until you click the OK button to close the dialog box. If you click Cancel, none of the sound changes will be retained.
As you scroll through the list under Program, you’ll see other programs in the list such as Windows Explorer and Windows Photo Gallery. Whatever programs appear in the list are the programs whose events you can assign sounds to. It’s surprising how few software vendors add their programs to the Windows Sounds dialog box. If more did so, you would have more control over which sounds were produced and you could better customize the sounds to suit your preferences.
Did you Know?
If you assign a lot of sounds to events, you might want to save that set of sounds as a sound scheme. By creating one or more sound schemes, you can save different sets of Windows sounds and load whatever set, or scheme, you want to use when you’re ready to do so. After you assign sounds to some Windows events, you can click the Windows Sounds dialog box’s Save As button and save that customized set of sounds in a sound scheme that you name. That named sound scheme will thereafter appear in the drop-down list box under the Sound Scheme label when you click the down arrow to see what sound schemes are stored on your system.
Making Your Mouse Work the Way You Want It To
While working with a mouse may seem pretty straightforward, you can actually control many aspects of its operation. Changing a mouse’s behavior is one of the simplest ways to customize your computer to match the way you work and yet even computer gurus often forget what’s possible with the mouse. Even if you’ve seen the Mouse Properties dialog box in the past, you owe it to yourself to review it from time to time. You might find an option that was of no use to you before, but could now be highly beneficial. To learn more about how you can customize your mouse, follow these steps:
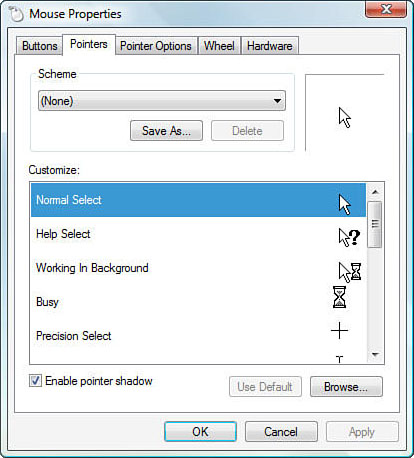
- Select Mouse Pointers from your Personalize Appearance and Sounds window. The Mouse Properties dialog box appears.
- Although the Pointers tab is active when you arrive, click the Buttons tab to display the Buttons dialog box page shown in Figure 7.12.
Figure 7.12. You can change the behavior of your mouse.
- If you’re left-handed but your mouse is set for a right-handed user, you can select the Switch Primary and Secondary Buttons option to change the mouse button orientation. The buttons will change their functionality as described in the text beneath the option. (The change takes effect immediately—even before you close the Mouse Properties dialog box or click the Apply button.) You can change the button back to its original state by clicking the option again.
- Dragging the speed slider between Slow and Fast adjusts the speed that produces a double-click. If you find that you aren’t clicking quickly enough to trigger the double-click effect when you want one, drag the slider closer to the slower edge. Test the setting by double-clicking the folder to the right of the Speed control. The folder will open or close when you double-click your mouse properly. Keep adjusting the Speed control until you can easily double-click the folder and trigger the folder’s movement reliably.
- The ClickLock option is designed to help some users select text more easily. Instead of clicking and dragging your mouse over text that you want to select, as you might do in a word processing program, you only need to click and keep your left mouse button down for about a second to anchor the selection, and then drag without pressing your mouse button to select text. When you click once more, the text will be selected to that point.
- Click the Pointers tab to display the Pointers dialog box page. Here you can change the default appearance of your mouse. Scroll through the list to see all the kinds of mouse pointer shapes that appear when certain Windows Vista events take place.
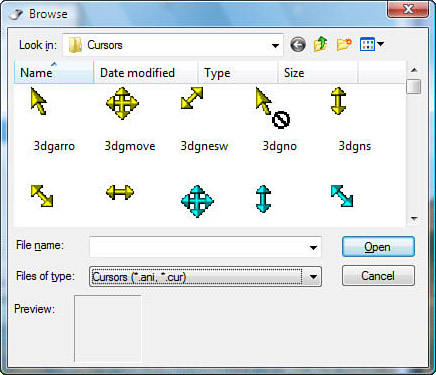
- To change the default mouse pointer (called Normal Select), double-click the row with the Normal Select text. Vista displays another dialog box, shown in Figure 7.13, with various mouse pointers you can use. The mouse pointers are stored in files on your computer. Some pointers (those whose filenames end with the
.anifilename extension shown if you’ve elected to display filename extensions in any Windows Explorer window) are animated cursors that move when you select them and use the mouse. Click Cancel to close this dialog box for now.Figure 7.13. Select a mouse pointer shape from one of the files.
- Vista can change the theme or overall look of all your mouse pointers to make them uniform. Click the down arrow next to (None) inside the Scheme area and you’ll see several mouse schemes available to you. Instead of changing just a single mouse pointer, you’ll change all possible mouse pointers when you select a scheme. Some people especially like to use an extra large mouse scheme when using a laptop so that they can locate their laptop mouse pointer more easily than with the smaller, default size.
If you select a mouse pointer or scheme that you don’t want, click the Use Default button to return to Vista’s standard mouse scheme.
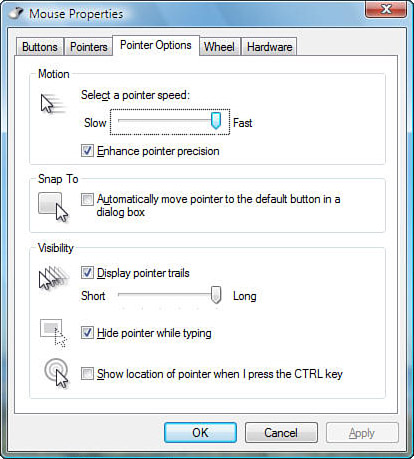
- The Pointer Options tab displays the Pointer Opens dialog box (see Figure 7.14). You can speed up or slow down your mouse pointer on the screen as you move your mouse on your desk. In addition, many users find the Snap To option quite useful because when a dialog box appears with this feature enabled, your mouse instantly jumps to the default button. This often speeds up your computing because the default button is typically the one you’d be moving your mouse to and clicking. That said, a lot of users find the Snap To option’s propensity for hijacking the pointer to a new location more than a little annoying.
Watch Out!
The Snap To option takes some time to get used to. Don’t get rid of it just because you dislike it the first time. The reason some people don’t like it is because it’s easy to inadvertently click the default button when you might have wanted to select a different button. Some dialog boxes with Yes or No buttons, for example, might default to an answer that you didn’t want to select. However, when you set the Snap To option, you’ll find yourself automatically clicking as soon as a dialog box appears, and out of habit you’ll click a button that you didn’t want to click simply because it was the default button.
The Visibility option is especially useful for laptop users with screens that aren’t always highly visible in all light. The Visibility option enables you to set up a trail of mouse pointers, not unlike a comet’s trail, as you move your mouse over the screen. The trail helps you locate your mouse pointer more easily.
The option labeled Hide Pointer While Typing causes your mouse pointer to disappear whenever you begin typing text into a text box. Sometimes you’ll click a text box to enter text and your mouse pointer overwrites some of the box as you type. You must move your mouse out of the way to get the pointer off the text box so that you can see what you type. With this option, Vista automatically hides your mouse pointer when you begin typing any text and displays the mouse cursor again when you move your mouse.
Figure 7.14. The Pointer Options can automate some of your mouse clicks and make locating your mouse pointer easier.
- The remaining tabs on the Mouse Properties dialog box differ depending on what kind of mouse you use. If you use a trackball, your remaining Mouse Properties dialog box tabs might relate to your trackball settings, such as allowing you to determine which programs automatically run when you click a predetermined set of buttons.
Did you Know?
If you aren’t yet comfortable with a mouse, or if you get a new kind of mouse or trackball and aren’t used to it yet, the best place to become familiar with your mouse is by playing a few hands of Solitaire. (See Chapter 11, “Taking Time Out with Windows Vista Games,” to learn more about Vista’s Solitaire game program.)
Chapter Wrap-Up
You now know how to personalize many of Windows Vista’s settings to suit your tastes. You spend a lot of time at your computer and you might as well make your computer do some of your work. You can even make your computer more appealing to you by putting a pleasant desktop background on the screen and by creating a screensaver of photos of family and friends.
Vista gives you control over just about anything and everything including mouse pointers, mouse buttons, sounds, colors, display resolution, and so much more. This chapter gave you the whirlwind tour of customizations you can perform.
Although it seems as though there are zillions of customization options all throughout Vista, you now understand the most important ones. In the next chapter, you’ll begin to use Vista more to explore some of your disk space by learning how Vista enables you to manage your files and folders.